background image

Lire vos enregistrements (suite)

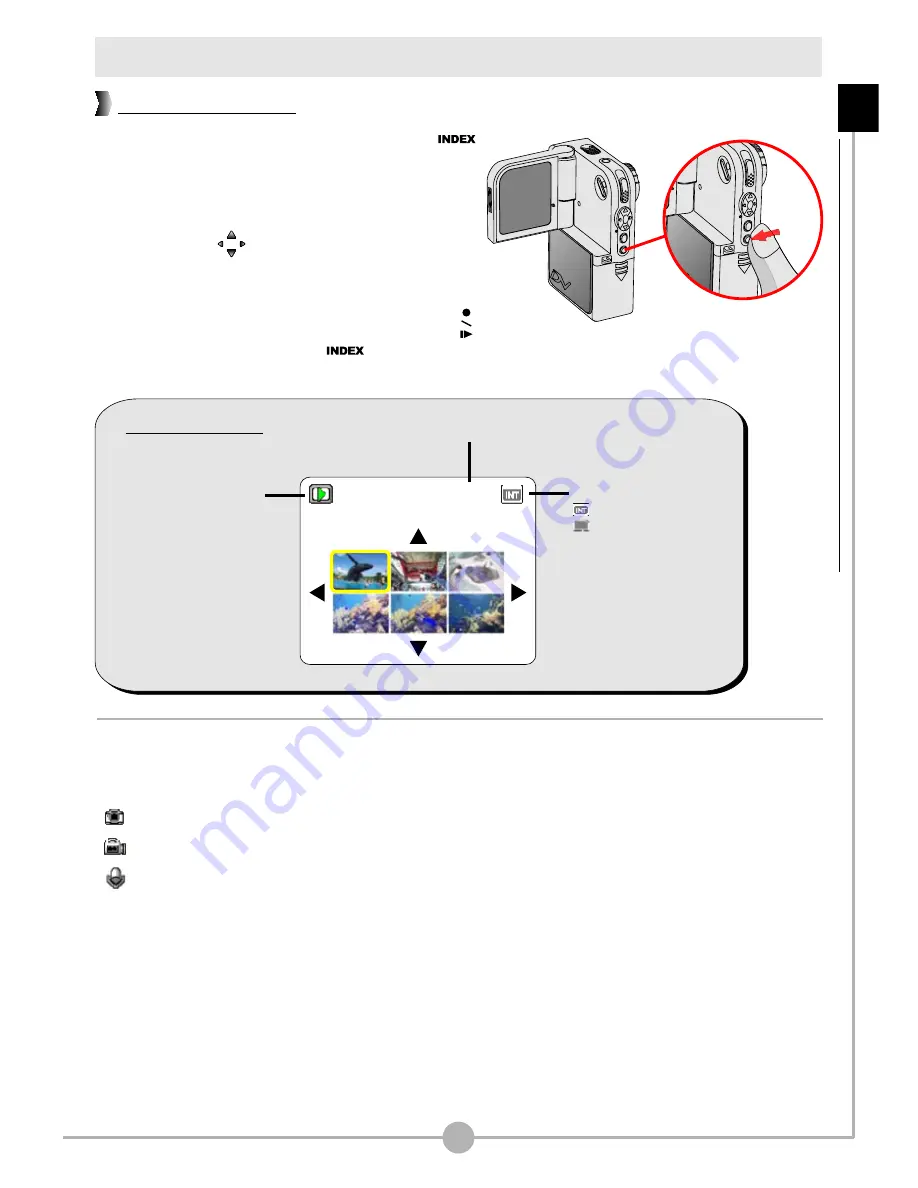
Si vous appuyez sur le bouton 

INDEX

 (       ) 

sous le mode lecture, la caméra basculera 
en mode d'affichage diapo. Vous pouvez 
alors utiliser les quatre boutons 
directionnels (     ) pour sélectionner le 
fichier que vous voulez visualiser. Une fois 
le fichier voulu sélectionné, appuyez soit 
sur le bouton 

Enregistrer/Déclencheur

 (    ), 

soit sur le bouton 

INDEX

 (        ) pour 

visualiser le fichier.

Il existe trois types de fichiers que vous pouvez 

identifier grâce aux icônes placées sur les diapos :

       : Images au format JPG

       : Clips vidéo au format ASF

       : Clips audio au format WAV.

Pour le détail des opérations permettant d'afficher

une image fixe, veuillez vous reporter à la page

22. Pour le détail des opérations permettant de 

lire un clip vidéo ou audio, veuillez vous reporter à 

la page 23.

21

Affichage diapo

Operations

De

Base

-

Lire

v

os

enregistrements

(suite)

Panneau LCD

1/20

Support de stockage:
     : Mémoire interne
     : Carte SD/MMC

Nombre d'enregistrements

Icône de mode

Содержание MoviePix M330

Страница 1: ......

Страница 2: ...t in direct sunlight Doing so may damage the camera 4 Use the camera with care Avoid pressing hard on the camera body 5 For your own safety avoid using the camera when there is a storm or lightning 6...

Страница 3: ...a Setting the language Recording a video clip 14 13 12 12 Turning on your camera 12 How to record a video clip Setting the focus Selecting metering modes 16 15 14 Taking a still picture 17 How to take...

Страница 4: ...iles 38 37 36 Sorting files 39 Adjusting the white balance Adjusting exposure compensation Applying special effects to still pictures 34 33 32 Using the date stamp 35 Playing MP3 music 40 Copying MP3...

Страница 5: ...ile Management 65 64 62 Installing MoviePix M 330 Manager 62 Picture Enhancement Downloading files to your PC 66 66 Slide show 66 Addenda 70 Troubleshooting 75 LED Event Table Storage Capacity Table T...

Страница 6: ...EX button Battery compartment cover Memory card slot Battery compartment Strap hook 1 Status LED Microphone Flash strobe Focus switch Lens Self timer LED A V out connector Earphone connector USB conne...

Страница 7: ...ed for high performance Loading the batteries 1 Slide the battery compartment cover open in the direction as indicated 2 Place the batteries into the compartment Note that the positive and negative en...

Страница 8: ...r the card pops up pull the card out of the slot The SD card comes with a write protect switch When the write protect switch is set to the Lock position the card will become non writable To ensure tha...

Страница 9: ...on the back side of the camera 3 Thread the other part of the strap into the hook 2 on the front side of the camera Getting Started Attaching the wrist strap optional 08 4 Fasten the wrist strap as in...

Страница 10: ...illustrated below How to hold your camera Please put your hand through the wrist strap and firmly hold the camera as illustrated While taking still pictures or recording video clips avoid blocking the...

Страница 11: ...ripod to minimize camera movement and ensure optimal image quality especially while shooting self portraits or video conferencing Tight Loose Using the tripod optional Getting Started Using the tripod...

Страница 12: ...Basic Operations...

Страница 13: ...please check 1 There are two AA batteries installed in the camera 2 The batteries have enough power left 3 The polar directions of the installed batteries are correct Turning off your camera Press an...

Страница 14: ...or Down button to highlight the Language item 3 When the Language item is highlighted press the Menu OK button to enter the sub menu In the sub menu use the Up or Down button to select a suitable lang...

Страница 15: ...ecord Shutter button to start recording Basic Operations Recording a video clip 14 How to record a video clip 1 0X 10 00 00 10 Storage media internal memory SD MMC card Battery life Recording time Num...

Страница 16: ...ly you should set the focus to for most shooting conditions Select only for close ups The focus is adjustable during recording While recording you can press the Up or Down button to zoom in or zoom ou...

Страница 17: ...g g g g Auto mode no indicator When the camera is in Auto mode the camera will automatically select the best metering method for the overall conditions Average mode When in Average mode the camera wi...

Страница 18: ...How to take a still picture 1 Set the Mode Dial to Digital Still Camera mode The LCD display will show the screen below LCD Display 1 0X 10 Battery life Self timer st atus White Balance Number of reco...

Страница 19: ...Right button to select a metering mode The metering mode changes in the following order Auto g Average g Center g Center low g Auto For a detailed description of each metering mode please see page 16...

Страница 20: ...een below 2 Press the Record Shutter button to start recording 3 Press the Record Shutter button again to stop recording 19 LCD Display 10 00 00 10 Battery life Recording time Number of recordings Mod...

Страница 21: ...ast recorded file will be automatically played 20 Full screen view 3 If you want to view other files stored in the camera you can use the Right and Left buttons to shift between files LCD Display Stor...

Страница 22: ...hed to thumbnail view Then There are three file types that you can identify by the icons on the thumbnails JPG format pictures ASF format video clips WAV format audio clips For detailed operations on...

Страница 23: ...cked You can then browse the picture using the direction buttons To unlock the zoom ratio press the Record Shutter button again 22 Reviewing a still picture 1 20 1 0X Full Screen Zoom lock Screen 1 20...

Страница 24: ...ideo or audio clip Playing back your recordings continued 1 20 00 00 56 Playing a video clip 1 20 00 00 56 Adjusting volume While playing a video or audio clip the available function buttons are as fo...

Страница 25: ...n off the OSD display When playing back a video clip or reviewing a still picture you can press the LCD display switch to disable the OSD display thus gaining a clearer view for your display Press the...

Страница 26: ...tly on your TV screen to share them with friends and family members Turn on your TV and switch to AV mode Connect the audio and video ends of the AV cable to your TV Open the connector cover of your c...

Страница 27: ...confirm the selection 3 If you want to exit a menu screen you can select the Exit item and press the Menu OK button or you can press the Record Shutter button to quick exit the menu In several modes y...

Страница 28: ...hted press the Menu OK button 3 A sub menu as illustrated on the right will appear Press the Up or Down button to select a resolution setting and then press the Menu OK button to apply The three items...

Страница 29: ...ghted press the Menu OK button 3 A sub menu as illustrated on the right will appear Press the Up or Down button to select an item and then press the Menu OK button to apply The applicable value ranges...

Страница 30: ...s the Up or Down button to highlight an item and then press the Menu OK button to apply The three effects you can choose from are Normal This option allows you to record the movie in natural color It...

Страница 31: ...n 3 A sub menu as illustrated on the right will appear Press the Up or Down button to select an item and then press the Menu OK button to apply The three items you can choose from are 2048X1536 the mo...

Страница 32: ...K button 3 A sub menu as illustrated on the right will appear Press the Up or Down button to select On and press the Menu OK button to apply After the self timer is turned on the camera will have ten...

Страница 33: ...effects you can choose from Auto The camera will determine the best white balance setting for your shooting environment Sunny suitable for normal outdoor shooting in sunny weather Cloudy suitable for...

Страница 34: ...Once the Exposure item is highlighted press the Menu OK button Adjusting exposure compensation 3 A sub menu as illustrated on the right will appear Press the Up or Down button to select an item and th...

Страница 35: ...ctures 3 A sub menu as illustrated on the right will appear Press the Up or Down button to select an item and then press the Menu OK button to apply The three effects you can choose from are Normal Th...

Страница 36: ...n Digital Still Camera mode press the Menu OK button 2 A menu as illustrated on the right will appear Press the Up or Down button to highlight the Date Stamp item Once the Date Stamp item is highlight...

Страница 37: ...ng files 3 Depending on the item you select the corresponding sub menu will appear If you select Delete to delete one file you can use the Left or Right button to shift between files in the sub menu P...

Страница 38: ...on Viewing file information 3 An info page of the file will then appear Note that the actual display shown depends on the file type You can also press the Right or Left button to shift between files W...

Страница 39: ...is selected press the Menu OK button Locking files 3 Depending on the item you select the corresponding sub menu will appear If you select Lock to lock one file you can use the Left or Right button t...

Страница 40: ...oll page and highlight the Index item Once the Index item is selected press the Menu OK button Sorting files 3 A sub menu as illustrated on the right will appear Press the Up or Down button to select...

Страница 41: ...My Computer and you will find a removable disk Inside the removable disk you can locate a MP3 folder Then you can copy the desired MP3 files into the folder for playing 40 For MP3 files Before you can...

Страница 42: ...as illustrated on the right 41 LCD Display 1 3 00 00 56 0001 track01 MP3 00 04 30 Current Total tracks Storage media internal memory SD MMC card Mode icon Playing time Play Pause Stop Advanced Operati...

Страница 43: ...to select Repeat item Once the Repeat item is selected press the Menu Ok button 3 A sub menu as illustrated on the right will appear Press the Up or Down button to select Yes and then press the Menu...

Страница 44: ...n button to select 3D Enhance item Once the 3D Enhance item is selected press the Menu Ok button 3 A sub menu as illustrated on the right will appear Press the Up or Down button to select a desired it...

Страница 45: ...the Bass item Once the Bass item is selected press the Menu OK button 3 A sub menu as illustrated on the right will appear Press the Up or Down button to select a desired item and then press the Menu...

Страница 46: ...g MP3 info This item enables you to view the MP3 file information To enable the bass effect 1 While in MP3 mode press the Menu OK button 45 Menu Info Delete Hold 2 A menu will appear Press the Up or D...

Страница 47: ...appear Press the Up or Down button to scroll page and highlight the Delete item Once the Delete item is selected press the Menu OK button 3 A sub menu as illustrated on the right will appear Press th...

Страница 48: ...light the Hold item Once the Hold item is selected press the Menu OK button 3 A sub menu as illustrated on the right will appear Press the Up or Down button to select Yes and then press the Menu OK bu...

Страница 49: ...onding page Setting the date and time 1 While in Settings mode use the Up and Down buttons to highlight the Time item and then press the Menu Ok button to enter the sub menu 2 Use the Right and Left b...

Страница 50: ...u OK button to confirm Setting the flicker 1 While in Settings mode use the Up and Down buttons to highlight the Flicker item and then press the Menu Ok button to enter the sub menu 2 Use the Up and D...

Страница 51: ...mode use the Up and Down buttons to highlight the Language item and then press the Menu Ok button to enter the sub menu 2 Use the Up and Down buttons to select a suitable language When the desired it...

Страница 52: ...nfirm Formatting media 1 While in Settings mode use the Up and Down buttons to highlight the Format item and then press the Menu Ok button to enter the sub menu 2 Use the Up and Down buttons to select...

Страница 53: ...lt item and then press the Menu Ok button to enter the sub menu 2 Use the Up and Down buttons to select Yes and then press the Menu OK button to confirm 52 Default Exit Yes Return to init setting Rest...

Страница 54: ...Copying Files to Your PC...

Страница 55: ...mputer now Shut down all other applications running on your computer If the title screen does not appear automatically please double click on My Computer and then the CD ROM drive Then browse to the f...

Страница 56: ...ia Format 9 Series Runtime and Direct X 8 0 or above are necessary for viewing the video clips recorded by the camera 7 After the installation is completed you may need to restart your computer for th...

Страница 57: ...ort are correctly aligned 56 Notice for Windows 2000 XP ME users If you select DISK mode and then want to disconnect the camera from your computer please follow these steps 1 Double click on the syste...

Страница 58: ...rer and click OK For Windows 2000 ME 98SE users Double click on My Computer Then double click on the icon of the removable disk that has just appeared Copying Files to Your PC Copying files to the PC...

Страница 59: ...C continued 58 2 Double click on the DCIM file folder 3 Double click on the 100MEDIA file folder 4 Drag the target file into My Documents or the destination folder Copying Files to Your PC Copying fil...

Страница 60: ...ny other folder that stores your files Viewing Playing files on your PC 2 Double click on the desired file and the file will be opened by the program matching the file s type 59 Copying Files to Your...

Страница 61: ...a removable disk will appear in your computer Under the disk you can find all files stored in your camera See the figure in the right to see where different types of files are located Note that MP3 fo...

Страница 62: ...Using MoviePix M 330 Manager...

Страница 63: ...talling the package Installing MoviePix M 330 Manager Before starting the application After the installation is completed please follow these steps to prepare for starting the program 2 Connect the ca...

Страница 64: ...cess some users might be asked to insert a licensed 98SE CD into the CD ROM drive to copy the needed files 4 Follow the on screen instructions to finish the installation 63 Using MoviePix M 330 Manage...

Страница 65: ...the Programs menu Using MoviePix M 330 Manager Starting the application 1 Select the operation mode Disk mode Please set the Mode Dial to or In this mode you can manage your files using MoviePix M 330...

Страница 66: ...ppear if the camera is not set to Live mode In this mode you can directly preview the files stored in the camera Moreover you can also choose to copy delete email or play your recordings Double click...

Страница 67: ...le in Disk mode your camera functions as a removable disk and you can directly download files to your computer 1 Select one file or press the button to select all files 2 Press the button to copy the...

Страница 68: ...mat Start Stop preview window Properties Setting Preview Window After starting MoviePix M 330 Manager the following screen will show up if the camera is set to Live mode In this mode you can use the P...

Страница 69: ...shot Recording an AVI movie Color Space Select one of the following functions according to your needs RGB 24 This item is for retaining better quality I420 This item indicates the AVI movie will be mo...

Страница 70: ...ring Flicker options 69 Video setting Banding Filter If the screen of your computer flickers when using PC Camera function change this setting to avoid noise Bandwidth If the network bandwidth is cong...

Страница 71: ...een Red Green Red Meanings Ready waiting for command Busy storage or capture Ready waiting for command Charging flash Ready waiting for command Data transformation Self Timer Self Timer LED Red regula...

Страница 72: ...384 768 30 60 120 240 480 20 40 80 160 320 SD MMC card 512MB 640 960 1536 96 224 min All resolutions 1 The actual number of pictures stored may vary up to 30 depending on the resolution and color satu...

Страница 73: ...ips continuous recording mins 1 Shooting interval 30 seconds 2 The flash strobe is used for every other image 1 Shooting interval 4 seconds 2 Flash strobe is disabled Battery indicator status Note The...

Страница 74: ...le Is Locked Locking Unlocking The camera can not access data in the internal memory Please format the media to solve this problem The flash strobe is charging The file being played is not compatible...

Страница 75: ...Digital zoom Lens Self Timer Interface Power saving Battery Dimension 1 5 Color TFT LCD 4X real time F 3 5 8 5mm 10 seconds USB 2 0 USB 1 1 compatible 1min 3min 5min auto power off if idle for over s...

Страница 76: ...space from the SD MMC card or the internal memory 2 Check if the camera is recharging the flash strobe 3 If you are using a SD card check if the card is set to protected 4 If the LCD screen displays...

Страница 77: ...nvironment of shooting or recording has adequate light Or you may consider using flash strobe when taking pictures Q8 Noises occur when viewing images on the LCD screen or on the computer A Check if t...

Страница 78: ...e driver before plugging in the USB cable Q3 The TV screen does not display after connecting the camera to the TV A 1 Check if the camera is correctly connected to the TV 2 Make sure the TV system is...

Страница 79: ...re not found message it is probably because your current operation system does not fully support USB 2 0 port Please consider using another port for connection or follow step 1 to install the necessar...

Страница 80: ...controller Billionton USB 2 0 Host Controller in this case and right click the mouse a menu should pop up a Click on Properties and a sub menu as the following should show up b Click on the Driver tab...

Страница 81: ...n USB 3 When the following dialogue window appears click on Next to continue 4 When the following dialogue window appears a Check the item Search for a suitable driver for my device b Click on Next to...

Страница 82: ...hen the following dialogue window appears select none of the items and click on Next to continue 6 When the following dialogue window appears a Check the item Install one of the other drivers b Click...

Страница 83: ...t USB driver In this case you should select the USB 2 0 driver provided by Microsoft to replace the original driver b Click on Next to continue 8 When the following dialogue window appears click on Fi...

Страница 84: ...r again If the old driver has been replaced by the new one the installation is successfully completed 10 After all the above steps are completed reconnect the camera to the USB 2 0 port Make sure that...

Страница 85: ...container 2 Highlight the USB 2 0 controller NEC PCI to USB Enhanced Host Controller B1 in this case and right click the mouse a menu should pop up Select the Update Driver item and the following wind...

Страница 86: ...ubleshooting on USB 85 3 Check the item Don t search I will choose the driver to install Then click on Next to continue 4 Select Standard Enhanced PCI to USB Host Controller and click on Next to conti...

Страница 87: ...g on USB 86 5 The driver installation process is complete Click on Finish to continue 6 Launch Device Manager and unfold the Universal Serial Bus controllers container Make sure the USB 2 0 driver has...

Страница 88: ...o load the file If you encounter problems related to taking a long time loading video clips we recommend you 1 Copy the video clips to your computer and then view them on the computer 2 Upgrade your m...

Страница 89: ...Benutzerhandbuch...

Страница 90: ...mperatur oder direkten Sonneneinstrahlung aus Die Kamera kann dadurch besch digt werden 4 Gehen Sie vorsichtig mit der Kamera um Vermeiden Sie es die Kamera stark zu dr cken 5 Verwenden Sie die Kamera...

Страница 91: ...Kamera Einstellen der Sprache Aufnehmen eines Videoclips 14 13 12 12 Einschalten der Kamera 12 Aufnehmen eines Videoclips Einstellen des Fokus W hlen eines Messmodus 16 15 14 Aufnehmen eines Bildes 1...

Страница 92: ...stellen der Belichtungskompensation Anwenden der Sondereffekte an Bildern 34 33 32 Verwenden des Datumsaufdrucks 35 Wiedergeben von MP3 Musikdateien 40 Kopieren von MP3 Dateien zur Kamera Wiedergeben...

Страница 93: ...Konfigurieren der Formatoptionen Konfigurieren der Eigenschaften 69 68 Konfigurieren der Flimmeroptionen 69 Anhang 70 Fehlerbehebung 75 LED Beschreibungen Speicherkapazit t TV Systemeinstellung Batter...

Страница 94: ...atteriefachdeckel Speicherkartensteckplatz Batteriefach Trageriemenhalterung 1 Status LED Mikrofon Blitz Fokusschalter Linse Selbstausl ser LED A V Ausgangsanschluss Kopfh reranschluss USB Anschluss T...

Страница 95: ...r eine h here Leistung empfohlen Einlegen der Batterien 1 Schieben Sie den Batteriefachdeckel in die angezeigte Richtung um das Fach zu ffnen 2 Legen Sie die Batterie in das Fach ein Achten Sie bitte...

Страница 96: ...hin etwas heraus und kann dann aus dem Steckplatz herausgenommen werden Die SD Karte ist mit einem Schreibschutz Schalter ausgestattet Wenn der Schreibschutz Schalter auf die Verrieglungs Position ges...

Страница 97: ...der Kamerar ckseite 3 Befestigen Sie den anderen Teil des Trageriemens an der Trageriemenhalterung 2 auf der Kamerafrontseite Inbetriebnahme Anbringen des Trageriemens optional 08 4 Binden Sie den Tr...

Страница 98: ...die angezeigte Richtung Halten Ihrer Kamera Bitte f hren Sie Ihre Hand durch den Trageriemen und halten die Kamera wie angezeigt fest Vermeiden Sie es die Linse w hrend der Aufnahme von Bildern oder V...

Страница 99: ...ckeln der Kamera zu vermeiden und eine optimale Bildqualit t zu erhalten Sie k nnen so auch Bilder von sich selber oder lange Videoclips mit hoher Qualit t aufnehmen Festziehen Lockern Verwenden des S...

Страница 100: ...Grundbedienung...

Страница 101: ...stellen Sie bitte sicher dass 1 zwei AA Batterien in die Kamera eingelegt wurden 2 die Batterien gen gend Strom haben 3 Die Polung der eingelegten Batterien richtig ist Ausschalten der Kamera Dr cken...

Страница 102: ...nguage Sprache zu markieren 3 Dr cken Sie nach dem Markieren des Elements Language die Men OK Taste um das Submen aufzurufen Verwenden Sie die Oben oder Unten Taste um eine gew nschte Sprache in dem S...

Страница 103: ...Ausl ser Taste um die Aufzeichnung zu starten Grundbedienung Aufnehmen eines Videoclips 14 Aufnehmen eines Videoclips 1 0X 10 00 00 10 Datentr ger Integrierter Speicher SD MMC Karte Batteriezustand Au...

Страница 104: ...e auf f r die meisten Aufnahmekonditionen gestellt werden W hlen Sie nur f r Nahaufnahmen Die Brennweite kann w hrend der Aufnahme ge ndert werden Sie k nnen w hrend der Aufnahme die Oben oder Unten T...

Страница 105: ...g g g Auto Modus keine Anzeige Die Kamera w hlt automatisch die beste Messmethode f r die gesamten Konditionen wenn sich die Kamera auf dem Auto Modus befindet Durchschnitt Modus In diesem Modus miss...

Страница 106: ...ehmen 17 Aufnehmen eines Bildes 1 Stellen Sie den Modusschalter auf den Bildmodus Das nachstehende Bild wird auf dem LCD Bildschirm angezeigt 1 0X 10 LCD Anzeige Batteriezustand Selbstausl sermodus Bl...

Страница 107: ...r cken um einen Messmodus zu w hlen Der Messmodus wird in der nachstehenden Reihenfolge umgeschaltet Auto Durchschnitt Zentrum Unten Mitte Auto Ausf hrliche Beschreibungen jedes Messmodus finden Sie a...

Страница 108: ...2 Dr cken Sie die Aufnahme Ausl ser Taste um die Aufnahme zu starten 3 Dr cken Sie noch einmal die Aufnahme Ausl ser Taste um die Aufnahme zu stoppen 19 LCD Anzeige 10 00 00 10 Batteriezustand Aufnah...

Страница 109: ...isch wiedergegeben sobald der Modusschalter auf den Wiedergabemodus gestellt wurde 20 Vollbildschirmansicht 3 Verwenden Sie die Rechts oder Links Taste um die anderen Dateien auszusuchen und wiederzug...

Страница 110: ...tei ausgew hlt haben Durch die Symbole in der Miniaturansicht k nnen Sie drei Dateitypen erkennen JPG Format Bilder ASF Format Videoclips WAV Format Audioclips Ausf hrliche Bedienungsbeschreibungen f...

Страница 111: ...Aufnahme Ausl ser Taste um den Zoomfaktor zu entriegeln 22 Wiedergabe eines Bildes 1 20 1 0X Vollbildschirm Zoomverriegelter Bildschirm 1 20 2 0X Die Funktionen der verf gbaren Tasten im Bildwiedergab...

Страница 112: ...udioclips Wiedergeben Ihrer Aufnahmen Fortsetzung 1 20 00 00 56 Wiedergabe eines Videoclips 1 20 00 00 56 Lautst rkereglung Die Funktionen der verf gbaren Tasten im Video oder Audiowiedergabe Modus si...

Страница 113: ...oder eines Bildes den LCD Anzeigeschalter dr cken um die OSD Anzeige zu deaktivieren und eine klarere Ansicht f r die Wiedergabe zu erhalten Dr cken Sie noch einmal den Schalter um die OSD Anzeige zu...

Страница 114: ...her ein und schalten ihn in den AV Modus um Verbinden Sie den Video sowie Audio Stecker des AV Kabels mit dem AV Eingang an Ihrem Fernseher ffnen Sie den Kameraanschlussdeckel siehe Seite 9 Schalten S...

Страница 115: ...dr cken anschlie end die Men OK Taste Sie k nnen ebenfalls die Aufnahme Ausl ser Taste dr cken um das Men sofort zu schlie en In verschiedenen Modi k nnen Sie das Men aufrufen um die Kameraeinstellung...

Страница 116: ...Submen wie die rechte Abbildung erscheint daraufhin Verwenden Sie die Oben oder Unten Taste um die gew nschte Aufl sung auszuw hlen Dr cken Sie anschlie end die Men OK Taste um Ihre Auswahl zu best ti...

Страница 117: ...end die Men OK Taste um Ihre Auswahl zu best tigen 3 Ein Submen wie in der rechten Abbildung erscheint daraufhin Verwenden Sie die Oben oder Unten Taste um den gew nschten Wert auszuw hlen Dr cken Si...

Страница 118: ...rwenden Sie die Oben oder Unten Taste um die gew nschte Option auszuw hlen Dr cken Sie anschlie end die Men OK Taste um Ihre Auswahl zu best tigen Die folgenden drei Effekte stehen Ihnen zur Auswahl N...

Страница 119: ...n Verwenden Sie die Oben oder Unten Taste um die gew nschte Option auszuw hlen Dr cken Sie anschlie end die Men OK Taste um Ihre Auswahl zu best tigen Die folgenden drei Optionen stehen Ihnen zur Ausw...

Страница 120: ...ste um Ihre Auswahl zu best tigen 3 Ein Submen wie in der rechten Abbildung erscheint daraufhin Verwenden Sie die Oben oder Unten Taste um Ein zu w hlen Dr cken Sie anschlie end die Men OK Taste um Ih...

Страница 121: ...nschlie end die Men OK Taste um Ihre Auswahl zu best tigen Es stehen Ihnen f nf Optionen zur Auswahl Auto Diese Option l sst die Kamera automatisch die passende Wei abgleich Einstellung entsprechend d...

Страница 122: ...Dr cken Sie anschlie end die Men OK Taste um Ihre Auswahl zu best tigen Einstellen der Belichtungskompensation 3 Ein Submen wie in der rechten Abbildung erscheint daraufhin Verwenden Sie die Oben oder...

Страница 123: ...der rechten Abbildung erscheint daraufhin Verwenden Sie die Oben oder Unten Taste um die gew nschte Option auszuw hlen Dr cken Sie anschlie end die Men OK Taste um Ihre Auswahl zu best tigen Die folg...

Страница 124: ...en vor um den Datumsaufdruck zu aktivieren 1 Dr cken Sie im Bildmodus die Men OK Taste 2 Ein Men wie die rechte Abbildung erscheint daraufhin Verwenden Sie die Oben oder Unten Taste um das Element Dat...

Страница 125: ...e die Oben oder Unten Taste um Ihre Entscheidung f r diese Aktion zu w hlen und dr cken anschlie end die Men OK Taste um Ihre Entscheidung zu best tigen 36 Erweiterte Funktionen Wiedergabemen Beenden...

Страница 126: ...hirm angezeigt Sie k nnen auch mit Hilfe der Links oder Rechts Taste eine Datei aussuchen Dr cken Sie die Men OK Taste um das Dateiinformationsbild zu schlie en 37 Erweiterte Funktionen Wiedergabemen...

Страница 127: ...chts Taste um die Datei im Submen zu durchsuchen Verwenden Sie die Oben oder Unten Taste um Ihre Entscheidung f r diese Aktion zu w hlen und dr cken anschlie end die Men OK Taste um Ihre Entscheidung...

Страница 128: ...hlen und dr cken anschlie end die Men OK Taste um Ihre Entscheidung zu best tigen Nachdem der Dateityp bestimmt wurde werden nur Dateien von dem gew hlten Typ im Wiedergabemodus angezeigt werden 39 S...

Страница 129: ...e Sie finden daraufhin einen Wechseldatentr ger Innerhalb des Datentr gers gibt es einen MP3 Ordner Sie k nnen die gew nschten MP3 Dateien zu diesen Ordner zur Wiedergaben bringen 40 F r MP3 Dateien E...

Страница 130: ...dergabezeit Wiedergabe Pause Stopp Erweiterte Funktionen Wiedergeben von MP3 Musikdateien Fortsetzung Lautst rke erh hen Lautst rke verringern N chste Datei Schnellvorlauf Vorherige Datei R ckspulen W...

Страница 131: ...tionen an Nehmen Sie bitte zur Kenntnis dass das Men nicht aufgerufen werden kann wenn es keine MP3 Dateien auf der Kamera gibt Beenden Wiederholung 3D erh hen Sie k nnen das Spielen wiederholen und b...

Страница 132: ...ben oder Unten Taste um eine gew nschte Option zu w hlen und dr cken anschlie end die Men OK Taste um Ihre Entscheidung zu best tigen Stark Der st rkste 3D Effekt Niedrig Ein mittlerer 3D Effekt Aus D...

Страница 133: ...ie die Oben oder Unten Taste um eine gew nschte Option zu w hlen und dr cken anschlie end die Men OK Taste um Ihre Entscheidung zu best tigen Stark Der st rkste Basseffekt Niedrig Ein mittlerer Bassef...

Страница 134: ...en der MP3 Informationen 45 2 Ein Men erscheint daraufhin Verwenden Sie die Oben oder Unten Taste um das Element Information zu markieren Dr cken Sie anschlie end die Men OK Taste um Ihre Auswahl zu b...

Страница 135: ...nt daraufhin Verwenden Sie die Oben oder Unten Taste um Ihre Entscheidung f r diese Aktion zu w hlen und dr cken anschlie end die Men OK Taste um Ihre Entscheidung zu best tigen L schen Beenden L sche...

Страница 136: ...bitte vor dem Aktivieren dieser Funktion sicher dass die Einstellungen richtig konfiguriert wurden 4 Dr cken Sie eine beliebige Taste au er dem Stromschalter um den Status zu entsperren Ein Men wie in...

Страница 137: ...chenden Seite nach Einstellen des Datums und der Uhrzeit 1 Verwenden Sie im Einstellungsmodus die Oben oder Unten Taste um das Element Zeit zu w hlen Dr cken Sie anschlie end die Men OK Taste um das S...

Страница 138: ...st tigung die Men OK Taste Einstellen des Flimmerns 1 Verwenden Sie im Einstellungsmodus die Oben oder Unten Taste um das Element Flimmern zu w hlen Dr cken Sie anschlie end die Men OK Taste um das Su...

Страница 139: ...im Einstellungsmodus die Oben oder Unten Taste um das Element Sprache zu w hlen Dr cken Sie anschlie end die Men OK Taste um das Submen aufzurufen 2 Verwenden Sie die Oben oder Unten Taste um eine gew...

Страница 140: ...stellungsmodus die Oben oder Unten Taste um das Element Formatieren zu w hlen Dr cken Sie anschlie end die Men OK Taste um das Submen aufzurufen 2 Verwenden Sie die Oben oder Unten Taste um Ja zu w hl...

Страница 141: ...chlie end die Men OK Taste um das Submen aufzurufen 2 Verwenden Sie die Oben oder Unten Taste um Ja zu w hlen Dr cken Sie zur Best tigung die Men OK Taste 52 Standard Beenden Ja Werkseinstellung zur c...

Страница 142: ...Kopieren von Dateien zum PC...

Страница 143: ...ht mit dem Computer Schlie en Sie alle ausgef hrten Anwendungen auf dem Computer Klicken Sie bitte doppelt auf Arbeitsplatz und dann auf das CD ROM Laufwerk wenn das Startbild nicht automatisch angeze...

Страница 144: ...Fortfahren auf Ja Windows Media Player Codecs Windows Media Format 9 Series Runtime und Direct X8 0 oder eine neuere Version sind zur Wiedergabe der von dieser Kamera aufgenommenen Videoclips notwend...

Страница 145: ...itte den nachstehenden Schritten 1 Klicken Sie doppelt auf das Symbol auf der Taskleiste 2 Klicken Sie auf USB Disk und dann auf Stopp bzw Deaktivieren 3 W hlen Sie die Kamera wenn das Best tigungsfen...

Страница 146: ...nter Windows 2000 ME 98SE Klicken Sie doppelt auf My Computer Arbeitsplatz Klicken Sie anschlie end doppelt auf das Symbol des neu angezeigten Datentr gers Kopieren von Dateien zum PC Kopieren von Dat...

Страница 147: ...doppelt auf den DCIM Ordner 3 Klicken Sie doppelt auf den 100MEDIA Ordner 4 Ziehen Sie die gew nschte Datei zu Eigene Dateien oder einem anderen Zielordner Kopieren von Dateien zum PC Kopieren von Dat...

Страница 148: ...deren Ordner der Ihre Dateien enth lt Anzeigen Wiedergeben von Dateien auf dem PC 2 Klicken Sie doppelt auf die gew nschte Datei Die Datei wird daraufhin von einem passenden Programm ge ffnet 59 Kopie...

Страница 149: ...rbunden ist Auf diesem Datentr ger finden Sie die auf der Kamera gespeicherten Dateien Die rechte Abbildung zeigt Ihnen wie Dateien verschiedener Typen geordnet werden Achten Sie bitte darauf dass MP3...

Страница 150: ...Verwendung das MoviePix M 330 Manager...

Страница 151: ...Manager installieren Hinweise f r Windows ME Benutzer W hlen Sie bitte Nach dem besten Treiber f r das Ger t suchen und klicken dann zum Fortfahren auf Weiter wenn das rechte Bild erscheint 1 Stellen...

Страница 152: ...werk einzulegen um die notwendigen Dateien zu kopieren 4 Folgen Sie den Anweisungen auf dem Bildschirm um die Installation zu vervollst ndigen 63 Verwendung das MoviePix M 330 Manager Fortsetzung Vor...

Страница 153: ...amm zu starten Nach dem Starten k nnen Sie MoviePix M 330 Manager verwenden 1 W hlen Sie den Betriebsmodus Disk Modus Stellen Sie das Modusrad auf oder In diesen Modi k nnen Sie Ihre Dateien mithilfe...

Страница 154: ...nnen Sie die auf Ihrer Kamera gespeicherten Dateien direkt einsehen Sie k nnen Ihre Aufnahmen auch kopieren l schen per Email verschicken oder wiedergeben Doppelklicken um die Datei abzuspielen DV Dis...

Страница 155: ...ein Wechseldatentr ger und Sie k nnen Dateien direkt auf Ihren Computer herunterladen 1 W hlen Sie eine Datei oder dr cken Sie um alle Dateien auszuw hlen 2 Dr cken Sie um die gew hlten Dateien in ei...

Страница 156: ...nahme stoppen Schnappschuss Formatieren Verwendung das MoviePix M 330 Manager MoviePix M 330 Manager PC Kamera Vorschaufenster starten stoppen Eigenschaften Einstellungen Vorschau Fenster Ist die Kame...

Страница 157: ...u machen Aufnehmen eines AVI Videoclips Color Space Farbtiefe W hlen Sie eine der folgenden Optionen nach Bedarf aus RGB 24 Diese Option erzeugt eine bessere Qualit t 1420 Mit dieser Option wird das A...

Страница 158: ...tellung Banding Filter Bandfilter Wenn der Computerbildschirm w hrend der Verwendung der PC Kamerafunktion flackert ndern Sie bitte diese Einstellung um ein Rauschen zu vermeiden Bandwidth Bandbreite...

Страница 159: ...arten Daten bertragung Betriebsbereit Auf Befehle warten Daten bertragung Selbstausl ser Selbstausl ser LED Rot regelm ig Verz gerungszeit z hlen Ein Bild aufnehmen Rot schnell China Japan Korea 50Hz...

Страница 160: ...512MB 640 960 1536 Alle Aufl sungen 1 Die tats chliche Anzahl der Bilder die gespeichert werden k nnen kann je nach der Aufl sung und Farbs ttigung bis zu 30 variieren Audioclip Max TV Systemeinstellu...

Страница 161: ...rvall 30 Sekunden 2 Der Blitz wurde f r jede Bildaufnahme verwendet 1 Aufnahmeintervall 4 Sekunden 2 Der Blitz wurde deaktiviert Bedeutungen der Batteriestatusanzeigen Anmerkung Die folgenden Tests wu...

Страница 162: ...amera kann nicht auf die Daten im internen Speicher zugreifen Bitte formatieren Sie den Speicher um das Programm zu beseitigen Der Blitz wird aufgeladen Die wiederzugebende Datei ist mit der Kamera ni...

Страница 163: ...armodus Batterie Abmessungen 1 5 Farb TFT LCD 4x Echtzeit F 3 5 8 5 mm 10 Sekunden USB 2 0 USB 1 1 kompatibel 1 Min 3Min 5Min Auto Ausschalten wenn die Kamera sich l nger als die angegebene Zeit im Ru...

Страница 164: ...icher 2 Pr fen Sie ob die Kamera gerade den Blitz aufl dt 3 Pr fen Sie ob die SD Karte schreibgesch tzt ist 4 Bitte stellen Sie die Kamera auf den Einstellungsmodus und formatieren den Datentr ger wen...

Страница 165: ...Sie sicher dass die Aufnahmeumgebung gen gend Licht hat Verwenden Sie eventuell Blitzlicht F8 Es gibt Rauschen bei der Wiedergabe auf dem LCD oder Computermonitorbildschirm A Pr fen Sie ob die Flimme...

Страница 166: ...SB Kabels installiert haben F3 Der Fernseher zeigt nichts an nachdem die Kamera an den Fernseher angeschlossen wurde A 1 Pr fen Sie ob die Kamera richtig mit dem Fernseher verbunden ist 2 Stellen Sie...

Страница 167: ...h dann nicht ordnungsgem beachten Sie die folgenden Hinweise zum Akualisieren Ihres Betriebssystems Schritt 1 Betriebssystem Update vom Internet herunterladen Bitte ffnen Sie die Webseite http v4 wind...

Страница 168: ...on USB 2 0 Host Controller und dr cken Sie die rechte Maustaste Ein Men erscheint a Klicken Sie Eigenschaften und ein Untermen wie folgt erscheint b Klicken Sie den Karteireiter Treiber und klicken Si...

Страница 169: ...B Fehlerbehebung 3 In der folgenden Anzeige klicken Sie Weiter um fortzufahren 4 In der folgenden Anzeige a Markieren Sie Nach einem passenden Treiber f r das Ger t suchen b Klicken Sie Weiter um fort...

Страница 170: ...bung 5 In der folgenden Anzeige markieren Sie keine der Felder und klicken Sie Weiter um fortzufahren 6 In der folgenden Anzeige a Markieren Sie Einen der anderen Treiber installieren b Klicken Sie We...

Страница 171: ...n Sie den korrekten USB Treiber In diesem Fall w hlen Sie den USB 2 0 Treiber von Microsoft um den originalen Treiber zu ersetzen b Klicken Sie Weiter um fortzufahren 8 In der folgenden Anzeige klicke...

Страница 172: ...Sie erneut USB Controller Wurde der alte Treiber von einem Neuen ersetzt war die Installation erfolgreich 83 10 Haben Sie die o g Schritte durchgef hrt verbinden Sie die Kamera erneut mit einer USB 2...

Страница 173: ...2 0 Controller in diesem Fall Billionton USB 2 0 Host Controller und klicken Sie die rechte Maustaste Ein Men erscheint W hlen Sie Treiber aktualisieren die folgende Anzeige erscheint W hlen Sie die O...

Страница 174: ...ung 3 W hlen Sie die Option Nicht suchen sondern den zu installierenden Treiber selbst w hlen Klicken Sie Weiter um fortzufahren 4 W hlen Sie Erweierter NEC PCI zu USB Hostcontroller B1 und klicken Si...

Страница 175: ...Fehlerbehebung 5 Die Treiberinstallation ist komplett Klicken Sie Fertig stellen um fortzufahren 6 Starten Sie den Ger te Manager und ffnen Sie USB Controller Pr fen Sie dass der USB 2 0 Treiber aktua...

Страница 176: ...t zunehmender Dateigr e l nger Wenn Sie mit langen Ladezeiten beim Laden von Videodateien Probleme haben empfehlen wir folgendes 1 Kopieren Sie die Videodateien zuerst auf Ihren Computer und starten S...

Страница 177: ...Guide Utilisateur Guide Utilisateur...

Страница 178: ...Vous risquez sinon de l endommager 4 Utilisez la cam ra avec soin Evitez d appuyer trop fort sur le corps de la cam ra 5 Pour votre propre s curit viter d utiliser la cam ra pendant une temp te ou un...

Страница 179: ...Choisir la langue Enregistrer un clip vid o 14 13 12 12 Allumer votre cam ra 12 Comment enregistrer un clip vid o R gler la mise au point S lection des modes de m trage 16 15 14 Prendre une image fixe...

Страница 180: ...chiers 39 R glage de l quilibre des blancs R glage de la compensation d exposition Appliquer des effets sp ciaux aux images fixes 34 33 32 Utilisation du timbre date 35 Lire la musique MP3 40 Copier d...

Страница 181: ...68 Configurer les options de scintillement 69 Annexes 70 D pannage 75 Tableau des v nements LED Tableau des capacit s de stockage Tableau des r glages pour le syst me TV Tableau de l autonomie des pi...

Страница 182: ...nt piles Emplacement pour carte m moire Compartiment piles Oeillet pour dragonne 1 LED d tat Microphone Flash S lecteur de mise au point Objectif LED retardateur Connecteur de sortie A V Connecteur ca...

Страница 183: ...erformances Mise en place des piles 1 Faites glisser le capot du compartiment piles dans la direction indiqu e 2 Placez les piles dans le compartiment Attention la direction des bornes positives et n...

Страница 184: ...t Lorsqu elle ressort tirez la doucement hors de son emplacement La carte SD comporte une languette de protection en criture Lorsque la languette de protection en criture est en position Verrouill e l...

Страница 185: ...e la cam ra 3 Enfilez l autre partie de la dragonne dans l oeillet 2 sur l avant de la cam ra Mise En Route Fixation de la dragonne optionnelle 08 4 Attachez la dragonne ainsi qu indiqu D placez l ann...

Страница 186: ...ainsi qu illustr ci dessous Comment tenir votre cam ra Enfilez votre main dans la dragonne et tenez fermement la cam ra ainsi qu illustr Lorsque vous prenez des photos ou enregistrez de la vid o vite...

Страница 187: ...ouvements de la cam ra et assurer ainsi une image de qualit optimale en particulier lorsque vous faites des auto portraits ou pour la visioconf rence Serr L che Utilisation du tr pied optionnel Mise E...

Страница 188: ......

Страница 189: ...oc der aux v rifications suivantes 1 Il y a bien deux piles AA install es dans la cam ra 2 Les piles poss dent encore suffisamment d nergie 3 L orientation des p les des piles install es est correcte...

Страница 190: ...l option Langue 3 Lorsque l option Langue est s lectionn e appuyez sur le bouton Menu OK pour entrer dans le menu secondaire Dans le menu secondaire utilisez les boutons Haut ou Bas pour s lectionner...

Страница 191: ...enregistrer Operations De Base Enregistrer un clip vid o 14 Comment enregistrer un clip vid o 1 0X 10 00 00 10 Support de stockage M moire interne Carte SD MMC Autonomie piles Temps d enregistrement...

Страница 192: ...point sur dans la plupart des circonstances S lectionnez uniquement pour les gros plans La mise au point est r glable en cours d enregistrement Pendant l enregistrement vous pouvez appuyer sur le bout...

Страница 193: ...de m trage pour les conditions globales Mode Moyenne En mode Moyenne la cam ra mesure les conditions d clairage dans la zone encadr e Mode Centre En mode centre la cam ra mesure les conditions d clair...

Страница 194: ...Comment prendre une image fixe 1 Placez la Molette de Mode sur le mode Appareil photo num rique Le panneau LCD affiche l cran ci dessous Panneau LCD Autonomie piles Etat du retardateur Etat du flash N...

Страница 195: ...pour faire basculer le mode flash dans l ordre suivant Arr t g Auto g Arr t Arr t Le flash est d activ Auto Le flash est d clench automatiquement lorsque la lumi re est Avant de prendre une photo vous...

Страница 196: ...Enregistrer D clencheur pour lancer l enregistrement 3 Appuyez sur le bouton Enregistrer D clencheur pour arr ter l enregistrement 19 Panneau LCD 10 00 00 10 Autonomie piles Temps d enregistrement No...

Страница 197: ...est automatiquement lu 20 Affichage en plein cran 3 Si vous voulez visualiser les autres fichiers enregistr s dans la cam ra vous pouvez utiliser les boutons Droite et Gauche pour passer d un fichier...

Страница 198: ...aliser le fichier Il existe trois types de fichiers que vous pouvez identifier gr ce aux ic nes plac es sur les diapos Images au format JPG Clips vid o au format ASF Clips audio au format WAV Pour le...

Страница 199: ...es boutons directionnels Pour d verrouiller le niveau de zoom appuyez de nouveau sur le bouton Enregistrer D clencheur 22 Afficher une image fixe 1 20 1 0X Plein cran cran v rouillige de zoom 1 20 2 0...

Страница 200: ...re un clip vid o ou audio Lire vos enregistrements suite Lire un clip vid o Lire un clip audio Lorsque vous lisez un clip vid o ou audio les boutons de fonction suivants sont disponibles Operations De...

Страница 201: ...orsque vous lisez un clip vid o ou passez en revue des images fixes vous pouvez appuyer sur l interrupteur d affichage LCD pour d sactiver l cran OSD et avoir ainsi une vue plus claire de votre cran A...

Страница 202: ...llumez votre t l viseur et faites le passer en mode AV Connectez les extr mit s audio et vid o du c ble AV sur votre t l viseur Ouvrez le capot des connecteurs de votre cam ra page 9 Allumez la cam ra...

Страница 203: ...t appuyer sur le bouton Menu OK ou bien vous pouvez appuyer sur le bouton Enregistrer D clencheur pour quitter rapidement le menu Dans plusieurs modes vous pouvez ouvrir le menu pour ajuster les r gla...

Страница 204: ...e bouton Menu OK 3 Un menu secondaire tel que celui reproduit sur la droite s affiche Appuyez sur le bouton Haut ou Bas pour s lectionner un r glage de r solution puis appuyez sur le bouton Menu OK po...

Страница 205: ...onn e appuyez sur le bouton Menu OK 3 Un menu secondaire tel que celui reproduit sur la droite s affiche Appuyez sur le bouton Haut ou Bas pour s lectionner une option et appuyez sur le bouton Menu OK...

Страница 206: ...fiche Appuyez sur le bouton Haut ou Bas pour s lectionner une option puis appuyez sur le bouton Menu OK pour appliquer Vous avez le choix entre les trois effets suivants Normal Cette option vous perme...

Страница 207: ...l que celui reproduit sur la droite s affiche Appuyez sur le bouton Haut ou Bas pour s lectionner une option et appuyez sur le bouton Menu OK pour appliquer Vous avez le choix entre trois options 2048...

Страница 208: ...aire tel que celui reproduit sur la droite s affiche Appuyez sur le bouton Haut ou Bas pour s lectionner Marche et appuyez sur le bouton Menu OK pour appliquer Une fois que le retardateur est activ l...

Страница 209: ...ppliquer Vous avez le choix entre cinq effets Auto La cam ra d termine le meilleur r glage d quilibre des blancs pour votre environnement de prise de vue Ensoleill convient pour une prise de vue l ext...

Страница 210: ...Exposition est s lectionn appuyez sur le bouton Menu OK R glage de la compensation d exposition 3 Un menu secondaire tel que celui reproduit sur la droite s affiche Appuyez sur le bouton Haut ou Bas p...

Страница 211: ...duit sur la droite s affiche Appuyez sur le bouton Haut ou Bas pour s lectionner une option puis appuyez sur le bouton Menu OK pour appliquer Vous avez le choix entre les trois effets suivants Normal...

Страница 212: ...photo num rique appuyez sur le bouton Menu OK 2 Un menu tel que celui reproduit sur la droite s affiche Appuyez sur le bouton Haut ou Bas pour s lectionner l option Timbre date Une fois l option Timb...

Страница 213: ...s lectionnez le menu secondaire correspondant s affiche Si vous s lectionnez Supprimer pour supprimer un fichier vous pouvez utiliser le bouton Gauche ou Droite pour faire d filer les fichiers dans l...

Страница 214: ...ns de fichier 3 Une page d informations sur le fichier sera ainsi affich e Il faut noter que l affichage r el donn d pendra du type de fichier Vous pouvez aussi appuyer sur le bouton Droite ou Gauche...

Страница 215: ...Menu OK Verrouiller les fichiers 3 Selon l option que vous avez s lectionn e vous verrez s afficher le menu secondaire correspondant Si vous s lectionnez Verrouiller ceci pour verrouiller un fichier...

Страница 216: ...l option Index Une fois l option Index s lectionn e appuyez sur la bouton Menu OK Trier les fichiers 3 Un menu secondaire tel que celui reproduit sur la droite s affiche Appuyez sur le bouton Haut ou...

Страница 217: ...y trouverez un disque amovible Dans le disque amovible vous trouverez un fichier MP3 Vous pouvez alors copier les fichiers MP3 d sir s dans ce dossier pour les lire 40 Pour les fichiers MP3 Avant de...

Страница 218: ...Panneau LCD Pistes courante totales M dia de stockage M moire interne Carte SD MMC Autonomie de la batterie Mode Icon Temps de lecture Lecture Pause Stop Operations Avancees Lire la musique MP3 suite...

Страница 219: ...le bouton Menu OK pour confirmer R p t Ceci Quitter Oui Non R p ter le fichier courant Operations Avancees Menu MP3 Vous pouvez utiliser les diff rentes fonctions offertes par le menu MP3 Vous remarq...

Страница 220: ...am liorer la qualit du son Pour activer l effet Enrichissement 3D 1 En mode MP3 appuyez sur le bouton Menu OK 43 3 Un menu secondaire tel que celui reproduit sur la droite s affiche Appuyez sur le bo...

Страница 221: ...ion Basses Une fois l option Basses s lectionn e appuyez sur le bouton Menu OK 3 Un menu secondaire tel que celui reproduit sur la droite s affiche Appuyez sur le bouton Haut ou Bas pour s lectionner...

Страница 222: ...3 Cette option vous permet de visualiser les informations de fichier MP3 Pour activer l effet Basses 1 En mode MP3 appuyez sur le bouton Menu OK 45 2 Un menu s affiche Appuyez sur le bouton Haut ou Ba...

Страница 223: ...le bouton Haut ou Bas pour faire d filer la page et s lectionner l option Supprimer Une fois l option Supprimer s lectionn e appuyez sur le bouton Menu OK 3 Un menu secondaire tel que celui reproduit...

Страница 224: ...produit sur la droite s affiche Appuyez sur le bouton Haut ou Bas pour s lectionner Oui puis appuyez sur le bouton Menu OK pour confirmer la s lection 4 Pour d verrouiller l tat appuyez sur n importe...

Страница 225: ...er la page correspondante R gler la date et l heure 1 En mode R glages utilisez les bouton Haut et Bas pour s lectionner l option Temps et appuyez sur le bouton Menu OK pour acc der au menu secondaire...

Страница 226: ...1 En mode R glages utilisez les boutons Haut et Bas pour s lectionner l option Scintillement et appuyez sur le bouton Menu OK pour acc der au menu secondaire 2 Utilisez les boutons Haut et Bas pour s...

Страница 227: ...s lectionner l option Langue et appuyez sur le bouton Menu OK pour acc der au menu secondaire 2 Utilisez les bouton Haut et Bas pour s lectionner la langue qui vous convient Une fois l option d sir e...

Страница 228: ...glages utilisez les boutons Haut et Bas pour s lectionner l option Formater puis appuyez sur le bouton Menu OK pour acc der au menu secondaire 2 Utilisez les boutons Haut et Bas pour s lectionner Oui...

Страница 229: ...ur le bouton Menu OK pour acc der au menu secondaire 2 Utilisez les boutons Haut et Bas pour s lectionner Oui puis appuyez sur le bouton Menu OK pour confirmer 52 D faut Quitter Oui S r La restauratio...

Страница 230: ...Copier Les Fichiers Sur Votre PC...

Страница 231: ...pplications en cours d ex cution sur votre ordinateur Si l cran de titre ne s affiche pas automatiquement veuillez double cliquer sur le Poste de travail et sur l unit CD ROM Puis allez dans le dossie...

Страница 232: ...u version ult rieure sont n cessaires pour pouvoir lire les clips vid o enregistr s par la cam ra 7 Une fois l installation termin e il se peut que vous deviez red marrer votre ordinateur pour que le...

Страница 233: ...de votre ordinateur veuillez suivre la proc dure ci dessous 1 Double cliquez sur sur le casier syst me 2 Cliquez sur Disque USB puis cliquez sur Stop 3 S lectionnez la cam ra dans l cran de confirmati...

Страница 234: ...es utilisateurs de Windows 2000 ME 98SE Double cliquez sur le Poste de travail My Computer Puis double cliquez sur l ic ne du disque amovible qui vient d appara tre Copier Les Fichiers Sur Votre PC Co...

Страница 235: ...ier DCIM 3 Double cliquez sur le dossier de fichiers 100MEDIA 4 Faites glisser le fichier voulu dans Mes documents My Documents ou dans le dossier de destination Copier Les Fichiers Sur Votre PC Copie...

Страница 236: ...e dossier qui contient vos fichiers Afficher lire les fichiers sur votre PC 2 Double cliquez sur le fichier d sir et le fichier est ouvert dans le programme qui lit ce type de fichiers 59 Copier Les F...

Страница 237: ...t dans votre ordinateur Dans ce disque vous pouvez trouver tous les fichiers stock s dans votre cam ra Voir la figure sur la droite pour voir o se trouvent les diff rents types de fichiers Vous remarq...

Страница 238: ...Utiliser le MoviePix M 330 Manager...

Страница 239: ...MoviePix M 330 Manager Remarque pour les utilisateurs de Windows ME Lorsque l cran suivant s affiche veuillez s lectionner Rechercher automatiquement le meilleur pilote puis cliquer sur Suivant pour...

Страница 240: ...licence dans le lecteur de CD ROM pour copier les fichiers n cessaires 4 Suivez les instructions l cran pour terminer l installation 63 Utiliser le MoviePix M 330 Manager Avant de lancer le programme...

Страница 241: ...iePix M 330 Manager 1 S lectionner le mode de fonctionnement Mode Disque Veuillez r gler la Molette de s lection de mode en position ou Dans ce mode vous pouvez g rer vos fichiers en utilisant le Movi...

Страница 242: ...vous pouvez directement effectuer un aper u sur les fichiers enregistr s sur l appareil photo num rique De plus vous pouvez choisir de copier de supprimer d envoyer un courrier lectronique ou de lire...

Страница 243: ...ique fonctionne comme un disque amovible vous pouvez t l charger directement les fichiers vers votre ordinateur 1 S lectionnez un fichier ou pressez le bouton pour s lectionner tout 2 Pressez le bouto...

Страница 244: ...per u Apr s avoir lanc le MoviePix M 330 Manager l cran suivant appara tra si l appareil photo num rique est r gl sur le mode En Direct Dans ce mode vous pouvez utiliser la fonction Cam ra PC Lancer A...

Страница 245: ...un film AVI Espace chromatique S lectionnez l une des fonctions suivantes en fonction de vos besoins RGB 24 Cette option permet d obtenir une meilleure qualit I420 Cette option permet d avoir des fic...

Страница 246: ...le pays dans lequel vous vous trouvez Configurer les options de scintillement 69 R glage vid o Filtre bande Si l cran de votre ordinateur scintille lorsque vous utilisez la fonction Cam ra PC agissez...

Страница 247: ...Signification Pr t en attente d une commande Occup stockage ou capture Pr t en attente d une commande Chargement du flash en cours Pr t en attente d une commande Tranmission de donn es en cours Retar...

Страница 248: ...48 96 192 384 768 30 60 120 240 480 20 40 80 160 320 Carte SD MMC 512Mo 640 960 1536 96 224 min 640x480 352x288 160x128 Le nombre r el de photos stock es peut d pendre selon un proportion de 30 de la...

Страница 249: ...tes Indicateur de l tat des piles Remarque Les tests ci dessous sont effectu s dans les conditions suivantes 1 Utilisation de piles alcalines 2 Temp rature 25 C 3 L cran LCD reste toujours allum Ic ne...

Страница 250: ...acc der aux donn es en m moire Veuillez formater le support pour r soudre ce probl me Le flash est en cours de chargement Le fichier en cours de lecture n est pas compatible avec la cam ra La cam ra e...

Страница 251: ...r Interface Economie d nergie Piles Dimensions LCD TFT couleur 1 5 4x temps r el F 3 5 8 5 mm 10 secondes USB 2 0 compatible USB 1 1 1 min 3 min 5 min mise hors tension auto en cas d inactivit pendant...

Страница 252: ...r la m moire interne 2 V rifiez si la cam ra n est pas en train de recharger le flash 3 Si vous utilisez une carte SD v rifiez que la carte n est pas verrouill e 4 Si l cran LCD affiche un message ERR...

Страница 253: ...ise de vue ou d enregistrement dispose d assez de lumi re Peut tre devez vous utiliser le flash lorsque vous prenez les photos Q8 Il y a des parasites lorsque j affiche les images sur l cran LCD ou su...

Страница 254: ...cher le c ble USB Q3 L cran du t l viseur n affiche rien une fois la cam ra branch e sur le t l viseur R 1 V rifiez si la cam ra est correctement connect e au t l viseur 2 Assurez vous que le syst me...

Страница 255: ...ttre jour votre syst me d exploitation ETAPE 1 T l charger le logiciel de mise jour du syst me d exploitation par Internet Veuillez aller l adresse suivante http v4 windowsupdate microsoft com en defa...

Страница 256: ...es un clic droit avec la souris un menu doit appara tre a Cliquez sur Propri t s Properties et un sous menu identique celui illustr ci dessous doit appara tre b Cliquez sur l onglet Pilote Driver Puis...

Страница 257: ...gue ci dessous cliquez sur Suivant Next pour continuer 4 Une fois que la bo te de dialogue ci dessous appara t a Cochez l l ment Rechercher un pilote appropri pour mon p riph rique Search for a suitab...

Страница 258: ...i dessous ne s lectionnez aucun des l ments puis cliquez sur Suivant Next pour continuer 6 Une fois que la bo te de dialogue ci dessous appara t a Cochez l l ment Installer l un des autres pilotes Ins...

Страница 259: ...S lectionnez le pilote USB adapt Dans cet exemple vous devez s lectionner le pilote USB 2 0 fourni par Microsoft pour remplacer le pilote original b Cliquez sur Suivant Next pour continuer 8 A l appar...

Страница 260: ...s Contr leur Universal Serial Bus Si l ancien pilote a t remplac par le nouveau pilote cela signifie que l installation s est termin e avec succ s 10 Une fois que vous aurez effectu toutes les tapes c...

Страница 261: ...vidence NEC PCI to USB Enhanced Host Controller B1 Contr leur d H te NEC PCI vers USB Etendu B1 dans cet exemple et faites un clic droit avec la souris un menu doit appara tre S lectionnez l option M...

Страница 262: ...n Ne pas effectuer la recherche Je choisirai le pilote installer Puis cliquez sur Suivant pour continuer 4 S lectionnez Standard Enhanced PCI to USB Host Controller Contr leur d H te PCI vers USB Eten...

Страница 263: ...USB 5 La proc dure d installation du pilote est termin e Cliquez sur Terminer pour continuer 6 Lancez le Gestionnaire de p riph riques et d ployez l arborescence Contr leur de Bus Assurez vous que le...

Страница 264: ...s de t l chargement sera long Si vous rencontrez les probl mes li s la longueur des dur es de t l chargement d un clip vid o nous vous sugg rons de 1 Copier les clips vid o sur votre ordinateur puis d...

Страница 265: ...Guida utente...

Страница 266: ...la fotocamera 4 Fare attenzione nell uso della fotocamera Non sottoporre il corpo della fotocamera a eccessiva pressione 5 Per garantire la sicurezza della persona non utilizzare la fotocamera durant...

Страница 267: ...ione di filmati 14 13 12 12 Accensione della fotocamera 12 Come registrare un filmato Impostazione della messa a fuoco Scelta della modalit di misurazione 16 15 14 Scattare foto 17 Come scattare una f...

Страница 268: ...golazione del bilanciamento del bianco Regolazione della compensazione dell esposizione Inserimento di effetti speciali nelle foto 34 33 32 Uso della funzione inserimento data 35 Riproduzione di MP3 4...

Страница 269: ...opzioni per le Propriet 69 68 Configurazione delle opzioni per la Frequenza 69 Addenda 70 Individuazione dei guasti 75 Tabella LED Tabella capacit della memoria Tabella impostazioni sistema TV Tabella...

Страница 270: ...rie Alloggiamento scheda di memoria Vano batterie Occhiello cinghietta 1 LED di stato Microfono Flash elettronico Interruttore messa a fuoco Obiettivo LED autoscatto Connettore A V out Connettore auri...

Страница 271: ...cabili NiMH per avere prestazioni migliori Inserimento delle batterie 1 Per aprire il vano batterie far scorrere il coperchio nella direzione indicata 2 Inserire le batterie nel vano Fare attenzione a...

Страница 272: ...mento La scheda SD dotata di un interruttore per la protezione da scrittura Quando l interruttore si trova nella posizione Blocco non possibile scrivere aggiungere dati alla scheda Per assicurare il c...

Страница 273: ...riore della fotocamera 3 Infilare l altra parte nell occhiello 2 che si trova nella parte anteriore della fotocamera Per iniziare Come fissare la cinghietta da polso opzionale 08 4 Unire e bloccare la...

Страница 274: ...figura Come tenere la fotocamera Inserire la mano all interno della cinghietta come mostrato e tenere saldamente la fotocamera Evitare di bloccare o coprire l obiettivo quando si scattano foto o duran...

Страница 275: ...ovimenti della fotocamera e per avere immagini di ottima qualit in particolare quando si scattano foto di autoritratti o per videoconferenze Stringere Allentare Come utilizzare il treppiedi opzionale...

Страница 276: ...Operazioni fondamentali...

Страница 277: ...on si accende verificare che 1 Nella fotocamera ci siano due batterie di tipo AA 2 Le batterie siano cariche a sufficienza 3 La polarit delle batterie sia corretta Spegnimento della fotocamera Per spe...

Страница 278: ...ilizzare i tasti Su o Gi per evidenziare la voce Lingua 3 Quando la voce Lingua evidenziata premere il tasto Menu OK per entrare nel sottomenu Nel sottomenu utilizzare i tasti Su o Gi per selezionare...

Страница 279: ...ore per iniziare a registrare Operazioni fondamentali Registrazione di filmati 14 Come registrare un filmato 1 0X 10 00 00 10 Supporto memoria Memoria interna Scheda SD MMC Autonomia batteria Durata r...

Страница 280: ...ore deve trovarsi su Selezionare solo per i primi piani La messa a fuoco pu essere regolata anche durante la ripresa Durante la registrazione possibile premere i tasti Su e Gi per zoomare in avanti o...

Страница 281: ...tocamera si trova in modalit Auto e il metodo di misurazione migliore sar selezionato automaticamente in relazione alle condizioni generali Modalit Media In modalit Media la fotocamera esegue la misur...

Страница 282: ...foto 1 Posizionare la Ghiera delle modalit su modalit Fotocamera digitale Sul display LCD apparir la schermata presentata sotto Display LCD Autonomia batteria Stato autoscatto Numero di registrazioni...

Страница 283: ...sto Destra per selezionare la modalit di misurazione Le modalit di misurazione cambiano nel seguente ordine Auto g Media g Centrale g Centrale basso g Auto Si veda pagina 16 per avere una descrizione...

Страница 284: ...il tasto Registra Otturatore per iniziare la registrazione 3 Premere di nuovo il tasto Registra Otturatore per interrompere la registrazione 19 Display LCD 10 00 00 10 Autonomia batteria Durata regis...

Страница 285: ...e registrato viene riprodotto automaticamente 20 Visualizzazione a tutto schermo 3 Per riprodurre gli altri file memorizzati nella fotocamera possibile utilizzare i tasti Destra e Sinistra per scorrer...

Страница 286: ...turatore o il tasto INDICE Le icone presenti nelle miniature consentono di identificare tre tipi di file JPG per immagini ASF per filmati WAV per i file audio Per avere informazioni dettagliate su com...

Страница 287: ...zione Per sbloccare il rapporto dello zoom premere di nuovo il tasto Registra Otturatore 22 Visualizzazione di una foto 1 20 1 0X A tutto schermo Schermat a con zoom bloccato 1 20 2 0X Operazioni fond...

Страница 288: ...le registrazioni segue Riproduzione di un filmato Regolazione del volume Quando si riproduce un filmato o un file audio sono disponibili i seguenti tasti funzione Operazioni fondamentali Riproduzione...

Страница 289: ...riproduzione di un filmato o di un immagine fissa possibile premere l interruttore del display LCD per disabilitare la visualizzazione del menu OSD in questo modo le immagini riprodotte nel display p...

Страница 290: ...tare la modalit AV Collegare le estremit audio e video del cavo AV al televisore Aprire il coperchio dei connettori sulla fotocamera pag 9 Accendere la fotocamera Collegare l altra estremit del cavo v...

Страница 291: ...oppure premere il tasto Registra Otturatore per uscire rapidamente dal menu In diverse modalit possibile richiamare i menu per poter mettere a punto le impostazioni della fotocamera agendo sui menu D...

Страница 292: ...e il tasto Menu OK 3 Verr visualizzato un sottomenu simile a quello riprodotto al lato Premere il tasto Su o Gi per selezionare un valore per la Risoluzione e premere il tasto Menu OK per applicare il...

Страница 293: ...il tasto Menu OK Menu della videocamera digitale segue Regolazione della compensazione dell esposizione Esposizione 0 3 0 0 0 3 0 6 MENU Uscita Risoluz Esposizione Effetto 0 0 Operazioni Avanzate Menu...

Страница 294: ...l tasto Su o Gi per selezionare una voce e premere il tasto Menu OK per applicare l effetto possibile scegliere uno dei tre effetti descritti di seguito Normale Questa opzione consente di registrare i...

Страница 295: ...l lato Premere il tasto Su o Gi per selezionare una voce e premere il tasto Menu OK per applicare il valore selezionato possibile scegliere uno dei tre valori di risoluzione descritti di seguito 2048X...

Страница 296: ...u simile a quello riprodotto al lato Premere il tasto Su o Gi per selezionare una voce e premere il tasto Menu OK per applicare l opzione selezionata Dopo aver attivato l autoscatto la fotocamera scat...

Страница 297: ...ta per scattare foto all aperto in presenza di nuvole o in ambienti in ombra Tungsteno adatta per scattare foto all interno con illuminazione incandescente o in ambienti con una temperatura bassa per...

Страница 298: ...aver evidenziato la voce Esposizione premere il tasto Menu OK Regolazione della compensazione dell esposizione 3 1 Verr visualizzato un sottomenu simile a quello riprodotto al lato Premere il tasto S...

Страница 299: ...o 3 Verr visualizzato un sottomenu simile a quello riprodotto al lato Premere il tasto Su o Gi per selezionare una voce e premere il tasto Menu OK per applicare l effetto possibile scegliere uno dei t...

Страница 300: ...emere il tasto Menu OK in modalit Fotocamera digitale 2 Verr visualizzato un menu simile a quello riprodotto al lato Premere il tasto Su o Gi per evidenziare la voce Inserimento data Dopo aver evidenz...

Страница 301: ...3 Verr visualizzato un sottomenu in funzione della voce selezionata Se si selezionata la voce Elimina con i tasti Destra o Sinistra possibile spostarsi all interno dei file presenti nel sottomenu Pre...

Страница 302: ...Menu OK Visualizzazione delle informazioni sul file 3 Verr visualizzata una pagina di informazioni sul file Si faccia attenzione che la pagina visualizzata in funzione del tipo di file Con i tasti De...

Страница 303: ...ato la voce desiderata premere il tasto Menu OK Blocco protezione file 3 Verr visualizzato un sottomenu in funzione della voce selezionata Se si selezionata la voce Blocca per bloccare proteggere un s...

Страница 304: ...a voce Indice Dopo aver evidenziato la voce Indice premere il tasto Menu OK Ordinamento dei file 3 Verr visualizzato un sottomenu simile a quello riprodotto al lato Le informazioni relative al file se...

Страница 305: ...o un disco rimovibile All interno del disco rimovibile presente una cartella MP3 I file MP3 vanno copiati in questa cartella 40 Per i file MP3 Prima di poter riprodurre MP3 con la fotocamera necessari...

Страница 306: ...ay LCD Traccia corrente totali Supporto memoria Memoria interna Scheda SD MMC Icona modalit Durata riproduzione Play Pausa Stop Operazioni Avanzate Riproduzione di MP3 segue Aumenta volume Diminuisci...

Страница 307: ...lay Per poter attivare la riproduzione continua degli MP3 1 Premere il tasto Menu OK in modalit MP3 42 3 Verr visualizzato un sottomenu in funzione della voce selezionata Premere il tasto Su o Gi per...

Страница 308: ...l audio Per attivare l ottimizzazione dell effetto 3D 1 Premere il tasto Menu OK in modalit MP3 43 3 Verr visualizzato un sottomenu simile a quello riprodotto al lato Con i tasti Su o Gi selezionare l...

Страница 309: ...Bassi premere il tasto Menu OK Verr visualizzato un menu simile a quello riprodotto al lato 3 Verr visualizzato un sottomenu simile a quello riprodotto al lato Con i tasti Su o Gi selezionare la voce...

Страница 310: ...li MP3 Per attivare la visualizzazione delle informazioni sugli MP3 1 Premere il tasto Menu OK in modalit Mp3 45 2 Verr visualizzato un menu simile a quello riprodotto al lato Premere il tasto Su o Gi...

Страница 311: ...prodotto al lato Premere il tasto Su o Gi per scorrere la pagina e evidenziare la voce Elimina Dopo aver evidenziato la voce Elimina premere il tasto Menu OK 3 Verr visualizzato un sottomenu simile a...

Страница 312: ...aver evidenziato la voce Blocco impostazioni premere il tasto Menu OK 3 Verr visualizzato un sottomenu simile a quello riprodotto al lato Premere il tasto Su o Gi per selezionare S e premere il tasto...

Страница 313: ...cata Impostazione di data e ora 1 In modalit Impostazioni utilizzare i tasti Su e Gi per evidenziare la voce Ora e premere il tasto Menu OK per accedere al sottomenu 2 Utilizzare i tasti Destra e Sini...

Страница 314: ...stazione della frequenza 1 In modalit Impostazioni utilizzare i tasti Su e Gi per evidenziare la voce Frequenza e premere il tasto Menu OK per accedere al sottomenu 2 Utilizzare i tasti Su e Gi per se...

Страница 315: ...Su e Gi per evidenziare la voce Lingua e premere il tasto Menu OK per accedere al sottomenu 2 Utilizzare i tasti Su e Gi per selezionare la lingua richiesta e premere il tasto Menu OK per confermare S...

Страница 316: ...Impostazioni utilizzare i tasti Su e Gi per evidenziare la voce Formattazione e premere il tasto Menu OK per accedere al sottomenu 2 Utilizzare i tasti Su e Gi per selezionare S e premere il tasto Me...

Страница 317: ...e premere il tasto Menu OK per accedere al sottomenu 2 Utilizzare i tasti Su e Gi per selezionare S e premere il tasto Menu OK per confermare 52 Predefinito Uscita Si Si certi Il ripristino delle impo...

Страница 318: ...Copia di file sul PC...

Страница 319: ...applicazioni in esecuzione sul PC Se la schermata del titolo non viene visualizzata automaticamente fare doppio clic sul Risorse del computer e poi sull unit CD Scorrere fino a visualizzare la cartel...

Страница 320: ...Windows Media Format 9 Series Runtime e Direct X 8 0 o superiore sono necessari per poter visualizzare i filmati registrati con la videocamera 7 Una volta completata l installazione potrebbe essere n...

Страница 321: ...ate di seguito 1 Fare doppio clic su nell are di notifica della barra delle applicazioni 2 Fare clic su Disco USB e poi fare clic su Stop 3 Selezionare la fotocamera quando viene visualizzata la scher...

Страница 322: ...fare clic su OK Per gli utenti di Windows 2000 ME 98SE Fare doppio clic su Risorse del computer My Computer e quindi fare doppio sulla nuova icona del disco rimovibile Copia di file sul PC Copia di f...

Страница 323: ...clic sulla cartella DCIM 3 Fare doppio clic sulla cartella 100MEDIA 4 Trascinare il file desiderato in Documenti My Documents oppure nella cartella di destinazione Copia di file sul PC Copia di file...

Страница 324: ...o nella cartella dove sono conservati i file Visualizzazione riproduzione di file su PC 2 Fare doppio clic sul file desiderato e il file verr aperto dal programma corrispondente 59 Copia di file sul P...

Страница 325: ...ibile Nel disco rimovibile possibile trovare tutti i file memorizzati nella fotocamera Si osservi la figura riportata sulla destra per vedere dove sono ubicati i diversi tipi di file I file MP3 devono...

Страница 326: ...Uso di MoviePix M 330 Manager...

Страница 327: ...tto Prima di avviare l applicazione Avviso per gli utenti di Windows ME Quando viene visualizzata la seguente schermata selezionare Cerca un driver migliore e fare clic su Avanti per continuare Instal...

Страница 328: ...di installazione di Windows 98SE per copiare i file necessari 4 Seguire le istruzioni presentate per completare l installazione 63 Uso di MoviePix M 330 Manager Prima di avviare l applicazione segue...

Страница 329: ...ogramma possibile utilizzare MoviePix M 330 Manager 1 Selezionare la modalit operativa Modalit disco Portare la Ghiera delle modalit su o Sar cos possibile gestire i file utilizzando MoviePix M 330 Ma...

Страница 330: ...lizzare automaticamente l anteprima dei file salvati nella fotocamera inoltre possibile scegliere di copiare eliminare inviare per posta elettronica o riprodurre le registrazioni effettuate Fare doppi...

Страница 331: ...la fotocamera funziona da disco rimovibile ed possibile scaricare i file direttamente nel computer 1 Selezionare un file o premere il tasto per selezionare tutti i file 2 Premere il tasto per copiare...

Страница 332: ...330 Manager Webcam Apri chiudi la finestra di anteprima Propriet Impostazioni Finestra d anteprima Dopo aver avviato MoviePix M 330 Manager se la fotocamera si trova in modalit Diretta verr visualizza...

Страница 333: ...filmato AVI Colore Selezionare una delle opzioni seguenti come desiderato RGB 24 consente di avere una qualit migliore I420 consente di avere filmati AVI pi compressi e di avere quindi tempi di elabo...

Страница 334: ...in cui ci si trova Configurazione delle opzioni per la Frequenza 69 Impostazioni video Filtro banding se lo schermo del computer sfarfalla quando si utilizza la funzione webcam modificare questa opzio...

Страница 335: ...osso Significato Pronto in attesa di un comando Occupato cmemorizzazione o cattura Pronto in attesa di un comando Flash in ricarica Pronto in attesa di un comando Elaborazione dati Autoscatto Autoscat...

Страница 336: ...160 320 Scheda SD MMC 512MB 640 960 1536 Il numero effettivo di immagini pu variare fino al 30 in funzione della risoluzione e della saturazione colore File audio Maximum Tabella impostazioni sistema...

Страница 337: ...ivato Indicatore autonomia della batteria Nota I testi sono stati eseguiti nelle condizioni specificate di seguito 1 Sono state utilizzate batterie alcaline 2 Temperatura 25 C 3 Display LCD sempre att...

Страница 338: ...occ Blocco Sblocco La fotocamera non riesce ad accedere ai dati memorizzati nella memoria interna Per risolvere questo problema formattare il supporto Il flash elettronico si sta ricaricando Il file c...

Страница 339: ...ico Batteria Dimensioni 1 5 TFT LCD a colori 4X in tempo reale F 3 5 8 5 mm 10 secondi USB 2 0 compatibile con USB 1 1 1 min 3 min 5min con spegnimento automatico se si supera il tempo predefinito di...

Страница 340: ...MMC o nella memoria interna 2 Verificare se la fotocamera sta ricaricando il flash 3 Se si sta utilizzando una scheda SD controllare che la scheda non sia protetta 4 Se sul display LCd appaiono i mes...

Страница 341: ...cattano le foto o si riprendono i filmati sia adeguatamente illuminato Altrimenti si pu utilizzare il flash elettronico quando si scattano le foto Q8 Quando si visualizzano le immagini sul display LCD...

Страница 342: ...inserire il cavo USB Q3 Sullo schermo TV non viene visualizzato niente dopo aver collegato la fotocamera alla TV A 1 Verificare di aver collegato correttamente la fotocamera alla TV 2 Verificare che i...

Страница 343: ...tamente attenersi alla seguente procedura per aggiornare il sistema operativo FASE 1 Scaricamento dell aggiornamento per il sistema operativo da Internet Andare all indirizzo http v4 windowsupdate mic...

Страница 344: ...2 0 Host Controller e fare clic col tasto destro del mouse apparir un menu a Fare clic su Propriet apparir un menu secondario come il seguente b Fare clic sulla scheda Driver Poi fare clic su tasto A...

Страница 345: ...SB 3 Quando appare la seguente finestra di dialogo fare clic su Avanti per continuare 4 Quando appare la seguente finestra di dialogo a Contrassegnare la voce Cerca un driver adatto alla periferica b...

Страница 346: ...do appare la seguente finestra di dialogo non selezionare alcuna voce e fare clic su Avanti per continuare 6 Quando appare la seguente finestra di dialogo a Contrassegnare la voce Installare un altro...

Страница 347: ...go a Selezionare il corretto driver USB In questo caso bisogna selezionare il driver USB 2 0 fornito da Microsoft per sostituire il driver originale b Fare clic su Avanti per continuare 8 Quando appar...

Страница 348: ...er USB Se il vecchio driver stato sostituito da quello nuovo significa che l installazione stata completata con successo 10 Dopo avere completato tutte le fasi di cui sopra collegare di nuovo la macch...

Страница 349: ...SB 2 Evidenziare il controller USB 2 0 NEC PCI to USB Enhanced Host Controller B1 in questo caso e fare doppio clic con il mouse verr visualizzato un menu Selezionare la voce Aggiorna driver verr quin...

Страница 350: ...i problemi USB 3 Selezionare la voce Non eseguire la ricerca Seleziono il driver da installare fare clic su Avanti per proseguire 4 Selezionare Standard Enhanced PCI to USB Host Controller e fare clic...

Страница 351: ...dei problemi USB 5 L installazione del driver stata completata Fare clic su Avanti per proseguire 6 Lanciare Gestione periferiche e espandere la cartella Controller USB Verificare che il driver USB 2...

Страница 352: ...ile pi tempo sar impiegato per caricare il file Se si riscontrano problemi relativi ai lunghi tempi di scaricamento delle sequenze video si raccomanda di 1 Copiare le sequenze video sul computer e poi...

Страница 353: ...Gu a del usuario Gu a del usuario Gu a del usuario...

Страница 354: ...irecta del sol Si lo hace podr a da arse la c mara 4 Utilice la c mara con cuidado Evite apretar con fuerza el cuerpo de la c mara 5 Por su propia seguridad evite utilizar la c mara cuando haya tormen...

Страница 355: ...aci n de un fragmento de v deo 14 13 12 12 Encendido de la c mara 12 C mo grabar un fragmento de v deo Configuraci n del enfoque Selecci n de los modos de medici ns 16 15 14 Hacer fotograf as 17 C mo...

Страница 356: ...lance de blanco Ajuste de la compensaci n de exposici n Aplicar efectos especiales a las fotograf as 34 33 32 Utilizaci n del sello de fecha 35 Reproducci n de m sica Mp3 40 Copia de archivos MP3 a la...

Страница 357: ...figuraci n de las opciones de parpadeo 69 Ap ndice 70 Especificaciones 75 Tabla de estado de LED Tabla de capacidad de almacenamiento Tabla de configuraci n del sistema de TV Tabla de duraci n de bate...

Страница 358: ...ento de bater a Ranura de tarjeta de memoria Compartimiento para la bater a Enganche de mu equera 1 LED de estado Micr fono Luz estrobosc pica para flash Bot n de enfoque Focus Objetivo LED de tempori...

Страница 359: ...lto rendimiento Instalaci n de las pilas 1 Deslice la cubierta del compartimiento de la bater a en la direcci n indicada 2 Coloque las pilas en el compartimiento Observe que los polos positivo y negat...

Страница 360: ...la ranura La tarjeta SD incluye un dispositivo de protecci n de escritura Cuando el dispositivo de protecci n de escritura se encuentra en la posici n no se podr escribir en la tarjeta Para asegurar q...

Страница 361: ...erior de la c mara 3 Pase la otra parte de la mu equera por el enganche 2 situado en la parte frontal de la c mara Primeros pasos Colocar la mu equera opcional 08 4 Apriete la mu equera como se indica...

Страница 362: ...inuaci n Sujeci n de la c mara Pase la mano por la mu equera y sujete la c mara firmemente como se muestra en la ilustraci n Al hacer fotograf as o grabar v deo evite bloquear el objetivo para obtener...

Страница 363: ...ar el movimiento de la c mara y asegurar una calidad ptima de la imagen especialmente al hacer autorretratos o durante videoconferencias Apretar Aflojar Utilizaci n del tr pode opcional Primeros pasos...

Страница 364: ...Operaciones b sicas...

Страница 365: ...de encendido compruebe que 1 Se han instalado dos pilas AA en la c mara 2 Las pilas est n cargadas 3 La orientaci n de los polos de las pilas instaladas es la correcta Apagado de la c mara Mantenga pu...

Страница 366: ...resaltar el elemento Idioma 3 Cuando se haya resaltado el elemento Idioma pulse el bot n Men Aceptar Menu OK para entrar en el submen En el submen utilice los botones Arriba Up o Abajo Down para selec...

Страница 367: ...iguiente pantalla Operaciones b sicas Grabaci n de un fragmento de v deo 14 C mo grabar un fragmento de v deo 1 0X 10 00 00 10 Medio de almacenamiento Memoria interna Tarjeta SD MMC Duraci n de las pi...

Страница 368: ...ionarse como para la mayor a de las condiciones de fotograf a Seleccione solamente para primeros planos El enfoque puede ajustarse durante la grabaci n Durante la grabaci n puede pulsar los botones Ar...

Страница 369: ...Auto g g g g Modo Auto sin indicador Cuando la c mara se encuentra en el modo Auto la c mara seleccionar autom ticamente la mejor medici n para las condiciones globales Modo Media En el modo Media la...

Страница 370: ...orizador Estado de flash N mero de grabaciones Nivel de zoom Resoluci n Icono de modo Medio de almacenamiento Memoria interna Tarjeta SD MMC Operaciones b sicas Hacer fotograf as 1 Coloque el Selector...

Страница 371: ...Right para seleccionar un modo de medici n El modo de medici n cambiar en el orden siguiente Auto g Media g central g Central bajo gAuto Para obtener una descripci n detallada de cada modo de medici n...

Страница 372: ...Disparador Record Shutter de nuevo para detener la grabaci n 2 Pulse el bot n Grabar Disparador Record Shutter para comenzar la grabaci n 19 Pantalla LCD 10 00 00 10 Duraci n de las pilas Tiempo de g...

Страница 373: ...oducir autom ticamente 2 Si desea visualizar otros archivos guardados en la c mara puede utilizar los botones Derecha Right e Izquierda Left para cambiar de archivo 20 Visualizaci n a pantalla complet...

Страница 374: ...xisten tres tipos de archivo que puede identificar por los iconos de las miniaturas im genes en formato JPG v deo en formato ASF fragmentos de sonido en formato WAV Para obtener una informaci n detall...

Страница 375: ...pulse de nuevo el bot n Grabar Disparador Record Shutter 22 Revisi n de fotograf as 1 20 1 0X Pant alla complet a Pant alla de fijaci n de zoom 1 20 2 0X Cuando est visualizando una imagen los botones...

Страница 376: ...oducci n de las grabaciones Continuaci n 1 20 00 00 56 Reproducci n de un fragmento de v deo 1 20 00 00 56 Ajuste del volumen Mientras reproduce un fragmento de v deo o sonido los botones de funci n d...

Страница 377: ...do reproduce un clip de v deo o revisa una imagen fija puede pulsar el interruptor de la pantalla LCD para desactivar la pantalla OSD de forma que obtendr una visualizaci n m s n tida para su pantalla...

Страница 378: ...os de su familia Encienda el aparato de TV y seleccione el modo AV Conecte los terminales de audio y video del cable AV al aparato de TV Abra la cubierta de la conexi n de la c mara p gina 9 Encienda...

Страница 379: ...y pulsar el bot n Men Aceptar Menu OK o bien puede pulsar el bot n Grabar Disparador Record Shutter para salir del men directamente En algunos modos puede llamar el men para afinar la configuraci n d...

Страница 380: ...n Men Aceptar Menu OK 3 Aparecer un men como el que se muestra a la derecha Pulse los botones Arriba Up o Abajo Down para resaltar el elemento Resoluci n Una vez se ha resaltado el elemento Resoluci n...

Страница 381: ...pulse el bot n Men Aceptar Menu OK 3 Aparecer un submen como el que se muestra a la derecha Pulse los botones Arriba Up o Abajo Down para seleccionar un elemento y a continuaci n pulse el bot n Men Ac...

Страница 382: ...Up o Abajo Down para resaltar un elemento y a continuaci n pulse el bot n Men Aceptar Menu OK para aplicar el valor Los tres efectos entre los que puede elegir son Normal Esta opci n le permite grabar...

Страница 383: ...mo el que se muestra a la derecha Pulse los botones Arriba Up o Abajo Down para seleccionar un elemento y a continuaci n pulse el bot n Men Aceptar Menu OK para aplicar el valor Los tres elementos ent...

Страница 384: ...parecer un submen como el que se muestra a la derecha Pulse los botones Arriba Up o Abajo Down para seleccionar Activado y pulse el bot n Men Aceptar Menu OK para aplicar la selecci n Tras activar el...

Страница 385: ...el bot n Men Aceptar Menu OK para aplicar la selecci n Existen cinco efectos entre los que poder elegir Auto La c mara determinar el mejor valor de balance de blanco para el entorno de fotograf a Sol...

Страница 386: ...vez se ha resaltado el elemento Exposici n pulse el bot n Men Aceptar Menu OK Ajuste de la compensaci n de exposici n 3 Aparecer un submen como el que se muestra a la derecha Pulse los botones Arriba...

Страница 387: ...s 3 Aparecer un submen como el que se muestra a la derecha Pulse los botones Arriba Up o Abajo Down para seleccionar un elemento y a continuaci n pulse el bot n Men Aceptar Menu OK para aplicar el val...

Страница 388: ...fotogr fica digital pulse el bot n Men Aceptar Menu OK 2 Aparecer un men como el que se muestra a la derecha Pulse los botones Arriba Up o Abajo Down para resaltar el elemento Sello de fecha Una vez...

Страница 389: ...elemento que seleccione aparecer el submen correspondiente Si selecciona Eliminar para eliminar un archivo puede utilizar el bot n Izquierda Left o Derecha Right para cambiar entre los archivos del s...

Страница 390: ...el bot n Men Aceptar Menu OK Visualizaci n de la informaci n de archivo 3 Entonces aparecer una p gina de informaci n del archive Observe que la pantalla que aparecer depender del tipo de archivo Tam...

Страница 391: ...esee pulse el bot n Men Aceptar Menu OK Bloqueo de archivos 3 Dependiendo del elemento que seleccione aparecer submen correspondiente Si selecciona Bloquear este para bloquear un archivo puede utiliza...

Страница 392: ...el elemento Indice Una vez se ha seleccionado el elemento Indice pulse el bot n Men Aceptar Menu OK Ordenado de archivos 3 Aparecer un submen como el que se muestra a la derecha Pulse los botones Arr...

Страница 393: ...tro de la unidad extra ble puede localizar una carpeta MP3 A continuaci n puede copiar los archivos MP3 que desee en esta carpeta para reproducirlos 40 Para archivos Mp3 Antes de poder reproducir m si...

Страница 394: ...recha 41 1 3 00 00 56 0001 track01 MP3 00 04 30 Pantalla LCD Pistas actuales totales Medio de almacenamiento Memoria interna Tarjeta SD MMC Icono de modo Tiempo de reproducci n Reproducir Pausa Detene...

Страница 395: ...Abajo Down para seleccionar el elemento Repetir Una vez seleccionado el elemento que desee pulse el bot n Men Aceptar Menu OK 3 Aparecer un submen como el que se muestra a la derecha Pulse los botones...

Страница 396: ...cionar el elemento Mejora 3D Una vez seleccionado el elemento que desee pulse el bot n Men Aceptar Menu OK 3 Aparecer un submen como el que se muestra a la derecha Pulse los botones Arriba Up o Abajo...

Страница 397: ...Graves Una vez se ha seleccionado el elemento Graves pulse el bot n Men Aceptar Menu OK 3 Aparecer un submen como el que se muestra a la derecha Pulse los botones Arriba Up o Abajo Down para seleccion...

Страница 398: ...informaci n del archivo MP3 Para activar el efecto de graves 1 Mientras se encuentra en el modo MP3 pulse el bot n Men Aceptar Menu OK 45 2 Aparecer un men Pulse los botones Arriba Up o Abajo Down par...

Страница 399: ...iba Up o Abajo Down para desplazar la p gina y resaltar el elemento Eliminar Una vez se ha seleccionado el elemento Eliminar pulse el bot n Men Aceptar Menu OK 3 Aparecer un submen como el que se mues...

Страница 400: ...elemento Fijar pulse el bot n Men Aceptar Menu OK 3 Aparecer un submen como el que se muestra a la derecha Pulse el bot n Arriba Up o Abajo Down para seleccionar S y a continuaci n pulse el bot n Men...

Страница 401: ...e la fecha y la hora 1 Mientras est en el modo Configuraci n pulse los botones Arriba Up y Abajo Down para resaltar el elemento Hora y a continuaci n pulse el bot n Men Aceptar Menu OK para entrar en...

Страница 402: ...Configuraci n del parpadeo 1 Mientras est en el modo Configuraci n pulse los botones Arriba Up y Abajo Down para resaltar el elemento Parpadeo y a continuaci n pulse el bot n Men Aceptar Menu OK para...

Страница 403: ...nfiguraci n pulse los botones Arriba Up y Abajo Down para resaltar el elemento Idioma y a continuaci n pulse el bot n Men Aceptar Menu OK para entrar en el submen 2 Utilice los botones Arriba Up y Aba...

Страница 404: ...teo de medio 1 Mientras est en el modo Configuraci n pulse los botones Arriba Up y Abajo Down para resaltar el elemento Formatear y a continuaci n pulse el bot n Men Aceptar Menu OK para entrar en el...

Страница 405: ...ontinuaci n pulse el bot n Men Aceptar Menu OK para entrar en el submen 2 Utilice los botones Arriba Up y Abajo Down para seleccionar S y a continuaci n pulse el bot n Men Aceptar Menu OK para confirm...

Страница 406: ...Copia de archivos al PC...

Страница 407: ...plicaciones que se est n ejecutando en el equipo Si la pantalla del CD no aparece autom ticamente haga doble clic en Mi PC y a continuaci n en la unidad de CD ROM A continuaci n busque la carpeta Movi...

Страница 408: ...tenga instalados los Codecs de Windows Media Player Windows Media Format 9 Series Runtime y Direct x 8 0 7 Tras completar la instalaci n puede ser necesario que reinicie el equipo para que se aplique...

Страница 409: ...equipo siga estos pasos 1 Haga doble clic en la bandeja de sistema 2 Haga clic en Disco USB y a continuaci n haga clic en Detener Stop 3 Seleccione la c mara cuando aparezca la pantalla de confirmaci...

Страница 410: ...Aceptar Para usuarios de Windows 2000 ME 98SE Haga doble clic en Mi PC A continuaci n haga doble clic en el icono de la unidad extra ble que acaba de aparecer Copia de archivos al PC Copia de archivos...

Страница 411: ...clic en la carpeta archivos DCIM 3 Haga doble clic en la carpeta archivos 100MEDIA 4 Arrastre el archivo de destino en Mis documentos o la carpeta de destino Copia de archivos al PC Copia de archivos...

Страница 412: ...en la que guarde sus archivos Visualizaci n Reproducci n de archivos en el PC 2 Haga doble clic en el archivo que desee y ste se abrir en el programa apropiado para el tipo de archivo 59 Copia de arc...

Страница 413: ...po aparecer una unidad extra ble en el PC En esta unidad podr encontrar los archivos guardados en la c mara Consulte la figura de la derecha para ver d nde se ubican los diferentes tipos de archivo Ob...

Страница 414: ...Uso del Administrador MoviePix M 330...

Страница 415: ...del Administrador MoviePix M 330 Antes de comenzar la aplicaci n Aviso para los usuarios de Windows ME Cuando aparezca la pantalla siguiente seleccione Buscar autom ticamente un controlador mejor Aut...

Страница 416: ...de 98SE con licencia en la unidad de CD ROM para copiar los archivos necesarios 4 Siga las instrucciones de la pantalla para completar la instalaci n 63 Uso del Administrador MoviePix M 330 Antes de...

Страница 417: ...l programa usted puede comenzar a usar el Administrador MoviePix M 330 1 Seleccione el modo de operaci n Modo de disco Por favor fije el Dial de Modo a 0 En este modo usted puede administrar sus archi...

Страница 418: ...en Vivo En este modo usted puede hacer una vista preliminar de los archivos guardados en la c mara Adem s usted tambi n puede seleccionar copiar borrar enviar por correo o reproducir sus grabaciones...

Страница 419: ...emovible y usted puede descargar archivos directamente a su computadora 1 Seleccione un archivo o presione el bot n para seleccionar todos los archivos 2 Presione el bot n para copiar los archivos sel...

Страница 420: ...mara de PC Iniciar Detener la ventana de vista previa Propiedades Configuraci n Ventana de Vista preliminar Despu s de iniciar el Administrador MoviePix M 330 se mostrar la siguiente pantalla si la c...

Страница 421: ...cula AVI Espacio de color Seleccione una de las funciones siguientes que se adecue a sus necesidades RGB 24 Este elemento ofrece la mejor calidad I420 Este elemento indica que la pel cula AVI estar m...

Страница 422: ...entre Configuraci n de las opciones de parpadeo 69 Configuraci n de v deo Filtro de banda Si la pantalla del PC parpadea al utilizar la funci n de c mara de PC cambie esta configuraci n para evitar el...

Страница 423: ...de Rojo Verde Rojo Significado Preparado esperando rdenes Ocupado guardando datos o capturando Preparado esperando rdenes Cargando el flash Preparado esperando rdenes Transformaci n de datos Temporiza...

Страница 424: ...B 640 960 1536 Todas las resoluciones 1 El n mero real de im genes guardadas puede variar hasta 30 dependiendo de la resoluci n y la saturaci n de color Clip de sonido M ximo Tabla de configuraci n de...

Страница 425: ...inua min 1 Intervalo entre fotograf as 30 segundos 2 La luz del flash se utiliza para todas las im genes 1 Intervalo entre fotograf as 4 segundos 2 La luz del flash est desactivada Estado del indicado...

Страница 426: ...Desbloqueando La c mara no puede acceder a los datos de la memoria interna Formatee el medio para solucionar este problema El flash se est cargando El archivo que est intentando reproducir no es comp...

Страница 427: ...rizador Interfaz Ahorro de energ a Pilas Dimensiones LCD TFT color de 1 5 4X tiempo real F 3 5 8 5mm 10 segundos USB 2 0 compatible con USB 1 1 1min 3min 5min desconexi n autom tica si permanece inact...

Страница 428: ...ria interna 2 Compruebe si la c mara est cargando el flash 3 Si est utilizando una tarjeta SD compruebe si la carpeta est Protegida 4 Si la pantalla LCD muestra el mensaje ERROR DE MEMORIA o ERROR DE...

Страница 429: ...e luz O deber a considerar utilizar el flash para capturar las im genes P8 Al ver las im genes en la pantalla LCD o el PC aparecen ruidos R Compruebe si la configuraci n de parpadeo es la misma que la...

Страница 430: ...tar el cable USB P3 Tras conectar la c mara a la TV en la pantalla no aparece nada R 1 Compruebe si la c mara est correctamente instalada en la TV 2 Aseg rese de que el sistema de TV est configurado c...

Страница 431: ...ara actualizar su sistema operativo PASO 1 Descargue el software de Actualizaci n del Sistema Operativo en Internet Por favor vaya a http v4 windowsupdate microsoft com en default asp para descargar e...

Страница 432: ...or Central Billionton USB 2 0 en este caso y haga clic con el bot n derecho del rat n se debe mostrar un men a Haga clic en Propiedades y deber aparecer un men como el siguiente B Haga clic en la pest...

Страница 433: ...aparezca la siguiente ventana de di logo haga clic en Siguiente para continuar 4 Cuando aparezca la siguiente ventana de di logo a Marque el elemento Buscar un controlador adecuado para mi dispositiv...

Страница 434: ...guiente ventana de di logo no seleccione ninguno de los elementos y haga clic en Siguiente para continuar 6 Cuando aparezca la siguiente ventana de di logo a Marque el elemento Instalar uno de los otr...

Страница 435: ...l controlador de USB adecuado En este caso usted debe seleccionar el controlador USB 2 0 proporcionado por Microsoft para reemplazar el controlador original b Haga clic en Siguiente para continuar 8 C...

Страница 436: ...de Bus Universal en Serie Si el controlador anterior ha sido reemplazado por el nuevo la instalaci n se ha realizado exitosamente 10 Despu s de haber llevado a cabo todos los pasos anteriores vuelva a...

Страница 437: ...Serie 2 Seleccione el controlador USB 2 0 en este caso NEC PCI a Controlador Central Mejorado USB B1 y haga clic con el bot n derecho del rat n aparecer un men Seleccione el elemento Actualizar Contr...

Страница 438: ...s del USB 3 Marque el elemento No buscar Seleccionar el controlador para instalar Despu s haga clic en Siguiente para continuar 4 Seleccione PCI Mejorado Est ndar a Controlador Central USB y haga clic...

Страница 439: ...oceso de instalaci n del controlador est completo Haga clic en Terminar para continuar 6 Abra el Administrador de Dispositivos y entre a la parte de controladores de Bus Universal en Serie Aseg rese q...

Страница 440: ...ivo m s se tardar en cargar el archivo Si tiene problemas relacionados con la carga prolongada de clips de v deo le recomendamos 1 Copie los clips de v deo a su computadora y luego v alos en su comput...

Страница 441: ...Handleiding...

Страница 442: ...irect zonlicht U kunt er de camera mee beschadigen 4 Gebruik de camera zorgvuldig Druk niet hard op de behuizing van de camera 5 Gebruik voor uw eigen veiligheid de camera niet tijdens een storm of on...

Страница 443: ...a uitzetten De taal kiezen Een videofilmpje opnemen 14 13 12 12 De camera aanzetten 12 Een videofilmpje opnemen Afstandinstelling Lichtmeting instellen 16 15 14 Een momentopname maken 17 Een momentopn...

Страница 444: ...37 36 Bestanden sorteren 39 De witbalans instellen De belichtingscompensatie instellen Speciale effecten op momentopnamen toepassen 34 33 32 Het datumstempel gebruiken 35 MP3 muziek afspelen 40 MP3 be...

Страница 445: ...es voor de bestandsopmaak opgeven Eigenschappen configureren 69 68 Flikkeropties configureren 69 Addenda 70 Addendum voor USB Probleemoplossing 78 Tabel van de leds Opslagcapaciteit Televisiesystemen...

Страница 446: ...atterijdeksel Gleuf voor geheugenkaart Batterijvak Oogje voor polsriem 1 Indicatielampje Microfoon Flitser Focusschakelaar Lens Lampje van zelfontspanner AV uitgang Hoofdtelefoonaansluiting Usb aanslu...

Страница 447: ...erijen of NiMH accu s worden aanbevolen voor de beste prestaties De batterijen plaatsen 1 Open het batterijvak door het deksel in de aangegeven richting te schuiven 2 Leg de batterijen in het vak Let...

Страница 448: ...es in Daarna kunt u hem uit de gleuf trekken Een SD kaart heeft een schakelaar om hem tegen beschrijven te beschermen Staat deze schakelaar in de stand Sluiten dan kan de kaart niet beschreven worden...

Страница 449: ...e van de camera 3 Trek het andere deel van het riempje door het oogje 2 aan de voorzijde van de camera Allereerst Het polsriempje monteren eventueel 08 4 Maak het riempje aan elkaar vast zoals hier is...

Страница 450: ...pen het deksel voorzichtig in de getoonde richting De camera vasthouden Doe uw hand door de polsriem en houd de camera vast zoals getoond Pas op dat u bij het maken van opnamen geen vingers voor de le...

Страница 451: ...en van de camera te vermijden en een optimale beeldkwaliteit te garanderen bijvoorbeeld bij het maken van een zelfportret of bij een videoconferentie Vast Los Een statief gebruiken eventueel Allereers...

Страница 452: ...Bediening...

Страница 453: ...volgende 1 Er bevinden zich twee AA batterijen in de camera 2 De batterijen hebben nog voldoende vermogen 3 De batterijen zijn met de juiste polariteit gemonteerd De camera uitzetten Houd de aan uitk...

Страница 454: ...oppen Omhoog en Omlaag om de taalinstelling te kiezen 3 Druk nu op de knop Menu OK om naar het submenu te gaan Gebruik in het submenu de knoppen Omhoog en Omlaag om de taal te kiezen en druk tenslotte...

Страница 455: ...knop Opname sluiter om de opname te starten Bediening Een videofilmpje opnemen 14 Een videofilmpje opnemen Opslagmedium Intern geheugen SD MMC kaart Toestand van batterij Opnametijd Aantal opnamen 1 0...

Страница 456: ...Focusschakelaar Normaliter stelt u de afstand in op Voor close ups gebruikt u De afstand kan tijdens de opname versteld worden Tijdens de opname drukt u op Omhoog of Omlaag om in of uit te zoomen 15...

Страница 457: ...dden g Midden onder Auto Auto Mode Average Mode Center Mode Center low Mode Auto geen indicator staat de camera in de stand Auto dan wordt de beste meetmethode gekozen voor de geldende condities Gemid...

Страница 458: ...ntopname maken 1 Zet het moduswieltje in de stand Digitale momentopname Het lcd scherm toont het onderstaande beeld Lcd scherm Toestand van batterij Toestand van zelfontspanner Toestand van flitser Aa...

Страница 459: ...chtmeting instellen De wijze van meten als volgt veranderd Auto g Gemiddeld g Midden g Midden onder g Auto Een gedetailleerde beschrijving hiervan vindt u op pagina 16 De flitser gebruiken Lichtmeting...

Страница 460: ...de beeld 2 Druk op de knop Opname Sluiter om de opname te starten 3 Druk opnieuw op de knop Opname Sluiter om de opname te stoppen 19 Lcd scherm 10 00 00 10 Toestand van batterij Opnametijd Aantal opn...

Страница 461: ...aatste opname automatisch afgespeeld 20 Weergave op volledig scherm 3 Wilt u een andere opname bekijken druk dan op de knoppen Rechts of Links om een keuze te maken Lcd scherm Opslagmedium Intern gehe...

Страница 462: ...ijn drie bestandstypes herkenbaar aan de pictogrammen op de miniafbeeldingen JPG afbeelding ASF filmpje WAV geluidsopname Details over het bekijken van een momentopname vindt u op pagina 22 Details ov...

Страница 463: ...Pijltjesknoppen Om de zoomverhouding weer vrij te geven drukt u opnieuw op Opname Sluiter 22 Een momentopname bekijken 1 20 1 0X Volledig scherm Vastgezette zoomverhouding 1 20 2 0X Bediening Opnamen...

Страница 464: ...g Een filmpje afspelen De geluidssterkte veranderen Tijdens het afspelen van een filmpje of geluidsopname staan de volgende knoppen tot uw beschikking Bediening Opnamen terugspelen vervolg Geluidsster...

Страница 465: ...agment afspeelt of een foto weergeeft kunt u op de schakelaar voor het LCD scherm drukken om de OSD weergave op het scherm uit te schakelen zodat u een duidelijker beeld krijgt van uw video of foto Dr...

Страница 466: ...ekijken Zet de televisie aan en schakel hem in AV Sluit de audio en videostekkers van de AV kabel op de televisie aan Open het deksel van de aansluitingen pagina 9 Schakel de camera in Sluit het ander...

Страница 467: ...erm be indigen door het object Afsluiten te selecteren en op Menu OK te drukken of door op de knop Opname Sluiter te drukken In diverse modi kunt u het menu oproepen om de instellingen van de camera t...

Страница 468: ...Het hiernaast getoonde submenu verschijnt Druk op de knoppen Omhoog of Omlaag om de gewenste resolutie te selecteren Bevestig de keuze met de knop Menu OK U kunt kiezen uit 640 x 480 beste resolutie...

Страница 469: ...3 Het hiernaast getoonde submenu verschijnt Druk op de knoppen Omhoog of Omlaag om de gewenste waarde te selecteren Bevestig de keuze met de knop Menu OK U kunt een waarde instellen tussen 1 5 en 1 5...

Страница 470: ...Omlaag om de gewenste waarde te selecteren Bevestig de keuze met de knop Menu OK U kunt kiezen uit de volgende effecten Normaal hiermee maakt u een opname in de natuurlijke kleur Het is ook de standa...

Страница 471: ...nt Druk op de knoppen Omhoog of Omlaag om de gewenste resolutie te selecteren Bevestig de keuze met de knop Menu OK U kunt kiezen uit 2048 x 1536 hiervoor is het meeste geheugen nodig Deze resolutie i...

Страница 472: ...t getoonde submenu verschijnt Druk op de knoppen Omhoog of Omlaag om Aan te selecteren Bevestig de keuze met de knop Menu OK Nu de zelfontspanner ingeschakeld is duurt het tien seconden na het drukken...

Страница 473: ...uze met de knop Menu OK U kunt kiezen uit vijf effecten Auto de camera bepaalt zelf wat de beste witbalans is Zonnig geschikt voor opnamen buitenshuis bij zonnig weer Bewolkt geschikt voor opnamen bij...

Страница 474: ...n Bevestig de selectie met de knop Menu OK De belichtingscompensatie instellen 3 Het hiernaast getoonde submenu verschijnt Druk op de knoppen Omhoog of Omlaag om de gewenste waarde te selecteren Beves...

Страница 475: ...toepassen 3 Het hiernaast getoonde submenu verschijnt Druk op de knoppen Omhoog of Omlaag om de gewenste waarde te selecteren Bevestig de keuze met de knop Menu OK U kunt kiezen uit de volgende effec...

Страница 476: ...Digitale videocamcorder op de knop Menu OK 2 Het hiernaast getoonde menu verschijnt Druk op de knoppen Omhoog of Omlaag om Datumstempel te selecteren Bevestig de selectie met de knop Menu OK Het datu...

Страница 477: ...ijk van uw selectie verschijnt het hiernaast getoonde submenu Hebt u Verwijderen gekozen om slechts een bestand te verwijderen dan kunt u met Links en Rechts een bestand in het submenu opzoeken Druk o...

Страница 478: ...standen 3 Een infopagina van het bestand zal vervolgens worden weergegeven Merk op dat de eigenlijke weergave afhankelijk is van het bestandstype Met de knoppen Rechts en Links kunt u een bestand opzo...

Страница 479: ...selectie met de knop Menu OK Bestanden beveiligen 3 Afhankelijk van uw keuze verschijnt het hiernaast getoonde submenu Hebt u gekozen een enkel bestand te beveiligen dan kunt met de knoppen Links en...

Страница 480: ...Omlaag om Index te selecteren Bevestig de selectie met de knop Menu OK Bestanden sorteren 3 Het hiernaast getoonde submenu verschijnt Druk op de knoppen Omhoog of Omlaag om een bestandstype te selecte...

Страница 481: ...Verwisselbare schijf aantreft Hierin kunt u de MP3 map vinden Kopieer de gewenste bestanden naar de map om ze af te spelen 40 voor MP3 bestanden Voorat u MP3 muziek kunt afspelen moet u MP3 bestanden...

Страница 482: ...spoor totaal aantal sporen Opslagmedium Intern geheugen SD MMC kaart Moduspictogram Speeltijd Afspelen Pauze Stop Geavanceerde toepassingen MP3 muziek afspelen vervolg Geluidssterkte harder Geluidsst...

Страница 483: ...Omhoog of Omlaag om Herhalen te selecteren Bevestig de selectie met de knop Menu OK 3 Het hiernaast getoonde submenu verschijnt Druk op de knoppen Omhoog of Omlaag om Ja te selecteren en bevestig de...

Страница 484: ...t Druk op de knoppen Omhoog of Omlaag om 3D effect te selecteren Bevestig de selectie met de knop Menu OK 3 Het hiernaast getoonde submenu verschijnt Kies met de knoppen Op en Neer het gewenste effect...

Страница 485: ...chijnt Druk op de knoppen Omhoog of Omlaag om Bas te selecteren Bevestig de selectie met de knop Menu OK 3 Het hiernaast getoonde submenu verschijnt Kies met de knoppen Op en Neer het gewenste effect...

Страница 486: ...kunt u gegevens zien van de MP3 bestanden MP3 gegevens bekijken 1 Druk in de modus MP3 op de knop Menu OK 45 2 Het hiernaast getoonde menu verschijnt Druk op de knoppen Omhoog of Omlaag om Info te se...

Страница 487: ...Het hiernaast getoonde menu verschijnt Druk op de knoppen Omhoog of Omlaag om Verwijderen te selecteren Bevestig de selectie met de knop Menu OK 3 Het hiernaast getoonde submenu verschijnt Druk op Omh...

Страница 488: ...ecteren Bevestig de selectie met de knop Menu OK 3 Het hiernaast getoonde submenu verschijnt Druk op de knoppen Omhoog of Omlaag om Ja te selecteren en bevestig de keuze met Menu OK Beveiligen Afsluit...

Страница 489: ...datum en de tijd instellen 1 Gebruik in het menu Instellingen de knoppen Op en Neer om Tijd te kiezen Druk daarna op Menu OK om naar het submenu te gaan 2 Gebruik de knoppen Rechts en Links om een on...

Страница 490: ...uk dan op Menu OK om uw keuze te bevestigen De flikkerwaarde instellen 1 Gebruik in het menu Instellingen de knoppen Op en Neer om Flikker te kiezen Druk daarna op Menu OK om naar het submenu te gaan...

Страница 491: ...ellen 1 Gebruik in het menu Instellingen de knoppen Op en Neer om Taal te kiezen Druk daarna op Menu OK om naar het submenu te gaan 2 Gebruik de knoppen Op en Neer om de juiste waarde te kiezen Is de...

Страница 492: ...eren 1 Gebruik in het menu Instellingen de knoppen Op en Neer m Format te kiezen Druk daarna op Menu OK om naar het submenu te gaan 2 Gebruik de knoppen Op en Neer om Ja te kiezen Druk vervolgens op M...

Страница 493: ...aarna op Menu OK om naar het submenu te gaan 2 Gebruik de knoppen Op en Neer om Ja te kiezen Druk vervolgens op Menu OK om uw keuze te bevestigen 52 Standaard Afsluiten Ja Zeker Door de standaardinste...

Страница 494: ...Bestanden naar de computer kopi ren...

Страница 495: ...luit alle toepassingen af die op de computer draaien Verschijnt het titelscherm niet automatisch dubbelklik dan op Deze computer en daarna op de cd lezer Zoek vervolgens de map MoviePix M 330 Driver e...

Страница 496: ...Runtime en Direct X 8 0 zijn noodzakelijk om de videofilms van de camera op het scherm te kunnen bekijken 7 Na de installatie moet de computer herstart worden voordat het stuurprogramma actief is 4 Is...

Страница 497: ...in de aansluiting past 56 Opmerking voor gebruikers van Windows 2000 XP Me Selecteert u de stand DISK en wilt u later de verbinding met de computer weer verbreken doe dan het volgende 1 Dubbelklik in...

Страница 498: ...rs van Windows 2000 Me 98SE Dubbelklik op Deze computer Dubbelklik vervolgens op het pictogram van de Verwisselbare schijf Bestanden naar de computer kopi ren Bestanden naar de computer kopi ren Sommi...

Страница 499: ...8 2 Dubbelklik op de map DCIM 3 Dubbelklik op de map 100MEDIA 4 Sleep het gewenste bestand naar Mijn documenten of een andere map Bestanden naar de computer kopi ren Bestanden naar de computer kopi re...

Страница 500: ...standen zich Bestanden op de computer bekijken en afspelen 2 Dubbelklik op het gewenste bestand en het wordt geopend door het programma dat geassocieerd is met het bestandstype 59 Bestanden naar de co...

Страница 501: ...chijnt er een Verwisselbare schijf in uw computer U vindt daarin alle bestanden die zich in de camera bevinden In de afbeelding rechts ziet u waar de verschillende bestanden zich bevinden De MP3 besta...

Страница 502: ...MoviePix M 330 Manager gebruiken...

Страница 503: ...r de installatie MoviePix M 330 Manager installeren Voordat u de toepassing start 1 Stel de Keuzeschakelaar in op Live modus Opmerking voor gebruikers van Windows Me Verschijnt het hier getoonde venst...

Страница 504: ...stallatie wordt misschien gevraagd om de cd van Windows 98SE om benodigde bestanden te kunnen kopi ren 4 Volg de instructies op het scherm om de installatie te voltooien 63 MoviePix M 330 Manager gebr...

Страница 505: ...rogramma te starten U kunt nu MoviePix M 330 Manager gaan gebruiken 1 De gewenste stand kiezen Schijf Zet het moduswieltje in de stand of In deze stand kunt u uw bestanden beheren met de MoviePix M 33...

Страница 506: ...den bekijken die in de camera zijn opgeslagen U kunt ook uw opnamen kopi ren verwijderen per e mail verzenden en afspelen Dubbelklik hierop om het bestand af te spelen DV Disk DCIM 100MEDIA map voor o...

Страница 507: ...mera als een verwisselbare schijf en u kunt direct bestanden naar de computer kopi ren 1 Selecteer een bestand of druk op de knop om alle bestanden te selecteren 2 Druk op de knop om de geselecteerde...

Страница 508: ...Formatteren Voorbeschouwingsvenster starten stoppen Eigenschappen Instellingen Voorbeschouwingsvenster Nadat u MoviePix M 330 Manager gestart hebt verschijn het volgende scherm als de camera in de Li...

Страница 509: ...Kies afhankelijk van uw behoefte een van de volgende RGB 24 Voor een betere kwaliteit I420 Geeft aan dat de AVI film meer gecomprimeerd wordt voor een snellere verwerking Uitvoergrootte Geef de uitvo...

Страница 510: ...ren 69 Video instelling Bandfilter Flikkert het scherm van uw computer bij gebruik van de computercamera verander deze instelling dan Bandbreedte Hebt u bij gebruik van de computercamera hinder van ee...

Страница 511: ...ood Betekenis Gereed wacht op opdracht Bezig opslag opname Gereed wacht op opdracht Flitser wordt geladen Gereed wacht op opdracht Gegevenstransformatie Zelfontspanner Zelfontspanner led Rood gewoon B...

Страница 512: ...e videotest geldt voor alle resoluties Audio opname Maximum Televisiesystemen PAL NTSC Amerika T ai wan Japan Korea enz Duitsland Engeland Itali Nederland China Japan Hongkong enz Flashgeheugen 16MB S...

Страница 513: ...den 2 De flitser wordt niet gebruikt Statusindicator batterij Opmerking de volgende tests zijn uitgevoerd onder de volgende voorwaarden 1 Er worden alkaline batterijen gebruikt 2 Temperatuur 25 C 3 LC...

Страница 514: ...rmatteren File op slot Sluiten Openen De camera heeft geen toegang tot het interne geheugen Formatteer het medium om het probleem op te lossen De flitser wordt opgeladen Er bevindt zich een bestand in...

Страница 515: ...ebesparing Batterij Afmetingen 1 5 kleuren tft lcd 4 x real time F 3 5 8 5 mm 10 seconden Usb 2 0 compatibel met usb 1 1 Automatisch uitschakelen indien 1 3 of 5 minuten niet gebruikt AA x 2 alkaline...

Страница 516: ...De camera is bezig met het opladen van de flitser 3 Gebruikt u een SD kaart controleer dan of de schakelaar van de kaart in de stand Unlock staat 4 Staat er Geheugenfout of Kaartfout op het lcd scherm...

Страница 517: ...ing overeenkomt met de plaats waar u verblijft Lees voor meer informatie de tabel van flikkerinstellingen op pagina 68 V9 Ik kan geen MP3 afspelen en er komen vreemde tekens in de titel A Dit probleem...

Страница 518: ...om het stuurprogramma opnieuw te installeren 2 Installeer het stuurprogramma voordat u de usb kabel aansluit V3 Het televisiescherm toont geen beeld nadat de camera op de televisie is aangesloten A 1...

Страница 519: ...gssysteem bij te werken STAP 1 Download de Update software voor uw besturingssysteem vanaf het Internet Ga naar http v4 windowsupdate microsoft com en default asp om het meest recente updateprogramma...

Страница 520: ...onton USB 2 0 Host Controller Klik met de rechtermuisknop op het item om het snelmenu weer te geven a Klik op Eigenschappen en een submenu zoals in de onderstaande afbeelding wordt weergegeven b Klik...

Страница 521: ...het volgende dialoogvenster verschijnt klikt u op Volgende om door te gaan 4 Wanneer het volgende dialoogvenster verschijnt a Activeer de optie Zoeken naar een geschikt stuurprogramma voor dit appara...

Страница 522: ...dialoogvenster verschijnt selecteert u geen enkel item en klikt u op Volgende om door te gaan 6 Wanner het volgende dialoogvenster verschijnt a Activeer het selectievakje Installeer een van de andere...

Страница 523: ...cte USB stuurprogramma In dit geval moet u het USB 2 0 stuurprogramma selecteren dat voorzien is door Microsoft om het oorspronkelijke stuurprogramma te vervangen b Klik op Volgende om door te gaan 8...

Страница 524: ...USB controller Indien het oude stuurprogramma werd vervangen door het nieuwe dan is de installatie met succes voltooid 10 Nadat u alle bovenstaande stappen hebt uitgevoerd sluit u de camera opnieuw aa...

Страница 525: ...p USB controllers 2 Markeer de USB 2 0 controller in dit geval NEC PSI to USB Enhancement Host Controller B1 en klik met de rechterknop Er verschijnt een menu Selecteer Stuurprogramma bijwerken en u z...

Страница 526: ...bepaal zelf welk stuurprogramma ik wil installeren Klik op Volgende om verder te gaan 4 Selecteer Standard Enhanced PCI to USB Host Controller en klik op Volgende om verder te gaan 85 Addendum voor U...

Страница 527: ...SB Probleemoplossing 5 Het stuurprogramma is nu ge nstalleerd Klik op Voltooien om verder te gaan 6 Start het Apparaatbeheer en open de map USB controllers U ziet dat het stuurprogramma van USB 2 0 is...

Страница 528: ...t bestand afhankelijk zijn van de grootte van dit bestand Indien u problemen ondervindt omdat het laden van de videofragmenten te lang duurt raden wij u het volgende aan 1 Kopieer de videofragmenten n...

Страница 529: ...Manual do utilizador Manual do utilizador...

Страница 530: ...luz solar directa Isto pode danificar a c mara 4 Utilize a c mara cuidadosamente Evite exercer press o sobre o corpo da c mara 5 Para sua pr pria seguran a evite utilizar a c mara durante a ocorr ncia...

Страница 531: ...o de um clip de v deo 14 13 12 12 Ligar a c mara 12 Como gravar um clip de v deo Defini o da focagem Selec o dos modos de medi o 16 15 14 Captura de imagens fixas 17 Como capturar uma imagem fixa Uti...

Страница 532: ...iros 39 Regula o do balan o de brancos Regula o da compensa o da exposi o Aplica o de efeitos especiais em imagens fixas 34 33 32 Utiliza o do carimbo de data 35 Reprodu o de m sica MP3 40 Copiar fich...

Страница 533: ...es Flicker Cintila o 69 Adenda 70 Resolu o de problemas 75 Tabela de estados do LED Tabela de capacidade de armazenamento Tabela de defini es do sistema de TV Tabela de vida til das pilhas 72 71 71 7...

Страница 534: ...mento das pilhas Ranhura para o cart o de mem ria Compartimento das pilhas Gancho da correia 1 LED indicador de estado Microfone Flash Comutador de focagem Lente LED do temporizador Conector de sa da...

Страница 535: ...NiMH para um ptimo desempenho Coloca o das pilhas 1 Fa a deslizar a tampa do compartimento das pilhas na direc o indicada para abrir 2 Coloque as pilhas no compartimento Verifique se os p los positiv...

Страница 536: ...ncionamento da c mara deve definir o comutador de protec o contra escrita para a posi o Unlock desbloquear antes de introduzir o cart o de mem ria SD na ranhura N o retire o cart o de mem ria SD MMC e...

Страница 537: ...traseira da c mara 3 Fa a passar a outra parte pelo gancho 2 situado na parte frontal da c mara Primeiros passos Coloca o da correia opcional 08 4 Prenda a correia tal como indicado A desloca o da arg...

Страница 538: ...Como segurar a c mara Fa a passar a sua m o pela correia e segure na c mara firmemente tal como ilustrado Durante a captura de imagens fixas ou a grava o de clips de v deos evite bloquear a lente para...

Страница 539: ...mento da c mara e para assegurar uma ptima qualidade da imagem sobretudo durante a captura de auto retratos ou durante as sess es de videoconfer ncia Apertar Desapertar Utiliza o do trip opcional Prim...

Страница 540: ...Opera es B sicas...

Страница 541: ...ir o bot o de alimenta o verifique se 1 Foram colocadas duas pilhas AA na c mara 2 As pilhas t m pot ncia suficiente 3 Os p los das pilhas est o na posi o correcta Desligar a c mara Prima e mantenha p...

Страница 542: ...eccionar o item Language Idioma 3 Quando o item Language estiver seleccionado prima o bot o Menu OK para entrar no sub menu No sub menu utilize o bot o ascendente ou descendente para seleccionar o idi...

Страница 543: ...ava o Obturador para iniciar a grava o Opera es B sicas Grava o de um clip de v deo 14 Como gravar um clip de v deo Suporte de armazenamento mem ria interna cart o de mem ria SD MMC Vida til da pilha...

Страница 544: ...nida para para a maior parte das condi es de captura de imagens Seleccione apenas para grandes planos A focagem regul vel durante a grava o Durante a grava o pode premir o bot o ascendente ou descende...

Страница 545: ...em indicador Quando a c mara est no modo Auto esta selecciona automaticamente o melhor m todo de medi o tendo em conta as condi es gerais Modo Average Interm dio Quando a c mara est no modo Average es...

Страница 546: ...magem fixa 1 Rode o disco selector de modo para o modo Digital Still Camera C mara Digital Fixa O ecr LCD mostra a seguinte informa o Ecr LCD Vida til da pilha Estado do temporizador Estado do flash N...

Страница 547: ...seleccionar um modo de medi o Os modos de medi o s o apresentados pela ordem seguinte Auto g Average g Center g Center low g Auto Utiliza o do flash Selec o dos modos de medi o Antes de capturar uma i...

Страница 548: ...o 2 Prima o bot o Grava o Obturador para iniciar a grava o 3 Prima novamente o bot o Grava o Obturador para parar a grava o 19 Ecr LCD 10 00 00 10 Vida til da pilha Tempo de grava o N mero de grava e...

Страница 549: ...ro 3 Se quiser visualizar outros ficheiros armazenados na c mara pode utilizar os bot es direito e esquerdo para alternar entre ficheiros Ecr LCD Suporte de armazenamento mem ria interna cart o de mem...

Страница 550: ...tipos de ficheiros que pode identificar pelos cones apresentados nas miniaturas imagens em formato JPG clips de v deo em formato ASF clips de udio em formato WAV Para informa es mais detalhadas quanto...

Страница 551: ...ente o bot o Grava o Obturador 22 Revisualiza o de uma imagem fixa 1 20 1 0X Ecr inteiro Ecr de fixa o do zoom 1 20 2 0X Durante a visualiza o de uma imagem fixa os bot es de fun o dispon veis s o os...

Страница 552: ...du o do material gravado continua o 1 20 00 00 56 Reprodu o de um clip de v deo 1 20 00 00 56 Regula o do volume Durante a reprodu o de um clip de v deo ou udio os bot es de fun o dispon veis s o os s...

Страница 553: ...durante a visualiza o de uma imagem fixa pode premir o bot o do ecr LCD para desactivar a fun o OSD desta forma poder visualizar melhor o que pretende Prima novamente o mesmo bot o para activar a fun...

Страница 554: ...es Ligue o seu televisor e mude para o modo AV Ligue as extremidades udio e v deo do cabo AV ao seu televisor Abra a tampa do conector da c mara p gina 9 Ligue a c mara Ligue a outra extremidade do ca...

Страница 555: ...e premir o bot o Menu OK ou pode premir o bot o Grava o Obturador para sair rapidamente do menu Em v rios modos poss vel aceder ao menu para fazer uma sintoniza o fina das defini es da sua c mara atra...

Страница 556: ...onado prima o bot o Menu OK 3 Aparecer um sub menu tal como o ilustrado direita Prima o bot o ascendente ou descendente para seleccionar uma defini o de resolu o e de seguida prima o bot o Menu OK par...

Страница 557: ...ionado prima o bot o Menu OK 3 Aparecer um sub menu tal como o ilustrado direita Prima o bot o ascendente ou descendente para seleccionar um item e de seguida prima o bot o Menu OK para aplicar O valo...

Страница 558: ...o bot o ascendente ou descendente para seleccionar um item e de seguida prima o bot o Menu OK para aplicar Os tr s efeitos sua escolha s o Normal Esta op o permite lhe gravar um filme com uma cor natu...

Страница 559: ...ub menu tal como o ilustrado direita Prima o bot o ascendente ou descendente para seleccionar um item e de seguida prima o bot o Menu OK para aplicar Os tr s itens sua escolha s o 2048X1536 esta op o...

Страница 560: ...enu tal como o ilustrado direita Prima o bot o ascendente ou descendente para seleccionar On e de seguida prima o bot o Menu OK para aplicar Ap s activa o do temporizador a c mara define um per odo de...

Страница 561: ...tem cinco efeitos sua escolha Auto a c mara determina qual a melhor defini o de balan o de brancos tendo em conta as condi es ambientais Com sol adequado para captura de imagens no exterior com bastan...

Страница 562: ...ste item tiver sido seleccionado prima o bot o Menu OK Regula o da compensa o da exposi o 3 Aparecer um sub menu tal como o ilustrado direita Prima o bot o ascendente ou descendente para seleccionar u...

Страница 563: ...s fixas 3 Aparecer um sub menu tal como o ilustrado direita Prima o bot o ascendente ou descendente para seleccionar um item e de seguida prima o bot o Menu OK para aplicar Os tr s efeitos sua escolha...

Страница 564: ...tal Still Camera prima o bot o Menu OK 2 Aparecer um menu tal como o ilustrado direita Prima o bot o ascendente ou descendente para seleccionar o item Date Stamp Carimbo de data Quando este item tiver...

Страница 565: ...do item seleccionado aparecer o sub menu correspondente Se escolher Delete para eliminar um ficheiro pode utilizar o bot o esquerdo ou direito para percorrer os ficheiros no sub menu Prima o bot o asc...

Страница 566: ...iza o da informa o do ficheiro 3 Pode tamb m premir o bot o direito ou esquerdo para alternar entre ficheiros Quando quiser sair prima o bot o Menu OK Aparecer uma p gina de informa o do ficheiro Tenh...

Страница 567: ...rima o bot o Menu OK Bloquear ficheiros 3 Dependendo do item que tiver seleccionado aparecer o sub menu correspondente Se seleccionou a op o Lock This Bloquear este para bloquear um ficheiro pode util...

Страница 568: ...onar o item ndex Quando o item tiver sido seleccionado prima o bot o Menu OK Ordenar ficheiros 3 Aparecer um sub menu tal como o ilustrado direita Prima o bot o ascendente ou descendente para seleccio...

Страница 569: ...s ficheiros MP3 desejados para a pasta para posterior reprodu o 40 Para ficheiros MP3 Antes de poder reproduzir m sica MP3 ter de copiar os ficheiros MP3 para a c mara Opera es Avan adas Reprodu o de...

Страница 570: ...s Total de faixas Suporte de armazenamento mem ria interna cart o de mem ria SD MMC cone de modo Tempo de reprodu o Reprodu o Pausa Parar Opera es Avan adas Reprodu o de m sica MP3 continua o Aumentar...

Страница 571: ...o item Repetir Quando o item desejado tiver sido seleccionado prima o bot o Menu OK 3 Aparecer um sub menu tal como o ilustrado direita Prima o bot o ascendente ou descendente para seleccionar Yes Si...

Страница 572: ...onar o item 3D Enhance Melhoramento 3D Quando o item desejado tiver sido seleccionado prima o bot o Menu OK 3 Aparecer um sub menu tal como o ilustrado direita Prima o bot o ascendente ou descendente...

Страница 573: ...Bass Graves Quando o item tiver sido seleccionado prima o bot o Menu OK 3 Aparecer um sub menu tal como o ilustrado direita Prima o bot o ascendente ou descendente para seleccionar um item e de segui...

Страница 574: ...he visualizar a informa o do ficheiro MP3 Para visualizar a informa o 1 No modo MP3 prima o bot o Menu OK 45 2 Aparecer um menu Prima o bot o ascendente ou descendente para percorrer a p gina seleccio...

Страница 575: ...cendente ou descendente para percorrer a p gina e seleccionar o item Delete Eliminar Quando o item tiver sido seleccionado prima o bot o Menu OK 3 Aparecer um sub menu tal como o ilustrado direita Pri...

Страница 576: ...seleccionado prima o bot o Menu OK 3 Aparecer um sub menu tal como o ilustrado direita Prima o bot o ascendente ou descendente para seleccionar Yes Sim e de seguida prima o bot o Menu OK para confirm...

Страница 577: ...Defini o da data e hora 1 No modo Settings utilize os bot es ascendente e descendente para seleccionar o item Time Hora de seguida prima o bot o Menu OK para entrar no sub menu 2 Utilize os bot es dir...

Страница 578: ...o Menu OK para confirmar Defini o da cintila o 1 No modo Settings utilize os bot es ascendente e descendente para seleccionar o item Flicker Cintila o e de seguida prima o bot o Menu OK para entrar n...

Страница 579: ...os bot es ascendente e descendente para seleccionar o item Language Idioma e de seguida prima o bot o Menu OK para entrar no sub menu 2 Utilize os bot es ascendente e descendente para seleccionar o id...

Страница 580: ...1 No modo Settings utilize os bot es ascendente e descendente para seleccionar o item Format Formatar e de seguida prima o bot o Menu OK para entrar no sub menu 2 Utilize os bot es ascendente e descen...

Страница 581: ...o e de seguida prima o bot o Menu OK para entrar no sub menu 2 Utilize os bot es ascendente e descendente para seleccionar Yes Sim e de seguida prima o bot o Menu OK para confirmar 52 Predefini o Sai...

Страница 582: ...Copiar ficheiros para o seu PC...

Страница 583: ...s aplica es que estejam abertas no seu computador Se o ecr de t tulo n o aparecer automaticamente fa a um duplo clique sobre My Computer O Meu Computador e de seguida sobre a unidade de CD ROM Depois...

Страница 584: ...X 8 0 ou superior s o necess rios para poder visualizar os clips de v deo gravados pela c mara 7 Quando a instala o estiver conclu da pode ser necess rio reiniciar o computador para que o controlador...

Страница 585: ...inhados 56 Copiar ficheiros para o seu PC Liga o da c mara ao PC Aviso para os utilizadores do Windows 2000 XP ME Se seleccionar o modo DISK Disco e de seguida quiser desligar a c mara do computador s...

Страница 586: ...zadores do Windows 2000 ME 98SE Fa a um duplo clique sobre My Computer O Meu Computador De seguida fa a um duplo clique sobre o cone do disco amov vel que acabou de aparecer Copiar ficheiros para o se...

Страница 587: ...cheiros DCIM 3 Fa a um duplo clique sobre a pasta de ficheiros 100MEDIA 4 Arraste o ficheiro pretendido para a op o My Documents Os Meus Documentos ou para a pasta de destino Copiar ficheiros para o s...

Страница 588: ...pasta onde os seus ficheiros estejam armazenados Visualiza o Reprodu o de ficheiros no PC 2 Fa a um duplo clique sobre o ficheiro pretendido e este ser aberto pelo programa que corresponde ao tipo do...

Страница 589: ...ador Aqui poder encontrar todos os ficheiros armazenados na sua c mara Consulte a figura direita para ver onde est o localizados os diferentes tipos de ficheiros Lembre se que os ficheiros de formato...

Страница 590: ...Utiliza o do MoviePix M 330 Manager...

Страница 591: ...0 Manager Antes de iniciar a aplica o 1 Rode o disco selector de modo para o modo Live Aviso para os utilizadores do Windows ME Quando o ecr seguinte aparecer seleccione a op o Automatic search for a...

Страница 592: ...o de instala o pode ser pedido a alguns utilizadores que insiram um CD licenciado do 98SE na unidade de CD ROM para copiar os ficheiros necess rios 4 Siga as instru es no ecr para concluir a instala o...

Страница 593: ...grama Ap s inicia o do programa pode come ar a utilizar o MoviePix M 330 Manager 1 Seleccione o modo de funcionamento Modo Disk Disco Rode o disco selector de modo para ou Neste modo pode gerir os seu...

Страница 594: ...a c mara Para al m disso pode tamb m copiar eliminar enviar por correio electr nico ou reproduzir os ficheiros guardados Fa a um duplo clique para reproduzir o ficheiro Disco DV DCIM 100MEDIA pasta pa...

Страница 595: ...um disco amov vel permitindo lhe transferir directamente os ficheiros para o seu computador 1 Seleccione um ficheiro ou prima o bot o para seleccionar todos os ficheiros 2 Prima o bot o para copiar os...

Страница 596: ...er A fun o PC Camera Iniciar Parar janela de visualiza o Propriedades Defini o Janela de pr visualiza o Ap s iniciar o MoviePix M 330 Manager o ecr seguinte aparece caso a c mara esteja definida para...

Страница 597: ...rdo com as suas necessidades RGB 24 Este item permite reter uma melhor qualidade I420 Este item indica que o filme AVI ficar mais comprimido para permitir uma mais r pida velocidade de processamento T...

Страница 598: ...tila o 69 Defini o de v deo Filtro do efeito de banda Se o ecr do seu computador cintilar aquando da utiliza o da fun o PC Camera altere esta defini o para evitar ru do Largura de banda Se a largura d...

Страница 599: ...e Vermelho Verde Vermelho Significado Pronto a aguardar comando Ocupado armazenamento ou captura Pronto a aguardar comando A carregar o flash Pronto a aguardar comando Transforma o de dados Temporizad...

Страница 600: ...es do sistema de TV PAL NTSC Am rica Taiwan Jap o e Coreia etc Alemanha Inglaterra It lia Holanda China Jap o e Hong Kong etc Mem ria flash 16MB Cart o de mem ria SD MMC 32MB Cart o de mem ria SD MMC...

Страница 601: ...ntervalo entre capturas 30 segundos 2 O flash utilizado fotografia sim fotografia n o 1 Intervalo entre capturas 4 segundos 2 O flash est desactivado Estado do indicador das pilhas Nota Os testes segu...

Страница 602: ...bloq A bloquear A desbloquear A c mara n o consegue aceder aos dados armazenados na mem ria interna Formate a mem ria para resolver este problema O flash est a ser carregado O ficheiro a ser reproduzi...

Страница 603: ...s Dimens es Ecr TFT LCD a cores de 1 5 4X tempo real F 3 5 8 5 mm 10 segundos USB 2 0 compat vel com USB 1 1 1 min 3 min 5 min desliga automaticamente se estiver inactiva por um per odo de tempo super...

Страница 604: ...rna 2 Verifique se a c mara est a recarregar o flash 3 Se estiver a utilizar um cart o de mem ria SD verifique se o cart o est definido como protegido 4 Se o ecr LCD mostrar a mensagem MEMORY ERROR ou...

Страница 605: ...a visualiza o de imagens no ecr LCD ou no computador R Verifique se a defini o de cintila o corresponde ao local onde se encontra Para mais informa es consulte a tabela de defini es da op o Flicker n...

Страница 606: ...antes de ligar o cabo USB P3 O ecr de televis o n o mostra qualquer informa o ap s liga o da c mara ao televisor R 1 Verifique se a c mara est correctamente ligada ao televisor 2 Certifique se de que...

Страница 607: ...dor n o funcionar correctamente siga o procedimento seguinte para actualizar o sistema operativo ETAPA 1 Transfira o software de actualiza o do sistema operativo a partir da Internet V at http v4 wind...

Страница 608: ...ima a tecla direita do rato para aceder ao menu de contexto a Clique em Properties Propriedades para aceder a um sub menu como o seguinte b Clique no separador Driver Controlador De seguida clique no...

Страница 609: ...di logo seguinte aparecer clique em Next Seguinte 4 Quando a caixa de di logo seguinte aparecer a Assinale o item Search for a suitable driver for my device Procurar um controlador adequado ao meu dis...

Страница 610: ...o seguinte aparecer n o seleccione nenhum dos itens e clique em Next Seguinte para continuar 6 Quando a caixa de di logo seguinte aparecer a Assinale o item Install one of the drivers Instalar um dos...

Страница 611: ...one o controlador USB correcto Neste caso deve seleccionar o controlador USB 2 0 fornecido pela Microsoft para substituir o controlador original b Clique em Next Seguinte para continuar 8 Quando a cai...

Страница 612: ...novamente a pasta Universal Serial Bus Controllers Se o controlador antigo tiver sido substitu do pelo novo a instala o conclu da com xito 10 Ap s conclus o de todas as etapas acima volte a ligar a c...

Страница 613: ...eleccione o controlador USB 2 0 NEC PCI to USB Enhanced Host Controller B1 neste caso e prima a tecla direita do rato para fazer aparecer o menu Seleccione o item Update Driver Actualizar controlador...

Страница 614: ...em Don t search I will choose the driver to install N o procurar Eu escolho o controlador a instalar De seguida clique em Next Seguinte para continuar 4 Seleccione a op o Standard PCI to USB Host Cont...

Страница 615: ...o controlador conclu da Clique em Finish Concluir para 6 Abra o Device Manager Gestor de dispositivos e abra a pasta Universal Serial Bus controllers Controladores USB Universal Serial Bus Certifique...

Страница 616: ...ior for o ficheiro mais este demora a ser carregado Se tiver problemas relacionados com a demora no carregamento de clips de v deo recomendamos lhe que mmend you 1 Copie os clips de v deo para o compu...

Страница 617: ...82 143 91090v1 1...

Отзывы: