background image

90-823224--2  796

454 CID (7.4L) / 502 CID (8.2L) - 3A-37

Oil Pan

Removal

1. Drain crankcase oil.

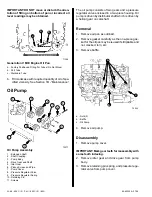
2. Remove dipstick and tube, or tubes, if equipped

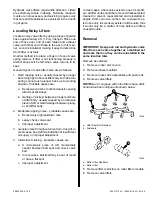
with two. Note shape of port and starboard tubes
as shown following to aid in reassembly. On High
Output (H.O.) Engine only, disconnect outlet
hose of seawater pump.

IMPORTANT: On Generation V engines DO NOT
move or disturb the orientation of fitting on bot-
tom of pan or incorrect oil level readings may be
obtained.

71308

c

a

b

Generation V MIE Engine Oil Pan

a - Factory Positioned Fitting For Tubes (Do Not Move)
b - Port Tube
c - Starboard Tube

3. Remove oil pan.

Installation

1. Clean sealing surfaces of engine block and oil

pan.

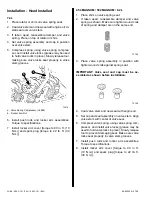
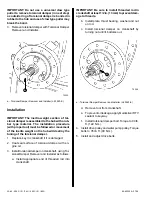
2. Apply a small amount of Quicksilver RTV Sealer

to joints of rear seal retainer and joints of front
cover.

IMPORTANT: Quicksilver RTV Sealer sets up in
about 15 minutes. Be sure to complete assembly
promptly.

72544

b

a

a - Joints Of Rear Seal Retainer
b - Joints Of Front Cover

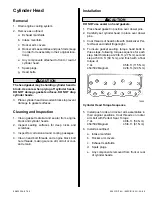
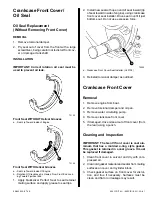
3. Install oil pan gasket in position as shown.

NOTE:A one-piece oil pan gasket may be re-used if
it is still pliable and is not cracked, torn or otherwise
damaged.

72545

a

a - Oil Pan Gasket

4. Install oil pan. Starting from the center and work-

ing outward in each direction, tighten 5/16-18
threaded fasteners to 165 lb. in. (19 N·m).

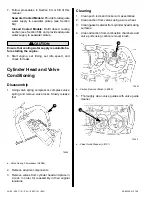
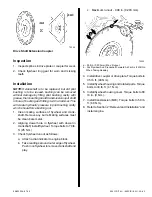
5. Install dipstick tube(s) and dipstick(s). Be certain,

if equipped with two tubes, that they are fitted
where they were removed, and positioned as
shown following.

Содержание 454 MAGNUM

Страница 1: ...A 3 72851 90 823224 2 796 454 CID 7 4L 502 CID 8 2L 3A 3 ENGINE 454 CID 7 4L 502 CID 8 2L ...

Страница 2: ...iew 3A 27 Installation Head Installed 3A 28 Cylinder Head 3A 29 Removal 3A 29 Cleaning and Inspection 3A 29 Installation 3A 29 Cylinder Head and Valve Conditioning 3A 30 Disassembly 3A 30 Cleaning 3A 30 Page Inspection 3A 31 Valve Guide Bore Repair 3A 31 Valve Springs Checking Tension 3A 32 Valve Seat Repair 3A 32 Valve Grinding 3A 33 Reassembly 3A 33 Dipstick Specifications 3A 36 All Engines 3A 3...

Страница 3: ...shaft Sprocket 3A 56 Removal 3A 56 Installation 3A 56 Checking Timing Chain Deflection 3A 56 Camshaft 3A 57 Measuring Lobe Lift 3A 57 Removal 3A 58 Inspection 3A 58 Installation 3A 58 Camshaft Bearings 3A 58 Removal 3A 58 Inspection 3A 59 Installation 3A 59 Cylinder Block 3A 60 Cleaning and Inspection 3A 60 Oil Filter By Pass Valve and Adaptor 3A 63 Inspection and or Replacement 3A 63 90 823224 2 ...

Страница 4: ...3A 0 454 C I D 7 4L 502 C I D 8 2L 90 823224 2 796 THIS PAGE IS INTENTIONALLY BLANK ...

Страница 5: ...lbow 30 41 Filter Adapter 5 16 18 20 27 Flywheel 75 100 Flywheel Drive Plate MIE 35 48 Flywheel Housing to Block 30 41 Flywheel Housing Cover 80 9 Front Mount Bracket 30 41 Fuel Pump 25 34 Intake Manifold 35 48 See Note Main Bearing Cap 110 149 Oil Baffle Nuts 25 34 Oil Filter Adapter Nuts 40 54 Oil Pan Bolts 5 16 18 80 9 Oil Pan Drain Plug 15 20 Oil Pump 70 95 Oil Pump Cover 80 9 Power Steering P...

Страница 6: ...IPTION Lb Ft N m Remote Oil Filter Adapter Nut Fitting 20 27 Seawater Pump Brace 30 41 Seawater Pump Bracket 30 41 Spark Plugs 15 20 Starter Motor 50 68 Thermostat Housing 30 41 Torsional Damper 40 54 Transmission To Housing 50 68 Water Circulating Pump 35 48 Water Temperature Sender 20 27 ...

Страница 7: ...7 Connecting Rod Guide Tool 3 8 24 J5239 Connecting Rod Guide Tool 7 16 20 J35228 Oil Pump Suction Pipe Installer J21882 Lift Indicator Tool J8520 Torsional Damper Remover and Installer J23523 E Crankcase Front Cover Seal Installer J22102 Crankshaft Gear and Sprocket Puller J24420 B Crankshaft Gear and Sprocket Installer J20158 20 Air Adapter Cylinder Inflator J23590 Main Bearing Remover and Insta...

Страница 8: ...ngines with engine code UB with serial number OF1589289 and lower will have forged pistons XX with serial number OF159290 and higher will have cast pistons Note 3 Serial numbers OD838819 thru OF800699 are equipped with cast aluminum intake manifolds CYLINDER BORE IMPORTANT 7 4L Bravo Three engines with engine code UB with serial number OF1589289 and lower have forged pistons The piston specificati...

Страница 9: ... i o n Gap Production 2nd 016 024 0 41 0 61 016 026 0 41 0 66 n Service High Limit Production 010 0 25 Max Oil Groove Production 0050 0065 0 127 0 165 Oil Groove Side Clearance Service High Limit Production 001 0 25 High Limit Production 005 0 12 Max Oil G Production 010 030 0 254 0 762 020 035 0 508 0 889 010 030 0 254 0 76 Gap Service High Limit Production 001 0 25 High Limit Production 005 0 12...

Страница 10: ...ction No 5 0025 0038 0 063 0 096 Main Bearing Clearance S i No 1 001 003 0 03 0 07 0010 0015 0 0254 0 0381 Clearance Service No 2 3 4 001 003 0 03 0 07 0010 0025 0 0254 0 0635 No 5 0025 0040 0635 1016 Crankshaft End Play 006 0010 0 15 0 2 C i Diameter 2 1990 2 1996 55 8546 55 8698 Connecting Taper Production 0005 0 0127 Max Connecting Rod Journal Taper Service 001 0 0254 Max Rod Journal Out of Rou...

Страница 11: ...t 46 Seat Runout Intake Exhaust 002 0 05 Max Seat Width Intake 1 32 1 16 03125 0625 in 0 79 1 58 mm Seat Width Exhaust 1 16 3 32 0625 09375 in 1 58 2 38 mm S Production Intake 0010 0027 0 025 0 069 Stem C Production Exhaust 0012 0029 0 0304 0 0736 Clearance Service Intake 001 0 02 003 0 07 0037 0 09 Service Exhaust 002 0 05 004 0 10 0049 0 12 Stem Diameter Intake 372 9 45 Stem Diameter Exhaust 372...

Страница 12: ...329 382 N Does Not Apply Note 1 Note 2 Pressure Open at 1 34 in 35 1 mm Does Not Apply 316 Lbs 1406 N Open at 1 40 in 35 6 mm 195 215 Lbs 867 956 N Does Not Apply Installed Height 1 875 47 6 1 88 47 7 Damper or Damper S Free Length Does Not 1 86 47 2 p p Shield Approximate Number Of Coils Apply 4 Damper or Damper Shield Valve Spring Fit in Damper Shield 42 094 1 07 2 38 Interference Does Not Apply...

Страница 13: ...t Intake 238 224 ROLLER TAPPET CAMSHAFT ENGINE MODEL 7 4L 454 MAGNUM 502 MAGNUM 8 2L Lobe Lift 020 0 051 Exhaust 284 7 214 342 8 687 Lobe Lift 020 0 051 Intake 282 7 163 342 8 687 Duration at 050 In 1 27mm C Lif Exhaust 209 227 Cam Lift Intake 209 211 Journal Diameter 1 9482 1 9492 49 485 49 509 Journal Out Of Round 001 0 025 Max Camshaft Runout 002 0 051 Max Timing Chain Deflection 375 9 5 from t...

Страница 14: ...lock Cast Iron 4 Bolt Main Bearing Caps Rods Forged Steel Pistons Cast Aluminum Crankshaft Cast Steel Camshaft Steel CYLINDER BORE Diameter 4 2500 4 2507 107 950 107 968 Out of Round Production 001 0 025 Max Out of Round Service 002 0 051 Max T Production Thrust Side 0005 0 0120 Max Taper Production Relief Side 001 0 0254 Max Service 001 0 0254 Over Production PISTON Clearance Production 0018 0030...

Страница 15: ...457 s s i o Gap Production 2nd 016 024 0 406 0 6096 o n Service High Limit Production 010 0 254 Max Oil Groove Side Production 0050 0065 0 1270 0 1651 Oil Side Clearance Service High Limit Production 001 0 254 Oil Gap Production 010 030 0 254 0 762 Gap Service High Limit Production 001 0 254 PISTON PIN Diameter 9895 9897 25 132 25 1371 Clearance In Piston Production 0002 0007 0 0051 0 0177 Clearan...

Страница 16: ... B i Cl Production No 1 2 3 4 0011 0024 0279 0610 Main Bearing Clearance Production No 5 0025 0038 0 0635 0 0965 Service No 1 2 3 4 0010 0030 0 0254 0 0762 Service No 5 0025 0040 0635 1016 Crankshaft End Play 005 0011 0 1270 0 2794 C i R d J l Diameter 2 1990 2 1996 55 8546 55 8698 C i R d J l Taper Production 0005 0 0127 Max Connecting Rod Journal Taper Service 001 0 0254 Max Out of Round Product...

Страница 17: ...7620 1 5240 Seat Width Exhaust 0600 0950 1 5240 2 4130 S Production Intake 0010 0029 0 0254 0 0737 Stem C Production Exhaust 0012 0031 0 0300 0 0787 Clearance Service Intake 0037 0 0939 Service Exhaust 0049 0 1244 Valve Lash Intake and Exhaust Net Lash VALVE SPRING V l S i Free Length 2 12 53 9 V l S i P Closed 1 838 in 46 6850 mm at Valve Spring Pressure Closed 71 79 Lbs 316 351 N Valve Spring Pr...

Страница 18: ...atness 004 0 1016 Overall Maximum 003 0 076 within a 6 in 152mm Span Lobe Lift 020 0 051 Exhaust 284 7 214 Lobe Lift 020 0 051 Intake 282 7 163 Duration at 050 In 1 27mm C f Exhaust 209 Cam Lift Intake 209 Journal Diameter 1 9482 1 9492 49 485 49 509 Journal Out Of Round 001 0 025 Max Camshaft Runout 002 0 051 Max Timing Chain Deflection 375 9 5 from taut position total 75 19 ...

Страница 19: ...ackages and replacement partial engines but not replacement cylinder block assemblies If the engine serial number and or model decals are missing the engine code letters may help in deter mining the engine models Following is a list of GM engines and their respective code letters 72312 a a Location Of GM Engine Code MCM Stern Drive Code Rotation 7 4L XW LH 7 4L Bravo Three UW UB XX LH 7 4LX EFI Br...

Страница 20: ...ough insert type bear ings Camshaft and Drive Flat tappet camshafts made of cast iron and roller lift er camshaft are made of steel All camshafts are driv en at one half crankshaft speed by a timing chain and sprockets or by timing gears and are supported by five main bearings which are pressed into the block A helical gear on the aft end of the camshaft drives the distributor and oil pump On engi...

Страница 21: ...re length of the block From the main oil gallery the oil is routed through individual oil pas sages to an annular groove in each camshaft bearing bore Some of the oil is then used to lubricate cam shaft bearings The remainder of the oil is routed to the valve lifter oil galleries and No 1 2 3 and 4 crankshaft main bearings by means of individual oil passages which intersect with the annular groove...

Страница 22: ...ed By Dirt a Scratches b Dirt Imbedded In Bearing Material 70436 a Tapered Journal a Overlay Gone From Entire Surface 70436 a Lack Of Oil a Overlay Worn Off 70436 a Radius Ride a Worn Area 70436 a Improper Seating a Bright Or Polished Sections 70436 a Fatigue Failure a Craters or Pockets ...

Страница 23: ...quate ly cooled section of material which can serve as a source Engine failures which result from the foregoing con ditions are beyond the control of Mercury Marine therefore no warranty will apply to failures which oc cur under these conditions Detonation Detonation commonly called fuel knock spark knock or carbon knock is abnormal combustion of the fuel which causes the fuel to explode violently...

Страница 24: ...ntrol of MerCruiser therefore no warranty will apply to failures which oc cur under these conditions 72425 Detonation Damage 72315 b c d a a Spark Occurs b Combustion Begins c Combustion Continues d Detonation Occurs Engine Mounts 72317 Front Mount All MCM Stern Drive Models 72318 Rear Mount Flywheel Housing All MCM Stern Drive Models ...

Страница 25: ...ssembly MIE 7 4L 8 2L with Borg Warner In Line Transmission 72319 Front Mount Assembly All MIE Models a Rubber Insert Cannot Be Removed 71789 Rear Mount Assembly MIE 7 4L 8 2L with Hurth Down Angle and V Drive Transmission 72319 Rear Mount Assembly MIE 7 4L with Borg Warn er Remote V Drive Transmission a Rubber Insert Cannot Be Removed ...

Страница 26: ...oling system 2 Disconnect hoses from thermostat housing 3 Disconnect intake manifold to circulating pump by pass hose from circulating pump 4 Disconnect electrical leads interfering with re moval 5 Disconnect crankcase ventilation hoses from rocker arm covers 6 Disconnect throttle cable from carburetor Re move fuel line and sight tube running between fuel pump and carburetor 7 Remove distributor c...

Страница 27: ...operate properly The choke will remain ON longer causing rough engine operation and wasted fuel 1 Apply Quicksilver Perfect Seal to intake manifold gaskets around coolant passages both sides 72514 b c a c b a Exhaust Crossover Port Opening in Gasket b Intake Valve Port c Coolant Passages WARNING Be sure to read and follow package label direc tions when using bellows adhesive 2 Using Quicksilver Be...

Страница 28: ... to TDC before removing rocker arms 1 Remove rocker arm covers as outlined 2 Remove rocker arm assemblies and push rods IMPORTANT Place rocker arm assemblies and push rods in a rack for reassembly in their origi nal locations Cleaning and Inspection 1 Clean parts with solvent and dry with com pressed air 2 Inspect all contact surfaces for wear Replace all damaged parts Installation IMPORTANT When ...

Страница 29: ...derate rapping noise probable causes are a Excessively high leakdown rate b Leaky check valve seat c Improper adjustment 3 General noise throughout valve train this will in most cases be a definite indication of insufficient oil supply or improper adjustment 4 Intermittent clicking probable causes are a A microscopic piece of dirt momentarily caught between ball seat and check valve ball b In rare...

Страница 30: ...specification 4 Install rocker arm cover 5 Start engine and check for leaks Valve Stem Oil Seal Valve Spring Removal Head Installed 1 Remove a Rocker arm cover b Spark plug of affected cylinder c Rocker arm assembly 2 Install air line adaptor tool J 23590 in spark plug hole and apply compressed air to hold valves in place NOTE If compressed air is not available piston may be brought up to TDC and ...

Страница 31: ...7 8 9 7 4L Only 1 Valve Lock 2 Retainer 3 Oil Shield Seal 4 Oil Shield 5 Outer Spring 6 Damper Shield 7 Rotator 8 Intake Valve 9 Exhaust Valve 72278 1 1 3 4 7 8 2 5 6 454 Magnum 502 Magnum 8 2L 1 Valve Lock 2 Retainer 3 Oil Shield 4 Inner Spring 5 Outer Spring 6 Shim 7 Intake Valve 8 Exhaust Valve ...

Страница 32: ... m and spark plug torque to 22 lb ft 30 N m 454 MAGNUM 502 MAGNUM 8 2L 1 Place shim on valve spring seat 2 If taken apart reassemble damper and valve spring as shown Make sure tighter wound coils of spring and damper are on the same end 72149 3 Place valve spring assembly in position with tighter wound coils against spring seat IMPORTANT Valve seal and cap must be as sembled as shown before instal...

Страница 33: ...passages 4 Clean head bolt threads and engine block bolt hole threads making sure no dirt old oil or cool ant remain Installation CAUTION DO NOT use sealer on head gaskets 1 Place head gasket in position over dowel pins 2 Carefully set cylinder head in place over dowel pins 3 Coat threads of head bolts with Quicksilver Per fect Seal and install finger tight 4 To insure gasket sealing torque head b...

Страница 34: ...alve Conditioning Disassembly 1 Using valve spring compressor compress valve spring and remove valve locks Slowly release tool 72565 a a Valve Spring Compressor J 8062 2 Remove all valve components 3 Remove valves from cylinder head and place in a rack in order for reassembly in their original locations Cleaning 1 Clean push rods and rocker arm assemblies 2 Clean carbon from valves using a wire wh...

Страница 35: ...spect valves for burned heads cracked faces or damaged stems 4 Inspect rocker arm bolts and push rod guides for wear and damage IMPORTANT Excessive valve stem to bore clear ance will cause excessive oil consumption and possible valve breakage Insufficient clearance will result in noisy and sticky valves 5 Measure valve stem clearance as follows a Attach a dial indicator to cylinder head posi tioni...

Страница 36: ...e Seat Repair Valve seat reconditioning is very important since seating of valves must be perfect for engine to deliver maximum power and performance Another important factor is valve head cooling Good contact between each valve and its seat in head is important to ensure that heat in valve head will be properly dispersed Several different types of equipment are available for reseating valve seats...

Страница 37: ...ace the valve Several different types of equipment are available for refacing valves The recommendation of the man ufacturer of the equipment being used should be carefully followed to attain proper results 50695 EXHAUST INTAKE b a b a Exhaust a 372 In 9 45 mm b 1 32 031 In 0 79 mm Min Intake a 372 In 9 45 mm b 1 32 031 In 0 79 mm Min Reassembly 1 Lubricate valve guides and valve stems with en gin...

Страница 38: ...f valve stem 72279 1 1 2 3 4 5 6 7 8 9 7 4L 1 Valve Lock 2 Retainer 3 Oil Shield 4 Oil Shield Seal 5 Outer Spring 6 Damper Shield 7 Rotator 8 Intake Valve 9 Exhaust Valve 72278 1 1 3 4 7 8 2 5 6 454 Magnum 502 Magnum 8 2L a Valve Lock b Retainer c Oil Shield d Inner Spring e Outer Spring f Shim g Intake Valve h Exhaust Valve ...

Страница 39: ...as shown Measure from spring seat to top of valve spring as shown If measurement exceeds specified height install a valve spring shim and recheck DO NOT shim valve springs to give an installed height less than the minimum specified 50037 a 72562 b Cutaway Scale a Cut Away This Portion 1 2 Inch b Valve Spring Installed Height ...

Страница 40: ...MEASUREMENT In mm 72341 1 2 13 1 2 13 1 2 13 33 1 2 849 15 1 8 384 19 7 64 485 35 1 4 895 17 13 64 437 1 2 13 19 32 15 59 64 23 FULL FULL FULL ADD ADD ADD 16 43 64 423 b c a a MCM Engines 805567 b MIE Velvet Drive In Line Transmissions 821503 3 c MIE All Transmissions Except Velvet Drive 821503 4 ...

Страница 41: ...lean sealing surfaces of engine block and oil pan 2 Apply a small amount of Quicksilver RTV Sealer to joints of rear seal retainer and joints of front cover IMPORTANT Quicksilver RTV Sealer sets up in about 15 minutes Be sure to complete assembly promptly 72544 b a a Joints Of Rear Seal Retainer b Joints Of Front Cover 3 Install oil pan gasket in position as shown NOTE A one piece oil pan gasket m...

Страница 42: ...creen and Pipe 7 Pump Cover 8 Pressure Regulator Valve 9 Pressure Regulator Spring 10 Retaining Pin 11 Screws The oil pump consists of two gears and a pressure regulator valve enclosed in a two piece housing Oil pump is driven by distributor shaft which is driven by a helical gear on camshaft Removal 1 Remove oil pan as outlined 2 Remove gasket carefully as the one piece gas ket for the oil pan ma...

Страница 43: ...stallation 1 Install pressure regulator valve and related parts 2 Install drive gear in pump body 3 Install idler gear in pump body with smooth side of gear toward pump cover opening Align marks made in disassembly 4 Fill gear cavity with engine oil 5 Install pump cover and torque attaching screws to 80 lb in 9 N m 6 Turn extension shaft by hand to check for smooth operation Installation 1 Install...

Страница 44: ...f the torsional damper 1 Replace key in crankshaft if it is damaged 2 Coat seal surface of torsional damper with en gine oil 3 Install torsional damper on crankshaft using Tor sional Damper Remover and Installer as follows a Install appropriate end of threaded rod into crankshaft IMPORTANT Be sure to install threaded rod in crankshaft at least 1 2 in 13 mm to prevent dam age to threads b Install p...

Страница 45: ...ward lip of seal toward inside of engine using crankcase front cover seal installer Drive seal in until it just bottoms out Do not use excessive force 72560 a a Crankcase Front Cover Seal Installer J 22102 3 Reinstall torsional damper as outlined Crankcase Front Cover Removal 1 Remove engine from boat 2 Remove torsional damper and oil pan 3 Remove water circulating pump 4 Remove crankcase front co...

Страница 46: ...orsional damper as outlined 5 Install water circulating pump 6 Reinstall engine in boat 7 Fill crankcase with engine oil 8 Follow procedures in Section 6A or 6B of this manual Seawater Cooled Models Provide for adequate water supply to seawater pickup see Section 6A Closed Cooled Models Refill closed cooling section see Section 6B and provide adequate water supply to seawater pickup CAUTION Ensure...

Страница 47: ...any burrs Mating surfaces must be clean bare metal 2 Aligning dowel hole in flywheel with dowel in crankshaft install flywheel Torque bolts to 70 lb ft 95 N m 3 Check flywheel runout as follows a Attach a dial indicator to engine block b Take readings around outer edge of flywheel Push in on flywheel to remove crankshaft end play c Maximum runout 008 in 0 203 mm 72353 b a a 008 in 0 203 mm Max Run...

Страница 48: ...t nick or gouge the engine block or rear main bearing cap sealing surface Protect end of crankshaft and crankshaft seal running surface from damage also Cleaning and Inspection Clean crankshaft seal running surface and seal re tainer IMPORTANT Correct rotation oil seal must be used to prevent oil leak 73126 a Rear Seal WITHOUT Helical Grooves a Seal Lip Towards Inside Of Engine 72618 b a Rear Seal...

Страница 49: ...tain accurate measurements while using Plasti gage or its equivalent engine must be out of the boat and upside down so crankshaft will rest on the upper bearings and total clearance can be measured be tween lower bearing and journal To assure the proper seating of the crankshaft all bearing cap bolts should be at their specified torque In addition preparatory to checking fit of bearings the surfac...

Страница 50: ...ure the journal with a micrometer if the flattened gauging plastic indicates more than 001 in difference 6 If the bearing clearance is within specifications the bearing insert is satisfactory If the clearance is not within specifications replace the insert Al ways replace both upper and lower inserts as a unit 7 A standard or 001 in undersize bearing may produce the proper clearance If not it will...

Страница 51: ... hole in crankshaft journal 5 Oil new lower bearing and install in bearing cap 6 Install main bearing cap with marks made on dis assembly or arrows if present pointing toward front of engine 7 Torque all main bearing caps EXCEPT THE REAR MAIN CAP to 110 lb ft 149 N m Torque rear main bearing cap to 10 12 lb ft 14 16 N m then tap end of crankshaft first rearward then forward with a lead hammer This...

Страница 52: ...ing surface as shown Posi tion the gauging plastic in the middle of the bearing shell Bearings are eccentric and false readings could occur if placed else where 72361 a a Gauging Plastic b Install the bearing in the connecting rod and cap c Install the bearing cap and evenly torque nuts Refer to Specifications d Remove the bearing cap and using the scale on the gauging plastic envelope measure the...

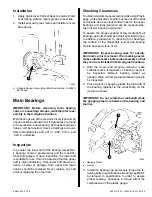
Страница 53: ...fore ridge and or deposits are re moved turn crankshaft until piston is at bottom of stroke and place a cloth on top of piston to col lect cuttings After ridge and or deposits are re moved turn crankshaft until piston is at top of stroke then remove cloth and cuttings 3 Mark connecting rods and bearing caps left bank 1 3 5 and 7 right bank 2 4 6 and 8 from front to rear on same side as piston thru...

Страница 54: ...s are clean 2 Inspect piston for cracked ring lands skirts and pin bosses wavy worn ring lands scuffed or damaged skirts and eroded areas at top of pis ton Replace pistons which are damaged or show signs of excessive wear 3 Inspect grooves for nicks and burrs that might cause rings to hang up 4 Measure piston skirt and check clearance as out lined under Piston Selection 5 Slip outer surface of a n...

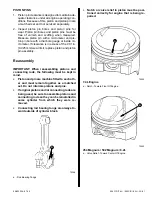
Страница 55: ...iston and piston pin assembly Reassembly IMPORTANT When reassembling pistons and connecting rods the following must be kept in mind Piston and pin are machine fitted to each oth er and must remain together as a matched set Do not intermix pistons and pins If original pistons and or connecting rods are being used be sure to assemble pistons and connecting rods so they can be reinstalled in same cyl...

Страница 56: ...er bore then press ring down into cylinder bore about 1 4 in 6 mm below ring travel Be sure that ring is square with cylinder wall 3 Measure gap between ends of ring with a feeler gauge as shown 72372 4 If gap between ends of ring is below specifica tions remove ring and try another for fit 5 Fit each compression ring to cylinder in which it is going to be used 6 Clean and inspect pistons if not p...

Страница 57: ... connecting rod into place on crankshaft journal with connecting rod bolt guide Use a hammer handle with light blows to install piston into bore Hold ring compressor firmly against cylinder block until all piston rings have entered cylinder bore IMPORTANT Be sure to install new pistons in same cylinders for which they were fitted and used pistons in same cylinder from which they were removed Each ...

Страница 58: ...nserts from connecting rod and caps Install new bearings following procedures outlined Cleaning and Inspection 1 Wash crankshaft in solvent and dry with com pressed air 2 Measure main bearing journals and crankpin di mensions with a micrometer for out of round ta per or undersize see Specifications 3 Check crankshaft for runout by supporting at front and rear main bearings journals in V blocks and...

Страница 59: ...ons 9 Turn crankshaft so mark on timing sprocket or gear is facing camshaft 10 Install as outlined a Timing chain and sprocket or gear on cam shaft align marks with crankshaft b Timing chain gear cover c Oil pump and baffle d Dipstick tube and oil pan e Spark plugs f Torsional damper and crankshaft pulley g Water pump h Belts i Flywheel and drive coupler plate j Flywheel housing k Starter 11 Insta...

Страница 60: ...Sprocket Removal 1 Remove torsional damper and crankcase front cover as outlined 2 Remove camshaft timing chain as outlined 3 Remove crankshaft sprocket using crankshaft gear and sprocket puller J 24420 B Installation 1 Using crankshaft gear and sprocket installer as shown install sprocket on crankshaft 72550 a a Crankshaft Gear And Sprocket Installer J 1058 20 2 Install timing chain as outlined 3...

Страница 61: ...th ball socket adaptor tool from Lift In dicator Tool Kit on push rod Be sure that push rod is in lifter socket 72551 a a Lift Indicator Tool Kit J 8520 3 Rotate torsional damper slowly in direction of ro tation until lifter is on heel of cam lobe At this point push rod will be in its lowest position 4 Set dial indicator on zero then rotate damper slowly or attach an auxiliary starter switch and b...

Страница 62: ...all two 5 16 18 x 5 in bolts in camshaft bolt holes then lubricate camshaft journals with engine oil and install camshaft being careful not to damage bearings b Lubricate camshaft lobes with General Mo tors Cam and Lifter Prelube or equivalent c Install timing chain or gears as outlined 2 Install crankcase front cover and valve lifters as outlined Camshaft Bearings Removal Camshaft bearings can be...

Страница 63: ...s are not the same Be sure to install bearings in proper loca tions Indicated by bearing manufacturer and to position bearings as follows directional refer ences are in reference to engine in its normal op erating position Front bearing must be positioned so that oil holes are equal distance from 6 o clock posi tion in the block Intermediate and center bearings must be positioned so that oil holes...

Страница 64: ...as sages 4 Remove expansion plugs NOTE These plugs may be removed with a sharp punch or they may be drilled and pried out 5 Clean and inspect water passages in cylinder block 6 Inspect cylinder block for cracks in cylinder walls water jacket valve lifter bores and main bearing webs 7 Measure cylinder walls for taper out of round or excessive ridge at top of ring travel This should be done with a d...

Страница 65: ...ssary cylinder bores may be cleaned with a hot water and detergent wash After cleaning swab cylinder bores several times with light en gine oil and a clean cloth then wipe with a clean dry cloth CYLINDER BORING 1 Before using any type boring bar file off top of cyl inder block to remove dirt or burrs This is very im portant to prevent boring bar tilt with result that bored cylinder wall is not at ...

Страница 66: ...eaned with kerosene or gasoline Clean re mainder of cylinder block to remove excess ma terial spread during honing operation PISTON SELECTION 1 Check used piston to cylinder bore clearance as follows a Measure cylinder bore diameter with a tele scope gauge 2 1 2 in 64 mm from top of cyl inder bore as follows 72570 b Measure piston diameter at skirt across cen ter line of piston pin as shown 72624 ...

Страница 67: ... adaptor 2 Remove hose fitting and seal from adaptor 3 Remove connector 4 Clean parts in solvent and blow dry with com pressed air 5 Inspect fiber valves for cracks or other damage Check that valves fit tightly against seats Push each valve down and release it Valves should re turn freely to their seats If valve operation is questionable by pass valve should be replaced 72546 a Typical By Pass Val...

Страница 68: ...THIS PAGE IS INTENTIONALLY BLANK TO ALLOW FOR CORRECTIONS OR ADDITIONS AT A LATER DATE 3A 64 454 C I D 7 4L 502 C I D 8 2L 90 823224 2 796 ...

Страница 69: ...THIS PAGE IS INTENTIONALLY BLANK TO ALLOW FOR CORRECTIONS OR ADDITIONS AT A LATER DATE 90 823224 2 796 454 CID 7 4L 502 CID 8 2L 3A 65 ...

Страница 70: ...THIS PAGE IS INTENTIONALLY BLANK TO ALLOW FOR CORRECTIONS OR ADDITIONS AT A LATER DATE 3A 66 454 C I D 7 4L 502 C I D 8 2L 90 823224 2 796 ...

Страница 71: ...THIS PAGE IS INTENTIONALLY BLANK TO ALLOW FOR CORRECTIONS OR ADDITIONS AT A LATER DATE 90 823224 2 796 454 CID 7 4L 502 CID 8 2L 3A 67 ...

Отзывы: