background image

D Heater Unit Assembly Re-

placement:


 (Refer to Figure #5)

1. Remove right panel.

2. Holding the heater connections with pliers to

prevent bending, remove the three screws

retaining the wiring harness on the heater

connections of the unit being replaced.

(Figure #4)

3. Remove insulation.

4. Remove the two screws holding heater

element to inside panel.

5. Slide heater unit out the side.

NOTE:

  Because of air space required in some

heating elements they may not easily pass thru the

opening.  If element does not slide out completely,

remove left side panel, insulation and wire guard.

(Refer to Section O).  Use a suitable “flat” tool

such as a yardstick or 24” ruler and insert through

wire guard opening.  Gently pry heating element at

curvature so it can clear opening and slide out.

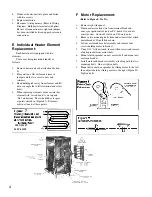
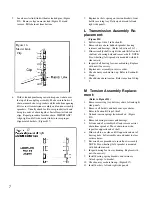
(Figure #6)


Figure 6

15. Install new thermostat with two screws and replace knob.

16. Position the balance of tube so it runs from bottom of

thermostat along inside of front panel.  Coil excess parallel to

and under shelf.  Make certain tube is away from all electrical

connections.

17. Check tube positioning before replacing panel to be sure the

tube will clear all electrical connections.

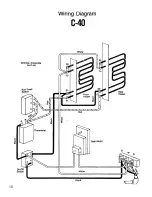
18. Replace heater element, wire guard, insulation, heater wires,

(refer to wiring diagram) and side panels.

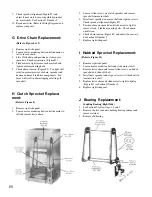
    Figure 5

3

Содержание C-40

Страница 1: ...ing the toasting of not only bread but English Muffins bagels as well as buns with one pass through the conveyor Standard features for both machines include variable heat and bun toast switch for toasting on one or both sides Each is available in 208V or 240V single phase Check data plate NOTICE All repair operations described in this Manual should only be carried out by a Savory Certified Service...

Страница 2: ...r the wire guard and read heater element 13 Push bulb through hole in left side inner panel It can be manually guided by reaching through rear delivery opening and up through opening in conveyor where baskets have been removed Bulb should be extended about 1 1 2 from left inner panel 14 Attach wires to thermostat Refer to wiring diagram IMPORTANT Disconnect power before attempting service or disas...

Страница 3: ...eft side panel insulation and wire guard Refer to Section O Use a suitable flat tool such as a yardstick or 24 ruler and insert through wire guard opening Gently pry heating element at curvature so it can clear opening and slide out Figure 6 Figure 6 15 Install new thermostat with two screws and replace knob 16 Position the balance of tube so it runs from bottom of thermostat along inside of front...

Страница 4: ...en adjust chain by sliding motor to the right Figure 8 Tighten bolts 6 Slide new heater unit into place and fasten with two screws 7 Replace insulation 8 Reconnect wiring harness Refer to Wiring Diagram Hold heater terminals with pliers Be sure all connections are tight and jumper has been installed between upper heater unit connections E Individual Heater Element Replacement Each heater unit is e...

Страница 5: ...lacement Coupling Bearing Right Side 1 See Section D follow steps 1 2 and 3 2 Remove the two lock nuts holding bearing retainer and remove retainer 3 Remove old bearing 9 Check sprocket alignment Figure 9 and adjust if necessary by moving clutch sprocket on motor shaft See Section G Number 5 10 Reconnect wires Refer to Wiring Diagram and replace side panel G Drive Chain Replacement Refer to Figure...

Страница 6: ...nd side panel Coupling Bearing Left side 1 Remove left side panel and insulation 2 Remove the two lock nuts holding bearing retainer and remove retainer 3 Remove old bearing 4 Install new bearing and seat in opening 5 Replace retainer and lock nuts TensionAssembly Bearing Right or Left 1 Remove either side panel 2 Remove one end of tension spring from tension bracket 3 Remove the two lock nuts hol...

Страница 7: ...ft and remove carrier chain from sprocket Move chain to one side repeat for opposite end of shaft 6 Slide shaft to one side and lift opposite end out of bearing hole Lift assembly out and under to clear carrier chains 7 Reverse above procedure to install new assembly NOTE Free wheeling left sprocket is mounted with hub side inward 8 Inspect bearing for wear or binding Replace with new if necessary...

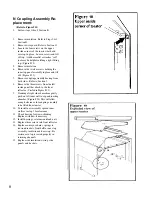
Страница 8: ... to Section J 8 Remove the three screws from the left inside panel that attach to the front reflector Circled in Figure 19 9 Standing at right side of machine gently push on left inner wall to expand toasting chamber Figure 20 This will allow enough clearance for coupling assembly to be lifted from toaster 10 To install new assembly spread inner walls as in step 9 for clearance 11 Check bearing fo...

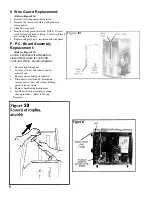
Страница 9: ...end plate nuts insulation and side panel P P C Board Assembly Replacement Refer to Figure 22 NOTICE PROCEEDWITHTHEBELOW LISTEDSTEPS ONLY IFYOURUNIT CONTAINSTHEP C BOARDASSEMBLY 1 Remove right side panel 2 Loosen set screw and remove speed control knob 3 Remove nut securing potentiometer 4 Disconnect wires from P C Board and remove screws nuts and washer holding guard to toaster frame 5 Remove boar...

Страница 10: ...10 ...

Страница 11: ...11 ...

Страница 12: ...1111 North Hadley Road Fort Wayne IN 46804 Technical Service Hotline 800 678 9511 Telephone 260 459 8200 www mercosavory com ...

Отзывы: