background image

12


20. Advanced Settings 


To navigate the Settings menu, 

1. Select 

Setting

 in the main menu and press the 

Play

 button. 

2. Press 

the 

Up

 and 

Down

 button to choose a setting and press the 

Play

 button to enter the submenu. Press the 

+


and 

 button to adjust the value. 

3.  After setting is finished, press and hold the 

Menu

 button to go back to the previous menu. 


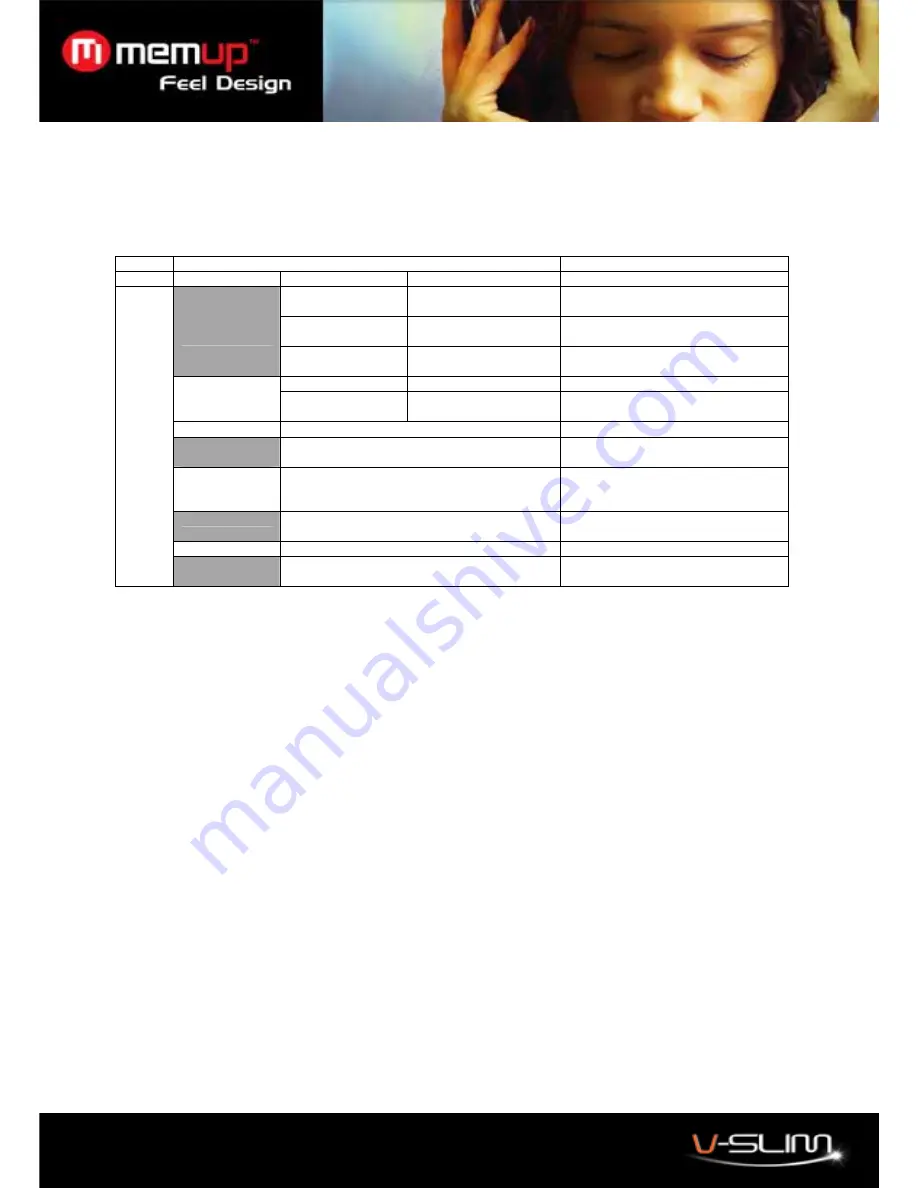
Menu Submenu 

Description 


Level 1  

Level 2 

Level 3 


EQ Normal/Rock/Pop/ 

Classic/Soft/Jazz/DBB 

Set the Equalizer of music. 

Repeat  

On/Off 

The music will be played repeatedly if 
Repeat is set to On. 


My Music 

Shuffle 

On/Off 

The music will be played randomly if 
Shuffle is set to On. 

Viewing Mode 

Manual Play/Slide Play 


My Pictures 

Slideshow Timer 

5 Sec. / 10 Sec. / 15 
Sec. 

Set the interval in slideshow mode. 

Display 

Backlight/Brightness 

Set the backlight and brightness. 

Language 
Select 

English/Simplified Chinese/Traditional Chinese  Set the Language the menu shows. 

Player 
Configure 

Sleep Time 

The player will power off 
automatically after the predetermined 
time. 

Online Device 

MTP Device / USB Disk 

Set the connected mode when 
connect to computer. 

Information 


Information about the player. 


Setting 

Reset 


Reset the player to factory default 
settings. 


21. File Navi 


All files within your player are classified in accordance with the folders' name. This function can navigate and delete files 
within your player. 

1.  In the main menu, select 

File Navi

.  

2.  Choose a folder, all files within your player are classified in accordance with the folders' name. 
3. Press 

the 

Play

 button, a submenu pops up, choose 

Remove

 to delete the media file. 

4. Press 

the 

Play

 button to play the media file. 


22. Data Exchange 


Data exchange is to copy data from internal memory to card or from card to internal memory. 

 
Format the player using the Windows Format Tool 


1.  Connect the player to the computer. 
2.  Right click on the disk representing the Media player. 
3.  Select format and start the formatting process. 

Note: Do not select NTFS from the Format File System menu. Otherwise, the player will not function, and you will 
need to format it again 

Содержание V-SLIM

Страница 1: ...Feel Design User Guide PLEASE READ CAREFULLY THIS MANUAL BEFORE USING V SLIM THE INFORMATION ON THIS GUIDE COULD BE UPDATED FOR ANY REQUEST OR MORE INFORMATION PLEASE VISIT OUR WEBSITE WWW MEMUP COM ...

Страница 2: ... listening to music slowly increase the volume until you find a comfortable listening level Static Electricity To minimize static electricity avoid operating the player in an extremely dry environment In an environment with electrostatic discharge the product may get malfunction and require the user to reset the product USB Storage Device Data Protection Always insert the USB device in the correct...

Страница 3: ...computer A battery icon blinks on the screen indicating the battery is being charged When the battery icon stays full it means the charging process has finished The process should take about 4 hours Note When the tips Warning Low Battery Voltage Shutting Down appears charge your player as soon as possible Please fully charge the battery every two or three months when the player is not used for a l...

Страница 4: ...our computer you can listen to all the music files and all data in the unit can be transferred to another computer Note Do not disconnect the player from computer during accessing 5 Transferring Media Files to V Slim by Windows Media Player You can use Windows Media Player 10 or 11 to manage your music files copy tracks from your audio CDs transfer tracks to the player and more The following is an...

Страница 5: ...E You can change your track encoding options by selecting Tools Options Rip Music 5 When finished Windows Media Player will automatically add the new tracks to your library To copy files from your PC to your V Slim 1 Connect the Player to your PC 2 Click Sync 3 Click Edit Playlist to add tracks to transfer to your player Click OK once all desired tracks have been added 4 You should now see the tra...

Страница 6: ...om internet and try again Make sure the MP3 music file and LRC file are located in same directory and the filenames are the same If not the player can not recognize the lyric file 9 Basic Operation Press and hold the Power button for about 3 seconds to turn on the player In playing mode press the Play button to pause press again it to continue Press buttons to increase decrease volume Press the sk...

Страница 7: ... main menu press the Up and Down buttons to select Menu options press the Play button to enter the menu Menu Structure Now Playing All Music Artists Albums Genres My Recordings My Music My Storage Local Memory Card Memory All videos Local Memory My Video Card Memory All Pictures Local Memory My Picture Card Memory Listen In Station List FM Band USA Band Japan Band FM Stop Playing Now Recording WAV...

Страница 8: ...onversion software preloaded on the flash memory to convert your files into correct format supported by the player 1 Select My Video in the Main Menu press Play button to enter 2 Select Local Memory or Card Memory 3 All video files in the memory display Select a file to play 14 Using the Video Conversion Tool You have to use the conversion software included in the CD to convert MPG MPG4 ASF AVI WM...

Страница 9: ...button to begin the conversion 6 Wait until the Progress bar turn to 100 to indicate that the file has been converted 7 Go finding the converted file on the chosen place and transfer it on your V Slim 15 Voice Recorder Now Recording WAV Rec 32kbps 64kbps 192kbps 384kbps Recorder Rec Type MP3 Rec 64kbps 128kbps 256kbps Now you can convert other files in the same way Click on Help for more details N...

Страница 10: ...lect a recording from the recording list for playback 16 My Ebook The player is not only a music player but also a txt book reader The player supports e book in TXT format Now Reading Dir List Local Memory Card Memory Tag List My Ebook Auto Play Gap Reading e books 1 Select My Ebook in the main menu and press the Play button 2 Select Dir List and press the Play button to enter e book list 3 Select...

Страница 11: ... receiving FM radio To switch to FM radio mode 1 Select FM from the Menu list and press the Play button 2 Select FM Band and press the Play button 3 Select one frequency band from USA and Japan 4 Press the play button to confirm and go back to previous menu 5 Select Listen In to start listen to FM radio Using the FM Settings menu To navigate the FM Settings menu in FM Radio mode press the Menu but...

Страница 12: ...m Setting the slideshow timer 1 Select Setting in the main menu 2 Press the Play button 3 Select My Pictures and press the Play button 4 Select Slideshow timer and press the Play button 5 Select one interval and press the Play button to confirm 6 The pictures will be show automatically at the interval you selected when you view the pictures in Slide Play Note The media player supports pictures in ...

Страница 13: ...Sleep Time The player will power off automatically after the predetermined time Online Device MTP Device USB Disk Set the connected mode when connect to computer Information Information about the player Setting Reset Reset the player to factory default settings 21 File Navi All files within your player are classified in accordance with the folders name This function can navigate and delete files w...

Страница 14: ...rgeable Li polymer Battery Equalizer Normal Classic Rock Jazz Soft Pop and DBB Display 320 x 240 dots Dot matrix TFT color display ID3 Tag display Controls Power On Off Play Pause Volume Right Volume Left Skip Next Down Skip Previous Up Hold Reset Audio Playback Windows Media Audio WMA MPEG Audio Layer 3 MP3 Audio Playback MP3 WMA Video Playback Movie AVI WMV Signal to Noise Ratio 90 dB Frequency ...

Отзывы: