background image

 12 


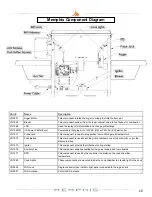
Memphis Component Diagram 

Part # 

Name 

Description 

VG9501 

Auger Motor 

This component rotates the auger to supply fuel into the burn pot 

VG1967 

Blower 

This component pulls air from the lower cabinet and into the firebox for combustion 

VG1968 

LCD 

Used to display Grill information and change grill settings 

VG1969(E) 

US Power Cable (Euro) 

Power cable that plugs into 120VAC (US) or 240VAC (EU) wall outlet 

VG1971 

Probe Jack 

This component is used to plug probes for monitoring meat temperature 

VG1972 

Push Button 

This component is used to set the grill to cooldown, reset the controller, or put the 
display to sleep 

VG1975 

Igniter 

This component provide the initial heat during startup 

VG1976 

Auxiliary Fan 

This component supplies cooling for the power supply and logic boards 

VG1977 

RTD 

This component is used by the controller to determine the cook chamber 
temperature 

VG1980 

Cook Lights 

These components are mounted inside the cook chamber to provide light to the cook 

VG9026 

WiFi Jack 

Single conductor jack install in right panel connected to the logic board 

VG9027 

WiFi Antenna 

2.4GHz WiFi antenna 

Содержание Elite Built-In ITC 3

Страница 1: ...s for future reference Memphis Elite Built In ITC 3 IntelliBurn TechnologyTM Model Number VGB0002S 11 Memphis Component Diagram 12 Memphis Fuse Diagram 13 Built In Grill Island Dimensions 3 Hardware Components 4 Grill Installation and Operation 5 9 Memphis WiFi Setup 10 Revision A1 VG0893 ...

Страница 2: ...stible materials The grill may be supported by either the three support brackets or the four leveling feet Please note that there must be at least 3 8 1 0 cm clearance between the bottom of the grill and the structures DIMENSIONS A 18 45 8 cm B 3 8 1 0 cm C 2 5 1 cm D 3 1 2 8 9 cm F 30 76 2 cm E 1 8 0 5 cm Power Cable Loca on Built in Bracket NOTE Clearance dimension E may only be used when the op...

Страница 3: ... 3 1 2 MIN 8 9 cm E Standard Cabinet Height NOTE Dimensions are to the finished surfaces Grill cavity surfaces are to be plumb and level to ensure a proper fit Power Requirements 110 120VAC supply required within 10 feet of the ITC Power cable located at the back right of the grill See note on previous page European 220VAC Top View Front View ...

Страница 4: ...5 4 TIME REQUIRED 1 5 Hours TOOLS REQUIRED 3 8 Open End Wrench Socket or Adjustable Wrench Phillips Screw Driver or Drill Snips or Heavy Duty Scissors Cut Resistant Gloves 5mm Allen Wrench 10 Leveling Feet DS4668 4 9 Meat Probe VG0956 1 11 Concrete Anchor DS2349 2 12 10 SS PH Screw DS2350 2 6 Antenna VG9023 1 14 Right Mounting Bracket VG0802 1 13 Left Mounting Bracket VG0803 1 15 Right Mounting Br...

Страница 5: ...fect the controller s operation Hopper Lid Orientation For easier pellet refill the hopper lid can be oriented to open toward the front of the grill instead of the rear when access to the back of the grill is difficult or unavailable To switch the orientation to be opened from the front the shoulder bolts holding the hopper lid must be removed Rotate the lid so the mounting holes are towards the b...

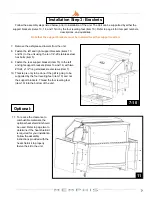
Страница 6: ...s item 1 from inside the grill hood To remove the Savorizer cut the 4 zip ties holding it in place Set aside grates and Savorizer until needed 2 Peel all plastic protective film from the grill Be diligent about inspection as the protective film will be hard to remove once the grill is installed and first burned Installation Step 2 Wiring 3 Remove two 5mm socket head screws from Display Housing shi...

Страница 7: ...ad the four leveling feet item 10 into the bottom of the unit Follow the assembly steps listed below prior to installation of the unit The Unit can be supported by either the support brackets items 13 14 and 15 or by the four leveling feet item 10 Refer to page 4 for item part numbers descriptions and quantities Note that the support brackets must be installed for either support method 7 10 11 To ...

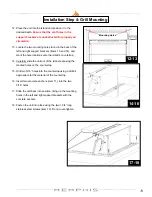
Страница 8: ...ark the hole locations onto the island s countertop 14 Carefully slide the unit out of the island exposing the marked holes on the countertop 15 Drill two 5 16 holes into the countertop using a drill bit appropriate for the material of the countertop 16 Insert two concrete anchors item 11 into the two 5 16 holes 17 Slide the unit back into position lining up the mounting holes in the left and righ...

Страница 9: ...ackets found inside the unit 21 Place the main cook grates item 1 onto the front and rear supports Place the upper cook grate item 1 onto the left and right upper brackets found inside the unit Vent holes on the mounting brackets must remain unobstructed for proper air circulation Grill must be accessible able to slide out for any future repair or maintenance Refer to the Owners Guide for first ti...

Страница 10: ...etting Screen and select Add Grill 7 Select your grill from the provisioning screen 8 Select the 2 4GHz network you would like to connect to your Memphis grill enter the network password and press Provision 9 If successful the controller will display Connection Successful and show the WiFi signal strength in the top right corner Note If a red X is displayed on the controller instead of the signal ...

Страница 11: ...rd VG1973 5V Wiring Harness 4 pin connector from power supply board to the logic board VG1975 Igniter Wiring Harness 2 pin connector from igniter to the logic board VG1976 Auxiliary Fan Wiring Harness 2 pin connector from Aux fan to logic board VG1977 RTD Wiring Harness 2 Pin connector from RTD to the logic board Connection to board is non polarized VG1978 24V Wiring Harness 2 pin connector from p...

Страница 12: ... probes for monitoring meat temperature VG1972 Push Button This component is used to set the grill to cooldown reset the controller or put the display to sleep VG1975 Igniter This component provide the initial heat during startup VG1976 Auxiliary Fan This component supplies cooling for the power supply and logic boards VG1977 RTD This component is used by the controller to determine the cook chamb...

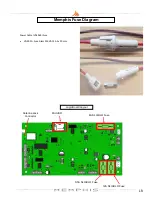
Страница 13: ...13 Memphis Fuse Diagram Logic Board Layout 4A SLO BLO Fuse 0 5A SLO BLO Fuse 12A SLO BLO Fuse MicroSD Antenna Jack Connector Power Cable VG1969 Fuse VG9021 Fuse Glass 250VAC 5A 5 x 20 mm ...

Отзывы: