background image

22

SETTING THE MENUS (CONTINUED)

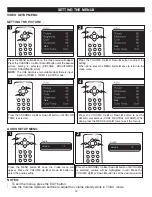
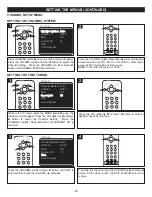
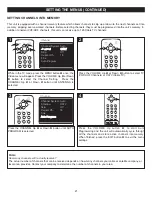
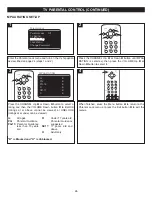
After setting channels into memory, you can add or delete channels as follows: 

Press the VOLUME Up 

1

or Down 

2

button to select a

desired channel to add or delete.

1

2

2

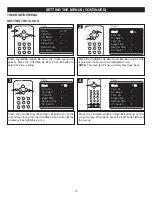
While in the TV mode, press the MENU button 

1

once; the

Video menu will appear. Press the VOLUME Up 

2

or Down

3

button to select the Channel Setting.  Press the

CHANNEL Up 

4

or Down 

5

button until CURRENT CH. is

selected.

Channel System  Auto

Antenna CATV

Skip 

Off

Off

Current Ch. 

13

Fine

Auto Program

C

Channel System  Auto

Antenna CATV

Skip Off

Current Ch. 

13

13

Fine

Auto Program

Channel

Channel System  Auto

Antenna  

CATV

Skip Off

Current Ch. 

13

Fine

Fine

Auto Program

Channel

Channel System  Auto

Antenna  

CATV

Skip Off

Current Ch. 

13

Fine

Auto Program

Auto Program

Channel

1

5

2

3

1

4

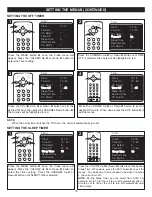
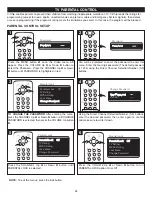
Press the VOLUME Up 

1

or Down 

2

button to turn Skip

feature ON (to skip the channel) or OFF (to memorize the

channel).  When done, press the EXIT button 

3

to exit the

menus.

3

1

2

4

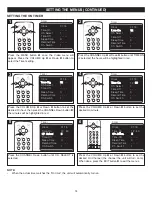
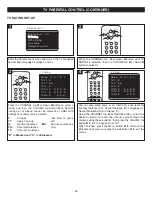
Press the CHANNEL Up 

1

or Down 

2

button until SKIP is

selected.

Channel System  Auto

Auto

Antenna CATV

Skip Off

Current Ch. 

13

Fine

Auto Program

Channel

Channel System  Auto

Antenna 

CATV

CATV

Skip Off

Current Ch. 

13

Fine

Auto Program

Channel

Channel System  Auto

Antenna CATV

Skip 

Off

Off

Current Ch. 

13

Fine

Auto Program

Channel

Channel System  Auto

Antenna CATV

Skip Off

Current Ch. 

13

13

Fine

Auto Program

Channel

Channel System  Auto

Antenna  

CATV

Skip Off

Current Ch. 

13

Fine

Fine

Auto Program

Channel

C

3

1

2

ADDING AND DELETING CHANNELS

Содержание MT2024

Страница 1: ...Before operating this product please read these instructions completely User s Guide 20 COLOR TV WITH REMOTE CONTROL MT2024 ...

Страница 2: ...n Using the Audio Video Out Jacks 11 Setting the Menus 12 Video Setup Menu 12 Audio Setup Menu 12 Timer Setup Menu 13 Setting the On Timer 14 Setting the Off Timer 15 Setting the Sleep Timer 15 Setting the Remind Timer 16 Setup Menu 17 Channel Setup Menu 20 Setting Channels into Memory 21 Adding and Deleting Channels 22 Calendar Setup Menu 23 TV Parental Control 24 Parental Control Setup 24 TV Rat...

Страница 3: ...2 IMPORTANT SAFETY INSTRUCTIONS ATTENTION POUR ÉVITER LES CHOC ÉLECTRIQUES INTRODUIRE LA LAME LA PLUS LARGE DE LA FICHE DANS LA BORNE CORRESPONDANTE DE LA PRISES ET POUSSER JUSQU AU FOND ...

Страница 4: ... operated only from the type of power source indicated on the marking label If you are not sure of the type of power supply to your home consult your appliance dealer or local power company For products intended to operate from battery power or other sources refer to the operating instructions 11 GROUNDING OR POLARIZATION This product is equipped with a polarized alternating current line plug a pl...

Страница 5: ...ng condition 21 WALL OR CEILING MOUNTING The product should be mounted to a wall or ceiling only as recommended by the manufacturer 22 DAMAGE REQUIRING SERVICE Unplug the product from the wall outlet and refer servicing to qualified service personnel under the following conditions a When the power supply cord or plug is damaged b If liquid has been spilled or objects have fallen into the product c...

Страница 6: ... with the 2 blades into a conveniently located AC outlet having 120V 60Hz NOTE The AC plug supplied with the unit is polarized to help minimize the possibility of electric shock If the AC plug does not fit into a nonpolarized AC outlet do not file or cut the wide blade It is the user s responsibility to have an electrician replace the obsolete outlet AC Plug AC Outlet NOTE When setting the TV Menu...

Страница 7: ...Down Buttons 3 RECALL Button 4 TV AV Button 5 P STD Picture Button 6 Power Button 7 CHANNEL Up Down Buttons 8 Direct Channel Selection Buttons 0 9 9 Button 10 MTS SAP Button 11 MUTE Button 12 DISPLAY Button 13 EXIT Button REMOTE NOTE When setting the TV Menus the Channel Up Down buttons are used as Navigation Up Down and the Volume Up Down buttons are used as Navigation Right Left ...

Страница 8: ... batteries as indicated next to the battery compartment Reversed batteries may cause damage to the device 3 Do not mix different types of batteries together e g Alkaline Rechargeable and Carbon zinc or old batteries with fresh ones 4 If the device is not to be used for a long period of time remove the batteries to prevent damage or injury from possible battery leakage 5 Do not try to recharge batt...

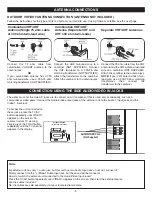
Страница 9: ... combination antenna has a 300 ohm twin lead wire use a 300 75 ohm matching transformer NOT SUPPLIED CONNECTION USING THE SIDE AUDIO VIDEO IN JACKS The optimal use for the side A V jacks are to connect an A V component that is used only occasionally such as a camcorder or video game Connect the Audio Video output jacks of the external unit to the Audio 1 Input jacks and the Video 1 Input jack To a...

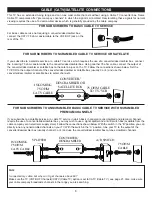
Страница 10: ... descrambler or satellite box usually 3 or 4 and use the converter descrambler or satellite box to select channels INCOMING 75 OHM CATV CABLE SPLITTER A B SWITCH 75 OHM CABLE CONVERTER DESCRAMBLER CONVERTER DESCRAMBLER OR SATELLITE BOX 75 OHM CABLE TO TV VCR INCOMING 75 OHM CATV CABLE FOR SUBSCRIBERS TO UNSCRAMBLED BASIC CABLE TV SERVICE WITH SCRAMBLED PREMIUM CHANNELS If you subscribe to a satell...

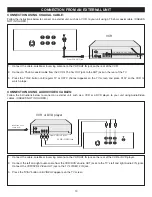
Страница 11: ...on the VCR to watch a tape VCR INCOMING CATV CABLE From VCR OUT jack 1 Connect the cable satellite or incoming antenna to the VHF UHF IN jack on the rear of the VCR or DVD player 2 Connect the left and right audio cable from the VCR DVD s Audio OUT jacks to the TV s left and right Audio 2 IN jacks Connect the VCR DVD s Video OUT jack to the TV s VIDEO 2 IN jack 3 Press the TV AV button until VIDEO...

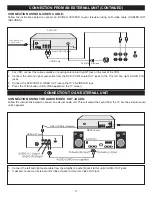
Страница 12: ...ks 3 Connect the DVD VCR s S VIDEO OUT jack to the TV s S VIDEO IN jack 4 Press the TV AV button until S VHS appears on the TV screen VCR DVD AUDIO Cord From VCR OUT jacks INCOMING CATV CABLE VCR To S VIDEO IN jack CONNECTION USING THE AUDIO VIDEO OUT JACKS Follow the instructions below to connect an external audio unit This will output the sound from the TV into the external audio unit s speakers...

Страница 13: ...H SELECT VOL VOL ADJUST AUDIO VOLUME 20 BALANCE 00 20 CH CH SELECT VOL VOL ADJUST CLOCK TIME 19 20 ON TIME 12 30 OFF TIME 21 00 ALARM BESPOKE TIME POSITION CH CH SELECT VOL VOL ADJUST AUDIO VOLUME 20 BALANCE 00 20 CH CH SELECT VOL VOL ADJUST 1 2 3 1 AUDIO SETUP MENU Picture 85 Brightness 60 Color 60 Sharpness 80 Tint 0 Color Temp Cool Video Clock 01 13 Time On Ch Select 1 Time Off Sleep Time 0 Tim...

Страница 14: ...nd Time Ch Switch 1 Timer 4 3 1 2 TIMER SETUP MENU Press the MENU button 1 once the Video menu will appear Press the VOLUME Up 2 or Down 3 button to select the Timer setting Sharpness 80 Tint 0 Color Temp Cool Clock 01 13 Time On Ch Select 1 Time Off Sleep Time 0 Remind Time Ch Switch 1 Timer Language English Background On Black Stretch On VNR On Fade Off C Caption CC1 Demo Mode Setup Channel Syst...

Страница 15: ...eep Time 0 Remind Time Ch Switch 1 Timer 5 Press the VOLUME Up 1 or Down 2 button to set the desired On Channel the channel the unit will turn on to When done press the EXIT button 3 to exit the menus Clock 01 13 13 Time On Ch Select 1 Time Off Sleep Time 0 Remind Time Ch Switch 1 Timer Clock 01 13 Time On 12 12 Ch Select 1 Time Off Sleep Time 0 Remind Time Ch Switch 1 Timer Clock 01 13 Time On Ti...

Страница 16: ...Timer setting Tint 0 Color Temp Cool Clock 01 13 Time On Ch Select 1 Time Off Sleep Time 0 Remind Time Ch Switch 1 Timer Language English Background On Black Stretch On VNR On Fade Off C Caption CC1 Demo Mode Setup Channel System Auto Air Cable Cable Skip Off Current Ch 13 Fine Auto Program Channel Solar 2005 6 1 s m t w t f s 1 2 3 4 5 6 7 8 9 10 11 12 13 14 15 16 17 18 19 20 21 22 23 24 25 26 27...

Страница 17: ... Timer Clock 01 13 Time On 12 30 Ch Select 5 Time Off 12 45 Sleep Time 0 Remind Time Ch Switch 7 7 Timer 2 1 2 Press the MENU button 1 once the Video menu will appear Press the VOLUME Up 2 or Down 3 button to select the Timer setting Color Temp Cool Clock 01 13 Time On Ch Select 1 Time Off Sleep Time 0 Remind Time Ch Switch 1 Timer Language English Background On Black Stretch On VNR On Fade Off C ...

Страница 18: ...ACKGROUND is selected Language English Background On Black Stretch On VNR On Fade Off C Caption CC1 Demo Mode Setup Language English English Background On Black Stretch On VNR On Fade Off C Caption CC1 Demo Mode Setup Language English Background On On Black Stretch On VNR On Fade Off C Caption CC1 Demo Mode Setup Language English Background On Black Stretch On On VNR On Fade Off C Caption CC1 Demo...

Страница 19: ...o Mode Setup 1 5 2 3 1 4 SETTING THE VNR VIDEO NOISE REDUCTION Press the VOLUME Up 1 or Down 2 button to turn the Fade ON While the Fade function is on the picture will fade in when the TV is turned on and fade out when it is turned off or OFF When done press the EXIT button 3 to exit the menus 3 1 2 2 Press the MENU button 1 once the Video menu will appear Press the VOLUME Up 2 or Down 3 button t...

Страница 20: ...o Mode Setup 1 5 2 3 1 4 SETTING THE CLOSED CAPTIONS Press the VOLUME Up button to activate the Demo mode the unit will then enter the Demo mode and the screen will show various features 1 3 2 Press the MENU button 1 once the Video menu will appear Press the VOLUME Up 2 or Down 3 button to select the Setup setting Press the CHANNEL Up 4 or Down 5 button until DEMO MODE is selected Language English...

Страница 21: ...p 2 or Down 3 button to select the Channel Setting Press the CHANNEL Up 4 or Down 5 button until CURRENT CH is selected Channel System Auto Antenna CATV CATV Skip Off Current Ch 13 Fine Auto Program Channel Channel System Auto Antenna CATV Skip Off Off Current Ch 13 Fine Auto Program Channel Channel System Auto Antenna CATV Skip Off Current Ch 13 13 Fine Auto Program Channel Channel System Auto An...

Страница 22: ... 13 Fine Auto Program Channel Channel System Auto Antenna CATV CATV Skip Off Current Ch 13 Fine Auto Program Channel Channel System Auto Antenna CATV Skip Off Off Current Ch 13 Fine Auto Program Channel Channel System Auto Antenna CATV Skip Off Current Ch 13 13 Fine Auto Program Channel Channel System Auto Antenna CATV Skip Off Current Ch 13 Fine Fine Auto Program Channel 1 5 2 3 1 4 Press the VOL...

Страница 23: ... Fine Auto Program Channel Channel System Auto Antenna CATV Skip Off Current Ch 13 Fine Auto Program Auto Program Channel 1 5 2 3 1 4 Press the VOLUME Up 1 or Down 2 button to turn Skip feature ON to skip the channel or OFF to memorize the channel When done press the EXIT button 3 to exit the menus 3 1 2 4 Press the CHANNEL Up 1 or Down 2 button until SKIP is selected Channel System Auto Auto Ante...

Страница 24: ... 15 16 17 18 19 20 21 22 23 24 25 26 27 28 29 30 Calendar 2005 6 1 1 s m t w t f s 1 2 3 4 5 6 7 8 9 10 11 12 13 14 15 16 17 18 19 20 21 22 23 24 25 26 27 28 29 30 Calendar 1 2 3 1 Press the VOLUME Up 1 or Down 2 button to set the day When done press the EXIT button 3 to exit the menus 2005 2005 6 1 s m t w t f s 1 2 3 4 5 6 7 8 9 10 11 12 13 14 15 16 17 18 19 20 21 22 23 24 25 26 27 28 29 30 Cale...

Страница 25: ...V Rating Password Password New Password Confirm Change Password Parental Lock Off TV Rating MPAA Rating Lock Menu Change Password Change Password Parental Lock Parental Lock Off Parental Lock Off TV Rating MPAA Rating Lock Menu Change Password Parental Lock Parental Lock Off TV Rating TV Rating MPAA Rating Lock Menu Change Password Parental Lock TV Rating Password Password New Password Confirm Cha...

Страница 26: ...us 2 3 4 1 5 4 Press the CHANNEL Up 1 or Down 2 button to select a rating and then the VOLUME Up button 3 to BLOCK ratings at or above cannot be viewed or UNBLOCK ratings at or under can be viewed B is Blocked and U is Unblocked 1 2 3 3 Y All ages Y7 Ages 7 and up G General Audience PG Parental Guidance 14 Parental Guidance less than 14 years old MA Mature Audiences Only Parental Lock Off Parental...

Страница 27: ...button to select a rating and then the VOLUME Down button 3 to BLOCK ratings at or above cannot be viewed or UNBLOCK ratings at or under can be viewed B is Blocked and U is Unblocked 2 3 1 G All ages PG Parental Guidance PG 13 Parental Guidance less than 13 years old R Under 17 years old Parental Guidance suggested NC17 17 years old and above X Adult only 3 2 Rating FV D L S V TV Y B TV Y7 B B TV ...

Страница 28: ... enter the Lock menu Press the CHANNEL Up 3 or Down 4 button to select AV Lock or Program Lock Press the VOLUME Up 1 or Down 2 to turn the option ON or OFF 3 4 1 2 3 AV Lock On On Program Lock On On Lock When finished press the Menu button 1 to return to the Parental Lock menu or press the Exit button 2 to exit the menus 1 2 3 NOTE When AV Lock is ON the Audio Video connections will be locked cann...

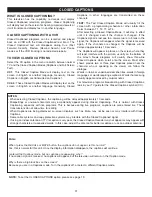
Страница 29: ...V option must be set to CATV when using cable see step 2 above Why are some channels scrambled You must subscribe to these channels through your cable company For proper operation before selecting channels they must be set into the unit s Program memory see page 21 Press and release the CHANNEL Up 1 or Down 2 button The unit automatically stops at the next channel set into memory Direct Program Se...

Страница 30: ...3 buttons Mute will disappear form the screen 3 1 2 1 DISPLAY Press the DISPLAY button once to display the current information on the screen Channel number or Video mode Press again to clear 2 1 RECALL Press the RECALL button to switch between the present channel and the last channel chosen 2 1 FAQ How do I watch the device connected to the side audio video jacks Press the TV AV button as describe...

Страница 31: ... Press to select between the picture modes Standard Vivid Personal Listen select just to listen not to watch or Movie 1 MTS SAP Press to select between Auto Sap Second Audio Program Stereo or Mono NOTE This function is for TV mode only 1 Press the VOLUME Up 1 Down 2 buttons to adjust the sound level 1 2 1 VOLUME Buttons Set the sound as follows ...

Страница 32: ... programs will usually show three line Closed Captions which scroll onto the screen Most other shows provide two or three lined Captions placed near the character who is speaking so the viewer can follow the dialogue Words in italics or underlined describe titles words in foreign languages or words requiring emphasis Words that are sung usually appear enclosed by musical notes For television progr...

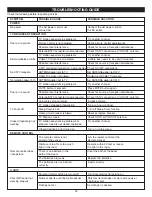
Страница 33: ...local interference Check for source of reception disturbance Antenna CATV connector is not connected Check CATV connection or VHF UHF antenna Volume is set to minimum Increase volume TV station stopped broadcasting Tune to a new channel TV shuts off Sleep Timer is set Turn off Sleep Timer function Home circuit breaker is blown Reset or replace breaker TV Signal is weak Check CATV or VHF UHF antenn...

Страница 34: ... the reception SNOW If your receiver is located in the fringe area of a television station where the signal is weak your picture may be marred by the appearance of small dots When the signal is extremely weak it may be necessary to install an external antenna to improve the picture RADIO FREQUENCY INTERFERENCE This interference produces moving ripples or diagonal streaks and in some cases causes l...

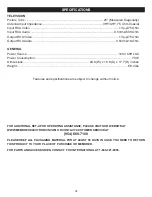
Страница 35: ...ons 24 6 W x 18 9 D x 17 7 H inches Weight 59 4 lbs Features and specifications are subject to change without notice 34 SPECIFICATIONS FOR ADDITIONAL SET UP OR OPERATING ASSISTANCE PLEASE VISIT OUR WEBSITE AT WWW MEMOREXELECTRONICS COM OR CONTACT CUSTOMER SERVICE AT 954 660 7100 PLEASE KEEP ALL PACKAGING MATERIAL FOR AT LEAST 90 DAYS IN CASE YOU NEED TO RETURN THIS PRODUCT TO YOUR PLACE OF PURCHAS...

Страница 36: ...Memcorp Inc Weston FL Printed in Hong Kong Visit our website at www memorexelectronics com ...

Отзывы: