background image

SAFELY REMOVING YOUR PLAYER FROM THE COMPUTER
NOTE: 
To avoid damage to your player or data loss, always follow the procedure listed below before
disconnecting the USB cable from your computer or disconnecting the player from the USB cable.

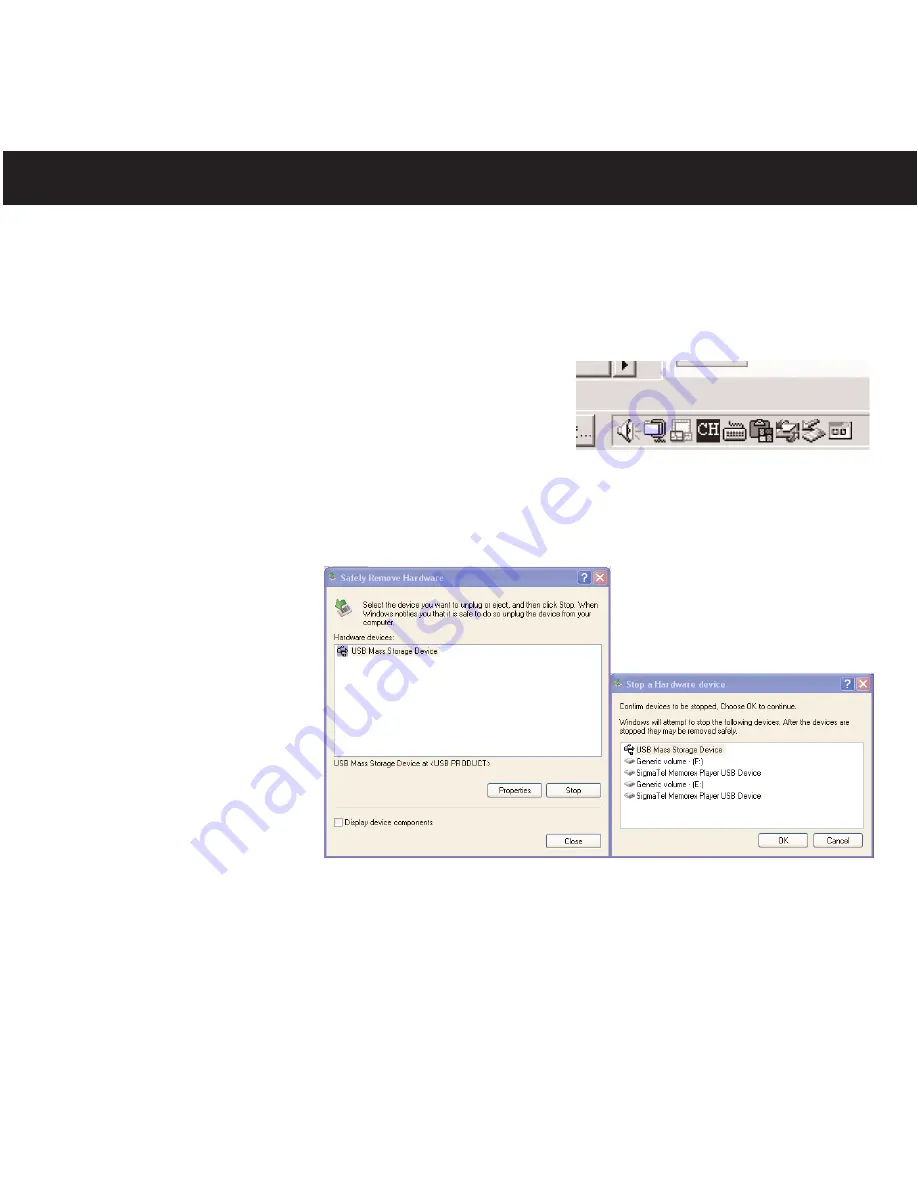
Using your mouse, double click the "Safely Remove Hardware" icon on the task bar. 

From the "Safely Remove Hardware" window, select "USB
Mass Storage Device" and click the "Stop" button. The "Stop a
Hardware Device" window will pop up as shown:
Click "OK". When the "Safe to Remove Hardware" window is
displayed, you may remove the player from the USB cable or
remove the USB cable from the computer. The unit will then
restart, update and check the index automatically.

NOTE: If the “Safely Remove Hardware” icon is not displayed on the task bar, please double click on
My Computer.  Right click on
“Removable Disk” and left click
on “eject”.  Then it is safe to
remove the player from the
computer. 

After disconnecting the player from the computer, the player will restart again, “Welcome” followed by
“Memorex” will appear briefly and then the player will check and update the index automatically if there
are new tracks/files which were added to the player. It will take from several seconds to several
minutes to check/update the index (depending on the total files/tracks added). When it is finished, the
Main Menu will show at the display automatically.

DOWNLOADING AND TRANSFERRING FILES (CONTINUED)

12

Содержание MHD8015

Страница 1: ...User s Guide 1 5 GB HardDisk Storage MP3 WMA Player MHD8015 Before operating this product please read these instructions completely...

Страница 2: ...angle is intended to alert the user to the presence of uninsulated dangerous voltage within the product s enclosure that may be of sufficient magnitude to constitute a risk of electric shock to person...

Страница 3: ...h the windows closed during periods of excessive heat ROAD SAFETY Do not use headphones while driving cycling or operating any motorized vehicle It may create a traffic hazard and it is illegal in som...

Страница 4: ...llation This equipment generates uses and can radiate radio frequency energy and if not installed and used in accordance with the instructions may cause harmful interference to radio communications Ho...

Страница 5: ...your hearing Guard against this by setting your equipment at a safe level BEFORE your hearing adapts To establish a safe level Start your volume control at a low setting Slowly increase the sound unti...

Страница 6: ...garbage disposals alarm clock at two feet THE FOLLOWING NOISES CAN BE DANGEROUS UNDER CONSTANT EXPOSURE 90 Subway motorcycle truck traffic lawn mower 100 Garbage truck chain saw pneumatic drill 120 Ro...

Страница 7: ...e Jack 2 FWD Button 3 REV Button 4 DC IN 5V Jack z 5 Play Pause p Button 6 Skip Search m Button 7 Stop X Button 8 Volume Scroll Up Down Control 9 Display 10 USB Cover and Port 11 HOLD Switch 12 Reset...

Страница 8: ...battery indicator at the top right becomes low Below are the icons which will give the rechargeable battery status To charge the battery with the unit on 1 Connect to AC as described above and turn t...

Страница 9: ...using a Macintosh For Windows98SE The USB mass storage function will not be activated without driver installation To activate the USB mass storage function please use the installation CD Rom to instal...

Страница 10: ...nstallation CD Explorer 4 Then the Windows 98 Driver Installation Guide Explorer will appear on the computer screen Follow the Installation Guide s procedure to install the Driver to your computer WIN...

Страница 11: ...computer right click the Removable Disk and left click on Format 4 At the Format window select FAT32 from the file system pull down menu then click start to format the unit see figure to the right NOT...

Страница 12: ...tle and or Genre style of music When a file is copied to this unit this unit retrieves the ID3 Tag information from the file The unit uses this information to index the file into the Artist Album Trac...

Страница 13: ...rom the computer The unit will then restart update and check the index automatically NOTE If the Safely Remove Hardware icon is not displayed on the task bar please double click on My Computer Right c...

Страница 14: ...he installation will automatically start 4 Follow the RealOne Install Wizard online prompts to complete the installation NOTES Before saving tracks to your RealOne player open the RealOne player and c...

Страница 15: ...Media view your entire library to view a list of the saved songs 6 Click on the yellow plus sign on the left bottom tool bar and click on Add File to add the tracks to the Digital Audio player Once y...

Страница 16: ...o CD or Device 2 Click on the Items to Copy pull down menu to locate the music files you wish to download Make sure to tick the box next to the files The unit will restart automatically Welcome will a...

Страница 17: ...DOWNLOADING AND TRANSFERRING FILES CONTINUED 16 3 4 See page 12...

Страница 18: ...Volume Scroll Up Down control 1 1 To return to the previous menu press the REV button 1 To advance to the next menu press the FWD button 2 or press the Volume Scroll Up Down control 3 To return to th...

Страница 19: ...Transport Indicator Song Title Battery Indicator Battery Track Progress Bar When a track is being played a progress bar is displayed showing how much of the track has been played and how much remains...

Страница 20: ...an ARTIST select the desired artist by using the Volume Scroll Up Down control 1 then select the desired album by using the Volume Scroll Up Down control 1 followed by pressing the Play Pause p butto...

Страница 21: ...the Power On Off M Main Menu button 2 until the unit completely turns off NOTES The volume can only be adjusted at the Now Playing Track Menu Press the REV button repeatedly to return to that menu See...

Страница 22: ...e the player back to the beginning of the currently playing file Press the Skip Search o button repeatedly to move the player back to lower numbered files in the folder 1 2 During playback press and h...

Страница 23: ...press the Volume Navigation control to select it the Settings menu will appear 1 2 RANDOM PLAYBACK Select RANDOM MODE using the Volume Navigation control then press the Volume Navigation control to se...

Страница 24: ...IST using the Volume Scroll Up Down control 1 then press the Volume Scroll Up Down control 1 to select it Select a desired Artist Albums Genres or Playlist using the Volume Scroll Up Down control 1 th...

Страница 25: ...Volume Scroll Up Down control to select it the Settings menu will appear 1 2 REPEAT PLAYBACK Select REPEAT MODE using the Volume Scroll Up Down control then press the Volume Scroll Up Down control to...

Страница 26: ...pressed 2 6 Select the TRACKS folder using the Volume Scroll Up Down control 1 then press the Volume Scroll Up Down control 1 to select it followed by the Play Pause p button 2 to start Repeat playbac...

Страница 27: ...gation control to select it the Settings menu will appear 1 2 INTRO PLAYBACK Select INTRO MODE using the Volume Navigation control then press the Volume Navigation control to select it the Intro indic...

Страница 28: ...l Up Down control 1 then press the Volume Scroll Up Down control 1 to select it Select a desired Artist Albums Genres or Playlist using the Volume Scroll Up Down control 1 then press the Play Pause p...

Страница 29: ...l to select it the Create Playlist menu will appear NOTE Each time you create a new playlist the player will arrange a new number of playlist i e the first playlist is PLY000 the second PLY001 etc 1 3...

Страница 30: ...own control 1 then press the Play Pause p button 2 to start playback OR Press the Volume Scroll Up Down control 1 Then you can use the Volume Scroll Up Down control 1 to select the desired tracks insi...

Страница 31: ...the Volume Scroll Up Down control then press the Volume Scroll Up Down control to select it the Playlist Manager menu will appear 1 2 MODIFYING A PLAYLIST Adding or Deleting a Track Select MODIFY EXI...

Страница 32: ...dding tracks in the playlist A track can be added as many times as desired TO DELETE Select DELETE TRACKS using the Volume Scroll Up Down control then press the Volume Scroll Up Down control to select...

Страница 33: ...ect DELETE EXISTING PLAYLIST using the Volume Scroll Up Down control then press the Volume Scroll Up Down control to select it the Playlist menu will appear 1 3 Select a Playlist to delete using the V...

Страница 34: ...nds whenever a button is pressed which will help you view the screen in dark areas 1 2 ADJUSTING THE BACKLIGHT SETTING While in the Main Menu select SETTINGS using the Volume Scroll Up Down control th...

Страница 35: ...assical or Pop using the Volume Scroll Up Down control then press the Volume Scroll Up Down control to select it and return to the SETTINGS menu 1 3 GRAPHIC EQ To make your own EQ settings select the...

Страница 36: ...hard drive While in the Main Menu select SETTINGS using the Volume Scroll Up Down control then press the Volume Scroll Up Down control to select it the Settings menu will appear Select REFRESH INDEX t...

Страница 37: ...it the Settings menu will appear Select ABOUT then press the Volume Scroll Up Down control to view the information of this unit 1 1 ABOUT If the player is not working properly or the buttons do not f...

Страница 38: ...formats Use the record function in MusicMatch to enco de the files into MP3 or WMA formats and then save them to the playlist Display shows ows RAM Test Failure Display shows HDD Test Failure Display...

Страница 39: ...noise ratio 60 dB Audio THD total harmonic distortion less than 0 1 Frequency response 20Hz 20kHz Headphone Output 12 mW 16 Ohms File Support MP3 WMA Windows Media Audio WMA file with DRM Bit Rate 8kb...

Страница 40: ...4 660 7100 PLEASE KEEP ALL PACKAGING MATERIAL FOR AT LEAST 90 DAYS IN CASE YOU NEED TO RETURN THIS PRODUCT TO YOUR PLACE OF PURCHASE OR TO MEMOREX FOR PARTS AND ACCESSORIES CONTACT FOX INTERNATIONAL A...

Страница 41: ...Memcorp Inc Weston FL Printed in China Visit our website at www memorexelectronics com...

Отзывы: