background image

12

OPERATION (Continued)

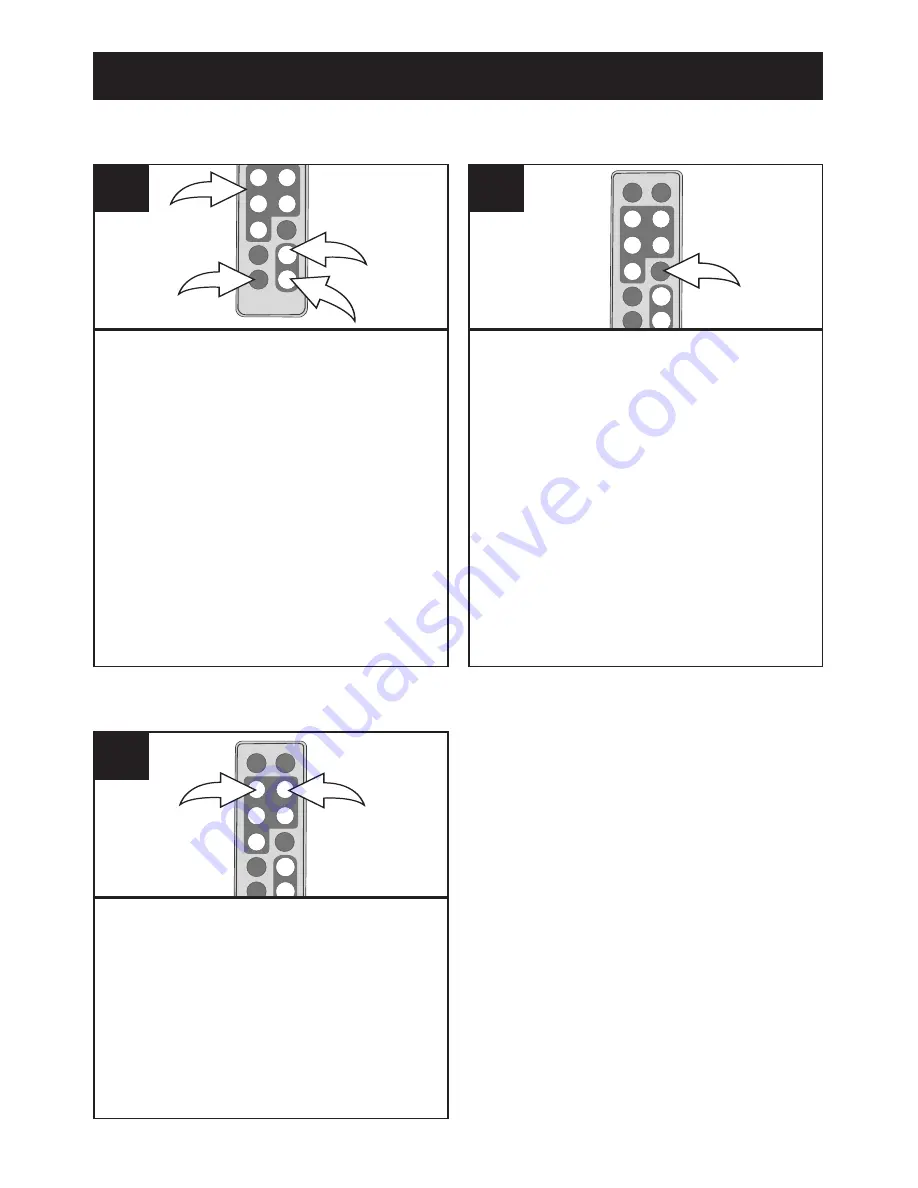
While viewing a photo (see the

previous page), press the ZOOM

IN button 

1

; the unit will zoom x2.

Repeatedly press to zoom up 

to x13. 

Use the Navigation 

,

®

,

π

,

buttons 

2

to move the photo on

the screen.

Press the ZOOM OUT button 

3

to

zoom back out of the photo.

To exit Zoom mode and return to

normal photo playback, press the

EXIT button 

4

.

1

2

4

3

1

While viewing a photo (see the

previous page), press the ROTATE

button to rotate the photo 90

degrees clockwise. Repeat to

continue to rotate as desired.

1

1

2

ZOOM

ROTATE

While viewing a photo (see the

previous page), press the

Navigation 

and/or 

®

button 

to skip to the previous or 

next picture.

1

SKIP

Содержание MDF1061-WLS

Страница 1: ...ons ATTENTION The exclamation point within an equilateral triangle is intended to alert the user to the presence of important operating and maintenance servicing instructions in the literature accompanying the appliance FCC WARNING This equipment may generate or use radio frequency energy Changes or modifications to this equipment may cause harmful interference unless the modifications are express...

Страница 2: ...rrect the interference by one or more of the following measures Reorient or relocate the receiving antenna Increase the separation between the equipment and receiver Connect the equipment into an outlet on a circuit different from that to which the receiver is connected Consult the dealer or an experienced radio TV technician for help 2 SAFETY PRECAUTIONS WARNING TO PREVENT FIRE OR SHOCK HAZARD DO...

Страница 3: ...e to do this now will help to prevent hearing damage or loss in the future After all we want you listening for a lifetime We Want You Listening For A Lifetime Used wisely your new sound equipment will provide a lifetime of fun and enjoyment Since hearing damage from loud noise is often undetectable until it is too late this manufacturer and the Electronic Industries Association s Consumer Electron...

Страница 4: ...ton 7 ENTER PLAY Button 8 Wall Mount Hole 9 Stand 10 Wall Mount Hole 11 Navigation VOLUME Button 12 Navigation VOLUME Button 13 Power Button Side of Unit 14 USB Jack Side of Unit USB CABLE PART NO 337 01000 E050 15 EXIT CANCEL Button 16 Headphones Jack Side of Unit 17 DC 12V IN Jack Side of Unit AC ADAPTER PART NO 295 04981 E000 18 Speakers Consumer Replaceable Part See page 21 to order MAIN UNIT ...

Страница 5: ...Button 4 Navigation Button 5 MENU Button 6 EXIT Button 7 Remote Transmitter Top of Unit 8 TIME Button 9 Navigation VOLUME Button 10 ENTER PLAY Button 11 ROTATE Button 12 ZOOM IN Button 13 ZOOM OUT Button 14 Battery Compartment Rear of Unit REMOTE PART NO 239 04421 E001 Consumer Replaceable Part See page 21 to order REMOTE ...

Страница 6: ...aced Replace only with the same or equivalent type 2 Use only the size and type of batteries specified 3 Be sure to follow the correct polarity when installing the batteries as indicated next to the battery compartments A reversed battery may cause damage to the device 4 If the device is not to be used for a long period of time remove the batteries to prevent damage or injury from possible battery...

Страница 7: ... UNIT If desired the digital frame can be mounted onto a wall Simply hang using the Wall Mount holes as you would hang an ordinary photo frame or painting STAND REAR OF UNIT To use the stand lift the stand up and then rotate counterclockwise until it is in position When viewing photos vertically it is recommended that you gently pull the stand back a little further to ensure that the frame is stab...

Страница 8: ...ards Simply insert the SD MMC MS or xD card into the top Card Slot located at the right side of the unit with the card facing towards the rear of the unit as shown Insert the CF card in the same manner but using the bottom Card Slot 1 TO REMOVE A MEMORY CARD Press the Power button to the Off out position to turn it off With the power off remove the memory card by pulling it out gently You may need...

Страница 9: ...USB cable to the USB jack located under the left cover of this unit and connect the other end to your computer as shown 3 On your computer double click My Computer This unit will appear as a removable drive named Memorex 4 Navigate to the media files that you want to copy Then drag and drop them to the Memorex drive Refer to the owners manual accompanying your computer for more information on copy...

Страница 10: ...e correct AM PM setting if you selected the 12 Hour mode in the Time Mode Setup option Press the Navigation button 2 to select the minutes Use the Navigation π buttons 2 to set the current minutes Repeat to set the month day and year To save your setting press ENTER PLAY button 1 then press EXIT button 3 return to main menu 1 2 3 2 SETTING THE TIME AND DATE The clock calendar page will automatical...

Страница 11: ...ect Photo using the Navigation π buttons 1 then press the ENTER PLAY button 2 to enter the Photo Thumbnail view Select the desired photo or page of photos to view using the Navigation π buttons 1 then press the ENTER PLAY button 2 again to playback the selected photo Press the ENTER PLAY button 2 again to begin a Slideshow of all photos from the selected media source To stop playback and return to...

Страница 12: ...OOM OUT button 3 to zoom back out of the photo To exit Zoom mode and return to normal photo playback press the EXIT button 4 1 2 4 3 1 While viewing a photo see the previous page press the ROTATE button to rotate the photo 90 degrees clockwise Repeat to continue to rotate as desired 1 1 2 ZOOM ROTATE While viewing a photo see the previous page press the Navigation and or button to skip to the prev...

Страница 13: ...have the option of selecting to view your Favorites in Landscape or Portrait mode Press the ENTER PLAY button 1 to select Direction Then press the Navigation π buttons 2 to select between Landscape and Portrait then press the ENTER PLAY button 1 again to confirm 1 2 3 Once you have chosen the viewing mode if desired select Play using the Navigation π buttons 1 then press the ENTER PLAY button 2 to...

Страница 14: ...in with the MP3 that you selected To stop playback and return to the Main menu press the EXIT button 3 2 1 3 2 BASIC MUSIC PLAYBACK Supported format MP3 To adjust the main volume Press the Navigation VOLUME 1 and or Navigation VOLUME 2 button to increase and or decrease the volume 2 1 1 To mute the main volume Press the MUTE button 1 Press this button again or either of the Navigation VOLUME 2 and...

Страница 15: ...ton 2 again to confirm Playback will begin with the video file that you selected Press ENTER PLAY button 2 to pause the video press again to resume playback To stop playback and return to the Movie menu press the EXIT button 3 Press again to exit to the Main menu 2 1 3 2 BASIC VIDEO PLAYBACK Supported format MOV Video Compress type MPEG 4 Video Frame Rate 30fps Dimensions 352 x 288 CIF Audio µ Law...

Страница 16: ...ce to exit and access the Main menu 1 1 1 Select Folder using the Navigation π buttons 1 then press the ENTER PLAY button 2 to enter the Folder menu Select the desired file to delete using the Navigation π buttons 1 Then press the Navigation button 1 a pop up menu will appear Select No to NOT delete the file or Yes to delete the file using the Navigation buttons 1 then press the ENTER PLAY button ...

Страница 17: ...again to confirm To return to the Main menu press the EXIT button 3 2 1 3 2 COPYING A FILE NOTES While copying a file if more than one target media media to copy to is available select the target media when prompted by the pop up window to do so If the target media is full Disk is Full will appear While copying a file if there is already a file with the same name on the target media a Would you li...

Страница 18: ...deshow mode press the EXIT button 1 twice to exit and access the Main menu 2 Select Setup using the Navigation π buttons 2 then press the ENTER PLAY button 3 to enter the Setup menu NOTE You can also access the Setup menu at any time by pressing the MENU button 3 Use the Navigation π buttons 2 to select one of the Setup options i e Select Card on the two available pages of options then press the E...

Страница 19: ... a photo Slideshow after being turned on Choose to set Auto Play to ON or OFF Music Mode Use this Setup option to select a Play mode when listening to MP3s on this unit Choose from Repeat All will repeat all of the files from the selected media source continuously until you exit the Music menu Repeat One will repeat the selected file continuously until you exit the Music menu or Repeat Off for Nor...

Страница 20: ...attery not inserted or Insert battery correctly inserted incorrectly as shown on page 6 No photos in frame No photos are present in Copy files onto the frame Internal Flash or external or insert external media media source source see pages 8 9 Computer does not USB cable not Secure USB cable recognize frame as a connected securely connection Removable Disk Frame is not turned on Turn on frame usin...

Страница 21: ...ject to change without notice FOR ADDITIONAL SET UP OR OPERATING ASSISTANCE PLEASE VISIT OUR WEBSITE AT WWW MEMOREXELECTRONICS COM OR CONTACT CUSTOMER SERVICE AT 1 800 919 3647 PLEASE KEEP ALL PACKAGING MATERIAL FOR AT LEAST 90 DAYS IN CASE YOU NEED TO RETURN THIS PRODUCT TO YOUR PLACE OF PURCHASE OR MEMOREX FOR CONSUMER REPLACEABLE PART S SEE PART NUMBER S ON PAGES 4 AND 5 AND THEN CONTACT FOX IN...

Отзывы: