background image

15

•  If the appliance, cord or plug have been 

damaged, have them inspected and if 
necessary repaired by an authorised repair 
engineer. Never try to repair the appliance 
yourself. Please contact the store where 
you bought the appliance for repairs under 
the guarantee. Unauthorised repairs or 
modifications to the appliance will invalidate 
the guarantee.

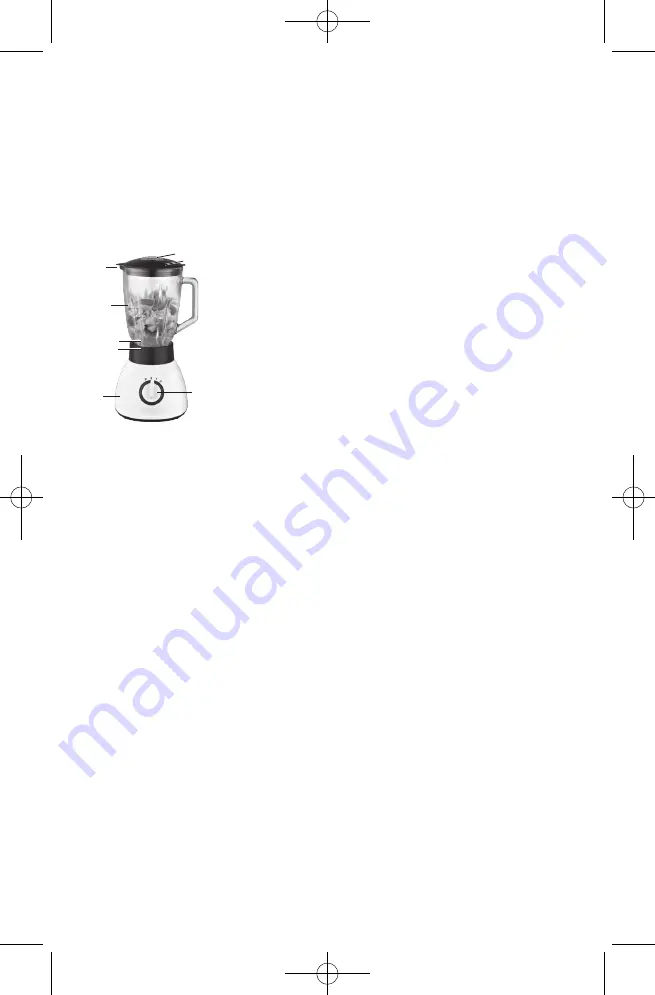
KEY TO MAIN COMPONENTS OF THE 
APPLIANCE

1.  Pouring spout
2.  Blender glass with scale
3.  Motor section
4.  On/Off button
5.  Blender glass lid
6.  Cap
7.  Blade
8.  Blade unit

PRIOR TO FIRST USE

•  Before using for the first time, or after 

prolonged storage without use, wash any 
parts that will come into contact with food.

•  Spare cord can be wrapped around the 

cord storage holders at the bottom of the 
appliance.

USING THE APPLIANCE

1.  Place the motor section (3) on a level 

surface, e.g. a kitchen counter, and make 
sure it is standing firmly on the four suction 
cups underneath.

2.  Assemble the blade section: Turn the blade 

unit (8) upside down, place the sealing ring 
inside the unit, and fit the blade in the unit.

3.  Screw the blade section onto the bottom of 

the blender glass.

4.  Fit the blender glass on the drive shaft of 

the motor section, and turn it slightly, until it 
locks into place.

5.  Lift the blender glass lid (5) (can be a bit 

tight).

6.  Pour food into the blender glass.
      o   NOTE! Never add liquid or food above 
 

     the “1,000 ml” mark on the blender glass.

7.  Fit the lid onto the blender glass, so the 

curved edge is over the pouring spout (1). 
First, push the rear of the lid into the glass 
next to the handle, and then push down the 
front of the lid next to the pouring spout. 
Ensure the lid is firmly pressed into place.

8.  Place the cap (6) in the hole in the lid and 

turn it until it locks into place.

9.  Plug in and switch on the power.
10. Place a hand on the lid and switch on the 

appliance by turning the On/Off button (4) to 
“1” (low speed) or “2” (high speed).

11. The appliance also has a pulsing option with 

extra speed. 

      o   Turn the On/Off button to “P” and hold it 
 

     briefly in that position. 

      o   When you release the button, it reverts to 
 

     “0” and the appliance stops.

12. You can add more food to the blender glass 

during operation through the opening in the 
lid. Always switch off the appliance before 
removing the cap and adding more food.

13. Turn off the appliance by turning the On/

Off button to “0” when you have finished 
blending. Wait until the blade has come to a 
complete stop before removing the lid.

NOTE! 

•  Do not leave the appliance running non 

stop for more than 2 minute at a time. If the 
appliance has been running for 2 minute, 
allow it to cool down for 2 minute before you 
use it again.

•  Always add liquid to the blender glass when 

crushing ice cubes.

CLEANING

When cleaning the appliance, you should pay 
attention to the following points:
•  Remove plug from the mains socket, and 

allow the appliance to cool down before 
cleaning it.

•  Do not immerse the motor section of the 

appliance in water and make sure no water 
enters the appliance.

•  Clean the motor section by wiping it with a 

damp cloth. A little detergent can be added 
if the appliance is heavily soiled.

•  Never use a scouring pad, steel wool or any 

form of strong solvents or abrasive cleaning 
agents to clean the appliance, as those 
may damage the outside surfaces of the 
appliance.

1.

2.

3.

4.

5.

6.

7.

8.

Содержание 16180059

Страница 1: ...DK Blender 2 SE Mixer 5 NO Hurtigmikser 8 FI Tehosekoitin 11 UK Blender 14 DE Mixer 17 PL Blender 20 www adexi eu 16180059 ...

Страница 2: ...nderglasset Sørg for at fødevarerne har en så lav temperatur at du undgår forbrænding skoldning ved eventuel hudkontakt Fyld aldrig væske eller fødevarer over mærket 1000 ml på blenderglasset Brug ikke apparatet hvis blenderglasset er revnet eller gået i stykker Lad ikke apparatet køre uafbrudt i mere end 2 minutter ad gangen Hvis apparatet har kørt i 2 minutter skal du lade det køle af i 2 minutt...

Страница 3: ...fter trykke lågets forkant ned ved hældetuden Sørg for at trykke låget godt fast 8 Sæt proppen 6 i hullet i låget og drej den indtil den låses fast 9 Sæt stikket i stikkontakten og tænd for strømmen 10 Læg en hånd på låget og start apparatet ved at dreje tænd sluk knappen 4 til position 1 lav hastighed eller 2 høj hastighed 11 Apparatet har også en pulsfunktion som giver ekstra høj hastighed o Dre...

Страница 4: ...etingelse af at du køber nyt udstyr Kontakt forhandleren distributøren eller de kommunale myndigheder for at få yderligere oplysninger om hvordan du skal håndtere elektrisk og elektronisk affald REKLAMATIONSBESTEMMELSER Reklamationsretten gælder ikke hvis ovennævnte ikke iagttages hvis der har været foretaget uautoriserede indgreb i apparatet hvis apparatet har været misligholdt udsat for en volds...

Страница 5: ...l för att inte orsaka brännsår skållning i händelse av kontakt med huden Tillsätt aldrig vätska eller mat över markeringen 1 000 ml på mixerns glasbehållare Använd inte apparaten om glasbehållaren är spräckt eller skadad på annat sätt Kör inte apparaten kontinuerligt i mer än 2 minuter åt gången Om apparaten körts i 2 minuter låt den svalna i 2 minuter innan du använder den igen Stoppa aldrig ner ...

Страница 6: ...i glasbehållaren bredvid handtaget och tryck därefter ner lockets framsida bredvid hällpipen Tryck locket ordentligt på plats 8 Placera proppen 6 i hålet i locket och vrid tills den låses på plats 9 Anslut apparaten och sätt på strömmen 10 Håll en hand på locket och sätt på apparaten genom att vrida på av knappen 4 till 1 låg hastighet eller 2 hög hastighet 11 Apparaten har även en pulsfunktion me...

Страница 7: ...I vissa medlemsländer kan du i vissa fall returnera den använda utrustningen till återförsäljaren om du köper ny utrustning Kontakta din återförsäljare distributör eller lokala myndighet för ytterligare information om hantering av avfall som utgörs av eller innehåller elektriska eller elektroniska delar GARANTIVILLKOR Garantin gäller inte om ovanstående instruktioner inte har följts apparaten har ...

Страница 8: ... i blandeglasset Påse at matvarene har en lav nok temperatur til at du unngår brann skoldingsskader i tilfelle hudkontakt Ikke tilsett væske eller andre ingredienser over merket 1 000 ml på blenderglasset Ikke bruk apparatet hvis blandeglasset har sprekker eller andre skader Ikke la apparatet stå på i mer enn 2 minutter om gangen Hvis apparatet har stått på i 2 minutter må det kjøle seg ned i 2 mi...

Страница 9: ...rei den til den låses på plass 9 Sett i støpselet 10 Legg en hånd på lokket og slå på apparatet ved å vri av på bryteren 4 til 1 lav hastighet eller 2 høy hastighet 11 Apparatet har også en pulsfunksjon med ekstra hastighet o Vri av på bryteren til P og hold den i denne stillingen en kort stund o Når du slipper bryteren går den tilbake til 0 og apparatet stopper 12 Du kan tilsette flere ingrediens...

Страница 10: ...rmasjon om hva du skal gjøre med elektrisk og elektronisk avfall GARANTIVILKÅR Garantien gjelder ikke hvis instruksjonene over ikke følges apparatet har blitt endret apparatet er brukt feil har vært utsatt for hard håndtering eller på en eller annen måte er blitt skadet ved feil som måtte oppstå på grunn av feil på strømnettet På grunn av at vi hele tiden utvikler funksjonen og utformingen på prod...

Страница 11: ...ttimen lasiosaan Varmista että ruoan lämpötila on tarpeeksi alhainen jotta se ei aiheuta palovammoja Älä koskaan lisää nestettä tai muita ruoka aineita tehosekoittimen lasiosan 1 000 ml merkin yläpuolelle Älä käytä laitetta jos tehosekoittimen lasiosa on haljennut tai vaurioitunut millään tavalla Anna laitteen käydä yhtäjaksoisesti kerrallaan enintään 2 min Jos laite on käynyt 2 minuuttia jätä se ...

Страница 12: ...viereen Paina kansi tiukasti paikalleen 8 Aseta korkki 6 kannen reikään ja kierrä kunnes se loksahtaa paikalleen 9 Kytke pistoke ja kytke laitteeseen virta 10 Pidä kättä kannen päällä ja kytke laitteen virta kääntämällä virtakytkin 4 asentoon 1 pieni nopeus tai 2 suuri nopeus 11 Laitteessa on myös erikoisnopea pulssitoiminto o Käännä virtakytkin P asentoon ja pidä sitä hetken aikaa siinä asennossa...

Страница 13: ...ilalle hankitaan uusi laite Lisätietoja sähkö ja elektroniikkajätteen käsittelystä saat jälleenmyyjältäsi tukkukauppiaaltasi tai paikallisilta viranomaisilta TAKUUEHDOT Takuu ei ole voimassa jos edellä olevia ohjeita ei ole noudatettu laitteeseen on tehty muutoksia laitetta on käsitelty väärin tai rajusti tai se on kärsinyt muita vaurioita syntyneet viat johtuvat sähköverkon häiriöistä Kehitämme j...

Страница 14: ...to avoid burning scalding in case of skin contact Never add liquid or food above the 1 000 ml mark on the blender glass Do not use the appliance if the blender glass is cracked or damaged in any way Do not leave the appliance running non stop for more than 2 minutes at a time If the appliance has been running for 2 minutes allow it to cool down for 2 minutes before you use it again Never put tools...

Страница 15: ...e and then push down the front of the lid next to the pouring spout Ensure the lid is firmly pressed into place 8 Place the cap 6 in the hole in the lid and turn it until it locks into place 9 Plug in and switch on the power 10 Place a hand on the lid and switch on the appliance by turning the On Off button 4 to 1 low speed or 2 high speed 11 The appliance also has a pulsing option with extra spee...

Страница 16: ...ic waste must be disposed of separately In accordance with the WEEE directive every member state must ensure correct collection recovery handling and recycling of electrical and electronic waste Private households in the EU can take used equipment to special recycling stations free of charge In some member states you can in certain cases return the used equipment to the retailer from whom you purc...

Страница 17: ...tellen Sie das Gerät stets auf einer trockenen ebenen und festen Oberfläche mit ausreichender Entfernung zu den Kanten auf Das Gerät darf nur eingeschaltet werden wenn sich der Glasaufsatz mit Deckel darauf befindet der Flüssigkeit und oder feste Zutaten enthält Auf keinen Fall kochende Flüssigkeiten oder sehr heiße Zutaten in den Glasaufsatz geben Vergewissern Sie sich dass die Temperatur der Leb...

Страница 18: ... den Kabelhalter unter dem Gerät gewickelt werden ANWENDUNG DES GERÄTES 1 Stellen Sie das Motorteil 3 auf eine waagerechte Fläche Arbeitsplatte o Ä und sorgen Sie dafür dass es auf den 4 Saugnäpfen sicher steht 2 Zusammenbau der Messereinheit Die Einheit 8 auf den Kopf stellen Dichtring einlegen und Messer einsetzen 3 Die Messereinheit unten auf den Glasaufsatz schrauben 4 Den Glasaufsatz auf den ...

Страница 19: ...Produkt dieses Zeichen trägt Das heißt dass es nicht zusammen mit normalem Haushaltsmüll sondern als Sondermüll zu entsorgen ist Gemäß der WEEE Richtlinie hat jeder Mitgliedstaat für ordnungsgemäße Einsammlung Handhabung und Recycling von Elektro und Elektronikmüll zu sorgen Private Haushalte innerhalb der EU können ihre gebrauchten Geräte kostenfrei an speziellen Recyclingstationen abgeben In ein...

Страница 20: ...ych wraz z urządzeniem lub zalecanych przez producenta Użycie Urządzenie należy zawsze umieszczać na suchej płaskiej i stabilnej powierzchni z dala od krawędzi Urządzenie można włączyć tylko wtedy gdy szklane naczynie blendera zostało zamontowane i znajduje się w nim płyn i lub żywność Nigdy nie wlewać wrzących płynów ani bardzo gorących produktów żywnościowych do szklanego naczynia blendera Upewn...

Страница 21: ... które bezpośrednio stykają się z żywnością Nadmiar przewodu zasilającego można owinąć wokół uchwytów do przechowywania przewodu na spodzie urządzenia KORZYSTANIE Z URZĄDZENIA 1 Umieścić część silnikową 3 urządzenia na płaskiej powierzchni np blacie kuchennym i upewnić się że stoi ona stabilnie na czterech przyssawkach znajdujących się na spodzie urządzenia 2 Zmontować zespół ostrzy Odwrócić zespó...

Страница 22: ...dukt marki Adexi oznaczony jest następującym symbolem Oznacza to że produktu nie należy wyrzucać wraz z normalnymi odpadami gospodarstwa domowego ponieważ zużyty sprzęt elektryczny i elektroniczny należy utylizować osobno Zgodnie z dyrektywą WEEE każde państwo członkowskie Unii Europejskiej ma obowiązek zapewnić odpowiednią zbiórkę odzysk przetwarzanie i recykling zużytego sprzętu elektrycznego i ...

Страница 23: ...23 ...

Отзывы: