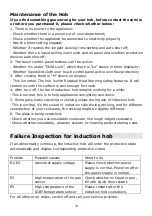
Meireles MI 1302 Скачать руководство пользователя страница 23


23 

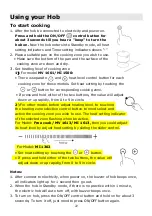
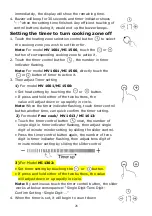
4. The power level can be adjusted from 0 to 9, default setting is level 5.   
5. The heat setting indicator of the selected zone flashing when adjusting. 
      After adjusting, the number flashing for 5 seconds then stop flashing,   

then the setting is be confirmed. 
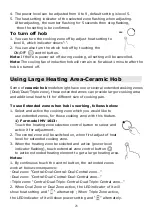
To turn off hob


1. You can turn the cooking zone off by adjust heat setting to   

level 0, which indicator shows“-“. 

2. You can also turn the whole hob off by touching the   

ON/OFF          control button. 

Note:

 If there is power cut off during cooking, all setting will be cancelled. 

Note: 

The cooling fan of induction hob will remain on for about 1 minute after the 

hob be turned off. 
 

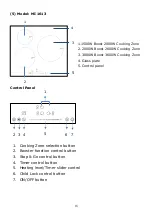
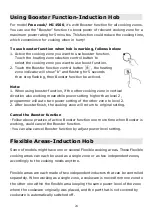
Using Large Heating Area-Ceramic Hob                 

Some of 

ceramic hob

 models might have one or several extended cooking zones 

(Oval/Dual/Triple zone), these extended zones can provide larger cooking area 
and additional heat to fit for different size of cooking pan.   
 

To use Extended zone when hob is working, follows below:


1. Select and active the cooking zone which you would like to   

use extended zones, for those cooking zone with this feature. 

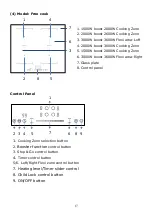
1) For model MV 1613:


Touch the heating zone selection control button to select and 
active it for adjustment. 

2. The central zone will be switched on, when first adjust of heat 

level for extended cooking zone. 

3. When the heating zone be selected and active (power level 
      indicator flashing), touch extended zone control button 

to active extended heating element to get a large heating area. 

Notes: 

1. By continuous touch the control button, the extended zones 
work at below consequence: 
-Oval zone: “Central-Oval-Central-Oval-Central zone…” 
-Dual zone: “Central-Dual-Central-Dual-Central zone…” 
-Triple zone: “Central-Dual-Triple-Central-Dual-Triple-Central zone…” 
2. When Oval Zone or Dual Zone active, the LED indicator of it will   
show heat setting and “      “ alternately ; When Triple Zone active,   
the LED indicator of it will show power setting and “      ” alternately. 

Содержание MI 1302

Страница 1: ...Built In Electric Hob Manual Model No MV 1601 MV 1613 MI 1302 MI 1500 MI 1613 Free Cook ...

Страница 2: ...2 CONTENTS Part 1 Safety Warnings Part 2 Installation Part 3 Operation Instructions Part 4 Cleaning and Maintenance ...

Страница 3: ... us Please read below information carefully before installing or using your Hob Installation Electrical Shock Hazard Disconnect the appliance from the mains electricity supply before carrying out any work or maintenance on it Connection to a good earth wiring system is essential and mandatory Alterations to the domestic wiring system must only be made by a qualified electrician Failure to follow t...

Страница 4: ...le to the person responsible for installing the hob as it could reduce your installation costs In order to avoid a hazard this appliance must be installed according to these instructions for installation This appliance is to be properly installed and earthed only by a suitably qualified person This appliance should be connected to a circuit which incorporates an isolating switch providing full dis...

Страница 5: ...re cleaning or maintenance Failure to follow this advice may result in electrical shock or death Health Hazard This appliance complies with electromagnetic safety standards However persons with cardiac pacemakers or other electrical implants such as insulin pumps must consult with their doctor or implant manufacturer before using this appliance to make sure that their implants will not be affected...

Страница 6: ...placed on the hob surface since they can get hot Keep children away Handles of saucepans may be hot to touch Check saucepan handles do not overhang other cooking zones that are on Keep handles out of reach of children Failure to follow this advice could result in burns and scalds Cut Hazard The razor sharp blade of a hob scraper is exposed when the safety cover is retracted Use with extreme care a...

Страница 7: ...devices e g computers MP3 players near the appliance as they may be affected by its electromagnetic field Never use your appliance for warming or heating the room After use always turn off the cooking zones and the hob as described in this manual Do not rely on the pan detection feature to turn off the cooking zones when you remove the pans Do not allow children to play with the appliance or sit s...

Страница 8: ...ce unless specifically recommended in the manual All other servicing should be done by a qualified technician Do not use steam cleaner to clean hob Do not place or drop heavy objects on hob Do not stand on your hob Do not use pans with jagged edges or drag pans across the ceramic glass surface as this can scratch the glass Do not use scourers or any other harsh abrasive cleaning agents to clean yo...

Страница 9: ...ities or lack of experience and knowledge if they have been given supervision or instruction concerning use of the appliance in a safe way and understand the hazards involved Children shall not play with the appliance Cleaning and user maintenance shall not be made by children without supervision WARNING Unattended cooking on a hob with fat or oil can be dangerous and may result in fire NEVER try ...

Страница 10: ... according to the sizes shown in the drawing For the purpose of installation and use a minimum of 5 cm space shall be preserved around the hole Be sure the thickness of the work surface is at least 30mm Please select heat resistant work surface material to avoid larger deformation caused by the heat radiation from the hotplate As shown below measure by unit mm Model L W H D A B X MI 1302 288 520 5...

Страница 11: ...inimal 20mm minimal Air intake Air exit 5mm Before locating the fixing brackets The unit should be placed on a stable smooth surface use the packaging Do not apply force onto the controls protruding from the hob Easy Fit kits There is one easy fit kits package for each hob include fixing clips and screws for ceramic hob total 2pcs clip and 2pcs screw for induction hob total 4pcs clip and 4pcs scre...

Страница 12: ... connected directly to the mains supply an omni polar circuit breaker must be installed with a minimum gap of 3mm between the contacts 3 The installer must ensure that the correct electrical connection has been made and that it complies with safety regulations 4 The cable must not be bent or compressed 5 The cable must be checked regularly and only replaced by qualified technician Cautions 1 The h...

Страница 13: ...n case necessary please consult your supply authority for system impedance information Note For some of the models there might applied with a power cord with plug If so you can directly plug in socket Please keep power cord plug out after use for those model power cord with plug The method of connections shown below Newly added for MI 1302 ...

Страница 14: ...Control Panel 6 1 2 1 2 Heating level and button 3 Stop Go control button 4 Timer and button 5 Child Lock control button 6 ON OFF button 5 3 6 1 2 4 1 1200W Cooking Zone 2 1800W Cooking Zone 3 1800W Cooking Zone 4 1200W Cooking Zone 5 Glass plate 6 Control panel 3 5 4 ...

Страница 15: ...ooster 2000W Cooking Zone 3 Glass plate 4 Control panel 1 Booster function control button 2 Stop Go control button 3 Timer control button 4 Cooking Zone selection button 5 Heating level Timer button 6 Heating level Timer button 7 Child Lock control button 8 ON OFF button 6 1 5 4 2 3 7 8 ...

Страница 16: ...000W Cooking Zone 3 2000W Cooking Zone 4 1500W Cooking Zone 5 Glass plate 6 Control panel 1 3 2 4 5 6 5 3 6 1 2 4 1 Heating level and control 2 Child Lock control button 3 Stop Go control button 4 Timer and control 5 Child Lock control button 6 ON OFF button ...

Страница 17: ...W Cooking Zone 5 1500W boost 2000W Cooking Zone 6 3000W boost 3600W Flexi area Right 7 Glass plate 8 Control panel 7 2 3 8 5 6 6 1 4 1 1 Cooking Zone selection button 2 Booster function control button 3 Stop Go control button 4 Timer control button 5 6 Left Right Flexi zone control button 7 Heating level Timer slider control 8 Child Lock control button 9 ON OFF button ...

Страница 18: ...ng Zone 3 3000W Boost 3600W Cooking Zone 4 Glass plate 5 Control panel 1 Cooking Zone selection button 2 Booster function control button 3 Stop Go control button 4 Timer control button 5 Heating level Timer slider control 6 Child Lock control button 7 ON OFF button 8 7 2 3 4 5 6 7 4 3 2 1 5 1 ...

Страница 19: ...roduct improvements 1 1200W Cooking Zone 2 1800W Cooking Zone 3 2700W 1800W 1100 Triple Cooking Zone 4 Glass plate 5 Control panel 1 Extended zone control button 2 Cooking Zone selection button 3 Child Lock control button 4 Stop Go control button 5 Timer control button 6 Heating level Timer slider control 7 ON OFF button 1 3 1 2 4 3 5 4 5 6 7 2 ...

Страница 20: ...ble by carrying out a magnet test Move a magnet towards the base of the pan If it is attracted the pan is suitable for induction hob If you do not have a magnet 1 Put some water in the pan you want to check 2 If does not flash in the display and water is heating the pan is suitable Cookware made from the following materials is not suitable for an induction hob pure stainless steel aluminum or copp...

Страница 21: ...ss Notes You can use any kind of pot or pan for Ceramic Hob Suggested Pan dimensions for induction hob The cooking zones are up to a limit automatically adapted to the diameter of the pan However the bottom of this pan is suggested to have a minimum of diameter according to the corresponding cooking zone To obtain the best efficiency of your hob please place the pan in the centre of the cooking zo...

Страница 22: ...idly from 0 to 9 in circle 2 For other model before adjust heating level to touching the heating zone selection control button to need select and active the cooking zone you wish to use The heat setting indicator of the selected zone flashing when be active For Model Free cook MV 1613 MI 1613 then you could adjust its heat level by adjust heat setting by sliding the slider control For Model MI 130...

Страница 23: ...r different size of cooking pan To use Extended zone when hob is working follows below 1 Select and active the cooking zone which you would like to use extended zones for those cooking zone with this feature 1 For model MV 1613 Touch the heating zone selection control button to select and active it for adjustment 2 The central zone will be switched on when first adjust of heat level for extended c...

Страница 24: ...so working meanwhile power setting higher than level 2 programmer will auto turn power setting of the other zone to level 2 2 After booster finish the cooking zone will return to original setting Cancel the Booster function Follow above practice of active Booster function one more time when Booster is working could cancel the Booster function You can also cancel Booster function by adjust power le...

Страница 25: ...area by slide the slider Inactive the flexible induction area To in active the flexible area when it works press either of the two cooking zone selection buttons of this flexible area when power level indicator flashing press the flexible control button again The indicator will off after inactive it Child Lock Safety Control You can lock the controls to prevent unintended use for example children ...

Страница 26: ...can turn off all zones When you back with one more touching of the button hob restarts where they were to carry on cooking 1 Active Stop Go function To active Stop Go function you can press the Stop Go function button once Then all programmer setting be hold on and hob stop heating all heat setting indicators show P 2 Inactive Stop Go function To cancel Stop Go function you can press the Stop Go f...

Страница 27: ... 1613 Touch the timer control button once the number of single digit in timer indicator flashing then adjust single digit of minute minder setting by sliding the slider control Press the timer control button again the number of tens digit in timer indicator flashing then adjust tens digit of minute minder setting by sliding the slider control 3 For Model MI 1302 Set timer setting by touching the o...

Страница 28: ...s and hold either of the two buttons the value will adjust down or up rapidly in circle Note When the timer indicator flashing touch timer control button another time can quick confirm the timer setting 2 For model Free cook MV 1613 MI 1613 Touch the timer control button once the number of single digit in timer indicator flashing then adjust single digit of minute minder setting by sliding the sli...

Страница 29: ...ute reminder the red dot next to timer indicator will flash If the lowest setting is timer setting the red dot of corresponding cooking zone power level indicator will flash Note If indicator shows timer setting of cooking zone To check minute reminder setting press the timer control button the indicator will show minute reminder setting Detection of Pan and Small Articles For induction hob if dis...

Страница 30: ...Protection For your safety the programmer will auto shut off the power if liquid boiling or wet cloth over touch control panel All control buttons became invalid except ON OFF and Child Lock button unless you wipe the touch control area dry Cooking Guidelines Take care when frying as the oil and fat heat up quickly particularly if you are using Booster function At extremely high temperature oil an...

Страница 31: ...meat onto the hot pan 4 Turn the steak only once during cooking The exact cooking time will depend on the thickness of the steak and how cooked you want it Times may vary from about 2 8 minutes per side Press the steak to gauge how cooked it is the firmer it feels the more well done it will be 5 Leave the steak to rest on a warm plate for a few minutes to allow it to relax and become tender before...

Страница 32: ... soon as possible after use Always ensure the surface is cool enough before cleaning Use a soft cloth or kitchen paper to clean the surface If the spillage has dried on the surface you may need to use a specialist vitro ceramic glass cleaner which is available for most of supermarkets Do not use other abrasive cleaners and or wire wool ect as it may scratch the ceramic glass surface of your hob He...

Страница 33: ...eramic glass of hob but beware of hot cooking zone surfaces 1 Switch off the power supply 2 Hold the blade or utensil at a 30 angle and scrape the soiling or spill to a cool area of the hob 3 Clean the soiling or spill up with a dish cloth or paper towel 4 Follow steps 2 to 4 for Everyday soiling on glass above Remove stains left by melts and sugary food or spillovers as soon as possible If left t...

Страница 34: ...he fan of induction hob remains working for a while This is normal this is to help appliances completely cool down 5 Some pans make crackling or clicking noises during use of induction hob This is normal it s the sound of induction coils during working and for different construction of your cookware the clicking might be slightly different 6 The glass is being scratched Check whether you use unsui...

Страница 35: ... disposed of in the wrong way The symbol on the product indicates that it may not be treated as normal household waste It should be taken to a collection point for the recycling of electrical and electronic goods This appliance requires specialist waste disposal For further information regarding the treatment recovery and recycling of this product please contact your local council your household w...

Отзывы: