background image

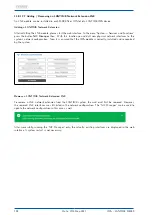
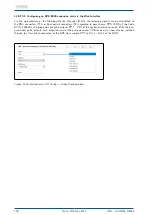
11.8.17.2 Adding / Removing an LANTIME Network Extension LNE

An LNE module can be installed in each MRI/ESI or IO Slot of a LANTIME IMS device.

Adding a LANTIME Network Extension

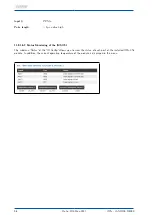
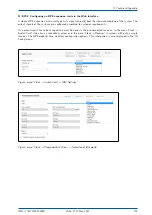
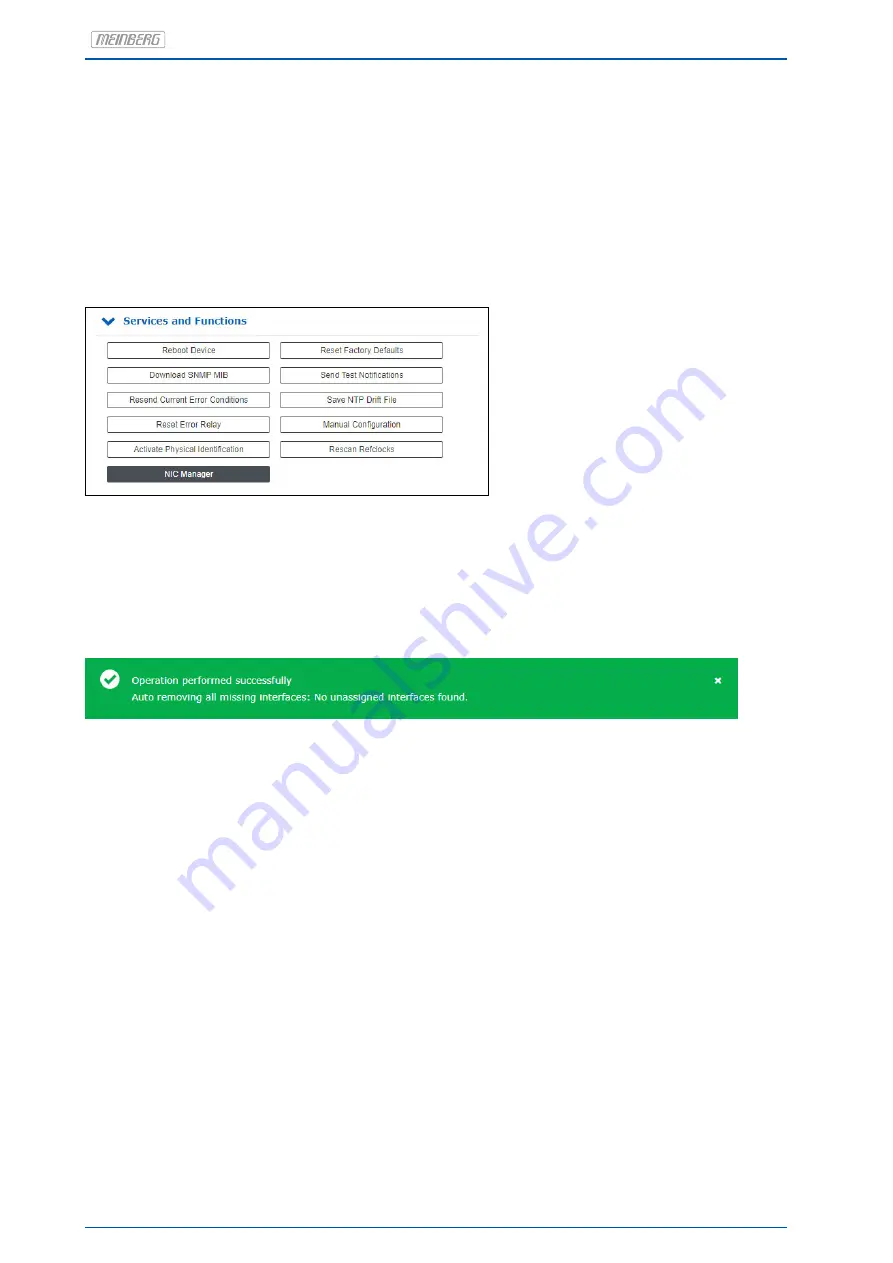
After installing the LNE module, please start the web interface. In the menu "System

Services and Functions"

press the button

NIC Manager

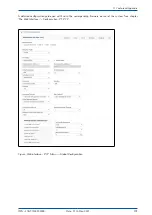
then . With this function you add all new physical network interfaces to the

system’s network configuration. Now it is ensured that the IMS module is correctly installed and recognized
by the system.

Remove a LANTIME Network Extension LNE

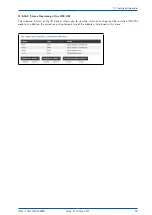
To remove a LNE network extension from the LANTIME system, the card must first be removed. However,
the removed LNE interfaces are still listed in the network configuration. The "NIC Manager" can be used to
update the network configuration in this case as well.

After successfully running the "NIC Manager", only the actually existing interfaces are displayed in the web
interface. A system restart is not necessary.

104

Date: 27th May 2021

IMS - LANTIME M4000

Содержание IMS-M1000

Страница 1: ...MANUAL IMS LANTIME M4000 Modular Sync System and NTP Server 27th May 2021 Meinberg Funkuhren GmbH Co KG ...

Страница 2: ......

Страница 3: ... Intelligent Modular Synchronization DEUTSCH M4000 Basiskonfiguration 2 GPS Satellitenempfängermodul CLK1 1 Netzteil PWR1 100 240 V AC 100 200 V DC 4 LAN CPU 3 SPT Standard Signal Distribution 1 Power Supply PWR1 100 240 V AC 100 200 V DC 2 GPS Satellite Receiver Module CLK1 3 SPT Standard Signal Distribution 4 LAN CPU ENGLISH M4000 Base Configuration SPT PPS 10MHz Clock Signal 1 2 3 4 ...

Страница 4: ...Cleaning and Care 15 4 9 Prevention of ESD Damage 15 4 10 Return of Electrical and Electronic Equipment 16 5 Before you start 17 5 1 Text and Syntax Conventions 17 5 2 Abbreviation List 18 5 3 Required Tools 20 5 4 Preparing Installation 21 5 5 Unboxing the Device 22 5 6 Disposal of Packaging Materials 24 6 System Installation 25 6 1 Antenna Connection 26 6 1 1 Mounting the Antenna 27 6 2 Connecti...

Страница 5: ... GNM Clock 72 11 8 9 PZF Clock 74 11 8 10 TCR Clock Time Code Reader and Generator 76 11 8 11 RSC Switch Card 80 11 8 12 SPT Single Pass Through 84 11 8 13 LAN CPU 85 11 8 14 MRI Standard Reference Input Signals 87 11 8 15 ESI Telecom Synchronisation References 90 11 8 16 VSI Video Synchronization Input Card 94 11 8 17 LNE GbE Network Expansion with Gigabit Support and SFP Option 100 11 8 18 HPS 1...

Страница 6: ...en GmbH Co KG Lange Wand 9 31812 Bad Pyrmont Germany Phone 49 0 52 81 93 09 0 Fax 49 0 52 81 93 09 230 Internet https www meinbergglobal com Mail info meinberg de Date 2021 05 27 Manual Version 1 14 IMS LANTIME M4000 Date 27th May 2021 1 ...

Страница 7: ...ed product range The structure and spelling of this manual assumes that the installation and commissioning technicians have knowledge of the use of electronical devices and network components 2 3 Return of Equipment All parts and components of your Meinberg system may only be repaired by Meinberg In the event of a malfunction the customer must contact our support service and never attempt to repai...

Страница 8: ... default gateway have to be configured from the front panel of LANTIME The network address or the equivalent name of LANTIME has to be shown to all NTP clients in the TCP IP network As well as NTP the Linux system also supports a number of further network protocols HTTP S FTP SSH and Telnet Because of this remote configuration or status requests can come from any WEB browser This access via the ne...

Страница 9: ... ten slots for expansion cards M4000 ten slots for expansion cardsn Redundant power supply and receiver solutions can be implemented for the following IMS series models M1000 S up to two power supplies and two receivers M2000S up to three power supplies and two receivers M3000 S up to four power supplies and two receivers M4000 up to four power supplies and two receivers Railmount Chassis The base...

Страница 10: ...nt 483 x 133 x 280 307 10 1 4 1 2 3HE 84TE M3000 S 19 inch rackmount 483 x 133 x 234 268 10 1 4 1 2 3HE 84TE M4000 19 inch rackmountu 483 x 133 x 274 10 1 4 1 2 4HE 84TE The IMS systems M500 M1000 M3000 and M4000 have a 4 x 20 character LC display and a control panel with 8 function keys for direct on site configuration The M1000S M2000S and M3000S models are delivered without a display These syst...

Страница 11: ...ling Module Active cooling with ACM modules Active cooling modules are available for the M4000 M3000 and M1000 S IMS systems For the M4000 and M3000 the use of an ACM is optional M1000 and M2000 systems are always equipped with an ACM Passive cooling Due to the small installation depth it is not possible to integrate an ACM module in an M3000S system For this reason we have developed a 1U passive ...

Страница 12: ...gnal words you may only continue if you have understood and fulfilled all requirements In this documentation dangers and indications are classified and illustrated as follows DANGER The signal word indicates an imminently hazardous situation with a high risk level This notice draws attention to an operating procedure or similar proceedings of which a non observance may result in serious personal i...

Страница 13: ...chen Schlages Caution risk of electric shock IEC 60417 5041 Vorsicht heiße Oberfläche Caution hot surface IEC 60417 6056 Vorsicht Gefährlich sich bewegende Teile Caution moving fan blades IEC 60417 6172 Trennen Sie alle Netzstecker Disconnection all power plugs IEC 60417 5134 Elektrostatisch gefährdete Bauteile Electrostatic Sensitive Devices IEC 60417 6222 Information generell Information general...

Страница 14: ...only be used for the purpose described in this manual In particular the given limits of the device must be observed The safety of the installation in which the unit is integrated is the responsibility of the installer Non observance of these instructions can lead to a reduction in the safety of this device Please keep this manual in a safe place This manual is intended exclusively for electricians...

Страница 15: ...measures e g Installation in an air conditioned control cabinet required Transport Unpacking Installation If the unit is brought into the operating room from a cold environment condensation may occur wait until the unit is temperature controlled and absolutely dry before operating it When unpacking setting up and before operating the equipment be sure to read the information on the hardware instal...

Страница 16: ... and lines work properly and are undamaged Pay particular attention to the facts that the cables do not have kinks or that they are not too short around corners and no objects are placed on the cables Also make sure that all connections are secure Faulty shielding or cabling will endanger your health electrical shock and may destroy other equipment Ensure that all necessary safety precautions have...

Страница 17: ...t on the appliance or the mains socket of the house installation is freely accessible to the user so that the mains cable can be pulled out of the socket in case of emergency Outside the assembly group the device must be disconnectable from the power supply in accordance with the provisions of IEC 62368 1 e g by the primary line protection Installation and disassembly of the power supply plug is o...

Страница 18: ...t covered or dusty as there is a danger of overheating during operation Disturbances during operation can result Normal Operation The normal operation and the observance of the EMC limits electromagnetic compatibility are only ensured if the housing cover is properly installed and when the doors are closed cooling fire protection shielding against electrical magnetic and electromagnetic fields Swi...

Страница 19: ...sks for the user and result in a loss of warranty as well as an exclusion of liability Danger due to moving parts keep away from moving parts Device parts can become very hot during operation Do not touch these surfaces If necessary switch off the unit before installing or removing any equipment and allow it to cool down 4 7 Handling Batteries CAUTION The lithium battery on the receiver modules ha...

Страница 20: ...truction Prepare removal and installation of assemblies Unload yourself for example by touching a grounded object before touching assemblies Ensure that you wear a grounding strap on the wrist when working with such assemblies which you attach to an unpainted non conductive metal part of the system Use only tools and devices that are free from static electricity Transporting Assemblies Assemblies ...

Страница 21: ...he product symbol on the left indicates that this electronic product must not be disposed of in domestic waste Return and Collection Systems For returning your old equipment please use the country specific return and collection systems available to you or contact Meinberg The withdrawal may be refused in the case of waste equipment which presents a risk to human health or safety due to contaminati...

Страница 22: ...wn in italics Example NTP Deamon ntpd Cross references in the document Cross references in the document are displayed in dark blue font e g see chapter Selection Options and Logical Groups Selection options e g in a drop down menu are underlined and then briefly described If several parameters are combined in a menu to logical groups these are also underlined and displayed in bold font e g PTP sta...

Страница 23: ...ntelligent Electronic Devices IEEE Institute of Electric and Electronic Engineers IEEE 1588 Protocol for high precision synchronization in nanosecond range PTP IP Internet Protocol IP 20 Protection Class 20 IRIG Inter range instrumentation group time codes LCD Liquid Crystal Display LDAP S Lightweight Directory Access Protocol LED Light Emitting Diode LINUX Unix like multi user computer operating ...

Страница 24: ...ndard for computer data logging TACACS Terminal Access Controller Access Control System TCG Time Code Generator TCR Time Code Receiver for IRIG A B AFNOR or IEEE1344 codes T1 North American telecommunication signal at 1 544 MHz frequency TCP Transmission Control Protocol TTL Transistor to Transistor Logic TX Data Transmission U Unit is a unit measure the vertical height of rack mounted electronic ...

Страница 25: ...ME LANTIME M1000S M2000S LANTIME LANTIME M3000 LANTIME M3000S LANTIME M4000 M500 LANTIME Mounting Rackears TORX T20 TORX T20 TORX T20 TORX T20 TORX T20 TORX T20 x Mounting DIN rail x x x x x x Phillips PH1 x 80 Replacing IMS modules TORX T8 TORX T8 TORX T8 TORX T8 TORX T8 TORX T8 TORX T8 FAN Installation TORX T8 TORX T8 TORX T8 TORX T8 x TORX T8 Flat head Screwdriver x Figure Required tools from l...

Страница 26: ...that have other standards e g for power supply connections please specify exactly which adapters or cables you need to put the device into operation when ordering Before unboxing the system make sure that there is sufficient space in the built in cabinet to ensure safe ventilation of the system Avoid dirt and dust during installation To avoid damage to the system and personal injury please make su...

Страница 27: ... 3 Screws for brackets M200 M300 M600 4 3 pin DFK connector or 5 pin DFK connector additional connector in case of AC DC or DC power supply 5 USB stick with software and documentation 6 Power cord only in case of AC power supply 7 Option power cable with 5 pin connector Only with delivered Antenna 8 Antenna 9 Optional cable for surge voltage protector 10 Antenna cable 11 Optional surge voltage pro...

Страница 28: ... 4x 4x C C Mounting Kit for Long Wave Antenna wall mounting Note Please read the safety instructions and the manual carefully to familiarize yourself with the safe and proper handling of electronic devices The product documentation can be found on the USB Flash Memory IMS LANTIME M4000 Date 27th May 2021 23 ...

Страница 29: ...terial Use for Disposal Polystyrol packaging frame filling material Recycling Depot polystyrene peanuts bubble wrap PE LD accessories packaging Recycling Depot Polyethylene low density Cardboard shipping packaging Paper recycling accessories packaging 24 Date 27th May 2021 IMS LANTIME M4000 ...

Страница 30: ...o be available at the installation site before the system is installed Make sure that all nec essary adapters for connecting the device are available Make sure that the voltage is disconnected from the power source during installation Figure M4000 rack mount The screws for rack mounting are not included in the delivery 21 inch ETSI rack mount Due to the low depth of the housing the M4000 chassis c...

Страница 31: ...S reception usually yields a higher degree of time accuracy than long wave reception A detailed description of the reception modes of our reference clocks and instructions for antenna installa tion can be found in our LTOS firmware manual http www mbg link doce fw ltos in chapter Antenna and Receiver Information The following table shows the available receiver types from Meinberg Type Receiver Sys...

Страница 32: ...s is exceeded Selection of the Antenna location To receive enough satellites select a location that allows an unobstructed view of the sky otherwise there may be problems with the synchronization of the system There should be no obstacle in the line of sight between the antenna and the satellites In addition the antenna must not be installed under high voltage lines or other electrical light or el...

Страница 33: ...used by lightning strikes can be transmitted via the antenna cable and may cause damage to the receiver The receiver is pro tected against these effects by using the MBG S PRO surge protection Being installed in a waterproof housing the MBG S PRO is also suitable for outdoor installation Mein berg recommends the indoor installation as soon as possible after the antenna cable enters the building to...

Страница 34: ... the socket of the surge protection Earth cable to PE rail Cable circa 1 5 mm Ø attached to the surge protection as short as possible 4 The next step is to connect the supplied coaxial cable between the surge protector and receiver N Norm female N Norm male SMA female BNC female N Norm male N Norm female BNC male Receiver Antenna splitter SMA male M B G S P R O Optional IMS LANTIME M4000 Date 27th...

Страница 35: ...ate the signal propagation time of the antenna cable therefore you need to enter the length of the antenna cable in meters or the compensation time in nanoseconds into the settings of your receiver Antenna Cable Length m The receiving satellite signal is delayed by the used coaxial cable Cable Delay Usage RG58U 5 ns m for GPS and GNS UC receivers H155 4 ns m for GNS and GNM receivers By entering t...

Страница 36: ...i fall equipment WARNING Working on the antenna system during thunderstorms Danger to life due to electrical shock Do not carry out any work on the antenna system or the antenna cable if there is a risk of a lightning strike Do not carry out any work on the antenna system if the safety distance to free lines and sequential circuits is exceeded Selection of the Antenna location To receive enough sa...

Страница 37: ... peaks e g caused by lightning strikes can be transmitted via the antenna cable and may cause damage to the receiver The receiver is pro tected against these effects by using the MBG S PRO surge protection Being installed in a waterproof housing the MBG S PRO is also suitable for outdoor installation Mein berg recommends the indoor installation as soon as possible after the antenna cable enters th...

Страница 38: ... the socket of the surge protection Earth cable to PE rail Cable circa 1 5 mm Ø attached to the surge protection as short as possible 4 The next step is to connect the supplied coaxial cable between the surge protector and receiver N Norm female N Norm male SMA female BNC female N Norm male N Norm female BNC male Receiver Antenna splitter SMA male M B G S P R O Optional IMS LANTIME M4000 Date 27th...

Страница 39: ...must compensate the signal propagation time of the antenna cable therefore you need to enter the length of the antenna cable in meters or the compensation time in nanoseconds into the settings of your receiver Antenna Cable Length m The receiving satellite signal is delayed by the used coaxial cable Cable Delay Usage RG58U 5 ns m for GPS and GNS UC receivers H155 4 ns m for GNS and GNM receivers B...

Страница 40: ...tallation 6 1 1 4 Installation of the RV 76G GPS GLONASS Antenna for mobile Applications Mounting the antenna Source Datasheet gps glonass_antenna_rv 76g_catalog_v1 pdf Sanav IMS LANTIME M4000 Date 27th May 2021 35 ...

Страница 41: ...efully It deci sively determines the receiving quality and thus the availability of the DCF77 signal If the antenna is not precisely aligned signal reception and timing accuracy will be affected The DCF antenna must be aligned towards Mainflingen near Frankfurt Main according to the installation conditions mentioned below DCF77 Transmission Tower Alignment DCF77 Antenna Location Mailand DCF77 Ante...

Страница 42: ...he advantage that the signal to noise ratio to electronic devices in buildings is usually increased and the reliability of the synchronization is thus significantly improved Installation conditions for optimal operation Horizontal mounting of the antenna Long side of the DCF77 antenna aligned to the transmission tower see illustration previous page min 30 cm distance from all metal objects If thes...

Страница 43: ...nimum field strength value on the front display if present or the modulation indicator LED does not yet flash every second Step 2 Person 1 rotates the antenna by 90 until person 2 notices a maximum reception field strength value at maxi mum or a flashing of the modulation LED every second without intermediate flickering However a high signal level alone is no guarantee of good reception as it can ...

Страница 44: ...e the risk of overvoltage damage e g due to lightning strikes N Norm male N Norm female Outside wall of the building Outdoor installation Inside a waterproof housing Indoor installation recommended Just after the antenna cable enters N Norm female N Norm male M B G S P R O M B G S P R O the wall 3 To ground the antenna cable connect the surge protection with a grounding cable to a equipotential bo...

Страница 45: ...lied coaxial cable between the surge protector and receiver N Norm female N Norm male SMA female BNC female N Norm male N Norm female BNC male Receiver Antenna splitter SMA male M B G S P R O Optional 40 Date 27th May 2021 IMS LANTIME M4000 ...

Страница 46: ...ction if present and the receiver and requires a power supply of 230 V 50 Hz Receiver Antenna splitter Antenna In Out 3 Out 1 Out 2 Out 4 Distance AB 280 m RG58 Total length OK Distance AC 410 m RG58 max total length exceeded Recommendation of an AV as amplifier A B C AW02 Compensation of the DCF signal delay To ensure that the connected receiver can compensate the transmission time from transmitte...

Страница 47: ...sical network AC DC NETWORK POWER GNSS ANTENNA CONSOLE SERIAL Figure Connection scheme LANTIME M4000 with power supply network connector serial connection and antenna link The following section describes how you can initially put a LANTIME system into operation via LED dis play with help of the Web Interface or via serial connection 42 Date 27th May 2021 IMS LANTIME M4000 ...

Страница 48: ...ms have a display with control keypad The following figure shows the individual steps you have to perform to read out an IP via the display or to set the IP manually Interfaces Global Cfg Services Add Interf Ref Time Time Service Network System MRS Sync to GPS NTP Offs 1us Tue 13 04 2021 UTC 10 25 51 OK Use Up and Down to select Port lan0 0 1of1 i 172 28 12 1 IPv4 Parameter IPv6 Parameter Link Mod...

Страница 49: ...out serial interface can be connected with a Serial to USB converter After connection is established the prompt for the user ID should be displayed Welcome to Meinberg LANTIME login _ Default user root Default password timeserver press RETURN again if necessary Change with the console to the directory wizard The LANTIME Basic Configuration Wizard can now be started with the startwizard command Aft...

Страница 50: ...he address line of a standard web browser A login dialog will open in delivery state you can use the following login data User root Password timeserver Note Please change these credentials during the first web session on your LANTIME For detailed documentation about management and monitoring please refer to the latest LTOS firmware manual at http www mbg link doce fw ltos or in the menu Documentat...

Страница 51: ...firmware version e g LTOS 6 24 027 For security reasons we always recommend the latest version of the respective firmware generation V5 V6 V7 In the web interface menu System you can copy a new firmware version to your LANTIME under Firmware Software Update With the submenu Configuration Firmware Management Firmware Management you can easily activate different firmware versions and delete versions...

Страница 52: ...tem Diagnostics and then use the button Download Diagnostic File In the submenu Configuration Firmware Management you can save your current configuration under Configuration Management This file is also helpful for our staff when solving problems If these files are too big to send by mail you can also use our upload page https www meinbergglobal com upload Please enter the serial number of your de...

Страница 53: ... view the last system notifications and the triggered event notifications For the system messages the date and UTC time is displayed for the notifications the date and UTC time of the last occurrence of the triggered event is displayed In addition the event level is also displayed for the notifications Info Action Warning Error Critical 48 Date 27th May 2021 IMS LANTIME M4000 ...

Страница 54: ... updates for the lifetime of your product i e for as long as you choose to use it Depending on the product this level also includes a 2 or 3 year hardware warranty You can extend the hardware warranty period after the standard warranty of your Meinberg product ends The chapter includes Basic Customer Support Support Ticket System How to download a Diagnostic File Self Help Online Tools NTP and IEE...

Страница 55: ...for your LANTIME please visit https www meinbergglobal com english sw firmware htm and fill out the form Available firmware updates will be provided by e mail LANTIME firmware V5 or older versions or with a direct download link LANTIME firmware V6 or newer 10 2 Support Ticket System Meinberg assists you quickly and directly on questions regarding the initial setup of your devices troubleshoot ing ...

Страница 56: ...ics Press the Download Diagnostic File button The file will take some time to be created as its size is several MBs After the file has been created it will be automatically sent to your web browser Then save the file to your local hard disk The diagnostic file is named lt_diag_SERIALNUMBER tgz and the file format is a tgz archive You can open the tgz archive e g with 7Zip https www 7 zip org 10 3 ...

Страница 57: ... htm 8 NTP IEEE 1588 PTP online tutorials from Meinberg http blog meinbergglobal com 9 FAQs about Meinberg Products https www meinbergglobal com english faq 10 Meinberg Knowledgebase https kb meinbergglobal com 11 GPS GNSS Antenna Installation and mounting https www meinbergglobal com english info gps antenna mount htm https www youtube com watch v ZTJMKSI8OGY YouTube video 12 NTP support page and...

Страница 58: ...es and practical hands on labs If you are planning or re designing synchronization for your networks and you need additional knowledge see our agenda for the upcoming courses Homepage https www meinbergglobal com english support meinberg sync academy htm Courses Meinberg Product Training NTP Complete PTP Complete Customized Trainings and Online Trainings Contact Phone 49 0 5281 93093 0 E Mail info...

Страница 59: ...l excessive heat development which may cause an overheating damage during device oper ation it is necessary to leave space for ventilation of at least 1U height at the top and the bottom of the IMS system If this is not possible then the system must be equipped with an active cooling module ACM See chapter Retrofit the System with an Active Cooling Module ACM 54 Date 27th May 2021 IMS LANTIME M400...

Страница 60: ...peration without ACM active cooling mod ule and with space between devices for ventilation 1U at the bottom and the top In the right figure the air flow during device in operation with ACM and no space between devices in a server rack is depicted IMS LANTIME M4000 Date 27th May 2021 55 ...

Страница 61: ...e M4000 system can be upgraded with two ACM modules during operation In the upper unit of the device where both display and function keys are located you will find an empty slide in bay on the right and on the left side To pull out the empty slide in bays carefully introduce a tool e g small screwdriver into the indicated slots and press out the module from its anchoring The new Active Cooling Mod...

Страница 62: ...ded data line Network LAN CPU RJ 45 10 100 1000 Base T shielded data line SFP 1000Base T Module Options Power DC power supply 5pin DFK male 20 60 V DC or 5pin MSTB connector 10 36 V DC Network Modules LNE GbE RJ45 10 100 1000 MBit shielded data line SFP 1000BASE T HPS100 RJ45 SFP 10 100 1000 MBit shielded data line Output Modules CPE configurable BNC DFK 2 PPOs serial TS TC FO shielded data line D...

Страница 63: ...E1 T1 var Freq shielded data line MRI BNC FST 10 MHz PPS IRIG PPOs shielded data line VSI BNC Video Sync LTC Word Clk shielded data line and PPS Input Input Output Modules PIO180 BNC PPS 10 MHz shielded data line 58 Date 27th May 2021 IMS LANTIME M4000 ...

Страница 64: ...no parity and 1 Stopbit The terminal emulation have to set to VT100 After connecting to the timeserver there will be displayed the login message press RETURN for first connection default user root password timeserver 11 6 USB Connector Most LANTIME M Series products come with a USB interface for connectiong a USB storage device e g a USB stick This USB stick can be used for different tasks in comb...

Страница 65: ...le carefully out of the guide rail Note that the module is firmly anchored in the connector block of the housing You need a certain amount of force to release the module from this link Once the connection to the connector block of the system s backplane is loosened the module can be easily pulled out 4 Note during installation Please ensure that the module is correctly inserted into the two guide ...

Страница 66: ...I and MRI Slots hot plugable CLK1 CLK2 hot plugable Afer the exchange or the installation of a clock module a rescan of the reference clocks Rescan Refclocks must be executed in the web interface menu System RSC SPT not hot plugable The switching function or the distribution of generated signals is interrupted while the RSC SPT is disconnected CPU not hot plugable Before replacing the CPU the IMS ...

Страница 67: ...telecom references VSI Video synchronization inputs All output modules and all network modules TSU and HPS modules can operate in PTP Grandmaster and Slave mode in an ESI slot MRI MRI standard reference input signals PPS 10 MHz IRIG ESI input module for telecom references VSI Video synchronization inputs All output modules and all network modules TSU and HPS modules can operate in PTP Grandmaster ...

Страница 68: ...ax 50 W Maximum thermal energy Etherm 180 00 kJ h 170 61 BTU h N L AD10 PWR U 100 240V N U 265V max 90 I 1 0 A N f 50 60Hz N U 100 200V N U 250V max 90 I 0 6 A N 1 5 WARNING This equipment is operated at a hazardous voltage Danger to life due to electrical shock Only qualified personnel electricians may connect the device Never work with open terminals and plugs while the power is on All connector...

Страница 69: ...VIN 5 not connected Input Parameter Nominal voltage range UN 24 48 V Maximum voltage range Umax 20 60 V Nominal current IN 2 1 A Output Parameter Maximum power Pmax 50 W Maximum thermal energy Etherm 180 00 kJ h 170 61 BTU h DC20 PWR U V N 24 48 U V max 20 60 I 2 1 A N 2 4 64 Date 27th May 2021 IMS LANTIME M4000 ...

Страница 70: ...otective Earth 4 VIN 5 not connected Input Parameter Nominal voltage UN 24 V Maximum voltage range Umax 10 36 V Nominal current IN 2 5 A Output Parameter Maximum power Pmax 50 W Maximum thermal energy Etherm 180 00 kJ h 170 61 BTU h DC10 PWR U V N 24 U V max 10 36 I 2 5 A N 2 4 IMS LANTIME M4000 Date 27th May 2021 65 ...

Страница 71: ...DC insulated Local Oscillator to Converter Frequency 10 MHz 1 First IF Frequency 35 4 MHz 1 1 these frequencys are transfered via the antenna cable Power Requirements 15 V 100 mA via antenna cable Figure right GPS Receiver and GPS with XHE SPI Connector optional LED Indicators Init blue while the receiver passes through the initialization phase green the oscillator has warmed up Nav green position...

Страница 72: ...ng timestrings time telegrams can be used NMEA RMC NMEA ZDA Meinberg Standard Uni Erlangen COM Pin Assignment of the optional XHE SPI Connectors A1 PPS In A2 PPS Out Pin 1 SCL_Out SPI Clock Pin 2 CS Chip Select Pin 3 MOSI Master Out Slave In Pin 4 MISO Master In Slave Out Pin 5 GND Attention Use this plug only to connect a MEIN BERG IMS XHERb Rubidium expansion chassis IMS LANTIME M4000 Date 27th ...

Страница 73: ...ntenna Antenna Cable shielded coax cable Belden H155 PE Cable Length max 70 m low loss cable Type of Connector female SMA connector Power Requirements 5 V 100 mA via antenna cable Figure right GNSS Receiver and GNSS with XHE SPI Connector optional LED Indicators Init blue while the receiver passes through the initialization phase green the oscillator has warmed up Nav green positioning successfull...

Страница 74: ...ng timestrings time telegrams can be used NMEA RMC NMEA ZDA Meinberg Standard Uni Erlangen COM Pin Assignment of the optional XHE SPI Connectors A1 PPS In A2 PPS Out Pin 1 SCL_Out SPI Clock Pin 2 CS Chip Select Pin 3 MOSI Master Out Slave In Pin 4 MISO Master In Slave Out Pin 5 GND Attention Use this plug only to connect a MEIN BERG IMS XHERb Rubidium expansion chassis IMS LANTIME M4000 Date 27th ...

Страница 75: ...rt Antenna Cable shielded coax cable Cable Length max 300 m Type of Connector female BNC connector Power Requirements 15 V 100 mA via antenna cable LED Indicators Init blue while the receiver passes through the initialization phase green the oscillator has warmed up Nav green positioning successfully Ant red antenna faulty or not connected yellow the clock is synchronized by an external Signal MRS...

Страница 76: ...ng timestrings time telegrams can be used NMEA RMC NMEA ZDA Meinberg Standard Uni Erlangen COM Pin Assignment of the optional XHE SPI Connectors A1 PPS In A2 PPS Out Pin 1 SCL_Out SPI Clock Pin 2 CS Chip Select Pin 3 MOSI Master Out Slave In Pin 4 MISO Master In Slave Out Pin 5 GND Attention Use this plug only to connect a MEIN BERG IMS XHERb Rubidium expansion chassis IMS LANTIME M4000 Date 27th ...

Страница 77: ...a cold start 12 minutes in GPS only mode Signal Gain 40 dB Antenna Gain 3 5 dBic 3 dBic Connection Type SMA female Antenna Cable shielded coaxial line Belden H155 Cable lenght deductible up to max 70 m Power Supply 5 V DC via antenna cable Nominal Impedance 50 Ohm Backup Battery Type CR2032 button cell lithium battery The hardware clock and the RAM are battery buffered When the main power supply f...

Страница 78: ...rs male Pin 2 RxD Pin 3 TxD Pin 5 GND Synchronization with PPS string Pin 1 PPS Signal level TTL Pulse length 5 µs active high Pin 2 String The following timestrings time telegrams can be used NMEA RMC NMEA ZDA Meinberg Standard Uni Erlangen COM Pin Assignment of the optional XHE SPI Connectors A1 PPS In A2 PPS Out Pin 1 SCL_Out SPI Clock Pin 2 CS Chip Select Pin 3 MOSI Master Out Slave In Pin 4 M...

Страница 79: ...ion Backup Battery Type CR2032 button cell lithium battery When main power supply fails hardware clock runs free on quartz basis almanac data is stored in RAM Life time of lithium battery min 10 years Oscillator Options OCXO SQ OCXO MQ OCXO HQ OCXO DHQ Antenna Connector BNC female Antenna Cable shielded Coax cable Cable Length 300 m with standard coax cable LED Indicators Init blue while the recei...

Страница 80: ... RxD Pin 3 TxD Pin 5 GND Synchronization with PPS string Pin 1 PPS Signal level TTL Pulse length 5 µs active high Pin 2 String The following timestrings time telegrams can be used NMEA RMC NMEA ZDA Meinberg Standard Uni Erlangen COM IMS LANTIME M4000 Date 27th May 2021 75 ...

Страница 81: ...Vpp to 8 Vpp The input stage is electrically insulated and has an impedance of ei ther 50 Ω 600 Ω or 5 kΩ selectable by a jumper DC Level Shift Input insulated by optocoupler with internal series resistance of 220 Ω LED Indicators Init blue while the receiver passes the initialization phase off Oscillator not warmed up green the internal timing of the TCR180 is synchronized to the received time co...

Страница 82: ...nthesizer Battery Type CR2032 Figure 1 Jumper Settings 600 Ω Technical Specifications Receiver Input AM input BNC connector insulated by a transformer impedance settable 50 Ω 600 Ω 5 kΩ 600 mVPP to 8 VPP Mark Input Signal DC Level Shift input insulated by photocoupler internal series resistance 220 Ω maximum forward current 60 mA diode forward voltage 1 0 V 1 3 V Decoding Decoding of the following...

Страница 83: ...rammable outputs TTL level Default settings active only if sync PPO_0 PPO_3 Idle not active Timer Single Shot Pulse Per Second Per Minute Per Hour PPS PPM PPH DCF77 Marks Time Sync DCLS Time Code Synthesizer Frequency Accuracy of Pulses Better than 1 µsec after synchronization and 20 minutes of operation Serial Port Configurable RS 232 interface Baudrates 300 Bd 115200 Bd Framing 7E2 8N1 8N2 8E1 7...

Страница 84: ...Phase synchronous to pulse per second 10 kHz to 10 MHz deviation of frequency 0 0047 Hz Synthesizer Outputs TTL into 50 Ω sine wave 1 5 Vrms output impedance 200 Ω Pulse Outputs Pulse per second PPS TTL and RS 232 level positive pulse pulse duration 200 msec Pulse per minute PPM TTL level positive pulse pulse duration 200 msec Pin Assignment of the DSUB9 Connectors male Pin 2 RxD Pin 3 TxD Pin 5 G...

Страница 85: ...he TIME_SYNC signals are indicate the synchronization of the clocks To avoid unnecessary changeovers in case of repeatedly occurring free run operations of one system the master backup order is changed with each changeover For example let s suppose the current master system looses its synchronization Then a changeover is performed to a synchronous slave system and thus the former slave system beco...

Страница 86: ...lock 1 Clock 2 State of receivers MUX enabled disabled output signals during a free run Selected Clk selected reference clock 1 or 2 Menu Switch Unit SCU Cntl OK OK SCU State SCU Cntl SCU INFO MANUAL disabl Selected Clk 2 SCU Outputs enabled disabled MANUAL enable disable switching between automatic and manual operation Selected Clk 1 2 selection of the active reference clock IMS LANTIME M4000 Dat...

Страница 87: ...r clk 2 10 EN_CLK activates the clock with a sync event after reset only if DIP 1 is ON Figure DIP Switch of RSC180 Description of DIP_SW positions Switch No 1 Positions 0 OFF In the case that both clock are async all output signals are disabled 1 ON Even if both clocks are async outputs are activated from one of the clocks Switch No 2 Positions 0 OFF Front panel switch functions activated 1 ON Fr...

Страница 88: ...0 OFF The Priority master is clock 1 1 ON The Priority master is clock 2 IF Switch No 1 is ON Switch No 10 Positions 0 OFF Even async one clock is always enabled 1 ON A clock is enabled after the first sync event since a reset IMS LANTIME M4000 Date 27th May 2021 83 ...

Страница 89: ...face or CLI Status LEDs The status of the SPT is indicated by the four LEDs PPS red the signal was not provided to the system by the receiver yet green the signal is generated by the receiver and distributed in the system 10 MHz red the signal was not provided to the system by the receiver yet green the signal is generated by the receiver and distributed in the system Clock red as long as the rece...

Страница 90: ...Power Consumption Typ application 6 9 W 5V Technical Specifications IMS CPU C15G2 LTOS V7 only Processor Intel R AtomTM Processor E Series 2 Cores 1 33GHz TDP 3W Main Memory onboard 2MB Cache Memory 1MB 2nd Level Cache Flash Disk 4 GB Network Connectors 1 x 10 100 1000 Base T with RJ45 Jack 1 x 1000Base T with SFP Jack Power Consumption Typ application 6 9 W 5V Interfaces IMS LAN CPU Serial Interf...

Страница 91: ... the monitored network interfaces is faulty A Alarm off no error red general error Supported Protocols Network Time Protocol NTP NTP v2 RFC 1119 NTP v3 RFC 1305 NTP v4 RFC 5905 SNTP v3 RFC 1769 SNTP v4 RFC 4330 OSI Layer 2 Data Link Layer PRP IEC 62439 3 OSI Layer 3 Network Layer IPv4 IPv6 OSI Layer 4 Transport Layer TCP UDP TIME RFC 868 DAYTIME RFC 867 SYSLOG OSI Layer 7 Application Layer HTTP HT...

Страница 92: ...C connector isolated by opto coupler Insulation voltage 3750 Vrms Internal series resistor 330 Ohm Max input current 25 mA Diode forward voltage 1 0 V 1 3 V selectable Time Code Inputs modulated unmodulated DCLS B122 123 B002 003 B126 127 B006 007 IEEE1344 modulated and DCLS AFNOR NFS 87 500 modulated and DCLS Time Code modulated input AM BNC connector isolated by transformer Insulation voltage 30...

Страница 93: ...til USB is configured LED In LED B off until USB is configured USB is configured LED St blue LED In LED B 0 5 sec red 0 5 sec yellow 0 5 sec green 0 5 sec off Normal Operation LED St LED In green LED A green if timecode AM or timecode DCLS or both signals are available at the same time LED B green if 10 MHz or PPS or both signals are available at the same time Power Requirements 5 V 5 50 mA 88 Dat...

Страница 94: ...ritization of the available input sources 1 Open the Clock menu 2 Open the submenu Status configuration 3 Select the respective clock module of the corresponding MRI module 4 Click on the tab MRS settings 5 Configure the reference signals shown in the priority list IRIG settings Several time codes are available for selection for the IRIG reference signals of the MRI These are to be configured in t...

Страница 95: ...us of the backplane s reference signals LED A Status of the input signals 1 2 at the board LED B Status of the input signals 1 2 at the board Operation conditions Initialisation LED St blue until configuration is done LED In off until configuration is done LED A off until configuration is done LED B off until configuration is done expiration LEDs ALL LEDs 0 5 sec red 0 5 sec yellow 0 5 sec green 0...

Страница 96: ...ources to an IMS system It accepts E1 and T1 sources as a Bitstream 2 048 MBit s 1 544 Mbit s supporting SSM BOC It also handles configurable frequencies 1 kHz 20 MHz and 1PPS pulse synchronization source if re quired An ESI card is as the MRI card dedicated to one specific clock module depending on the slot it is installed in and can be installed in both ESI as well as MRI slots Configurable Inpu...

Страница 97: ... Cycles A discontinuity of an integer number of cycles in the measured carrier phase resulting from a temporary loss of input signal The maximum slip number can be selected in range between 0 5 3 cycles with 1 5 as a default value Input 3 accepts as input signal configurable frequencies from 1 kHz to 20 MHz 2048 kHz is set as default value 92 Date 27th May 2021 IMS LANTIME M4000 ...

Страница 98: ...RC Primary Reference Clock Rec G 811 QL INV3 reserved QL SSU A TNC QL INV5 reserved QL INV5 reserved QL ST2 QL SSU B QL INV9 reserved QL EEC2 ST3 QL EEC1 SEC Synchronous Equipment Timing Source SETS QL SMC QL ST3E QL PROV QL DNU DUS Do not use for synchronization Example User configured QL SSU B as Minimum Quality Level for his system E1 input signal coming from PRC G 811 or TNC will be allowed fo...

Страница 99: ...C Reader Input with Prescaler mode Frequency only Signal level 300 mVss into 75 Ω unbalanced Time Code Formats PAL SMPTE259M ITU R BT 470 6 SMPTE12M 1 SMPTE ST309M LTC Input LTC Reader 25 fps Word Clock Input Input signal Word Clock Input with programmable frequency range Signal level TTL Frequency range 1 kHz 10 MHz PPS Input Input signal PPS pulse per second Signal level TTL Pulse lenght 5 µs ak...

Страница 100: ...ng initialization green during operation LED In Shows status after initialization Green Accurate Green Flashing Timesync Yellow Insufficient quality of the reference signal Red Reference signal not available VSI180 is not synchronous Normal Operation LED St In green expiration LEDs ALL LEDs 0 5 sec red 0 5 sec yellow 0 5 sec green 0 5 sec off IMS LANTIME M4000 Date 27th May 2021 95 ...

Страница 101: ...nput References Menü IO Config Input Configuration VSI Module Video Sync Interface configurable Inputs Input 1 Video Sync In Format PAL 625i Epoch TAI Signal Source Single ended signal input Time Code Modes VITC Time Code Line 6 22 96 Date 27th May 2021 IMS LANTIME M4000 ...

Страница 102: ...11 Technical Appendix Input 2 LTC In Type LTC 25 FPS Frames per Second Input 3 Word Clk In Frequency 1 kHz 10 MHz Max Slip 0 5 3 0 oscillations IMS LANTIME M4000 Date 27th May 2021 97 ...

Страница 103: ...Monitoring of the IMS VSI The submenu Status of the IO Config allows you to view the status of each port of the installed IMS VSI module In addition the current operating temperature of the module is displayed in this menu 98 Date 27th May 2021 IMS LANTIME M4000 ...

Страница 104: ...of the IMS VSI The submenu Status of the IO Config allows you to view the status of each port of the installed IMS VSI module In addition the current operating temperature of the module is displayed in this menu IMS LANTIME M4000 Date 27th May 2021 99 ...

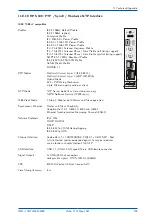
Страница 105: ...alisation LED In LED B Shows the state of the four LAN ports after initialisation green normal operation red defective LAN port Figure right LNE GbE and LNE GbE with SFP Option LNE SFP Option LNE SFP Interface 1000BASE T SFP Cable Multimode Fiber GI 50 125µm or GI 62 5 125µm gradient fiber Singlemode Fiber E9 125µm monomode fiber Link Speed Electrical 1000 Base T Fiber optical 1000 FX 100 Date 27t...

Страница 106: ... the MAC address order Thus the uppermost interface on a LNE module has the lowest and the bottommost interface has the highest MAC address respec tively Let s take an example where three LNE modules are inserted in a device Then the logical order of network interfaces assigned in a webinterface follows the MAC address order of LNE modules disregarding the I O slot order by which the modules are i...

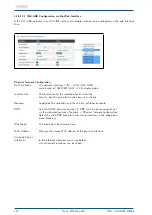
Страница 107: ...with function keys is available Bonding to optimize the reliability and the use of a of higher bandwith PRP As of LANTIME firmware version 7 0 PRP can also be conveniently set via the web interface menu Network Physical Network Configuration Select the same PRP group for at least two interfaces in the drop down menu Bonding IPv6 Mode This mode must be activated here MAC Address Displays the unique...

Страница 108: ...tomatic network configurations Misc With the tab Misc the virtual interface can be assigned to a physical interface VLAN With VLAN this function can be enabled and configured Cluster The cluster function can be activated with this submenu and additional Parameters such as multicast or unicast mode TCP IP address and subnet mask can be set up here IMS LANTIME M4000 Date 27th May 2021 103 ...

Страница 109: ...network configuration Now it is ensured that the IMS module is correctly installed and recognized by the system Remove a LANTIME Network Extension LNE To remove a LNE network extension from the LANTIME system the card must first be removed However the removed LNE interfaces are still listed in the network configuration The NIC Manager can be used to update the network configuration in this case as...

Страница 110: ...ssages second per client NTP Mode NTP Server mode 8 ns time stamp accuracy NTPD Software Service 15 000 req s 1588 Clock Mode 1 Step 2 Step for both Master and Slave operation Synchronous Ethernet Master and Slave Capability Compliant to ITU T G 8261 G 8262 and G 8264 Ethernet Synchronization Messaging Channel ESMC Network Protocols IPv4 IPv6 DHCP DHCPv6 DSCP IEEE 802 1q VLAN filtering tagging IEE...

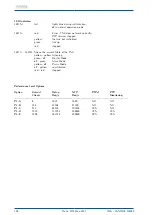
Страница 111: ...he current State of the TSU yellow yellow Listening green off Master Mode off green Slave Mode yellow off Passiv Mode off yellow uncalibrated red red stopped Performance Level Options Option Unicast Delay NTP PTPv1 PTP Clients Req s Req s Monitoring PL A 8 1024 1600 NO NO PL B 256 32768 51200 NO NO PL C 512 65536 102400 YES NO PL D 1024 131072 204800 YES YES PL E 2048 262144 409600 YES YES 106 Dat...

Страница 112: ...led configuration guide you will find in the corresponding firmware manual of the system See chapter The Web Interface Configuration PTP V2 Figure Webinterface PTP Menu Global Configuration IMS LANTIME M4000 Date 27th May 2021 107 ...

Страница 113: ...client NTP Mode NTP Server mode 10 ns time stamp accuracy 1588 Clock Mode 1 Step 2 Step for both Master and Slave operation Synchronous Ethernet Master and Slave Capability Compliant to ITU T G 8261 G 8262 and G 8264 Ethernet Synchronization Messaging Channel ESMC Network Protocols IPv4 IPv6 DHCP DHCPv6 DSCP IEEE 802 1q VLAN filtering tagging Ethernet Interface Combo Port 1 x 100 1000BASE T RJ45 1...

Страница 114: ...ror TSU does not work correctly PTP services stopped yellow No link but initialized green link up red stopped LED A LED B Shows the current State of the TSU yellow yellow Listening green off Master Mode off green Slave Mode yellow off Passiv Mode off yellow uncalibrated red red stopped IMS LANTIME M4000 Date 27th May 2021 109 ...

Страница 115: ...ese two modules have been designed to cover a wide range of interface and signal protocol require ments They feature a two tier architecture with a back end and front end The back end is responsible for internally routing the backplane IMS synchronization signals in case of the BPE or for autonomously generating a wide range of different signals by using a microprocessor on a CPE The front end mak...

Страница 116: ... into 50 Ω Power Requirements 5 V 5 150 mA BNC 5 V 5 150 mA FO Status Indicators LED St BPE status LED In Status of the backplane s output signals LED A BPE status output signals 1 2 LED B BPE status output signals 3 4 Note When pulse trains 1 6 s are configured the LED assigned to the output remains red as these pulse trains are not monitored e g PPM PPH Initialisation LED St blue until USB is co...

Страница 117: ...g the BPE 1060 module important configuration parameters must be observed In the web inter face you must set the mode to DCF77 Marks in the Clock Programmable Pulse Outputs Prog Out 1 menu In the drop down box Signal the setting Normal is to be selected In the menu Clock Time Zone Time Zone for external Outputs the Local Time Zone must be selected If the corresponding time zone does not exist in t...

Страница 118: ...ectors Signals Size BPE 3014 2 x D SUB9 female Out 1 Out 2 TC DCLS 4HP RS 422 Level BPE 3050 4 2 x D SUB9 female Out 1 Out 2 Progr Pulse 4HP RS 422 Level BPE 3412 1 x D SUB9 female Out 1 Progr Pulses RS 422 4HP 2 x BNC female Out 2 Out 3 TC AM BPE 3422 4 x D SUB9 female Out 1 Out 4 1MHz 8HP RS 422 Pegel BPE 3424 4 x D SUB9 female Out 1 Out 4 TC DCLS 8HP RS 422 Pegel BPE 3082 4 x D SUB9 female Out ...

Страница 119: ... FO Multimode BPE 5010 4 x FST PPS FO Multimode 4HP BPE 5014 4 x FST 2 x PPS 2 x 10 MHz FO Multimode 4HP BPE 5020 4 x FST 10 MHz FO Multimode 4HP BPE 5030 4 x FST TC DCLS FO Multimode 4HP BPE 5032 4 x FST TC DCLS FO Singlemode 4HP BPE 5080 4 x FST 2048 kHz FO Multimode 4HP BPE 5082 4 x FST PPS 10 MHz 2 x 2048 kHz 4HP FO Multimode BPE 5090 4 x FST PPO FO Multimode 4HP 114 Date 27th May 2021 IMS LAN...

Страница 120: ...ts If an output signal has to be changed this must be done via the pre connected receiver in the menu Clock Switch Card if you have a redundant system or in the menu Clock Receiver in systems with only a single receiver The BPE modules have no direct configuration options This information is also displayed in the IO Config menu Figure menu Clock Switch Card IRIG Settings Figure menu Clock Programm...

Страница 121: ...the backplane s output signals LED A BPE status output signals 1 2 LED B BPE status output signals 3 4 Initialisation LED St blue until USB is configured LED In LED B off until USB is configured USB is configured LED St blue LED In LED B 0 5 sec red 0 5 sec yellow 0 5 sec green 0 5 sec off Normal Operation LED St LED In green LED A green if the desired signal is present on output 1 and output 2 LE...

Страница 122: ...SMF via ST 8700 BPE Out 1 Out 2 Out 3 Out 4 A B 3 x TTL via BNC 1 x TC AM via BNC BPE Module Connectors Signal Outputs BPE 8000 4x BNC female TTL BPE 8100 4x ST Fiber Optic Multimode BPE 8200 2x ST 2x BNC female 2x Fiber Optic Multimode 2x TTL BPE 8300 4x ST Fiber Optic Singlemode BPE 8400 2x ST 2x BNC female 2x Fiber Optic Singlemode 2x TTL BPE 8500 4x ST 2x Fiber Optic Multimode 2x Fiber Optic S...

Страница 123: ...ding to your choice PPS 10MHz Time Code DCLS 2048 kHz and programmable pulse outputs PP 1 PP 4 of the upstream reference source With the pro grammable pulse outputs each output channel of the pulse generator IMS receiver can now also be switched through to all available connectors of the BPE for example PP 1 to Out 1 Out 4 of the BPE Figure Web interface menu IO Config Output Configuration 118 Dat...

Страница 124: ... the backplane s output signals LED A BPE status output signals 1 2 LED B BPE status output signals 3 4 Initialisation LED St blue until USB is configured LED In LED B off until USB is configured USB is configured LED St blue LED In LED B 0 5 sec red 0 5 sec yellow 0 5 sec green 0 5 sec off Normal Operation LED St LED In green LED A green if the desired signal is present on output 1 and output 2 L...

Страница 125: ...PE 1060 module in an IMS system In the Web Interface in the menu Clock Programmable pulse outputs Prog Out 1 the mode must be set to DCF77 Marks In the Signal drop down box select Normal see figure right The local time zone must be selected in the menu Clock Time Zone Time Zone for External Outputs If the corresponding time zone is not available in this drop down box the time zone can be added man...

Страница 126: ...veral time zones are entered with the changeover rule for summer and winter time Please note that these settings will also affect other output modules which provide the programmable pulse output Prog Out 1 IMS LANTIME M4000 Date 27th May 2021 121 ...

Страница 127: ...tings of the desired output configuration are selected in the IO Config Output Configuration It should be noted that the desired signals can be realized only with the corresponding front card Output Signals configurable 10 MHz PPS IRIG DCLS IRIG AM PPO Capture Input active high or active low permitted input level 5 V DC Power Supply 5 V DC 150 300 mA depending on the selected frontend Status Indic...

Страница 128: ...progr Pulse 4HP 1 x BNC female TC AM CPE 3000 2 x D SUB9 serial timestring 4HP RS 232 PPO CPE 3010 2 x D SUB9 serial timestring 4HP RS 422 CPE 3020 2 x D SUB9 serial timestring 4HP RS 422 PPO CPE 3030 2 x D SUB9 serial timestring 4HP RS 485 CPE 3040 2 x D SUB9 serial timestring 4HP RS 485 PPO CPE 3050 2 x D SUB9 PPO RS 422 4HP CPE 3060 2 x D SUB9 serial timestring 4HP RS 422 PPO CPE 4020 2 x RJ45 ...

Страница 129: ... COM A COM B COM A COM B COM A COM B COM A COM B COM A COM B COM A COM B COM A COM B PIN RS 232 Time String PPO Time String RS 422 RS 422 RS 422 PPO Time String Time String RS 485 RS 485 Time String PPO RS 422 PPO RS 422 PPO TTL RS 232 Time String RS 422 PPO RS 422 Time String 1 PPO RxD RxD PPO RxD 2 TxD RxD RxD TxD RxD 3 RxD TxD TxD RxD RxD TxD 4 TxD TxD RxD TxD 5 GND GND GND GND GND GND GND GND ...

Страница 130: ...d CPE Configuration In the IO Config menu you can select the following values for the output connectors Common Time zone with the corresponding UTC offset value Synthesizer Frequency Snthesizer range 1Hz 10 MHz IRIG Code Generated IRIG output codes B002 B122 Prog Out Programmable output Prog Out 1 Prog Out 4 Figure Menu Tab Synthesizer Frequency for selecting the Frequency Synthesizer option in th...

Страница 131: ...e not in use Timer 3 switching times On Off Single Shot pulse length and start time Cyclic Pulse pulse length and cycle time Pulse Per Second pulse length Pulse Per Minute pulse length Pulse Per Hour pulse length DCF77 Marks timeout Position OK position determined Time Sync clock synchronized All Sync position determined and clock synchronized DCLS Time Code Synthesizer Frequency 126 Date 27th May...

Страница 132: ...he signals Baud Rate 19200 Framing 8N1 String Type Meinberg GPS Mode per second PPS Pin assignment Pin 3 TXD_P serial interf transmit pos Pin 5 GND Ground Pin 6 TXD_N serial interf transmit neg Pin 7 SYNC_P PPS transmit pos Pin 8 SYNC_N PPS transmit neg Current Consumption 5 V 5 150 mA Connection type 8P8C RJ45 Cable Copper twisted pair e g CAT 5 0 4020 CPE COM A COM B RS 422 TxD 1 PPS Pin 3 TxD P...

Страница 133: ...IG Code Generated IRIG output codes B002 B122 Serial Serial connection parameters Prog Out Programmable outputs Prog Out 1 and Prog Out 2 Figure Serial connection parameter settings The following programmable pulse outputs can be selected Idle not in use Timer 3 switching times On Off Single Shot pulse length and start time Cyclic Pulse pulse length and cycle time Pulse Per Second pulse length Pul...

Страница 134: ...11 Technical Appendix Figure Selection of programmable pulse outputs IMS LANTIME M4000 Date 27th May 2021 129 ...

Страница 135: ... signals LED P display for preset PPS LED C display for preset 10 MHz Initialisation LED St blue until USB is configured LED In LED B off until USB is configured USB is configured LED St blue LED In 0 5 sec red 0 5 sec yellow 0 5 sec green 0 5 sec off Normal Operation LED St LED In green LED P green if card is preset to PPS LED C green if card is preset to 10 MHz 180 PIO I O 1 I O 2 I O 3 I O 4 St...

Страница 136: ...t to PPS Pulse Per Second PPS 10 MHz Mixed operation is not possible All inputs outputs are set to either PPS or 10 MHz 11 8 21 2 PIO Configuration via the Web Interface In the IO Config menu of the web interface each port of the PIO180 can be set separately to Input or Output To use the individual ports in SyncMon the direction Input must be selected IMS LANTIME M4000 Date 27th May 2021 131 ...

Страница 137: ...gnal is compared to the system PPS or to the 10 MHz reference frequency The offset values are displayed in the status window Download the Setup Guide on the PIO180 product page for more detailed information about the configura tion and status monitoring options of the PIO180 Download of the PIO180 Setup Guide https www meinbergglobal com download docs manuals english ims pio pdf 132 Date 27th May ...

Страница 138: ...hort term stability and Accuracy depends on oscillator of the reference clock LED Indicators Power T1 E1 Power Init blue during initialisation green in normal operation mode T1 green selected mode T1 red output disabled yellow signal quality unknown E1 green selected mode E1 red output disabled yellow signal quality unknown LIU Power T1 E1 BITS 0 Clock 0 A4004 BITS 1 BITS 2 BITS 3 Clock 1 Clock 2 ...

Страница 139: ...GSM CDMA UMTS DAB DVB 3 T1 4 E1 green red on off green red on off unsymm unbalanced Pinbelegung Pin assignment 1 TRING 2 TTIP LIU A 8 TRING 7 TTIP LIU E 5 TRING 4 TTIP LIU T symm balanced 1 2 4 5 7 8 There are two separate signal paths on the board LIU One is for providing the standard frequencies the second path is for generation of the telecom signals All output signals have high accuracy and st...

Страница 140: ...erface isolation isolation isolation isolation isolation isolation isolation isolation 4 096 MHz framed outputs T1 403 G703 9 balanced or unbalanced 1 544 Mbps or 2 048 Mbps diplexer diplexer diplexer amplifier amplifier amplifier amplifier clock outputs G703 13 balanced 1544 kHz or 2048 kHz clock outputs G703 13 unbalanced 1544 kHz or 2048 kHz USB IMS interface IMS LANTIME M4000 Date 27th May 202...

Страница 141: ...or 2048 kHz E1 Four unbalanced and four balanced outputs according to ITU T G703 13 CCITT recommendation Physical electrical characteristics of hierarchical digital interfaces are available via BNC female and RJ45 connectors The framed outputs are consisting of data signals known from digital telephony which are distributed by using a special frame structure EFS Framing Mode Extended Superframe As...

Страница 142: ...e board LIU meets these recommendations T1 T 403 253 175 149 97 78 0 97 149 175 220 298 395 499 603 752 Time in nanoseconds 0 0 05 0 05 0 26 0 45 0 50 0 80 0 90 0 95 1 05 1 20 Normalized amplitude E1 G 703 269 nsec 244 nsec 194 nsec 219 nsec 488 nsec Nominal pulse 0 10 20 20 50 80 90 100 110 120 Percantage of nominal peak voltage IMS LANTIME M4000 Date 27th May 2021 137 ...

Страница 143: ... socket 2048 kHz E1 mode or 1 544 MHz T1 mode G 703 75 Ω unbalanced BNC connector 2048 kBit s E1 mode or 1 544 MBit s T1 mode 120 Ω balanced RJ45 socket 2048 kBit s E1 mode or 1 544 MBit s T1 mode 75 Ω unbalanced BNC connector 11 8 22 6 Overview LIU Modules for IMS Systems LIU Model Size Signal bal unbal Connectors LIU A4040 8TE BITS 4 0 4 x RJ45 Clock 4 0 4 x RJ45 LIU A4004 8TE BITS 4 0 4 x RJ45 ...

Страница 144: ...LIU A0040 Clock 4 0 LIU A0004 Clock 0 4 LIU A2020 BITS 2 0 Clock 2 0 LIU A2002 BITS 2 0 Clock 0 2 LIU_A0400 BITS 0 4 LIU A1111 BITS 1 1 Clock 1 1 Power T1 E1 LIU A4000 BITS 1 BITS 2 BITS 3 BITS 4 Power T1 E1 Clock 1 Clock 2 Clock 3 Clock 4 LIU A0040 Power T1 E1 Clock 1 Clock 2 Clock 3 Clock 4 LIU A0004 LIU Power T1 E1 A2020 BITS 1 BITS 2 Clock 1 Clock 2 LIU Power T1 E1 A2002 BITS 1 BITS 2 Clock 1 ...

Страница 145: ...ed 2 048 kBit or T1 framed 1 544 kBit Quality Sa Bit group location of SSM QL bits With the pull down menu Output Configuration the available outputs of the I O slots can be configured Output Configuration of a LIU module Line Interface Unit In this menu one can select between E1 or T1 mode for the LIU outputs The selected mode is the same for all outputs T1 or E1 T1 is a digital carrier signal th...

Страница 146: ...s e g transcoder equipment within national borders The Sa4 bit may be used as a message based data link for operation maintenance and performance moni toring The SSM Bit Synchronization Status Message can be selected in the Web GUI for clock quality information Sa4 is selected as default IMS LANTIME M4000 Date 27th May 2021 141 ...

Страница 147: ...d In the phase locked state the output levels of the four outputs are monitored and in case of a failure signalized by an associated red LED Technical Specifications Interface 4x sine outputs 10 MHz or 5 MHz Output Level 5 dBm 1 dBm at 50Ω 8 dBm or 12 dBm output level option available Warm up time 3 25 C within accuracy of 1 x 10 7 Harmonics 60 dBc Phase Noise LNO180 OCXO SQ 1 Hz 80 dBc Hz 10 Hz 1...

Страница 148: ...ED Status Indicators All LEDs red Outputs disabled PLL not locked OCXO in warm up phase 10 MHz reference not available Quality of the reference signal is not sufficient All LEDs green Normal operation outputs activated Associated LED red defect output or short circuit during normal operation IMS LANTIME M4000 Date 27th May 2021 143 ...

Страница 149: ...edundant with two reference clocks and IMS RSC module switching unit or with one reference clock and SPT module different relay states can be switched There is also the possibility to set the relays A C by different events Additional documentation for the REL1000 The setup guide supports you in a quick initial operation https www meinberg de download docs manuals english ims rel pdf The LANTIME fi...

Страница 150: ...0 V DC Response Time ca 3 ms Normal Operation Mode CO NO connected Normal Operation Error Mode CO NC connected Error WARNING This equipment is operated at a hazardous voltage Danger to life due to electrical shock Never work with open terminals and plugs while the power is on When working on the connectors of the error relay cable always remove both sides of the cable from the respective devices D...

Страница 151: ...atus Relais A Initialization 1 Sek red 1 Sek yellow 1 Sek green 1 Sek off Green flashing Normal Operation Mode Red flashing Error Mode LED B Status Relais B Initialization 1 Sek red 1 Sek yellow 1 Sek green 1 Sek off Green flashing Normal Operation Mode Red flashing Error Mode LED C Status Relais C Initialization 1 Sek red 1 Sek yellow 1 Sek green 1 Sek off Green flashing Normal Operation Mode Red...

Страница 152: ... on delivery see Fig blue mark Both clocks and the switchover unit are monitored Notification CLK1 Fail PPS Fail CLK2 Fail 10MHz Fail RSC Fail or Notification A B C Jumper setting in operation with one reference clock If only one reference clock is used the jumpers of the REL1000 are set as follows on delivery Relay A CLK1 Fail Relay B PPS Fail Relay C 10 MHz Fail In addition relays A C can also be ...

Страница 153: ...on No tification Events for various events so that the selected relay is switched to error mode on this event Selectable events are NTP not Sync or Clock not Sync for example In this figure there are no selection options the relays are switched in redundant operation via the reference clocks and the RSC switch unit This figure shows the menu in a non redundant system Relay C can be controlled via ...

Страница 154: ...uency itself is sent out via serial interface or is beeing converted to an analog voltage output provided by a DAC Pin Assignement 16 pin DMC Phoenix Connector Pin Signal Pin 1 A0 Pin 2 A1 Pin 3 GND Pin 4 n c Pin 5 n c Pin 6 GND Pin 7 COM 0 RxD in Pin 8 COM 0 TxD out Pin 9 Pin 14 GND Pin 15 COM 1 RxD in Pin 16 COM 1 TxD out LED Indicator LED St Init blue during inintialisation green normal operati...

Страница 155: ...R LF SHORT FDM String FD 00 016 TD 00 368 CR LF AREVA FDM String STX 02049 984 CR LF 021 00 016 CR LF 022 00 378 CR LF 02315 03 30 368 CR LF 024068 15 03 30 CR LF ETX Resolution of Measurement frequency accuracy the oscillator 10 MHz 100 µHz time deviation accuracy of reference PPS 1ms Analog outputs 2 analog outputs for longtime recording time deviation and or frequency deviation range 2 5 V 2 5 ...

Страница 156: ...ons The SCG Module provides four outputs with different frequencies The SCG provides a wide range of programmable word clock rates between 24 Hz 12 288 MHz Technical Specifications Outputs 4 x BNC 2 5 V TTL into 75 Ohm outputs with configurable frequencies Input Signal 10 MHz sinewave or square pulse Current Consumption 5 V 5 400 mA Ambient Temperature 0 50 C 32 122 F Humidity 85 max IMS LANTIME M...

Страница 157: ... IO Configuration menu each output frequency can be adjusted seperately In the figure above the fol lowing value is set Frequency Out 3 Base Frequency Scale Frequency Out 3 44 1 kHz 1 4 Frequency Out 3 11 025 kHz Overview Configuration SCG U Sound Clock Generator Outputs 1 4 Output Type Studio Clock Out State Disabled Enabled Base Frequency 32 kHz 44 1 kHz 48 kHz Scale 1 8 to 256 152 Date 27th May...

Страница 158: ...emale connector 4 x DARS IEC 60958 4 format resolution 24 bits sampling frequency 48 kHz transformer balanced Input Signals 10 MHz sine wave or square pulse 1PPS Time String Power Consumption 5 V 5 400 mA Environmental Temperature 0 50 C 32 122 F Humidity max 85 Pin Assignment of the 25pin D SUB female connector DARS 1 Hot 1 Pin 18 Cold 1 Pin 6 GND 1 Pin 19 DARS 2 Hot 2 Pin 4 Cold 2 Pin 17 GND 2 P...

Страница 159: ...n easily configure the Studio Clock Generator via the Web Interface Sample Configuration Output 1 In the menu IO Configuration you can set the output on DARS for every output of the LANTIME IMS M4000 The four available outputs can optionally be switched off 154 Date 27th May 2021 IMS LANTIME M4000 ...

Страница 160: ...of the preconnected reference These signals significantly determine the accuracy of the output signals All output signals can be configured extensively and individually via the web interface The generated signals have a phase reference to the 1PPS Black Burst Output Output Signal PAL NTSC Black Burst with VITC Support or Tri Level Sync Signal level 300 mVpp into 75 Ω unbalanced Formats Black Burst...

Страница 161: ...Vpp into 75 Ω Frequency range 24 Hz 12 288 MHz Base frequencies 44 1 kHz and 48 kHz Scaling factor 0 125 0 25 0 5 1 2 4 8 16 32 64 128 256 Status Info ST Status of the VSG181 In Synchronization status A Status of the Blackburst output B Status of the LTC output Electrical Connectors 96 pin VG rail DIN 41612 Power Consumption 5 V 5 250 mA 156 Date 27th May 2021 IMS LANTIME M4000 ...

Страница 162: ...e then Overview Configuration VSG Video Sync Generator Outputs 1 4 Output 1 Output Type Video Out Epoch TAI D1970 01 01 T00 00 00 UTC D1972 01 01 T00 00 00 GPS D1980 01 06 T00 00 00 Format 720p 50 Hz SMPTE296M3 HD 1080i 25 Hz SMPTE274M6 HD 720p 59 94 Hz SMPTE296M1 HD 1080i 29 97 Hz SMPTE274M7 HD Phase Offset Offset Value IMS LANTIME M4000 Date 27th May 2021 157 ...

Страница 163: ...Output 2 Output Type Video Out Epoch like Output 1 Format NTSC 525i PAL 625i Phase Offset Offset Value 158 Date 27th May 2021 IMS LANTIME M4000 ...

Страница 164: ...Output Type Video Sync Out Signal Type SD H Sync SD V Sync SD Frame HD H Sync HD V Sync HD Frame HD Blank Output 3 VSG FW 2 06 LTOS V7 required Output Type LTC Out Signal Type LTC 25FPS Frames Per Second IMS LANTIME M4000 Date 27th May 2021 159 ...

Страница 165: ...utput 4 Output Type Digital Audio Out Signal Type DARS AES3id With the menu tab Misc the configuration of the VSG can be stored directly in the EEPROM of the card 160 Date 27th May 2021 IMS LANTIME M4000 ...

Страница 166: ...olybrominated biphenyls PBBs and polybrominated diphenyl ethers PBDEs Bis 2 ethylhexyl phthalat DEHP Benzylbutylphthalat BBP Dibutylphthalat DBP Diisobutylphthalat DIBP above the legal threshold WEEE status of the product This product is handled as a B2B Business to Busi ness category product In order to secure a WEEE compliant waste disposal it has to be returned to the manufacturer Any transport...

Страница 167: ...claration relates is in conformity with the following standards and provisions of the directives RED Richtlinie ETSI EN 303 413 V1 1 1 2017 06 RED Directive 2014 53 EU EMV Richtlinie ETSI EN 301 489 1 V2 2 3 2019 11 EMC Directive ETSI EN 301 489 19 V2 1 1 2019 04 DIN EN 61000 6 2 2019 2014 30 EU DIN EN 61000 6 3 2007 A1 2011 DIN EN 55032 2015 DIN EN 55024 2010 A1 2015 DIN EN 61000 3 2 2019 DIN EN ...

Страница 168: ......
Отзывы: