background image

1 Product introduction 


MegaRobo 

MRX-T4 User Manual


1-5


1.4


Product features and customer benefits 


Short payback period 

Its  payback  period  can  be  10  months  at  most,  therefore,  it  can  be  regarded  as  the  best  choice  for  the 

automation of SMEs. 


Human-Robot collaboration 

Do not need separate working space or transformation of the layout of existing production lines; become 
more efficient. 


Safe and reliable 

Flexible  housing,  reliable  and  advanced  all-around  protection  design  (starting  position  limit  protection, 
over temperature protection, anti-collision protection). Always think about your safety. 


Simple and easy to use 

Can be used immediately after opening the box. Do not need complex programming, low deployment and 
learning costs; count production line adjustments by hour; better adapted to production environments with 
small batches and multiple types of products. 


Flexible operation 

At most 4 freedom degrees; as agile as human arms; they can replace human to complete high-intensity, 
repetitive, dull and dangerous work so as to free human. 


More intelligence 

Supplemented  by  computer  vision,  complete  online  inspection  of  work  piece,  closed-loop  control; 
supplemented by Automatic Speech Recognition, achieve human-robot interaction. 


Perfectly matched MROS operating system 

The  MROS  operating  system  customized  deeply  based  on  ROS  is  perfectly  matched  with  MRX-T4 
four-axis  collaborative  robots.  It  can  be  used  to  calculate  and  plan  the  motion  trajectory  of  the 
collaborative  robot,  and  calculate  the  motion  of  the  collaborative  robot  in  real  time  to  the  equation  of 
motion of each joint motor, therefore, establish interactive links between human and collaborative robots. 


1.5


Typical application scenario 


MRX-T4  collaborative  robots  can  automate  almost  any  production  line,  including  work  piece  picking  and 
placement,  product  assembly  and  laboratory  sample  pretreatment,  so  as  to  improve  production  efficiency, 
product consistency and quality, reduce attrition rate, save costs, and resolve problems that have existed in 
traditional processes for a long time. 


1. 

Work piece picking and placement 

2. 

Product assembly 

3. 

Laboratory sample pretreatment 


Содержание MRX-T4

Страница 1: ...MRX T4 Four Axis Collaborative Robots User Manual Document No X0 UGCN 201807 00 MegaRobo Technologies Co Ltd ...

Страница 2: ......

Страница 3: ...this manual or for any accidental or consequential loss resulting from the use of this manual the information provided in the manual and the deductive function All statements information and suggestions in this manual do not constitute any expressed or implied guarantee Safety statement Only professional engineers can use this product MegaRobo is not responsible for damages to users or others due ...

Страница 4: ...1 4 Product features and customer benefits 1 5 1 5 Typical application scenario 1 5 1 6 Networking methods 1 6 2 Preparations before use 2 1 2 1 Open box to check 2 2 2 2 Fix MRX T4 2 3 2 3 Connect communication cable 2 4 2 4 Connect power line 2 5 2 5 Download and install NI VISA universal I O interface software 2 5 2 6 Install MegaRobo Studio 2 5 2 7 Start the device 2 5 2 8 Run the test 2 6 ...

Страница 5: ...fessional engineers who must master the necessary knowledge and skills to use such products so as to avoid harm to themselves and others or damage to the system or equipment when using this product The main content of this manual 1 Product introduction This chapter introduces the appearance characteristics specifications features and benefits typical application scenarios and networking methods of...

Страница 6: ......

Страница 7: ...uring as well as sample pretreatment processes in biotechnology chemical analysis and pharmaceutical research laboratories Besides it can complete dirty tiring dangerous repetitive and low value added work collaborate with people free human and let people do more high value added work This chapter introduces the appearance characteristics specifications features and benefits typical application sc...
Страница 8: ...o No 4 are the four axes of MRX T4 Among them 1 is a base rotational motion 2 is a shoulder joint rotational motion 3 is an elbow joint rotational motion 4 is a wrist joint rotational motion No 5 corresponds to the end actuator of MRX T4 Note The end actuator needs to be customized by the user according to the actual application scenario and will not be attached following the machine 1 1 Base join...

Страница 9: ...s driver controller module via the CAN bus The five channels of the five axis driver controller module control the corresponding five motors of the base big arm small arm wrist and end actuator MegaRobo Studio Mot or Reducer Angle sensor Mot or Reducer Angle sensor Mot or Reducer Angle sensor Mot or Reducer Base Shoulder joint Elbow joint Wrist joint End actuator Channel 1 Channel 2 Channel 3 Chan...

Страница 10: ...e mounting dimensions φ140mm Mounting hole 8 φ6 45 uniform distribution Axis range of motion J1 170 J2 20 90 J3 120 J4 180 Maximum speed of each axis 180 s Installation Desktop Software MegaRobo Studio Communication interface CAN USB WiFi LAN Power supply 100 240V 50 60Hz Power consumption 240W under normal conditions Operating temperature 10 C 45 C Storage temperature 10 C 60 C Figure 1 4 MRX T4 ...

Страница 11: ... high intensity repetitive dull and dangerous work so as to free human More intelligence Supplemented by computer vision complete online inspection of work piece closed loop control supplemented by Automatic Speech Recognition achieve human robot interaction Perfectly matched MROS operating system The MROS operating system customized deeply based on ROS is perfectly matched with MRX T4 four axis c...

Страница 12: ...connection is as shown in Figure 1 5 MRH U MRH E MRH T CANH CANL 120Ω 120Ω USB USB USB WiFi LAN MRX T4 MRX T4 MRX T4 Figure 1 5 Schematic Diagram of MRX T4 Typical Networking Connection Method MRX T4 typical networking connection methods is shown as follows 1 MRX T4 and MRH are connected via CAN bus 2 MRH is connected to PC via USB where MRH T can also be connected to PC via LAN and WiFi ...

Страница 13: ...er introduces the preparations before using MRX T4 collaborative robots The main contents of this chapter Open box to check Fix MRX T4 Connect communication cable Connect power line Download and install NI VISA universal I O interface software Install MegaRobo Studio Start the deviceRun the test ...

Страница 14: ... electrical and mechanical tests please contact your dealer 3 Check attachments Please check the attachments according to the packing list and contact your dealer if it is damaged or missing Note The end actuator needs to be customized by the user according to the actual application scenario and will not be given following the machine Table 2 1 Product Attachments Model Name Quantity Type MRX T4 C...

Страница 15: ...re Figure 2 1 Aperture 6 5mm 45 uniform distribution external diameter of base 140mm inner diameter 124mm 1 Determine the fixed position of MRX T4 on the workbench draw the punch position and punch the hole 2 Fix MRX T4 to the workbench using five M6 20 hexagonal socket bolts Figure 2 1 Schematic Diagram of MRX T4 Base Fixing Holes unit mm ...

Страница 16: ...onnected to the corresponding CANH CANL interface of MRH T with a CAN cable CAN interface CANL CANH Figure 2 1 Schematic Diagram of MRX T4 CAN Interface CANL CANH CAN interface Figure 2 2 Schematic Diagram of MRH T CAN Interface 2 Connect MRH T to computer using a USB data cable or LAN cable or WiFi LAN interface USB interface Figure 2 3 Schematic Diagram of MRH T USB LAN Interface ...

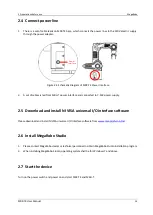
Страница 17: ...H T power interface and connected to 7 50V power supply 2 5 Download and install NI VISA universal I O interface software Please download and install NI VISA universal I O interface software from www ni com zh cn html 2 6 Install MegaRobo Studio 1 Please contact MegaRobo dealer or technical personnel to obtain MegaRobo Studio installation program 2 When installing MegaRobo Studio operating system ...

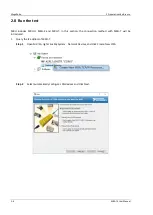
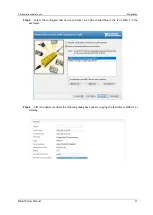
Страница 18: ... includes MRH U MRH E and MRH T In this section the connection method with MRH T will be introduced 1 Query the IP address of MRH T Step 1 Open NI VISA right click My System Network Devices and click Create New VISA Step 2 Select automatically configure LAN devices and click Next ...

Страница 19: ...RX T4 User Manual 2 7 Step 3 Select the configured LAN device and click Finish the shaded blue is the IP of MRH T in the example Step 4 After the device is added the following dialog box appears copying the IP address of MRH T as standby ...

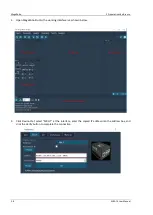
Страница 20: ...Studio the working interface is as shown below Project Window Robot Window Editing Area Device Window Record Output Window 3 Click Device Pref select MRH T at the interface enter the copied IP address into the address box and click the Verify button to complete the connection ...

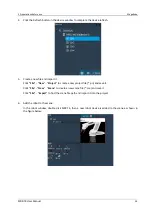
Страница 21: ...import it Click File New Project to create a new project file prj and save it Click File New Scene to create a new scene file sce and save it Click File Import to find the scene file path and import it into the project 6 Add the robot to the scene In the robot window double click MRX T4 then a new robot device is added to the scene as shown in the figure below ...

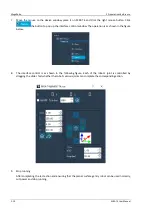
Страница 22: ...window The operation is as shown in the figure below 8 The interface control is as shown in the following figure Each of the robot s joint is controlled by dragging the slider Test whether the robot s various joints can complete the corresponding action 9 Stop running After completing the test action and ensuring that the planar surface gantry robot can be used normally cut power and stop running ...

Отзывы: