background image

7

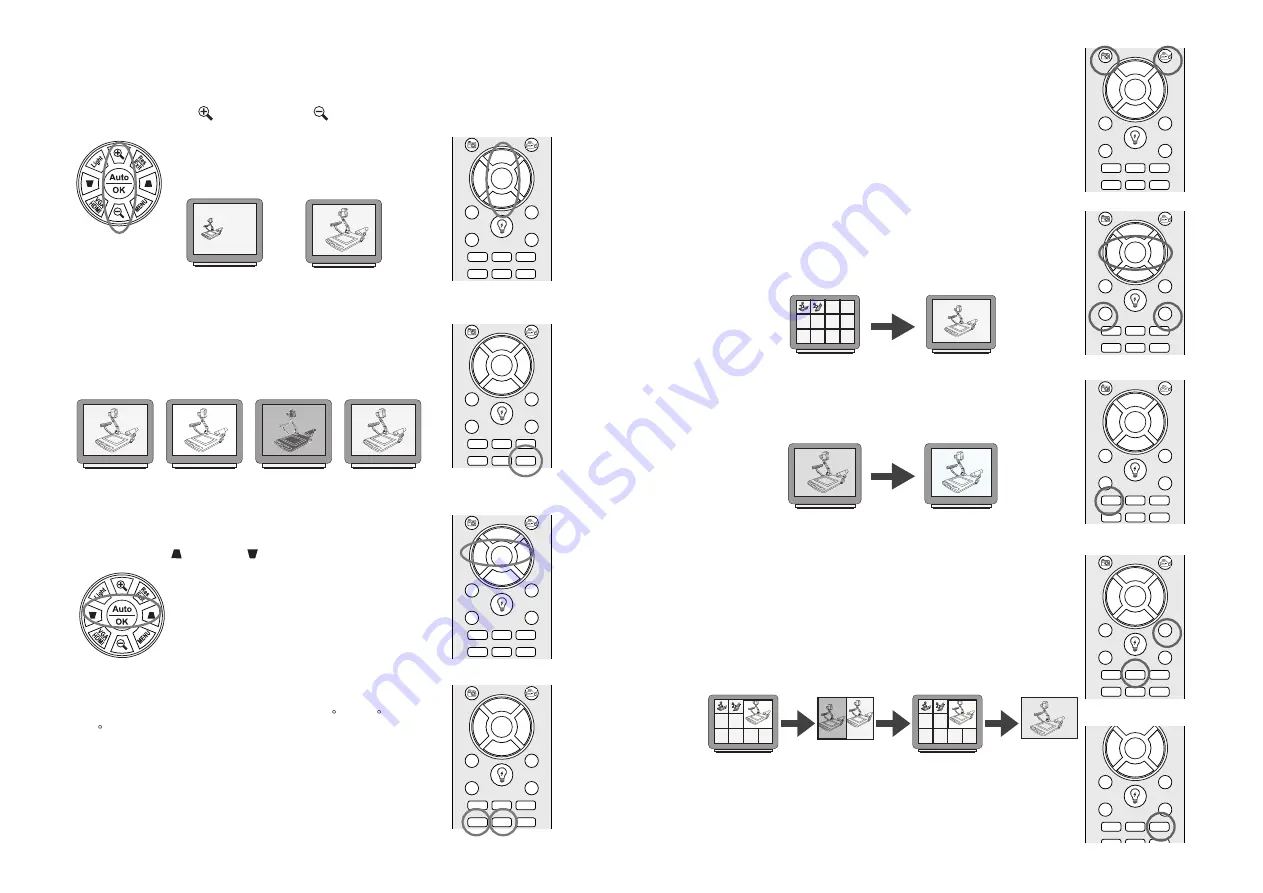
3.2  Image Adjustment

Mono/Color & Negative/Positive Film Selection

Adjusting the Size

ZOOM OUT(WIDE)

ZOOM IN(TELE)

Positive Film

Press the "ZOOM IN"       or "ZOOM OUT"       button to change the size of the 

displayed object.

Adjusting the Focus

Press "AUTO/OK" button to automatically adjust the focus.

and Press "FAR"     or "NEAR"      to adjust the focus.

Image Rotate

Press "ROTATE" button to rotate the image 90  --- 180  ---

270   --- Normal image.

ZOOM IN

ZOOM OUT

NEAR

FAR

AUTO/OK

PHOTO

RECORD

VGA

SWITCH

ONLINE

BROWSE

EXIT

DEL

LIGHT

SPLIT

TEXT / IMG

FREEZE

MIRROR

MONO / NEG

ROTATE

Auto

OK

ZOOM IN

ZOOM OUT

NEAR

FAR

AUTO/OK

PHOTO

RECORD

VGA

SWITCH

ONLINE

BROWSE

EXIT

DEL

LIGHT

SPLIT

TEXT / IMG

FREEZE

MIRROR

MONO / NEG

ROTATE

ZOOM IN

ZOOM OUT

NEAR

FAR

AUTO/OK

PHOTO

RECORD

VGA

SWITCH

ONLINE

BROWSE

EXIT

DEL

LIGHT

SPLIT

TEXT / IMG

FREEZE

MIRROR

MONO / NEG

ROTATE

Auto

OK

Image Mirror

Press "MIRROR" button to mirror the image.

Mirror : Horizontal Mirror --- Ver & Hor Mirror --- Vertical

            Mirror --- Normal image.

ZOOM IN

ZOOM OUT

NEAR

FAR

AUTO/OK

PHOTO

RECORD

VGA

SWITCH

ONLINE

BROWSE

EXIT

DEL

LIGHT

SPLIT

TEXT / IMG

FREEZE

MIRROR

MONO / NEG

ROTATE

Negative Film

B&W Image

Color Image

Press  "MONO/NEG"  button  to  B&W  mode,  then  press  this 

button again to Negative mode.

Press  "MONO/NEG"  button  again  to  return  to  Color  mode 

(normal state) 

8

Save Image

Image Retrieval

ZOOM IN

ZOOM OUT

NEAR

FAR

AUTO/OK

PHOTO

RECORD

VGA

SWITCH

ONLINE

BROWSE

EXIT

DEL

LIGHT

SPLIT

TEXT / IMG

FREEZE

MIRROR

MONO / NEG

ROTATE

Press "PHOTO" button to store the current image or "RECORD" 

button to store the video into the memory of the SD Card. 

Insert  SD  Card  into  the  slot  of  the  Digital  Presenter.  You  can 

store all images or videos into the SD Card.

ZOOM IN

ZOOM OUT

NEAR

FAR

AUTO/OK

PHOTO

RECORD

VGA

SWITCH

ONLINE

BROWSE

EXIT

DEL

LIGHT

SPLIT

TEXT / IMG

FREEZE

MIRROR

MONO / NEG

ROTATE

Image Retrieval

PREVIEW

Press "BROWSE" button to preview the stored images or videos 

in 4x3 format.
Use  "ZOOM  IN",  "ZOOM  OUT",  "FAR"  &  "NEAR"  buttons  to 

select  the  image  or  video.  Then  press  "AUTO/OK"  button  to 

display  the  stored  image  or  video.  Press  "EXIT"  button  to  exit 

this mode.

Compare Image 

ZOOM IN

ZOOM OUT

NEAR

FAR

AUTO/OK

PHOTO

RECORD

VGA

SWITCH

ONLINE

BROWSE

EXIT

DEL

LIGHT

SPLIT

TEXT / IMG

FREEZE

MIRROR

MONO / NEG

ROTATE

Insert SD Card into the slot of the Digital Presenter and Saved 

image.

Press  "SPLIT"  button  to  preview  the  stored  images  and  Live 

image in preview format.
Use  "ZOOM  IN",  "ZOOM  OUT",  "FAR"  &  "NEAR"  buttons  to 

select  the  image.  Then  press  "AUTO/OK"  button  to  compared 

the stored image & Live image. Press "EXIT" button to preview 

nmode and press"EXIT" again to exit this mode.

Original Image

PREVIEW

Live

PREVIEW

Live

Live

Compare Image

Freeze Image

Press the "FREEZE" button to freeze the current image display.

Press the "FREEZE" button again to (unfreeze)exit this mode.

FREEZE

ZOOM IN

ZOOM OUT

NEAR

FAR

AUTO/OK

PHOTO

RECORD

VGA

SWITCH

ONLINE

BROWSE

EXIT

DEL

LIGHT

SPLIT

TEXT / IMG

FREEZE

MIRROR

MONO / NEG

ROTATE

UNFREEZE

Text / Image

Press the "TEXT/IMG" button to togglet the current image between 

Text and Image mode.

ZOOM IN

ZOOM OUT

NEAR

FAR

AUTO/OK

VGA

SWITCH

ONLINE

BROWSE

EXIT

DEL

LIGHT

SPLIT

TEXT / IMG

FREEZE

MIRROR

MONO / NEG

ROTATE

Содержание MVP238

Страница 1: ...r 3 1 Control Panel 3 2 Image Adjustment Adjusting the Size Mono Color Negative Positive Film Selection Adjusting the Focus Image Rotate Image Mirror Save Image Image Retrieval Freeze Image Compare Image Text Image On Screen Menu Chapter 4 Care and Maintenance 4 1 Cleaning the Digital Presenter Housing 4 2 Cleaning the CCD Camera Lens 4 3 Transporting the Digital Presenter Chapter 5 Troubleshootin...

Страница 2: ...maged or frayed For a replacement power adaptor contact your authorized dealer Do not allow anything to rest on the power adaptor Do not place this presenter where the cord may be abused by persons walking on it Grounding This Digital Presenter is grounded through the conductor of the power adaptor To avoid elecric shock plug the power adaptor into a properly wired receptacle Do not defeat the saf...

Страница 3: ...Arm LED Light on the arm Infrared Receiver Window Place the Portable Digital Presenter on a flat surface Raise or Adjust the arm and turn the LCD camera so that the camera lens is pointing to the object to be displayed 2 Plug DC jack of the AC Power Adaptor into the port labeled DC 12V on the rear panel of the Digital Presenter 3 Plug the AC Power Adaptor into a convenient AC outlet 4 Follow the i...

Страница 4: ...NLINE BROWSE DEL EXIT Power ON OFF the presenter Selects signal output VGA or HDMI to Monitor or Projector Selects Resolution output to Monitor or Projector Resolution 1920x1080 1280x1024 1280x720 1024x768 Selects 5 levels of Top Light Top Arm Light Arm Light Off Shown OSD menu Auto Focus Select or Confirm Zooms In Enlarges Zooms Out Reduces size of object or Up Down in select mode Focus In Focus ...

Страница 5: ...ore the current image or RECORD button to store the video into the memory of the SD Card Insert SD Card into the slot of the Digital Presenter You can store all images or videos into the SD Card ZOOM IN ZOOM OUT NEAR FAR AUTO OK PHOTO RECORD VGA SWITCH ONLINE BROWSE EXIT DEL LIGHT SPLIT TEXT IMG FREEZE MIRROR MONO NEG ROTATE Image Retrieval PREVIEW Press BROWSE button to preview the stored images ...

Страница 6: ...Vertical Live Compare Image Live Horizontal Live Horizontal Division Compare Image Press MENU bittpn to show On screen menu on the bottom of the display image 10 PIP Picture in Picture On on screen menu select PIP to display the images Use Image Swap function to change the position the stored image Live image Image Swap Position Change PIP DISPLAY Live PIP DISPLAY Live Or use Position Change funct...

Страница 7: ...the cleaning cloth over the lens from center to the edge in circular motion Replace the lens cover 1 2 3 4 12 Chapter 5 Troubleshooting Guide If you are having a problem operating the Digital Presenter first make sure you have set it up according to the insruction in Chapter 3 You should also check the adjustments and the INPUT connections Verify that all power is switched on Before calling for se...

Отзывы: