background image

5

Instillation


Caution!


1. The installation must be carried out by an authorized dealer or trained professional.

2. Unit may cause severe injures if you have doubts concerning the safety do not install.

3. Unit is to be 24inches away from flammable materials (decoration material)

When installing the fixture it is very important that you follow common safety procedures.  Instillation requires extensive 

experience including but not limited to calculating working loads, material being used and periodic safety inspections.  If 

you lack these qualifications, do not attempt the installation yourself, instead use a professional structural rigger.


The installation location of the Fixture has got to be built in the way that it can hold 10 times the weight for 1 hour.  Instal-

lation should be checked at least one time every 2 years by a skilled person.


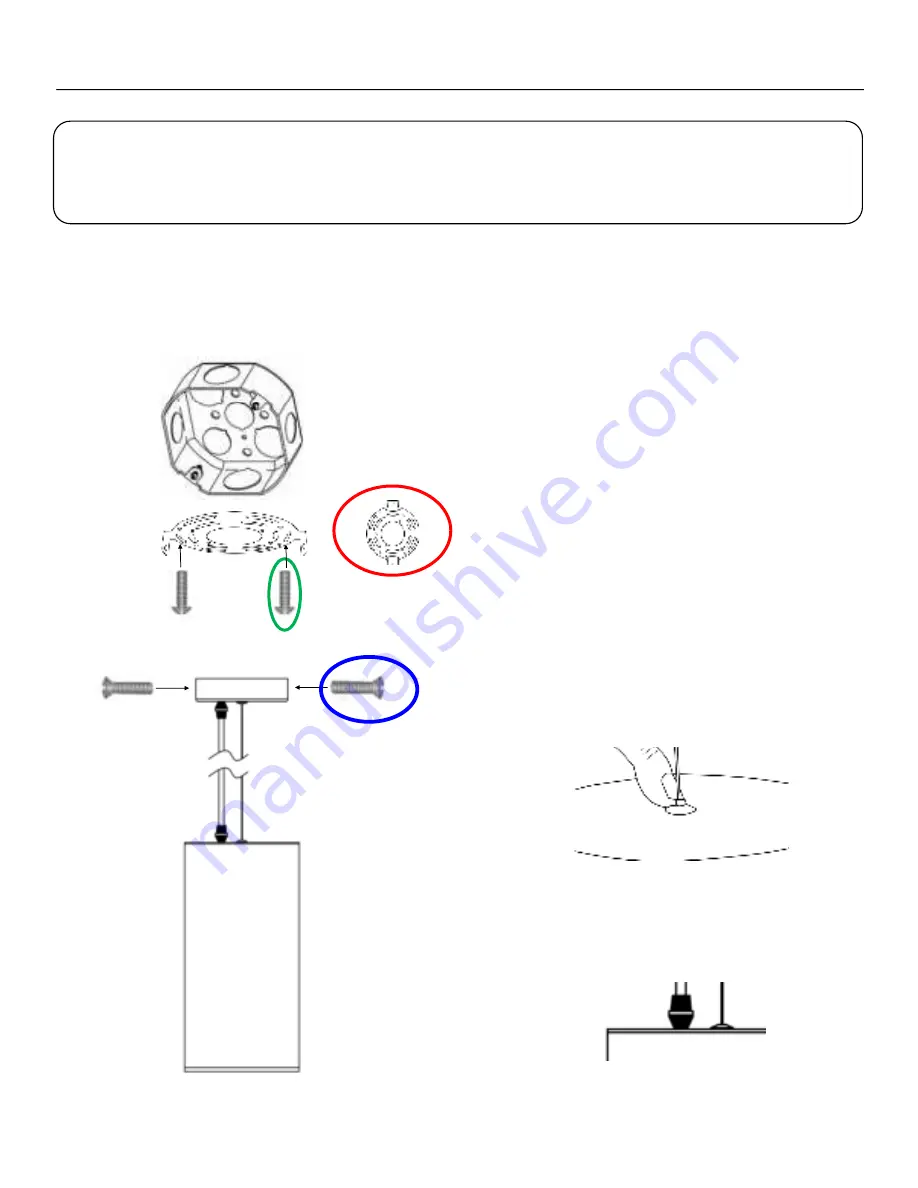
Installation 

Step 1: Remove the suspension brace 

(Fig1) 

by 

removing the side screws 

(Fig3) 

on the canopy.


Step 2: Secure the suspension brace to the electri-

cal box with screw 

(Fig2)


Step 3: Make necessary power connections using 

the RJ45 in and out connections


Step 4: Secure the canopy to the suspension brace 

using 

(Fig3) 

screws


Height Adjustment


Step 5: To adjust the height of the pendent press 

on the center part of the steel cable holder and 

push the cable inwards. This will release the steel 

support cable allowing you to adjust the desired 

height there is a maximum of 8 feet cable length to 

be adjusted.


Step 6: Deco PQ20 uses a 2 part cable strain re-

lief. Too loosen start by holding bottom part of the 

strain relief and unscrewing the top part this will 

allow the excess power cable to be stored inside 

the fixture.  


Fig1


Fig2


Fig3


Содержание Deco Pendant Q20

Страница 1: ...le of Contents Safety Information 2 What Is Included 2 Specifications 3 Main Power Connection 4 DMX 512 Control 4 Deco Driver Info 4 Installation 5 Size Weight 6 Cleaning Maintenance 6 Warranty 7 Cust...

Страница 2: ...sconnect power before servicing 2 For connection to main power supply proceed to page 6 3 This fixture must not be left on for long periods of time 4 This fixture is intended for indoor use do not ins...

Страница 3: ...Connection RJ45 In and Out Y Connect Housing Material Aluminum 8 Feet 105 degree 6 x 12 fixture Cable Beam Angle Size Weight 3 5lb Electrical Specifications LED Type Color Temp WW CRI Warm White LED Q...

Страница 4: ...unit per output port 100W Output Driver Can connect 5 unit per output port Ch Mode Ch 4 or Ch7 Use Ch4 or Ch7 Mode to control the unit Important information 1 Deco Lighting fixtures are specifically...

Страница 5: ...he weight for 1 hour Instal lation should be checked at least one time every 2 years by a skilled person Installation Step 1 Remove the suspension brace Fig1 by removing the side screws Fig3 on the ca...

Страница 6: ...uring the inspection 1 All screws used for installing the device or part of the device have to be tightly connected and must not be corroded 2 There must not be any deformations on the housing fixatio...

Страница 7: ...and other natural disasters fire explosion flood riots civil disorder or any other cause beyond the reasonable control of MSI Exposure to harsh or excessively corrosive environmental conditions whethe...

Страница 8: ...Lite has a customer support line to provide set up help and to answer any question should you encounter a problem Please visit our website for any other related technical documents For service relate...

Отзывы: