

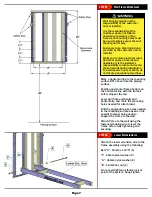

STEP #1
Wall Frame Attachment
Wall hanging location is the
responsibility of the customer
and/or installer.
It is the responsibility of the
customer and/or installer to
determine how many of the
frame’s 12 mounting holes must
be used to safely secure the wall
mount goal for play.
Fasteners to be determined and
provided by the customer and/or
installer.
Walls can contain electrical wires
and other unseen hazards and
obstacles. It is the installer’s
responsibility to locate and avoid
these hazards during installation.
To avoid severe injury or death, do
not locate goal under power lines.
Mark a horizontal line to the mounting
surface 88” above from the playing
surface.
Position and center frame bottom on
the horizontal line with the frame’s
safety stops at the top.
Level wall frame vertically and
horizontally, and mark the mounting
holes needed for attachment.
Drill the appropriate size holes needed
in the mounting surface based on the
specific fastener being used to
support the frame to the wall.
Attach frame to the wall using the
fasteners making sure to level the
frame before fully tightening and
securing.
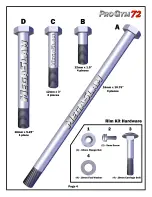
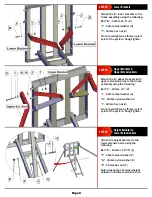
STEP #2
Lower Extension Arm
Attach the lower extension arm to the
frame assembly using the following:
Bolt “A” - 16mm x 10.75” (1)
“F” - 16mm steel washer (2)
“G” - 16mm nylon washer (2)
“E” - 16mm hex nut (1)
Do not overtighten as this is a pivot
point of the system. Snug Tighten.
Page 7


