background image

EN

33

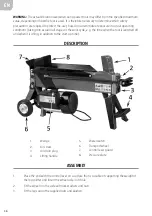
•  Place the log splitter in a suitable working area, free from obstacles.
•  Clear away wood and splinters etc. regularly, to keep the working area free.
•  Run the log splitter unloaded to check that it is working properly. If the log 

splitter’s noise level increases or the piston moves unevenly, this could mean 
that the hydraulic fluid level is too low. Check and top up if necessary.

•  Place the log splitter at least 3 metres from the mains outlet, to protect the 

outlet from dust.

•  Never allow children, or anyone who is unfamiliar with the log splitter and 

these instructions, to use it.

•  Familiarise yourself with the controls on the log splitter and how to use them. 

Learn how to stop the log splitter quickly in an emergency.

•  Never use the log splitter if you are tired or under the influence of drugs, 

alcohol or medication.

•  The log splitter must only be used by one person at once. Keep onlookers, 

especially children, and pets at a safe distance.

•  Never attempt to press the power switch or control handles with an object, or 

with any part of the body apart from your hands, and never attempt to bind or 
force down the control handles – risk of serious personal injury and/or death.

•  Do not allow any part of your body to come between the splitting wedge and 

the pressure pad.

•  Do not lean over, or try to step over the log splitter when it is switched on.
•  Only split logs parallel to the direction of the grain. Some types of wood can 

burst and/or be ejected when splitting across the direction of the grain – risk of 
personal injury.

•  Release the control handles if the log splitter cannot split the log. Release both 

handles to run back the piston. If the control handles are kept pressed down 
after the piston has stopped, the piston will not go back when you release  
the handles. In which case, switch off the motor and then switch it on again  
to continue.

•  Release the control handles immediately, switch off the log splitter and unplug 

the power cord if the log fastens in the blade. Tap the log loose with a hammer. 
Do not use your hands.

•  Never attempt to split more than one log at once, unless the piston has fully 

gone out and you need to use another log to completely split the first one. 
Never try to split several logs on top of each other.

•  Clear away the split logs regularly, to keep the working area free.

Содержание 721-485

Страница 1: ...s bruksanvisningen noggrant innan anv ndning Spara den f r framtida behov VEDKLYV SE EN LOG SPLITTER Operating instructions Translation of the original instructions Important Read the user instruction...

Страница 2: ...e by zagro eniem dla rodowiska i dla zdrowia Produkt nale y odda do odpowiedniego punktu sk adowania lub przynie go do jednego ze sklep w gdzie przy zakupie nowego sprz tu bezp atnie przyjmiemy stary...

Страница 3: ...lyven n r du r tr tt eller p verkad av droger alkohol eller l kemedel Var hela tiden f rsiktig Till mpa sunt f rnuft Placera vedklyven p en plan stabil horisontell yta med gott om plats f r anv ndaren...

Страница 4: ...f r endast ppnas av beh rig elektriker Elanslutning och andra elarbeten f r endast utf ras av beh rig elektriker R r inte vid metalldelar p stickproppen n r du s tter i eller drar ut den Endast en per...

Страница 5: ...artar den Anslut vedklyven endast till korrekt jordat n tuttag f r att undvika risk f r elolycksfall Om f rl ngningssladd anv nds ska dess ledartv rsnittsarea vara tillr cklig f r motorns str mf rs rj...

Страница 6: ...a tr slag kan spr ngas och eller slungas ut vid klyvning tv rs fiberriktningen risk f r personskada Sl pp man verhandtagen om vedklyven inte kan klyva veden Sl pp b da handtagen f r att k ra tillbaka...

Страница 7: ...gt anvisningarna i avsnittet om underh ll Dra inte i sladden f r att dra ut stickproppen SYMBOLER L s bruksanvisningen noggrant innan anv ndning Anv nd skyddshandskar Anv nd h rselskydd och skyddsglas...

Страница 8: ...6 mm Vikt 37 kg Ljudtrycksniv LpA 80 dB A K 3 dB A Ljudeffektniv LwA 93 dB A K 3 dB A Vibration 2 5 m s K 1 5 m s Anv nd alltid h rselskydd Det deklarerade v rdet f r vibration som har uppm tts i enli...

Страница 9: ...ryckplatta MONTERING 1 Placera nden med man verspaken p ett underlag som klarar vedklyvens vikt och f r in hjulaxeln i dess h l 2 Montera hjulen p axeln med l sbrickor och muttrar 3 Montera benet med...

Страница 10: ...godk nda skyddsglas gon och halkfria skor B r inte l st sittande kl der eller smycken Kapa veden till l mplig l ngd med vinkelr ta snitt F rs k aldrig klyva oj mn knotig eller kr kt ved Anv ndning 1 p...

Страница 11: ...h med korrekt viskositet OBS Begagnad hydraulv tska ska avfallshanteras i enlighet med g llande regler Underh ll och f rvaring Koppla alltid bort vedklyven fr n n tsp nning innan n got arbete utf rs p...

Страница 12: ...rsiktig Bruk sunn fornuft Plasser vedkl yveren p en jevn stabil og horisontal overflate med rikelig plass for brukeren til h ndtere vedkubbene Fest vedkl yveren i underlaget hvis den ikke st r stille...

Страница 13: ...rbeide med vedkl yveren om gangen Hold tilskuere p god avstand n r vedkl yveren er i bruk Ikke la andre hjelpe deg med l sne vedkubber som har satt seg fast Kontroller at vedkubbene er frie for spiker...

Страница 14: ...ke v re lengre enn 7 5 m Ledertverrsnittet skal v re minst 2 5 mm Vedkl yveren m ikke brukes i n rheten av antennelige v sker eller gasser Hydraulikkv sken er antennelig og kan eksplodere Fungerende b...

Страница 15: ...gge h ndtakene for kj re stempelet tilbake Hvis betjeningsh ndtakene holdes nedtrykt etter at stempelet har stanset g r ikke stempelet tilbake n r du slipper h ndtaket Sl i s fall av motoren og start...

Страница 16: ...LER Les bruksanvisningen n ye f r bruk Bruk beskyttelseshansker Bruk h rselvern og vernebriller Bruk vernesko VIKTIG Fare for klemskade ADVARSEL Bevegelige deler Plasser aldri kroppsdeler mellom ved o...

Страница 17: ...3 dB A Lydeffektniv LwA 93 dB A K 3 dB A Vibrasjon 2 5 m s K 1 5 m s Bruk alltid h rselvern Den angitte verdien for vibrasjon som er m lt i henhold til standardiserte testmetoder kan brukes til sammen...

Страница 18: ...kkplate MONTERING 1 Plasser enden med betjeningsspaken p et underlag som t ler vedkl yverens vekt og f r hjulakselen inn i hullene 2 Monter hjulene p akselen med l seskiver og muttere 3 Monter benet m...

Страница 19: ...e sko Ikke bruk l stsittende kl r eller smykker Kapp veden til egnet lengde med vinkelrette snitt Fors k aldri kl yve ujevn knudret eller b yd ved Bruk 1 pne lufteskruen Hvis den ikke er pen under dri...

Страница 20: ...med riktig viskositet OBS Brukt hydraulikkv ske skal avhendes i henhold til gjeldende regler Vedlikehold og oppbevaring Vedkl yveren m alltid kobles fra nettspenning f r noe arbeid utf res p den B rs...

Страница 21: ...ia Nigdy nie u ywaj uparki w stanie zm czenia ani pod wp ywem narkotyk w alkoholu lub lek w Przez ca y czas zachowuj ostro no Kieruj si zdrowym rozs dkiem Umie upark na p askiej stabilnej poziomej pow...

Страница 22: ...y Upewnij si e przew d jest uziemiony i wyposa ony w wy cznik r nicowopr dowy upark mo na pod cza wy cznie do w a ciwie uziemionego gniazda Unikaj bezpo redniego kontaktu z uziemionymi powierzchniami...

Страница 23: ...aby zapewni wydajniejsz i bezpieczniejsz prac Przechowuj upark w miejscu niedost pnym dla dzieci i os b nieupowa nionych Nigdy nie pozwalaj u ywa urz dzenia dzieciom ani osobom kt re nie znaj uparki...

Страница 24: ...e zm czenia ani pod wp ywem narkotyk w alkoholu lub lek w uparki mo e u ywa tylko jedna osoba Osoby postronne zw aszcza dzieci oraz zwierz ta powinny przebywa w bezpiecznej odleg o ci od urz dzenia Ni...

Страница 25: ...pora enia pr dem Obszar roboczy powinien by dobrze o wietlony Nigdy nie zmieniaj ustawie pr dko ci obrotowej silnika Maksymalna liczba obrot w silnika jest ustawiona fabrycznie wed ug odpowiednich pr...

Страница 26: ...i Przed u yciem sprawd upark Upewnij si e wszystkie elementy s nienaruszone i dzia aj prawid owo a ze sto u roboczego zosta y usuni te wszelkie narz dzia i podobne przedmioty Przed przyst pieniem do p...

Страница 27: ...e szkodliwych czynnik w w warunkach rzeczywistych bior c pod uwag wszystkie etapy cyklu roboczego jak r wnie czas w kt rym narz dzie jest wy czone lub pracuje na biegu ja owym poza czasem rozruchu nal...

Страница 28: ...twarza to ryzyko zwarcia i lub pora enia pr dem Przed ka dym u yciem sprawd czy wszystkie zabezpieczenia s prawid owo zamontowane i dzia aj Zawsze no odpowiednie ubranie r kawice ochronne atestowane o...

Страница 29: ...by wla wie y p yn hydrauliczny 6 Uzupe niaj poziom p ynu wy cznie p ynem przeznaczonym do urz dzenia i o prawid owym poziomie lepko ci UWAGA Zu yty p yn hydrauliczny nale y przekaza do utylizacji zgod...

Страница 30: ...nderstand its application limitations and potential risks Never use the log splitter if you are tired or under the influence of drugs alcohol or medication Stay alert at all times Use your common sens...

Страница 31: ...orrectly earthed mains outlet Avoid body contact with earthed surfaces such as pipes radiators cookers and refrigerators Never open the log splitter s switch The power switch may only be opened by aut...

Страница 32: ...r anyone who is unfamiliar with the log splitter and these instructions to use it The log splitter is dangerous if used by inexperienced people Safety instructions for use Switch off the log splitter...

Страница 33: ...art from your hands and never attempt to bind or force down the control handles risk of serious personal injury and or death Do not allow any part of your body to come between the splitting wedge and...

Страница 34: ...wer cord in the event of a fault or abnormal function Example If the log splitter s noise level increases or the piston moves unevenly this could mean that the hydraulic fluid level is too low Check a...

Страница 35: ...lace damaged or missing parts before use TECHNICAL DATA Rated voltage 230 VA 50 Hz Output 1500 W Splitting force 4 tonnes Protection rating IP54 Splitting length Max 370 mm Splitting diameter 50 250 m...

Страница 36: ...stages of the work cycle e g the time when the tool is switched off and when it is idling in addition to the start up time DESCRIPTION 1 Wedge 2 Air screw 3 Oil drain plug 4 Lifting handle 5 Power swi...

Страница 37: ...devices are correctly fitted and in working order before use Always wear suitable clothing safety gloves approved safety glasses and non slip shoes Do not wear loose fitting clothing or jewellery Cut...

Страница 38: ...on the motor end and fill with fresh hydraulic fluid 6 Only fill with hydraulic fluid of the intended type and with the correct viscosity NOTE Used hydraulic fluid must be recycled in accordance with...

Страница 39: ......
Отзывы: