


ENGLISH
20
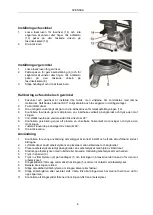
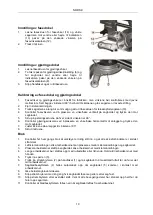
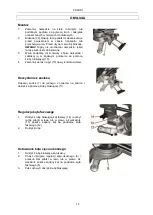
Calibration of bevel angle and mitre angle
1.
The bevel angle and mitre angle are set at the factory, but should be checked at regular intervals.
Set both angles to 90° according to the scales and lock the saw arm in the lowest position.
2.
Remove the clamp.
3.
Pull out the saw arm as far as it goes and tighten the locking screw for the telescopic extension
(19).
4.
Check the bevel angle by placing a set square vertically on the saw table and pressing it against
the blade.
5.
Turn the set screws on each side until the angle is 90°.
6.
Check the mitire angle by placing a set square horizontally against the stop and pressing it against
the blade.
7.
Adjust the screws on the stop until the angle is 90°.
8.
Tighten the screws.
Use
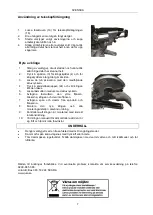
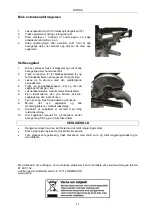
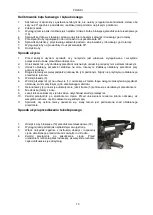
1.
Always check before use that the tool is correctly adjusted and that all the screw connections are
properly tightened.
2.
Lift the clamp so that the workpiece can be put between the clamp and the saw table.
3.
Place the workpiece so that it stands firm on the saw table. Lock the workpiece with the clamp.
4.
Support long workpieces with roller supports, or the equivalent. Never hold the workpiece with your
hand.
5.
Press in the catch (3).
6.
Press the power switch (2) on the handle (1) and allow the blade to reach maximum speed before
moving it against the workpiece.
7.
The blade guard (4) folds up automatically when the balde (5) comes in contact with the workpiece.
8.
Do not apply pressure to the blade from the side.
9.
Release the power switch immediatley if the blade jams or fastens.
10.
Release the power switch after completing the cut. Wait until all moving parts have completely
stopped before lifting up the saw arm.
11.
Check that the blade guard folds down when the blade is lifted from the workpiece.
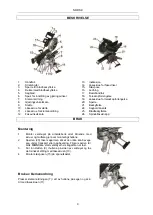
Using the telescopic extension
1.
Undo the locking screw (19) for the telescopic extension (18).
2.
Pull out the saw arm towards you as far as it goes.
3.
Start the tool as per the instructions and saw into the
workpiece.
4.
Release the power switch after completing the cut. Wait until
all moving parts have completely stopped before lifting up the
saw arm.


