


EN
38
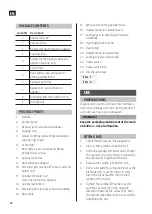
PACKAGE CONTENTS
Quantity Description
1
Router 1200 W
1
Parallel fence
1
Reducer for dust extraction adapter
1
Copying ring
2
Screws for fitting dust extraction
adapter/copying ring
1
Centre tap
2
Rails with screws and pads for
fitting parallel fence
1
Spanner with slot
1
Reducer for dust extraction
adapter
2
Bit holder Ø 8 mm and Ø 6 mm
1
Instructions
PRODUCT PARTS
1. Handle
2. Parallel fence
3. Reducer for dust extraction adapter
4. Copying ring
5. Screws for fitting dust extraction adapter/
copying ring (2 pcs)
6. Centre tap
7. Rails with screws and pads for fitting
parallel fence (2 pcs)
8. Spanner with slot
9. Dust extraction adapter
10. Bit holder Ø 8 mm and Ø 6 mm (under bit
holder nut)
11. Spindle/bit holder nut
(12a: Internal spring, spindle)
12. Spindle lock button
13. Mounting hole for dust extraction adapter
14. Base plate
15. Wing nuts for fitting parallel fence
16. Adjuster knob for spindle speed
17. Locking lever to adjust depth (shown
unlocked)
18. Depth adjustment knob
19. Depth stop
20. Adjuster knob for depth stop
21. Locking screw for depth stop
22. Power switch
23. Power switch lock
24. Directional arrow
FIG. 1
FIG. 2
USE
PREPARATIONS
Unpack all the parts and check that nothing is
missing or damaged (do not use the product if
any parts are missing or damaged).
WARNING!
Keep the packaging material out of the reach
of children – risk of suffocation.
FITTING BITS
1. Check that the plug is not plugged in.
2. Press in the spindle lock button (13).
3. Undo the spindle/bit holder nut (12) with
the spanner (9) in the direction shown by
the arrow (25) (right-hand thread).
4. Release the spindle lock button (13).
5. Put in a bit with the same diameter as the
bit holder (11) is use (8 mm or 6 mm).
Insert the bit at least 16 mm (the full
length of the shank).
6. Tighten the spindle/bit holder nut (12)
with the spanner (9) in the opposite
direction shown by the arrow (25). Keep
the spindle lock button (13) pressed while
tightening the nut.
Содержание 022576
Страница 4: ...1 1 A 2 14 18 21 20 16 11 12 19 24 9 17 22 23 13 15 ...
Страница 5: ...2 3 4 8 10 11a 11 9 5 3 6 7 2 4 ...
Страница 6: ...5 6 7 ...
Страница 7: ...8 9 10 ...
Страница 8: ...11 12 13 ...
Страница 9: ...15 14 R ...


