


EN
39
USE
• Check that the mains voltage corresponds
to the rated voltage on the type plate.
• Do not use the product if it is not fully
assembled.
RELEASING THE SAW HEAD
The saw head returns automatically to its
upper position when released from the locked
bottom position.
1. Press the handle (3) down gently.
2. Pull out the locking pin (9) and lock it in
extracted position. Allow the saw head to
move up to the top position.
NOTE:
• If the saw head does not release, rock it
carefully up and down. Pull out the
locking pin and turn it a 1/4 turn to lock
it in extracted position.
• Lock the saw head in the bottom
position when the product is not in use.
FITTING AND REMOVING CUT-OFF
WHEELS
WARNING!
• Switch off the product and pull out the
plug before changing cut-off wheels.
• Wear safety gloves when handling
cut-off wheels.
Removing cut-off wheel
1. Move the saw head to its top position.
2. Undo the screw (10) holding the top
guard (4) and turn the guard up to reveal
the spindle.
3. Press the spindle lock button (13).
4. Release the spindle lock screw with the
supplied spanner.
necessary to determine which safety
precautions are required to protect the user,
based on an estimate of exposure in actual
operating conditions (taking into account all
stages of the work cycle, e.g. the time when
the tool is switched off and when it is idling,
in addition to the start-up time).
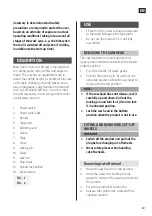
DESCRIPTION
Meec Tool’s metal cut off saw is the ideal tool
for cutting pipes, rods, profiles and angles in
metal. The saw has an adjustable fence to
adjust the cutting height, a spindle lock for safe
and simple changing of cut-off wheels and a
vice, angle gauge, carry handle and transport
lock. Cut-off wheels (Ø355 x 3.2 x 25.4 mm)
are sold separately in Jula’s department stores
and at www.jula.com.
1. Power switch
2. Power switch lock
3. Handle
4. Top guard
5. Bottom guard
6. Clamp
7. Table
8. Fence
9. Locking pin
10. Screw
11. Lock nut
12. Stop screw
13. Spindle lock button
14. Quick release
FIG. 1
FIG. 2
Содержание 017523
Страница 4: ...1 3 8 6 10 4 7 1 5 ...
Страница 5: ...2 2 9 13 12 11 14 ...


