Meec tools 017523 Скачать руководство пользователя страница 36

EN

36

because an accessory can be attached to 
your power tool, it does not assure safe 
operation.

•  The rated speed of the accessory must be 

at least equal to the maximum speed 
marked on the power tool. Accessories 
running faster than their rated speed can 
break and fly apart.

•  Wheels must be used only for 

recommended applications. For example: 
do not grind with the side of a cut-off 
wheel. Abrasive cut-off wheels are 
intended for peripheral grinding, side 
forces applied to these wheels may cause 
them to shatter.

•  Always use undamaged wheel flanges 

that are of correct diameter for your 
selected wheel. Proper wheel flanges 
support the wheel thus reducing the 
possibility of wheel breakage.

•  The outside diameter and the thickness of 

your accessory must be within the capacity 
rating of your power tool. Incorrectly sized 
accessories cannot be adequately guarded 
or controlled.

•  The arbour size of wheels and flanges 

must properly fit the spindle of the power 
tool. Wheels and flanges with arbour 
holes that do not match the mounting 
hardware of the power tool will run out of 
balance, vibrate excessively and may 
cause loss of control.

•  Do not use damaged wheels. Before each 

use, inspect the wheels for chips and 
cracks. If the power tool or wheel is 
dropped, inspect for damage or install an 
undamaged wheel. After inspecting and 
installing the wheel, position yourself and 
bystanders away from the plane of the 
rotating wheel and run the power tool at 
maximum no load speed for one minute. 
Damaged wheels will normally break 
apart during this test time.

•  Wear personal protective equipment. 

Depending on application, use face 
shield, safety goggles or safety glasses. 
As appropriate, wear dust mask, hearing 

•   Allow the wheel to reach maximum speed 

before applying it to the workpiece.

•   When the product has started, lower the 

wheel so that it comes in contact with the 
workpiece and starts cutting. Do not press 
the wheel so hard against the workpiece 
that it starts to vibrate or chop. This can 
damage the wheel.

•   The product cuts material with minimum 

pressure.

•  How quickly the wheel cuts depends on 

the quality of the wheel. Quick cutting 
results in more wheel wear, but reduces 
the risk of burring and/or discolouration 
of the workpiece.

•   Always use the wheel guard.
•   Do not use the product near flammable 

liquids or gas.

•   Do not expose the product to rain or 

moisture – risk of electric shock.

•   The product is intended for cutting ferrous 

metals. Do not use the product to cut 
wood, brick, aluminium or magnesium.

•   Hold the product at a safe angle and run 

it freely at maximum speed for at least 
1 minute.

•   Pull out the plug, switch off the product 

and wait until all moving parts have 
stopped before adjusting, maintenance 
and/or replacing accessories.

•   Switch off the tool immediately and pull 

out the plug if any part of the product or 
safety devices is missing or damaged in 
any way. Do not use the product until it 
has been repaired.

SAFETY INSTRUCTIONS FOR 

CUT-OFF MACHINES

•  Position yourself and bystanders away 

from the plane of the rotating wheel. The 
guard helps to protect the operator from 
broken wheel fragments and accidental 
contact with wheel.

•  Use only bonded reinforced or diamond 

cut-off wheels for your power tool. Just 

Содержание 017523

Страница 1: ...ion of the original instructions Viktig Les bruksanvisningen nøye før bruk Ta vare på den for fremtidig bruk Oversettelse av original bruksanvisning Viktigt Läs bruksanvisningen noggrant innan användning Spara den för framtida behov Bruksanvisning i original Ważne Przed użyciem uważnie przeczytaj instrukcję obsługi Zachowaj ją na przyszłość Tłumaczenie oryginalnej instrukcji 230 V 2 2 kW SAW Item ...

Страница 2: ...iske eller elektroniske komponentersom skal gjenvinnes Lever produkt till gjenvinning på anvist sted f eks kommunens miljøstation Med forbehold om endringer Ved eventuelle problemer kan du kontakte vår kundeservice på telefon 67 90 01 34 www jula no Dbaj o środowisko Nie wyrzucaj zużytego produktu wraz z odpadami komunalnymi Produkt zawiera elektryczne komponenty mogące być zagrożeniem dla środowi...

Страница 3: ...kułu 017523 Conforms to the following directives regulations and standards Överensstämmer med följande direktiv förordningar och standarder Er i samsvar med følgende direktiver forordning og standarder Są zgodne z następującymi dyrektywami regulacja i normami Machinery Directive 2006 42 EC EN 62841 1 2015 EN 62841 3 10 2015 Electromagnetic Compatibility 2014 30 EU EN 55014 1 2017 EN 55014 2 2015 E...

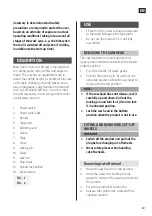
Страница 4: ...1 3 8 6 10 4 7 1 5 ...

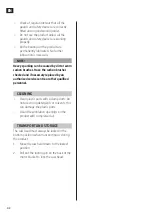
Страница 5: ...2 2 9 13 12 11 14 ...

Страница 6: ...stning för dammutsugning och dammuppsamling ska denna anslutas och användas på rätt sätt Sådana anordningar kan minska risken för problem som orsakas av damm SÄKERHETSANVISNINGAR SÄKERHET I ARBETSOMRÅDET Håll arbetsområdet rent och väl upplyst Belamrade och mörka områden ökar risken för olyckor Använd inte elverktyg i explosiva miljöer som i närheten av lättantändliga vätskor eller gaser eller lät...

Страница 7: ...RKTYG Tvinga inte elverktyget Använd rätt elverktyg för det planerade arbetet Rätt elverktyg fungerar bättre och säkrare när det används med avsedd belastning Använd inte elverktyget om det inte går att starta och stänga av det med strömbrytaren Elverktyg som inte kan styras med strömbrytaren är farliga och måste repareras Koppla ur stickproppen från uttaget och eller ta bort batteriet från elverk...

Страница 8: ...rktyget blir obalanserat och vibrerar vilket kan göra att du förlorar kontrollen Använd inte skadade skivor Kontrollera skivan med avseende på sprickor och flisning före varje användning Om elverktyget eller skivan tappas eller utsätts för stötar kontrollera skivan med Använd endast den medföljande skivflänsen Kontrollera att kapskivan inte är i kontakt arbetsstycket när strömbrytaren trycks in Lå...

Страница 9: ...rbetsstycket medan skivan fortfarande är i rörelse då kan kast inträffa Undersök och avhjälp orsaken till att skivan fastnar avseende på skador eller byt till en oskadad skiva När skivan kontrollerats och monterats håll elverktyget så att ingen person vistas i skivans rotationsplan och kör elverktyget obelastat med maximalt varvtal cirka 1 minut Om skivan är skadad brister den förmodligen under de...

Страница 10: ...cket kan skivan klättra eller kasta Palla upp större arbetsstycken för att minimera risken att skivan fastnar och kast uppstår Stora arbetsstycken sviktar ofta under sin egen vikt Stöd måste placeras under arbetsstycket på båda sidorna nära skärlinjen och nära arbetsstyckets kant MINIMERING AV BULLER OCH VIBRATION Planera arbetet så att exponering för kraftiga vibrationer fördelas över längre tid ...

Страница 11: ...das för att jämföra olika verktyg med varandra och för en preliminär bedömning av exponering Mätvärdena har fastställts i enlighet med EN 62841 3 10 2015 VARNING Den faktiska vibrations och bullernivån under användning av verktyg kan skilja sig från det angivna totalvärdet beroende på hur verktyget används samt vilket material som bearbetas Identifiera därför de säkerhetsåtgärder som krävs för att...

Страница 12: ...ingen För kapning av arbetsstycken med bredd mellan 150 och 190 mm måste geranslaget flyttas på bordet 7 Demontering av kapskiva 1 För såghuvudet till det övre läget 2 Lossa skruven 10 som håller fast det övre skyddet 4 och vrid skyddet uppåt så att spindeln blir synlig 3 Tryck på spindellåsknappen 13 4 Lossa spindelskruven med den medföljande skruvnyckeln OBS Spindelskruven är högergängad Dra åt ...

Страница 13: ... kapskivan börjar komma ut ur materialet När snittet är slutfört låt såghuvudet återgå till det övre läget och stäng av motorn 1 Avlägsna den främre och bakre skruven för geranslaget med den medföljande skruvnyckeln 2 Flytta geranslaget cirka 35 mm bakåt så att hålet och spåret i geranslaget är i linje med de två bakre hålen i bordet 3 Sätt i och dra åt skruvarna för geranslaget i de två bakre hål...

Страница 14: ... Ingen ytterligare smörjning behövs OBS Kraftig gnistbildning kan orsakas av smuts eller slitna kolborstar Låt behörig servicerepresentant eller annan kvalificerad personal kontrollera produkten och vid behov byta kolborstar RENGÖRING Rengör plastdelar med en fuktad trasa Använd inte starka rengöringsmedel eller lösningsmedel det kan skada plastdelar Rengör produktens ventilationsöppningar med try...

Страница 15: ...voppsamling skal dette kobles til og benyttes på riktig måte Slikt utstyr kan redusere faren for problemer forårsaket av støv SIKKERHETSANVISNINGER SIKKERHET I ARBEIDSOMRÅDET Hold arbeidsområdet rent og godt opplyst Uoversiktlige og mørke områder øker faren for ulykker Ikke bruk el verktøy i eksplosive miljøer for eksempel i nærheten av lettantennelige væsker eller gasser eller lettantennelig støv...

Страница 16: ...G VEDLIKEHOLD AV EL VERKTØY El verktøyet må ikke overbelastes Bruk riktig el verktøy til det planlagte arbeidet Riktig el verktøy fungerer bedre og sikrere når det brukes med den belastningen det er beregnet for Ikke bruk el verktøyet dersom det ikke kan slås på og av med strømbryteren El verktøy som ikke kan styres med strømbryteren er farlige og må repareres Trekk ut støpselet fra stikkontakten ...

Страница 17: ...aksimal hastighet uten belastning Skadede skiver vil normalt gå fra hverandre i løpet av denne testtiden Bruk personlig verneutstyr Visir eller vernebriller avhengig av hva slags arbeid du skal utføre Der det er hensiktsmessig Kontroller at kappeskiven ikke er i kontakt med arbeidsemnet når strømbryteren trykkes inn La sagbladet nå maksimalt turtall før det settes mot arbeidsemnet Når produktet ha...

Страница 18: ...et igjen Skiven kan sette seg fast eller slå tilbake hvis elektroverktøyet startes på nytt i arbeidsstykket Støtt større arbeidsemner for å redusere risikoen for at skiven blir klemt fast og slår skal du bruke støvmaske hørselsvern hansker og verkstedsforkle som kan stoppe små fragmenter av slipemiddelet eller arbeidsstykket Øyevernet må kunne stoppe rusk og rask som de ulike arbeidsoperasjonene f...

Страница 19: ...ngig av hvordan verktøyet brukes og hvilket materiale som bearbeides tilbake Store arbeidsstykker har en tendens til å bøye seg under sin egen vekt Det må derfor plasseres støtter under arbeidsstykket i nærheten av kuttelinjen og kanten av arbeidsstykket på begge sider av skiven REDUKSJON AV STØY OG VIBRASJON Planlegg arbeidet slik at eksponering for kraftig vibrasjon fordeles over lengre tid For ...

Страница 20: ... 10 som holder fast den øvre beskyttelsen 4 og vri beskyttelsen oppover slik at spindelen blir synlig 3 Trykk på spindellåsknappen 13 4 Løsne spindelskruen med den medfølgende skrunøkkelen Finn derfor ut hvilke sikkerhetstiltak som kreves for å beskytte brukeren på bakgrunn av en vurdering av eksponeringen under reelle driftsforhold som tar hensyn til alle delene av arbeidsprosessen som tiden når ...

Страница 21: ...m må gjæringsanlegget flyttes på bordet 7 1 Skru ut den fremre og den bakre skruen for gjæringsanlegget med medfølgende skrunøkkel 2 Flytt gjæringsanlegget cirka 35 mm bakover slik at hullet og sporet i MERK Spindelskruen er høyregjenget Den strammes med klokken og skrus ut mot klokken 5 Løsne spindelskruen skiven og den ytre flensen 6 Før den nedre beskyttelsen 5 opp til den øvre beskyttelsen 4 7...

Страница 22: ...e posisjon og slå av motoren Vent til motoren har stoppet helt og kappeskiven dekkes av den nedre gjæringsanlegget er i linje med de to bakre hullene i bordet 3 Sett inn og stram skruene for gjæringsanlegget i de to bakre hullene HURTIGFRIGJØRING AV KLEMANORDNING Klemanordningen har en innretning for hurtigfrigjøring 14 som sørger for at det går raskt å gjøre større justeringer 1 For å bruke hurti...

Страница 23: ...ere smøring MERK Kraftig gnistdannelse kan skyldes smuss eller slitte kullbørster La en godkjent servicerepresentant eller en annen kvalifisert person kontrollere produktet og skifte kullbørster ved behov RENGJØRING Rengjør plastdeler med en fuktig klut Ikke bruk sterke rengjøringsmidler eller løsemidler siden det kan skade plastdeler Rengjør produktets ventilasjonsåpninger med trykkluft TRANSPORT...

Страница 24: ...e klucze nastawne Klucz pozostawiony na obracającej się części elektronarzędzia może spowodować obrażenia Nie pochylaj się zbytnio do przodu Przez cały czas utrzymuj stabilną postawę aby ZASADY BEZPIECZEŃSTWA BEZPIECZEŃSTWO W MIEJSCU PRACY Zapewnij czystość i dobre oświetlenie w miejscu pracy Przeładowane miejsce pracy i niedostateczne oświetlenie zwiększają ryzyko wystąpienia wypadków Nie używaj ...

Страница 25: ...ada wrzeciona jest zwolniona Zawsze używaj osłony tarczy nie stracić równowagi Dzięki temu możesz lepiej kontrolować elektronarzędzie w nieoczekiwanych sytuacjach Noś odpowiednią odzież Nie noś luźnych ubrań ani biżuterii Trzymaj włosy ubrania i rękawice z dala od ruchomych części urządzenia Luźne ubrania biżuteria i długie włosy mogą zostać wciągnięte przez ruchome części narzędzia Jeżeli na wypo...

Страница 26: ...ależy wykorzystywać tylko zgodnie z przeznaczeniem Na przykład nie należy szlifować boczną powierzchnią tarczy tnącej Ściernice tnące są przeznaczone Nie dotykaj tarczy tnącej rękoma Umieść obrabiany przedmiot tak by nie mógł się przesuwać Trzymaj produkt oburącz w trakcie cięcia Nigdy nie wkładaj rąk pod obrabiany przedmiot ani za tarczę tnącą Przed przeniesieniem lub regulacją obrabianego przedm...

Страница 27: ...ia do szlifowania obwodowego Siły boczne przyłożone do tych tarcz mogą spowodować ich rozpadnięcie się Zawsze należy używać nieuszkodzonych kołnierzy mocujących o średnicy odpowiedniej do wybranej tarczy Odpowiednie kołnierze mocujące podtrzymują tarczę zmniejszając prawdopodobieństwo jej pęknięcia Średnica zewnętrzna i grubość akcesorium muszą mieścić się w dopuszczalnym zakresie dla elektronarzę...

Страница 28: ...Jeśli na przykład ściernica zostanie pochwycona lub zakleszczy się w przedmiocie obrabianym jej krawędź która znajduje się w zwężeniu może zagłębić się w powierzchnię materiału powodując uniesienie lub odrzucenie ściernicy W takich warunkach może również dojść do pęknięcia ściernicy Odrzut jest efektem niewłaściwego użycia elektronarzędzia i lub nieprawidłowych procedur roboczych lub warunków prac...

Страница 29: ... Tools to doskonałe narzędzie do cięcia rur prętów profili i kątowników z metalu Przecinarka jest wyposażona w regulowany ogranicznik do ustawiania wysokości cięcia blokadę wrzeciona do bezpiecznej i łatwej wymiany tarczy oraz imadło kątomierz uchwyt do przenoszenia i blokadę transportową Tarcza tnąca Ø 355 x 3 2 x 25 4 mm jest sprzedawana osobno w multimarketach Jula oraz na stronie www jula pl S...

Страница 30: ...ych 1 Upewnij się że wszystkie części są czyste 2 Zamontuj tarczę tnącą do wewnętrznego kołnierza i wrzeciona Sprawdź czy strzałka kierunku obrotu na tarczy 1 Przełącznik 2 Blokada przełącznika 3 Uchwyt 4 Górna osłona 5 Dolna osłona 6 Zacisk 7 Stół 8 Ogranicznik 9 Zawleczka 10 Śruba 11 Nakrętka zabezpieczająca 12 Śruba blokująca 13 Przycisk blokady wrzeciona 14 Element do szybkiego zwalniania RYS ...

Страница 31: ...ręć korbkę zacisku o 2 lub 3 obroty w lewo nastąpi zwolnienie szczęk 2 Naciśnij nakrętkę elementu do szybkiego zwalniania aby tylna krawędź podniosła się a śruba zacisku została zwolniona pokazuje ten sam kierunek co strzałka na górnej osłonie 4 3 Nałóż z powrotem kołnierz zewnętrzny podkładkę i śrubę wrzeciona 4 Naciśnij przycisk blokady wrzeciona 13 aby je zablokować 5 Dokręć śrubę wrzeciona za ...

Страница 32: ...śli nie wszystkie zabezpieczenia działają prawidłowo 3 Trzymając nakrętkę w położeniu zwolnionym pociągnij korbkę zacisku do siebie aby otworzyć zacisk 4 Odepchnij od siebie korbkę aby szybko zamknąć zacisk 5 Użyj korbki aby szybko zablokować obrabiany przedmiot za pomocą zacisku SPOSÓB UŻYCIA OSTRZEŻENIE Nie próbuj nigdy ciąć zbyt małych elementów Jeśli do wykonania cięcia potrzebujesz zbliżyć rę...

Страница 33: ...tek węglowych CZYSZCZENIE Oczyść elementy z tworzywa zwilżoną szmatką Nie używaj silnych środków czyszczących ani rozpuszczalników które mogą uszkodzić elementy z tworzywa Regularnie czyść otwory wentylacyjne produktu przy pomocy sprężonego powietrza TRANSPORT I PRZECHOWYWANIE Produkt zawsze należy transportować i przechowywać z głowicą tnącą zablokowaną w położeniu dolnym 1 Opuść głowicę tnącą do...

Страница 34: ...nd used correctly The use of such devices can reduce the risk of dust related problems SAFETY INSTRUCTIONS SAFETY IN THE WORK AREA Keep the work area clean and well lit Dark and cluttered work areas increase the risk of accidents and injuries Do not use power tools in explosive environments such as in the vicinity of flammable liquids gases or dust Power tools produce sparks that can ignite dust a...

Страница 35: ...OOLS Do not force the power tool Use the correct power tool for the planned work The correct power tool will work better and more safely when used with the load for which it was designed Do not use the power tool if it cannot be switched on and off with the power switch Power tools that cannot be controlled with the power switch are dangerous and must be repaired Unplug the plug from the mains and...

Страница 36: ...l normally break apart during this test time Wear personal protective equipment Depending on application use face shield safety goggles or safety glasses As appropriate wear dust mask hearing Allow the wheel to reach maximum speed before applying it to the workpiece When the product has started lower the wheel so that it comes in contact with the workpiece and starts cutting Do not press the wheel...

Страница 37: ...end to sag under their own weight Supports must be placed under the workpiece near the line of cut and near the edge of the workpiece on both sides of the wheel protectors gloves and shop apron capable of stopping small abrasive or workpiece fragments The eye protection must be capable of stopping flying debris generated by various operations The dust mask or respirator must be capable of filtrati...

Страница 38: ...41 3 10 2015 WARNING The actual vibration and noise level when using tools may differ from the specified maximum value depending on how the tool is used and the material It is therefore REDUCTION OF NOISE AND VIBRATIONS Plan the work so that exposure to heavy vibrations is spread over a longer period To reduce noise and vibrations when in use limit the time the tool is in use and use low power vib...

Страница 39: ...n 2 Undo the screw 10 holding the top guard 4 and turn the guard up to reveal the spindle 3 Press the spindle lock button 13 4 Release the spindle lock screw with the supplied spanner necessary to determine which safety precautions are required to protect the user based on an estimate of exposure in actual operating conditions taking into account all stages of the work cycle e g the time when the ...

Страница 40: ...m 150 to 190 mm 1 Release the front and back screws for the mitre fence with the supplied spanner 2 Move the mitre fence about 35 mm back so that the hole and slot in the mitre fence are in line with the two back holes in the table NOTE The spindle screw has a right hand thread Tighten clockwise unscrew anticlockwise 5 Remove the spindle screw the washer and the outer flange 6 Move up the bottom g...

Страница 41: ...tenance 3 Insert and tighten the screws for the mitre fence in the two back holes QUICK RELEASE OF CLAMP The clamp has a quick release device 14 to make it quicker to make larger adjustments 1 To use the quick release turn the clamp handle 2 or 3 turns anticlockwise to release the jaws 2 Press down the quick release nut so that the back jaw lifts and the clamp screw is released 3 Hold the nut in r...

Страница 42: ...shes Have the carbon brushes checked and if necessary replaced by an authorised service centre or other qualified personnel CLEANING Clean plastic parts with a damp cloth Do not use strong detergents or solvents this can damage the plastic parts Clean the ventilation openings on the product with compressed air TRANSPORT AND STORAGE The saw head must always be locked in the bottom position when tra...

Отзывы: