background image

Before Using:

Precautions

for Safe Use...

3

2.  Precautions For Safe Use

If the device is used with 
voltage other than the 
specified power-supply voltage, 
fire or electric shock may occur. 

Use the device with correct 
power-supply voltage. 

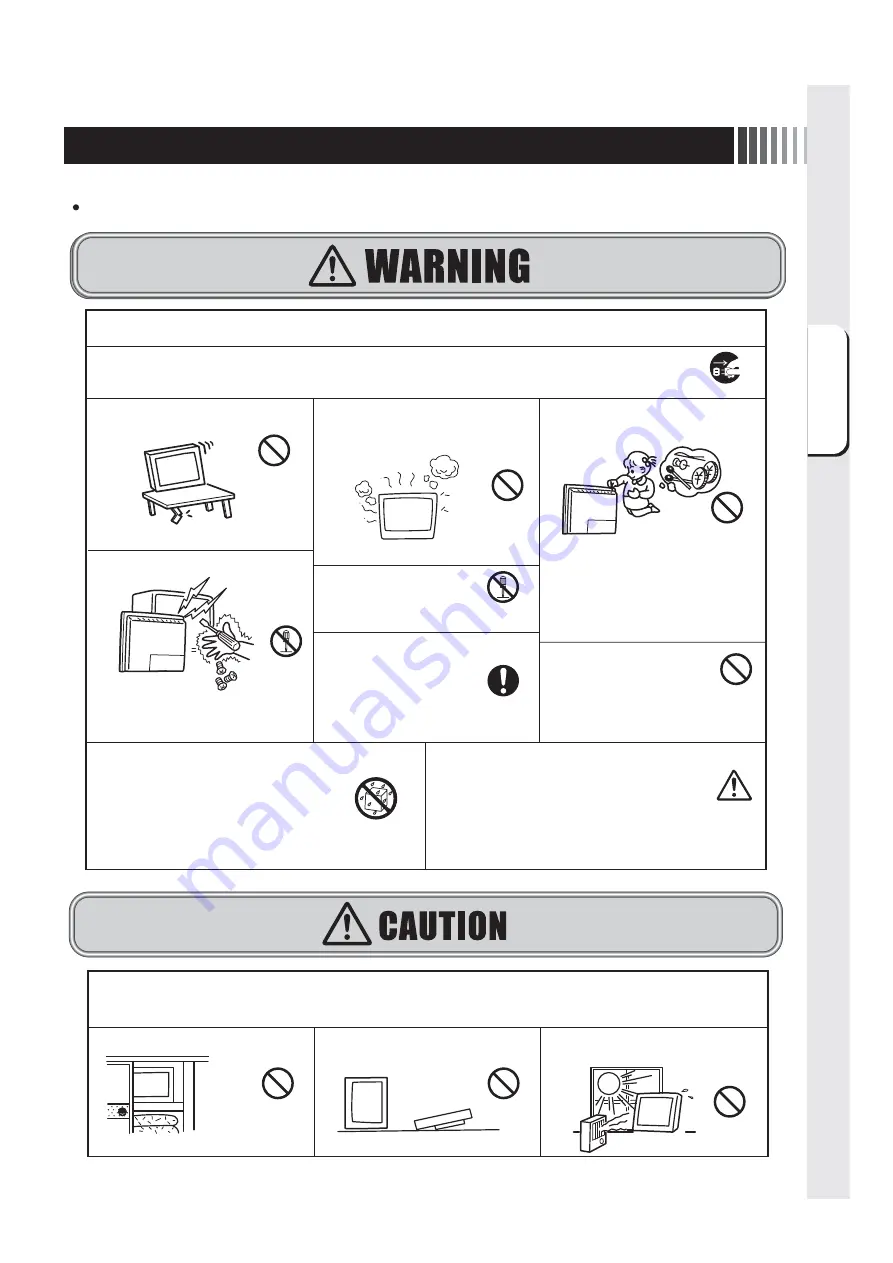
Before using, be sure to read this section for details on correct and safe use.

In the event of malfunction, immediately disconnect the power plug!!

Using this device in a defective state can cause fire and electric shock.
Immediately turn off the power switch, unplug the power plug from the power outlet, and bring your
monitor to your vendor for repair.

Disconnect plug

Do not use

May cause fire or electric shock.

Do not use when the monitor is 

malfunctioning (screen does not 

display, etc.) or when the monitor is 

generating smoke, odd sounds or 

odors

Prohibited

Do not put on non-flat or unstable

surfaces.

May drop or fall over, causing injury.

Prohibited

Do not insert foreign objects.

Beware particularly of children.

Do not

disassemble

Do not remove the back cover.

The monitor contains high voltage

components that may cause electrical

shock if touched.

Repair/modification

prohibited

Do not repair or modify.

May cause injury, fire or
electric shock.

Prohibited

Do not play with plastic bags.

Beware particularly of children.

Playing with the plastic bag
used to package this device can cause
suffocation.

Keep away

from water

If water, etc. gets inside the liquid crystal

display, immediately shut off power to the

main unit, unplug the power cord from the

power outlet and contact your vendor.

Using the display when wet may cause

malfunction, fire, electric shock, etc.

Do not place the monitor in the bathroom or in a place 

where it can come into contact with water.

Do not put the liquid crystal in your mouth.

Inhaling or drinking the liquid crystal that leaks from 
damaged liquid crystal panels can cause poisoning.
If the liquid crystal enters your mouth or eyes, rinse 
with water and consult your physician.
Wipe liquid crystal on your hands and clothing with 
alcohol, etc., then wash with water.

If metal or combustible material is 
inserted from the vent hole, etc., fire or 
electrical shock may occur. 
In the event that foreign objects are 
inserted, turn off the device 
immediately to switch off the DC input 
power and then consult your vendor. 

Warning

Observe the following during setup.

Installing this device in poorly ventilated locations and in certain unsuitable places may cause heat to collect inside the 
device or lead to fire or electric shock.

Do not install

Do not place in cramped locations.

Prohibited

Do not lay flat, turn on its side,
or turn up side down.

Do not expose to direct sunlight or
place next to heating appliances.

Do not install

Содержание TSD-FT1514-MNU

Страница 1: ...前 に 安 全 の た め に 各 部 の 名 称 機 能 1 ご使用の前に 2 安全のために必ず守ること 2 3 3 各部の名称 本体背面 コントロール部 本体背面 接続部 付属品の確認 5 5 6 6 4 接続 電源の接続 ケーブルの接続 5 画面調節 画面の調節 OSD機能 7 7 7 8 8 8 7 お客様筐体への取付 取付上のご注意 取付方法 保護フィルム 防水パッキン 8 困ったとき 故障かな と思ったら お手入れ 保証とアフターサービス 13 13 14 15 15 16 16 18 18 9 付録 保証書 仕様 さくいん 19 19 20 23 接 続 画 面 調 節 6 機能 自動画面表示 パワーマネージメント機能 タッチドライバのインストール 10 10 10 11 もくじ ページ アナログ抵抗膜方式 アナログ抵抗膜方式 インターネットホームページ http www m...

Страница 2: ...で 使用することを目的としていますが この装置がラジオやテレビジョン受信機に近接して使用されると 受信障害を引き起こすことが あります 取扱説明書に従って正しい取扱いをしてください 本機は付属のケーブル類および当社推奨のケーブルを使用した状態でVCCI基準に適合しています 本書の内容の一部または全部を無断で転載することは固くお断り します 本書の内容について 将来予告なしに変更することがあります 本書の内容については 万全を期して作成しましたが 万一誤り 記載もれなどお気付きの点がありましたらご連絡ください 乱丁本 落丁本の場合はお取り替えいたします 販売店までご連絡ください この取扱説明書に使用している表示と意味は次のようになっています 誤った取扱いをしたときに生じる危険とその程度を 次の表示で区分して説明しています 図記号の意味は次のとおりです WindowsNT Windows Vi...

Страница 3: ... を抜く 水ぬれ禁止 風呂場や水のかかるところに置かない 液晶を口にしない 水などがタッチモニタの内部に入った場合はすぐに本 体の電源を切り DC入力電源を切ってお買い上げの 販売店にご連絡ください そのまま使用すると 故障 火災 感電などの原因になります 液晶パネルが破損し 液晶が漏れ出た場合は 液晶を吸い 込んだり 飲んだり しないようにしてください 中毒を起こ す恐れがあります 万一口に入ってしまったり 目に入って しまった場合は 水でゆすいでいただき 医師の診断を受 けてください 手や衣類に付いてしまった場合は アルコ ールなどで拭き取り 水洗いしてください 内部には電圧の高い部分があり さわると 感電の原因になります 裏ぶたを外さない 分解禁止 設置のときは次のことをお守りください 風通しが悪かったり 置き場所によっては 内部に熱がこもり 火災や感電の原因になります 狭い所に置か...

Страница 4: ...の製品に関する技術相談 アフターサービス等も日本国外 ではおこなっていません This Touch panel monitor is designed for use in Japan and can not be used in any other countries 画面の位置は 目の高さよりやや低く 目から約40 70cmはな れたぐらいが見やすくて目の疲れが少なくなります 明るすぎる部屋は目が疲れます 適度な明るさの中でご使用くだ さい また 連続して長い時間 画面を見ていると目が疲れます 上手な見方 タッチパネルモニターのお手入れ タッチパネルモニターの上手な使い方 国内専用 タッチパネルモニターの表面にほこりや汚れがついているときは 柔ら かい布でやさしく拭いてください 表面は傷つきやすいので硬いもの でこすったり 叩いたり しないでください また 液晶パネルは壊れやす いので...

Страница 5: ...故障の原因とな ることがあります MENU EXIT SELECT INPUT 電源ランプ 電源を入れたときは電源 ランプは緑色に点灯しま す パワーマネージメント機 能の作動中は橙色に点灯 します P10 SELECT INPUTボタン ボタン ボタン OSD画面が表示されていないと き ホットキー機能 ブライトネス調節画面を表示し ます OSD画面が表示されているとき SELECT ボタンで調節項目 を選んだあと このボタンを押 してお好みの画面に調節します OSD画面が表示されていない とき 信号入力コネクタを選択します OSD画面が表示されている とき 選んだ調節項目を決定します OSD画面が表示されていな いとき ホットキー機能 長押しすると 自動画面調 節を実行します OSD画面が表示されてい るとき SELECT ボタンで調 節項目を選んだあと この ボタンを押してお好みの画...

Страница 6: ...コアなし アナログ映像信号入力コネクタ ミニD Sub 15ピン ミニD Sub15ピンケーブル を接続します OSD信号コネクタ 本コネクタはOSDスイッチを 外付けする場合に接続します 電源入力コネクタ 端子台 電源コードを接続します デジタル映像信号入力コネクタ DVI D 24ピン タッチ通信コネクタ USB タイプB USBケーブルを接続します お客さま相談窓口の ご案内 タッチドライバ CD ROM 取付金具 10個 ケーブルクランパ 1個 クランパ固定ネジ 1個 お客さま相談窓口のご案内 DVI Dケーブルはエレコム社CAC DVSL20BKをご使用ください OSD信号コネクタの詳細については弊社営業まで問い合わせてください DVI Dケーブルを接続します DVI Dケーブルは付属されて おりません ご使用のときは当社推奨の DVI Dケーブルをご購入くだ さい ...

Страница 7: ...複合映像同期信号 シンクオングリーン には対応していませんのでご注意ください 映像信号ケーブル DVI D は付属していません ご使用のときは 当社推奨の DVI D ケーブルをご購入く ださい P6 タッチ通信コネクタは 1 系統のみとなっていますので タッチパネルモニターとして同時に 2 台のコンピュ ータとの接続はできません コンピュータ ケーブルの接続 ケーブルは 接続後必ずそれぞれの固定ネジで確実に固定してください ケーブルを接続する前に 本機 コンピュータおよび周辺機器の電源を切ってください 映像信号ケーブル ミニD Sub15ピン アナログ映像信号コネクタ ミニD Sub 15ピン に接続する デジタル映像信号コネクタ DVI D に接続する タッチ通信コネクタ USB に接続する 映像信号ケーブル DVI D タッチ通信ケーブル USB FG GND 24V TOUCH 接...

Страница 8: ...コンピュータと接続したとき は 最初に 自動画面調節 をおこなってください その後 調節をおこなう必要がある場合は マニュアル画面調節 をお こなってください 本機は水平周波数 30 0 61 0kHz 垂直周波数 50 75 4Hz 対応となっていますが この範囲内であっても入 力信号によっては表示できない場合があります その場合は コンピュータのリフレッシュレー トまたは解像度を変更し てください 1 自動調節 1 本機 およびコンピュータの電源を入れてください 2 背面の を長押ししてください 自動画面調節を開始します 入力された信号を検出し Display Width Phase H Pos V Pos の自動調節を開始します 自動調節中は Auto Adjust Size の文字が表示され ます DOSプロンプ トのように文字表示のみの場合は 自動画面調節がうまく機能しない場合が...

Страница 9: ...ときに調節します アナログ接続の場合のみ 画面の横方向にノイズが表示されるときに調節します アナログ接続の場合のみ 左右方向の表示位置があっていないときに調節します アナログ接続の場合のみ 上下方向の表示位置があっていないときに調節します アナログ接続の場合のみ このグループの調節を終了します 出荷状態の設定に戻します 表示のシャープさを調節します OSDメニューの表示言語を切り替えます 英語 日本語 このグループの調節を終了します OSD表示が自動終了するまでの期間を設定します OSDの水平表示位置の調整が可能です OSDの垂直表示位置の調整が可能です 誤って調節してしまうことを防ぐために OSDメニューを 操作禁止にします このグループの調節を終了します 画面の解像度が表示されます 水平 垂直同期信号の周波数が表示されます MCUのF Wバージョンが表示されます OSD調節を終了します...

Страница 10: ...ます ユーザーメモリ機能 記憶させたい信号を入力し OSD機能でお好みの画面に調節 P8 するとタイミングおよび画面情報が自動的に記憶されます オールリセット を実行するとすべてのユーザーメモリに記憶された値が消去されます 本機は水平周波数 30 0 61 0kHz 垂直周波数 50 75 4Hz対応となっていますが この範囲内であって も入力信号によっては正しく表示できない場合があります この場合は コンピュータの周波数 または解像度を変更してください インターレース 複合映像同期 シンクオングリーン には対応していません 解像度1024 768以外の信号を入力した場合は 文字がにじんだり図形が歪んだりすることがあります 工場プリセッ トタイミング 本機は下表に示す種類のタイミングの自動判別をおこない画面情報を設定しますので コンピュータに接続すると 自動的に適切な画面を表示します ただ...

Страница 11: ...的にメニュー画面が表示されます インス トールする場合は 管理ユーザー Administrator でログインしてください Windows 3 1 WindowsNT 4 OS 2 Macintosh 等では使用できません タッチ ドライバのインス トール CD ROM より ドライバソフ トをインス トールくだ さい このCD ROM を ドライブにセッ トすると 自動的に メニュー画面が表示されます 自動的に表示されない場合は マイコンピュータ 内のCD ROM アイコンをダブルクリ ックするか CD ROM のルー トフォルダの index html をダ ブルクリ ックしてください 本機は アナログ抵抗膜方式 のタッチパネルを内 蔵しておりますので アナログ抵抗膜方式 ボタン 緑色 をクリ ックしてください 本機は TSD ATシリーズ をクリ ックしてください ドライバインス ト...

Страница 12: ...ン ドウが表示されますので 実行 を クリ ックください Controller USB USB を選択し インス トール を クリ ックください ドライバファイルのインス トールを開始します インス トール完了です 閉じる をクリ ックしてください 5 6 7 8 5 8 タッチ ドライバをインス トールする前に必ず ユー ザーガイ ド をクリ ックして 説明書をお読みください インス トール直後 ドライバが正常に動作しない場合は コンピュータを再起動してください 6 7 ...

Страница 13: ...寸法は 下図の寸法で加工ください なお 取付パネルの板厚は2mm以上 4mm以下です 2 筐体内部での他の機器との間隔 お客様筐体内部の通気をよくするため 本機を取り付ける場合 下図に示すように他の機器との間隔が必要です また 本機の周囲温度は55 以下となるようにしてください 3 本機の取付角度 本機は垂直取付を基本としています 斜めに設置する場合は 傾斜角度を30 以内としてください 本機を上向き または下向きでは使用しないでください 333 2 4 100 100 30 以内 30 以内 100 259 80 80 単位 mm 他の機器 および制御盤 ...

Страница 14: ...金具のつめを本機の角穴に後ろ向きにひっかけるように差し込みます 3 取付金具のネジを仮締め後 指定トルクにて本締めし本機を固定してください 締付トルク範囲 62 83 5N cm 全箇所固定後 筐体と防水パッキンの間に隙間がないことを確認してください 隙間があるとIP65相当の耐環境保護性能を確保できない場合があります なおIP65相当を確保するためには上部 下部各3箇所 左右側面部各2箇所を固定が必要となります コンピュータに接続する前に 本機 コンピュータおよび周辺接続機器の電源を切ってください 防水 パッキン 筐体 ...

Страница 15: ...扱い時の環境保護シート破損防止用のため 環境保護シートの表面には透明の保護 フィルムを貼り付けています お客様ご使用の際に 保護フィルムを環境保護シートから外されても本体の性能には影響ありません 防水パッキンは定期的に点検してください ワレ ヒビ等の劣化がある場合は 耐環境保護機能 IP65相当 の低下により使用環境によっては本機を破損す る恐れがありますので直ちに交換してください 防水パッキン交換については販売店にご相談ください 環境保護シー ト 透明保護フィルム 製品本体 防水パッキン ヒビ ワレ 製品背面 ...

Страница 16: ...ランプが緑色に点灯 している 1 OSD 画面で Contrast および Brightness を調節してください OSD 画面が表示されれば本機は正常です P9 2 コンピュータとの接続を確認してください 電源ランプが橙色に点灯 している 1 パワーマネージメント機能が作動していると画面が表示されません タッチ操作またはキーボードの適当なキーを押すかマウスを動かしてく ださい P10 2 信号ケーブルを正しく接続してください 3 コンピュータの電源が 切 になっていないか確認してください 2 画面がちらつく 1 分配器を使用している場合は コンピュータに直接入力してください 2 OSD メニュー Image Control の Phase を選択し調整してください 3 上下にちらつく場合は コンピュータのリフレッシュレートを 60Hz に設定してください 3 画面上に黒点 点灯しない点...

Страница 17: ...するか Tool の Reset で工場出荷設定に戻してください 6 数秒間画面が不安定になる ご使用のコンピュータによっては 入力信号を切り替えると画面が数秒間不 安定になることがありますが 故障ではありません 7 タッチパネルが動作しない 1 タッチ通信ケーブルをコンピュータに接続してから約 10 秒間はコン トローラがイニシャライズ中のため正常に感知しないことがあります 10 秒間以上経ってから操作してください 2 タッチ通信ケーブルを確実に接続してください 3 パソコン システム の立ち上げ時には 周辺機器の認識をおこなって おり タッチ操作をおこなうと正常な認識ができませんので システム が完全に立ち上がったあとに操作をおこなってください 8 タッチパネルが正常動作し ない 1 タッチ通信ケーブルをコンピュータに接続してから約 10 秒間はコント ローラがイニシャライズ中のため正...

Страница 18: ...てご不明の場合は お買上げの販売店へご相談ください 保証とアフターサービス お手入れ アフターサービスを依頼される場合はつぎの内容をご連絡ください お名前 ご住所 付近の目標など 電話番号 品 名 タッチパネルモニター 形 名 TSD FT1514 MNU 製造番号 本機背面のラベルに記載 故障の症状 状況など できるだけ詳しく 購入年月日または使用年数 タッチパネルモニターをより良い状態でご使用いただくため 定期的にタッチパネルのお手入れをおこなってください お手入れの際は電源ボタンを押して電源を 切 にし 電源を 切ってから 柔らかい布で軽くふき取ってください 電源を入れたままお手入れをおこなうと タッチセンサが反応 し 故障の原因となります 汚れがひどいときには水に浸した布をよくしぼってふき取り 乾いた柔らかい布で仕上げてください 販売店におまかせください 定期的な掃除は火災 故障を...

Страница 19: ...内に故障して無料修理を受ける場合には お買い上げの販売店に製品と保証書をご提示の上依頼 してください なお 製品を発送される場合の送料はお客様ご負担となりますのでご了承ください 3 保証期間内でも次のような場合は有料修理となります 1 保証書をご提示されないとき 2 本保証書の所定事項の未記入 記載内容の書き換えられたもの 3 火災 地震 水害 落雷 その他の天変地異 公害や異常電圧による故障または損害 4 お買い上げ後の輸送 移動時の落下等のお取り扱いが不適当なため生じた故障または損害 5 取扱説明書に記載の使用方法や注意に反するお取り扱いによって生じた故障または損害 4 本保証書は再発行いたしませんので紛失しないよう大切に保管してください この保証書は 本書に明示した期間 条件のもとにおいて無料修理をお約束するものです したがってこの保証書によって保証書を発行している者 保証責任者 お...

Страница 20: ... 1 標準 304 1 H 228 1 V mm ミニD Sub15ピン メス DVI D メス USB B端子 前面 0 40 背面 0 55 10 80 RH 結露なきこと 9 150Hz 4 9m s2 DC24V VCCI クラスB UL60950 1 c UL IP65相当 表示部 耐腐食性ガスのないこと 約3 5kg コン トラス ト ブライ トネス 色調節 画面調節 OSD設定調節 モニタ情報表示 この製品は一般工業等を対象とした汎用品として製作されたもので 人命にかかわるような状況下で使用さ れる機器あるいはシステムに用いられることを目的として設計 製造されたものではありません この製品を原子力用 電力用 航空宇宙用 医療用 乗用移動体用の機器あるいはシステムなど特殊用途への 適用をご検討の際には 当社の営業担当窓口までご照会ください この製品は厳重な品質管理体制の下に製造...

Страница 21: ...付 録 21 MEMO ...

Страница 22: ...付 録 22 MEMO ...

Страница 23: ...点灯したままの点 が少数ある 画面調節 画面に何も映らない 画面を切り替えても前の画面の 像が薄く残っている 機能 供給電源 ケーブルの接続 工場プリセットタイミング 故障かな と思ったら ご使用の前に 困ったとき 5 6 20 16 16 16 8 16 16 10 20 7 10 16 2 16 か アナログ映像信号入力コネクタ 6 7 アフターサービス 安全のために必ず守ること 映像信号ケーブル お客さま相談窓口のご案内 お手入れ 18 3 6 6 18 あ 入力信号 10 20 な ユーザーメモリ機能 10 や パワーマネージメント機能 ビデオ信号 表示画素数 表示サイズ 付属品の確認 付録 防水パッキン 保護フィルム 保証書 保証とアフターサービス 本体背面 コントロール部 本体背面 接続部 10 20 20 20 6 19 15 15 19 18 5 6 は マニュアル調節 8...

Страница 24: ...技術が支える確かな未来 40D871118A10 http www mee co jp ...

Страница 25: ...nctions Automatic Screen Display Power Management Function Software Installation for Touch sensor 7 Monitor Installation Attachment Precautions Attachment Method Protection Film Waterproof packing 8 Troubleshooting If the Device Malfunctions Cleaning Instructions 9 Appendix Specifications 2 3 5 5 6 6 7 7 7 8 8 8 10 10 10 11 13 13 14 15 15 16 16 18 19 19 Read all of the instructions in this user s ...

Страница 26: ...ome and or household articles Never do this Never attempt to disassemble repair or modify Be sure to unplug the power cable from the outlet Be sure to follow the instructions Be sure to ground earth the earth wire The symbols used in this User s Manual and their meanings are as following The dangers and the degree of danger possible as a result of mishandling are explained using the symbols below ...

Страница 27: ...rly of children Playing with the plastic bag used to package this device can cause suffocation Keep away from water If water etc gets inside the liquid crystal display immediately shut off power to the main unit unplug the power cord from the power outlet and contact your vendor Using the display when wet may cause malfunction fire electric shock etc Do not place the monitor in the bathroom or in ...

Страница 28: ...y other countries of Japan Furthermore technical consultation and after service etc for this device are not provided overseas This Touch panel monitor is designed for use in Japan and can not be used in any other countries For use in Japan only Effective viewing For the most comfortable viewing and to reduce eyestrain the screen should be positioned slightly lower than eye level and 40 70 cm away ...

Страница 29: ...ows the OSD screen When the OSD screen is shown Desappears the OSD screen is shown While operating OSD function previous screen is appeared Refer to OSD Function for details on the OSD window operations for each button P8 The LED lights to GREEN when your equipment is on and in use The LED lights to ORANGE when your equipment is in the power management mode SELECT INPUT Button When the OSD screen ...

Страница 30: ... Mini D Sub 15 pin with two ferrite cores Signal cable Customer service guide Verifying Accessories These are the accessories that should come with your purchase If any of your accessories are missing or damaged please contact your vendor DIGITAL SIGNAL INPUT CONNECTOR DVI D 24 pin ANALOG SIGNAL INPUT CONNECTOR Mini D Sub 15 pin Connects the mini D Sub 15 pin cable Connects the DVI D cable The DVI...

Страница 31: ...ecured with a screw from the top of the power supply connector prior to connection In the interests of safety secure the insulating plate again with the screw after connection No Composite video synchronization signal Sync on green is applicable for this product The 2 video signal cable DVI D is not provided When using the cable please purchase the DVI D cable recommended by us The touch communica...

Страница 32: ...re cases any image may not be displayed with the specified frequency Horiz 30 0 to 61 0kHz Vert 50 0 to 75 4Hz Please change the refresh rate or resolution of the PC in such case 1 Automatic screen adjustment 1 Turn on the monitor and the PC 2 When button of the back panel is kept pressing it starts automatic screen adjustment of Display Width Phase H Pos and V Pos by detecting input signal The ch...

Страница 33: ... this group Adjust the display width only for analog connection Adjusts the screen when noises appear in the transverse direction on the screen only for analog connection Adjusts the horizontal display position only for analog connection Adjusts the vertical display position only for analog connection End the adjustment of this group Resets the setting to the default Adjusts the sharpness of the d...

Страница 34: ...o set monitor information and automatically show the appropriate display when connected to your computer However flickering and blurring may occur in some computers Also some signals may cause display errors When errors occur adjust your monitor The monitor information is saved after the monitor is adjusted P8 Input signal identification is performed on the basis of horizontal frequencies vertical...

Страница 35: ...D AT series How to Install Driver 1 2 3 2 3 Select the OS of the PC 4 Acceptable operating software Windows2000 WindowsXP WindowsVista Windows7 Install the software included in the accessory CD ROM Refer to the user s guide included in the CD ROM in details The installation menu automatically appears after the accessory CD ROM is inserted to the CD drive with Windows2000 WindowsXP WindowsVista Win...

Страница 36: ... and click Install to start installation of the driver files When the installation is complete click Close 5 6 7 8 Before installing the touch driver click User s Guide to read through the instructions If the driver does not operate properly immediately after its installation restart the PC 6 7 5 8 ...

Страница 37: ...he case When installing this device it is necessary to ensure spacing see below between other devices in order to improve ventilation inside of the case Furthermore ensure an ambient temperature of 55 C or less 3 Display installation angle The display should always be attached vertically If installing at an angle ensure that the tilt does not exceed 30 Do not use the display facing upwards or down...

Страница 38: ...o fix the monitor Tightening torque 62 83 5 N cm After fixing all of the points confirm that any clearance is not found between a housing and waterproof ing packing The environmental protection proof performance of equivalent to IP65 may not be secured when a clearance is found Secure the three locations at the top and bottom and two locations on the left and right for equivalent to IP65 Before co...

Страница 39: ...f the main body without the transparent protection film Please check the waterproof packing regularly When there is the deterioration such as breaking the crack an environmental protection measure function IP65 equivalency falls machine might be damaged according to your environment Please contact your supplyer about the waterproof packing exchange Transparent protection film Environmental protect...

Страница 40: ...9 2 Check to make sure that your PC and equipment should be connected completely and correctly Power indicator is lit in ORANGE 1 Power management function may be operating To release it touch the screen on LCD panel press a key on the keyboard or move the mouse P10 2 Check to make sure that the signal cable should be completely and cor rectly connected 3 The PC connected with the monitor should b...

Страница 41: ... its input sig nal is switched In such case your equipment has no problem 7 Touch panel does not respond 1 The controller located within the monitor may not respond for initialization for approx 10 seconds soon after its power is turned on Allow more than 10 seconds for optimum performance 2 Check to make sure the connection cable for touch sensor should be con nected completely and correctly 3 Yo...

Страница 42: ...ent product failure Use a soft cloth when cleaning If the monitor is too soiled soak a cloth in water and give it a wring before cleaning Finish it with a dried soft cloth finally Avoid using any cleaning solution or glass cleaner Annual cleaning of the monitor inside is recommended Contact your supplier to have the monitor inside cleaned Periodic cleaning will prevent causing fire and any failure...

Страница 43: ...tance Approx 3 5kg Contrast Brightness Color Adjustmet Screen Adjustment OSD Adjustment Monitor Information This device has been manufactured as a multi purpose product for use in general industrial applications and so on and has not been designed or manufactured for use with devices or systems that may represent a danger to human life Please contact a member of our sales staff if considering cust...

Страница 44: ...40D871118A10 http www mee co jp ...

Отзывы: