10 MEDLINE
|
MDS806150N | PIC-00270 (Rev: 07-19-16)
1-800-MEDLINE (633-5463)
|
medline.com 11
General use Instructions
Safety Lap Belt Use
The lap belt is provided to help the rider be safe and well positioned in the wheelchair. The lap belt should be initially fitted by a qualified
healthcare professional or dealer. While sitting back in the chair, it should be adjusted to be sufficiently tight around the rider’s pelvis to keep
from sliding down without causing discomfort. There should be sufficient room to slide a hand between your body and the belt. Adjust belt so
that it buckles in the front.
Warning:
• The lap belt should be checked each time used for proper fit. A loose lap belt could cause the user to slip between the belt and seat and risk
suffocation or serious injury.
• Check belt and hardware regularly to be sure it is securely attached and not frayed. Replace belt if worn or torn.
Anti-Tippers
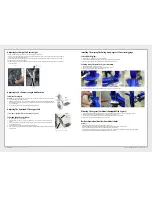
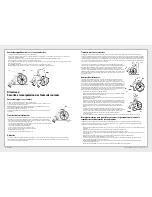
• Rear anti-tippers help keep the chair from tipping and are recommended attachments for additional safety (Fig 7). The use of anti-tippers is
required on Excel Recliner models.
Warning On Use Of Anti-Tippers:
• Anti-tippers must be fully engaged. Ensure the release button of the anti-tipper fully protrudes out of the hole on the bottom of the
wheelchair frame.
• Ensure both anti-tippers are adjusted to the same height.
• A 1.5-2” clearance between the bottom of the anti-tipper wheels and the ground/floor must
be maintained at all times.
Installing Anti-Tippers (Included With Recliner Models)
1.
Depress the release buttons (Fig 8) and insert the anti-tippers with the anti-tipper wheels
pointing toward the ground/floor into the wheelchair frame tubing.
2.
Ensure that the release button of the anti-tipper fully protrudes out of the hole in the
bottom of the wheelchair frame tubing.
3.
Adjust anti-tippers as necessary making sure there is a 1.5-2”/38-50 mm clearance to the
ground.
Important Notes:
There are potential finger pinch point areas at moving parts and between the seat frame and
the seat cradles on some models. When opening the wheelchair, take care not to place your
hand or fingers between the seat frame and the seat cradles (if present) or on any other moving parts.
ALWAYS keep hands and fingers away from moving parts. DO NOT sit in the wheelchair until the seat is completely in the open position. Risk of
injury may occur if care is not taken.
Opening And Folding The Wheelchair
To Open The Chair
1.
Hold onto one armrest and push the opposite side to open the chair.
2.
With your fingers and thumbs pointed towards the inside of the wheelchair, push downward on the seat to ensure the wheelchair is fully
open. Make sure the seat tubing rests completely inside the seat cradles (if equipped).
CAUTION:
Pinch points exist. Keep hands and fingers away from any moving parts.
Alternative Method To Open The Chair:
1.
Tilt the chair to one side by grasping the hand grip or arm nearest to you.
2.
With fingers pointed away from the seat rail, push down on one side of the seat frame / rail until the wheelchair is fully open. Keep hands
and fingers away from any moving parts.
Recliner Models Only:
3.
Secure the stabilizer bar (Fig 9). The bar should already be attached on the left side
of the chair. Push the notched part of the stabilizer bar flush with the stabilizer bar
connection on the right back cane and hand tighten the triangular thumb screw.
4.
Keep push canes even at all times.
To Close / Fold The Chair
(Recliner Models Only) First, loosen the thumb screw on the right side of the stabilizing
bar. Swing the stabilizing bar down and to the left side.
1.
Ensure the swing-away leg or footrests are in the forward and locked position.
2.
Fold the footplates up to the vertical position.
3.
Using both hands, grasp the center of the seat upholstery at the front and back edge
and lift the seat up.
Alternative Method To Close The Chair:
1.
Ensure the swing-away leg or footrests are in the forward and locked position.
2.
Fold the footplates up to the vertical position.
3.
Grasp the handles/straps on each side of the seat.
4.
Pull up until the chair is fully closed.
Wheel Locks
Push forward toward front of chair to lock.
Wheel Lock Warnings
Check the wheel locks to ensure proper function before using the chair. Wheel locks should embed into the wheel at least 1/8”/3.2 mm
when engaged.
Engage the wheel locks on both wheels before entering the chair, leaving the chair, leaning forward in the chair or while being transported
in an elevator or a wheelchair lift.
Check to make sure that the legrests do not unlock the wheel locks when they are swung back.
DO NOT
use the wheel locks to stop the wheelchair from moving. Wheel locks are not brakes.
DO NOT
use the wheel locks to slow your
descent down an incline.
Fig.9
Stabalizer
Bar
Fig. 8
Release
Buttons for
Height
Adjustment
Fig. 7
Anti-Tipper
Содержание Excel 2000 Extra Wilde
Страница 26: ......


