15
Basic Maintenance
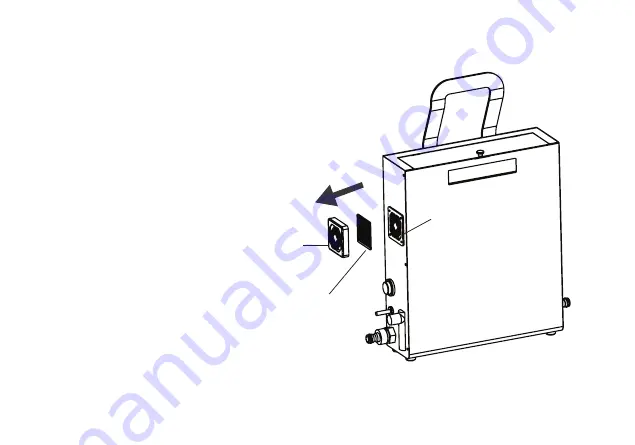
Cleaning the Fan Filter1. Turn off the AC power outlet. Make sure the light at the ON/OFF Button is not lit.
2. Remove the Fan Filter by pulling out the Filter Cover.
Filter mesh
Filter cover
Fan
Страница 1: ...O3 HYDRO 5 O3 HYDRO 5 USER MANUAL...
Страница 2: ...1 Safety Precautions 2 Device Identification 3 System Overview 4 Getting Started 5 Basic Maintenance 1 3 7 8 15 TABLE OF CONTENT...
Страница 3: ...the plug or cutting the power cable in any way will immediately cause the Warranty to become void Any subsequent fault in the operation of the device will not be covered by the Warranty and repair an...
Страница 4: ...on or electronic equipment This is to minimize the possibility of interference with the equipment or the remote controller 2 Do not cover the device in any way at all particularly the ventilation hole...
Страница 5: ...ilter Functional parts Air Dryer Chamber Fan Filter ON OFF Button Water Outlet O2 Control Removes moisture from the air supply before it goes into the ozone module Filters dust from entering the fan a...
Страница 6: ...ntification Functional parts Water Inlet Base Support Water supply flows into here Attach to give better stability to the device Air Ventilation Holes Water Inlet Base Support Medklinn O3 Hydro 5 Righ...
Страница 7: ...ro 5 Accessories Hose 1 Functional parts Hose Outlet Hose Quick Plug Female Hose Outlet Focuses the spray pattern of the water Quick Plug Female Secures the hose to the water source and or device Devi...
Страница 8: ...6 Functional parts Device Identification Quick Plug Female Secures the hose to the water source and or device Medklinn O3 Hydro 5 Accessories Hose 2 Quick Plug Female Hose Quick Plug Female...
Страница 9: ...tes bacteria viruses and mould Removes and prevents biofilm build up Dissolves oil and grease When the Medklinn O3 Hydro 5 operates the air is drawn into the air dryer chamber which dries the air The...
Страница 10: ...ale to the water source pipe with male threaded end NOTE Make sure that there is enough Teflon tape when attaching the Quick Plug Male to the threaded end of the pipe to avoid leakage at that point Qu...
Страница 11: ...secure the connection There should be a click sound when the Quick Plugs are secured together Pull the hose gently to confirm that the connection is indeed secured 3 Connect the other Quick Plug Femal...
Страница 12: ...10 To a water tap 1 If you have a water tap please remove one end of the Hose 2 Quick Plug Female by loosening the cap 2 Pull out the Quick Plug Hose 2...
Страница 13: ...the hose clip with a screwdriver Ensure it is tight so that water will not leak out when the tap is turned on 4 Connect the other Quick Plug Female of Hose 2 to the device s Water Inlet 5 Connect the...
Страница 14: ...1 1 5 lpm Getting Started Turn on the device 1 Plug the power inlet to the AC power supply 2 Connect both hoses provided to the device Refer to Getting Started Connecting the hose page 8 3 Turn on th...
Страница 15: ...screws to the wall NOTE Leave a distance of 1 5 cm screw length from the wall Do not screw all the way in The length allows the device to be hooked on safely 2 Hook the Medklinn O3 Hydro 5 mounting sl...
Страница 16: ...14 1 Remove the 4 pieces of M4 screws from the device 2 at the back 2 at the bottom 2 Align and secure the Base Support to the device using the same 4 screws Option B Table top M4 screws Base Support...
Страница 17: ...ic Maintenance Cleaning the Fan Filter 1 Turn off the AC power outlet Make sure the light at the ON OFF Button is not lit 2 Remove the Fan Filter by pulling out the Filter Cover Filter mesh Filter cov...
Страница 18: ...n Filter once a month or when it is clogged up with dirt dust which may block the Fan from functioning A clogged up filter will damage the fan Filter Mesh Filter Cover 3 Brush the Filter Mesh with a s...
Страница 19: ...17...
Страница 20: ......