background image

64 of 82

21.   Special  CleanUp   Function

The CleanUp function serves the targeted deletion of data, without using a PC. 

PLEASE NOTE!

Please use this function very carefully, because it is possible for data to 
be deleted that can only be entered again manually afterward.

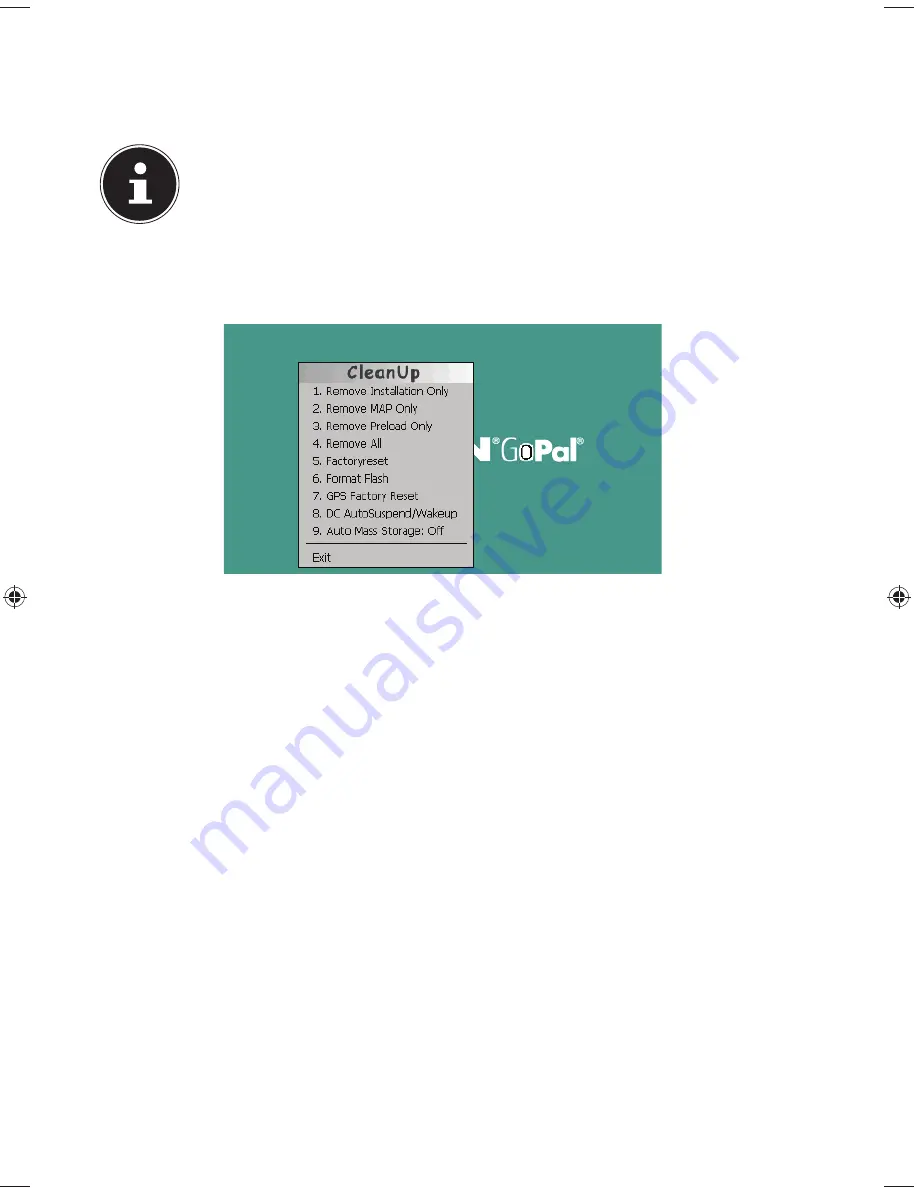
The CleanUp function is activated when the ‘o’ is pressed in the Gopal lettering of 
the Main Menu, immediately after the start tone following a reset. 

The CleanUp function offers different options:

1. Remove Installation Only

Removes the software installed from the ‘

My Flash Disk’ 

memory [= part of the permanent memory in which the executable parts of the 
navigation software will be located following the initial alignment (\My Flash Disk\
Navigation)].

2. Remove MAP Only

Removes the digital maps from the ‘

My Flash Disk’

 memory (\My Flash Disk\

MapRegions).

3. Remove Preload Only

Removes the data needed for the installation of the navigation software from the 
permanent memory (\My Flash Disk\Install).

4. Remove All

Deletes the whole contents of the ‘

My Flash Disk’

 memory. It will not be necessary 

to recalibrate the screen after this function has been carried out.  

5. Factoryreset

Sets the device back to the delivery status in the case of an intact main installation.  

6. Format Flash 

Formats the internal ‘

My Flash Disk

’ memory. This formatting can be necessary 

in the case of a prolonged removal of errors. It will be necessary to recalibrate the 
screen after the formatting function has been carried out. All data will be deleted 
from the internal ‘

My Flash Disk

’ memory irrevocably.

E4x70 Generic EN Gopal 7.0 Final Content.indd   64

E4x70 Generic EN Gopal 7.0 Final Content.indd   64

12.12.2012   14:16:16

12.12.2012   14:16:16

Содержание GoPal E4x70

Страница 1: ...10 92 cm 4 3 Navigation System MEDION GoPal E4x70 Instruction Manual...

Страница 2: ...10 Battery Operation 10 2 11 Maintenance 11 2 12 Care of the Display 11 3 Supplied Items 12 4 Views 13 4 1 Front Components 13 4 2 Back Components 14 4 3 Top Components 14 4 4 Left Components 15 5 In...

Страница 3: ...Screen 45 13 2 Select a Title and Move it into the List of Favourites 46 13 3 List of the established bookmarks 47 14 Picture Viewer optional 48 14 1 Operating the Picture Viewer 48 14 2 Main Screen 4...

Страница 4: ...m TMC optional 71 25 Working with Memory Cards 72 25 1 Inserting Memory Cards 72 25 2 Removing Memory Cards 72 25 3 Additional Card Material 73 26 FAQ 75 27 Customer Service 76 27 1 Faults and Possibl...

Страница 5: ...ogically advanced navigation system which is both practical and enjoyable to use Service Our customer care is there to provide support and assistance whenever you have questions or are experiencing pr...

Страница 6: ...nty card 1 1 Symbols and Key Words Used in these Instructions DANGER Warning of immediate risk of fatal injury WARNING Warning possible mortal danger and or serious irreversible injuries CAUTION Warni...

Страница 7: ...rmation Any other use is deemed improper and can cause personal injury or damage to the product Do not use the device in extreme ambient temperatures and conditions 1 3 Information about Conformity Th...

Страница 8: ...should pass on these instructions Never open up the housing of the appliance This contains no user serviceable parts If the housing is opened there is a danger of electric shock Please operate your n...

Страница 9: ...iability for data loss or damage to data storage units and no claims will be accepted for damages resulting from the loss of data or consequential losses 2 5 Operating Environment Failure to follow th...

Страница 10: ...ith this appliance For optimal performance maintain a distance of at least 10 ft from sources of high frequency and magnetic interference televisions loudspeaker systems mobile telephones etc This wil...

Страница 11: ...he plug when connecting the cables and plugs Do not permit any great forces to be exerted on the plug connections from the side for example This will lead to damage in and to your device if you do so...

Страница 12: ...We recommend using a display protection film mylar to prevent scratching of the screen Please contact your nearest dealer for this accessory The plastic on the display at delivery is purely for prote...

Страница 13: ...ward to us all claims for missing items within 14 days from the date of purchase The package should include the following Navigation system Power cable for cigarette lighter Car holder and cradle USB...

Страница 14: ...ator is fully charged 2 Touch Screen Displays the output of your appliance Tap on the screen with your finger a stylus or a blunt tip to select menu commands or enter data CAUTION To avoid damaging th...

Страница 15: ...lays back music language statements and warnings 4 3 Top Components 5 Ref Component Description 5 On Off button Turn the device on or off by pressing and holding the On Off button You will switch to t...

Страница 16: ...ot with cover Accepts an optional memory card for removable storage 7 Mini USB Connector Connection to external power supply as well as connection for connecting to a PC by means of the USB cable for...

Страница 17: ...rs The charging status LED will shine constant green if the battery has a high level of charge Leave the device charging for 20 further minutes to ensure the battery is fully charged The navigation sy...

Страница 18: ...rging process if possible during the initial charge PLEASE NOTE The brightness will be adjusted downwards if necessary if a USB connection is being set up when the device is switched on It is recommen...

Страница 19: ...dministering navigation destinations general instructions for use etc are described here among other aspects You will start the Settings assistant for the configuration of the basic settings of your n...

Страница 20: ...19 of 82 5 3 1 Main Views You will find an overview of the different main views of the Main menu here Button Description Main Screen Viewing maps Navigation menu Extras Settings...

Страница 21: ...ld the On Off key 3 sec to completely switch off the device No data will be lost as data is stored in the internal memory The starting process will only last slightly longer Your navigation system wil...

Страница 22: ...in the standby mode To switch off your navigation system briefly press the On Off switch The following screen will appear You have three possible choices Button Description Cancel Back Return to prev...

Страница 23: ...word A keyboard will appear Enter a password with it PLEASE NOTE The password must consist of at least 4 symbols Use a combination of letters A Z and numbers 0 9 Keep the password in a safe place Conf...

Страница 24: ...u have entered the password and the information note successfully Button Description Set here whether the device should request the password after a hard reset Set here whether the device should reque...

Страница 25: ...tion will appear on the display after you have confirmed the settings PLEASE NOTE Record this data in your Operating Instructions and keep them in a safe place You will need this information if you ha...

Страница 26: ...l appear Button Description Change the password or the information text Authentication settings see page 23 Making settings Display SuperPIN and UUID see page 24 Reverses the complete security functio...

Страница 27: ...LEASE NOTE The password will be displayed in the form of small stars Click on the question symbol to have the information note displayed if you have forgotten the password and need the Help setting Cl...

Страница 28: ...used in order to reorganise the memory In doing so all programs that are running are interrupted and the working memory is reinitialised You can carry out two different Reset procedures with your dev...

Страница 29: ...nsumption of energy can be kept as low as possible through this All the data in the temporary memory will be lost if the device is switched off completely hard reset To switch your navigation system o...

Страница 30: ...lay when it is safe to do so and driving conditions allow PLEASE NOTE The use of devices that warn for traffic monitoring systems like speed traps is prohibited in some countries like Germany Ireland...

Страница 31: ...in a Vehicle Take care that the holder does not present any risk to safety even in the case of an accident when installing it Take care that the cable does not impede any safety components The display...

Страница 32: ...s not impede the view Only use the car holder with the navigation device inserted in order to prevent hazards Snap in lever similar picture PLEASE NOTE Your navigation device can also be equipped with...

Страница 33: ...cable into the corresponding receptor of your navigation system s Insert the power adapter into the cigar lighter socket ensuring that it will not lose contact while driving This could cause a malfunc...

Страница 34: ...according to the version Tap on on the screen for entering the destination Enter the destination address Confirm your entry by clicking the symbol to start the navigation After a short time if the sa...

Страница 35: ...unction for traffic monitoring points has been installed Confirm with if you want to use navigation with the warning function for traffic monitoring points Tap on the Configure special functions inter...

Страница 36: ...make the settings for the radar fixes Here you have the option of having the traffic monitoring points represented on a map or faded out You can also set whether you would like to be informed by acous...

Страница 37: ...ndicated by a bar indicating closeness left lower edge of the display Sample view if map presentation has been activated PLEASE NOTE Please pay attention to the fact that traffic monitoring points are...

Страница 38: ...ntry Aside from the commands listed below you can also use those words printed in the speech bubbles for operating the device using voice control Range of validity Command Always applicable abort canc...

Страница 39: ...utes traffic jam congestion information situation info conditions Traffic conditions current position destination area overview Start point Start Starting point Volume settings Volume click sounds low...

Страница 40: ...ew direction changes display show 2 D two dimensional view map perspective display show view orientation in direction of travel motion driving direction Map optimised optimise map map orientation opti...

Страница 41: ...n the Operating Instructions of your mobile phone 12 1 Starting the Bluetooth Application Tap on Bluetooth Dialer PLEASE NOTE The function for active use will have to be reactivated first if Bluetooth...

Страница 42: ...the navigation device and the mobile phone Bluetooth Activate or deactivate the Bluetooth function Call announcement Switch on and off for the announcement of the telephone number contact in the case...

Страница 43: ...avigation device You will be requested to enter a 4 digit PIN code This is 1 2 3 4 for your navigation device Then the connection must be accepted by one or several confirmation messages on your mobil...

Страница 44: ...telephone number or the contact from the Phone Book will be read out initially in the case of an incoming message Then you will be able to return to the previous view by means of or to have the messa...

Страница 45: ...44 of 82 12 7 During a Call Button Description End call Mute for microphone and volume settings Return the conversation to your mobile...

Страница 46: ...en Button Description Reduces the screen brightness to a minimum to save electricity Determine add bookmarks or Increase or decrease the volume The display in the upper right corner of the screen will...

Страница 47: ...including all sub directories Tap on in order to mark all titles currently in view Tap on to delete all marks within a directory The selected titles will be indicated by a Tap on in order to confirm...

Страница 48: ...th in order to take over the new selection into the List of Favourites 13 3 List of the established bookmarks You will reach the list of the established bookmarks by clicking on the symbol You will de...

Страница 49: ...the Picture Viewer Start the Picture Viewer from the menu Extras by tapping on the Picture Viewer button Alternatively the Picture Viewer can also be started from the navigation software itself 14 2...

Страница 50: ...of the screen in the full image view in order to activate the service strip Fig Full image view with service strip Button Description Turn it clockwise by 90 in stages Fade in grid Previous picture S...

Страница 51: ...mage The image displayed will be subdivided into 6 fields by tapping on the symbol fade in grid Fig Full image mode with grid Tap on a square in the grid to zoom in on that area of the picture Fig Zoo...

Страница 52: ...urope such as sights restaurants culture and travel information Start the Travel Guide from the menu Extras by tapping on the Travel Guide button 15 1 Overwiev of the Main Screen Select initially the...

Страница 53: ...ftware as the destination Button Description Previous image Address Shows the address of the selected category Pictures Shows the available images in the selected category Navigate Tap on this control...

Страница 54: ...l About the Where am I function Receive information about your current location insofar as a GPS signal is available Tap in Extras one Where am I In order to add the current location to your favourite...

Страница 55: ...ts system and contains tips for environmentally friendly driving behaviour Eco tips 17 1 Overwiev of the Main Screen Tap in Extras on Eco Expert You will find a current overview under Eco points today...

Страница 56: ...points score at any time by tapping on the Reset points button You can display the statistics for the last 30 days via the option Eco points last 30 days Tap on Settings on the main screen to amend th...

Страница 57: ...minder during the current navigation 18 1 Overview of the Main Screen This view will appear if you have not yet set up a waking time Enter an alarm time in the 24 hour format and confirm your entry wi...

Страница 58: ...ill be located in the upper right corner of the screen You can adjust it as follows Tap on in the main screen The following screen will appear Tap on to change the time setting PLEASE NOTE The system...

Страница 59: ...larm sound and confirm the selection with Tap on the corresponding file in the Memory Card directory if you would like to select an alarm tone from the storage card and confirm again with Select the d...

Страница 60: ...st the volume of the alarm signal by tapping on the interface PLEASE NOTE The volume configured here only relates to the alarm signal and will not change the volume of the language output of the navig...

Страница 61: ...function End the snooze function in order to be woken again on the following day at the set time Exit the alarm display by clicking on You will then be returned to the view shown before the display f...

Страница 62: ...t only appear once in each section at the same time Each number must only appear once in each row and column Some number fields will already have been populated prior to the start of the game 19 1 Mai...

Страница 63: ...ame 19 3 Overview of the Game Field 19 3 1 Description of the Control Buttons Button Description Strip of numbers to be entered Strip for the selection of the numbers to be entered in the number field...

Страница 64: ...nge of basic information about the traffic regulations of the respective country and its emergency numbers by means of the switch in the Extras menu Select the required country to have the information...

Страница 65: ...he initial alignment My Flash Disk Navigation 2 Remove MAP Only Removes the digital maps from the My Flash Disk memory My Flash Disk MapRegions 3 Remove Preload Only Removes the data needed for the in...

Страница 66: ...ff when the ignition is switched off The AutoSuspend function will be activated several seconds after the discontinuation of the external power supply and the Standby display will appear for the time...

Страница 67: ...l automatically be set to the mass storage mode Exit Leaving the CleanUp function and restarting the device like reset PLEASE NOTE The deletion of the data must be confirmed before the action actually...

Страница 68: ...will be automatically installed After successful installation your device will be listed in Windows Explorer under the item portable devices ATTENTION Important files can be overwritten or changed dur...

Страница 69: ...rage mode You will be able to use your navigation device as a detachable device e g a USB stick in the Mass Storage mode Two drives the internal memory of the navigation system itself and the optional...

Страница 70: ...connect your navigation system to the PC The program will check whether the device is one with which a partnership has been entered If this is the case the changes that have taken place on the PC and...

Страница 71: ...he navigation The GPS receiver consumes additional power This is especially of concern when running on batteries To conserve power do not turn on the GPS receiver unnecessarily Also terminate the navi...

Страница 72: ...na within the cable TMC can only be received if the car adapter is connected 24 1 Premium TMC optional If your navigation system features premium TMC you will obtain more accurate TMC information prov...

Страница 73: ...ging or in another safe location PLEASE NOTE Memory cards are very fragile Take care not to dirty the contacts and not to force the card 25 2 1 Accessing Memory Cards The appliance only supports memor...

Страница 74: ...he file with the psf ending out of the Directory of the region that you require to the MapRegions Directory on your memory card from the CD DVD You can transfer several files with map material to your...

Страница 75: ...can be manipulated as in Windows Explorer The required directory must have been stored in order to make the installation files and the map material for the device available Deposit the INSTALL directo...

Страница 76: ...g the Help option as additional assistance These aids will be provided to you while you are using the computer or the device What do I need the accompanied CD DVD for The CD DVD contains the ActiveSyn...

Страница 77: ...TION If as a result of an unforeseeable combination of operating steps faulty data transfer or electrostatic discharge the navigation system or the card reader can no longer be operated switch off the...

Страница 78: ...customer service for advice When passing through baggage control at airports it is recommended that you pass the appliance and all magnetic storage media external hard drives through the X ray system...

Страница 79: ...ax Battery Li Ion 3 7 V Memory card type Micro SD Bluetooth optional Class 2 USB interface USB 2 0 Dimensions approx 123 mm x 79 mm x 15 mm Gewicht inkl Akku approx 140 g without packaging Temperature...

Страница 80: ...installation If this equipment does cause harmful interference to radio or television reception which can be determined by turning the equipment off and on the user is encouraged to try to correct the...

Страница 81: ...Call 44 Main screen 40 Main Screen 40 Making Calls 43 Starten 40 Starting 40 Bluetooth optional 40 C Cabling 10 Card reader 72 Care of the Display 11 CleanUp 64 Customer Service 76 D Data exchange 72...

Страница 82: ...Data Security 8 Electromagnetic Compatibility 9 Maintenance 11 Navigation 29 Operating Environment 8 Operational Safety 7 Transport 77 Security 22 Service Faults and possible causes 76 Hotline 76 Spee...

Страница 83: ...82 of 82...

Страница 84: ...on SN3 5JF Wiltshire United Kingdom Hotline 0871 37 61 020 Costs 7p min from a BT ladline mobile costs maybe higher Fax 01793 71 57 16 To contact us by email please visit the Service and Support secti...

Отзывы: