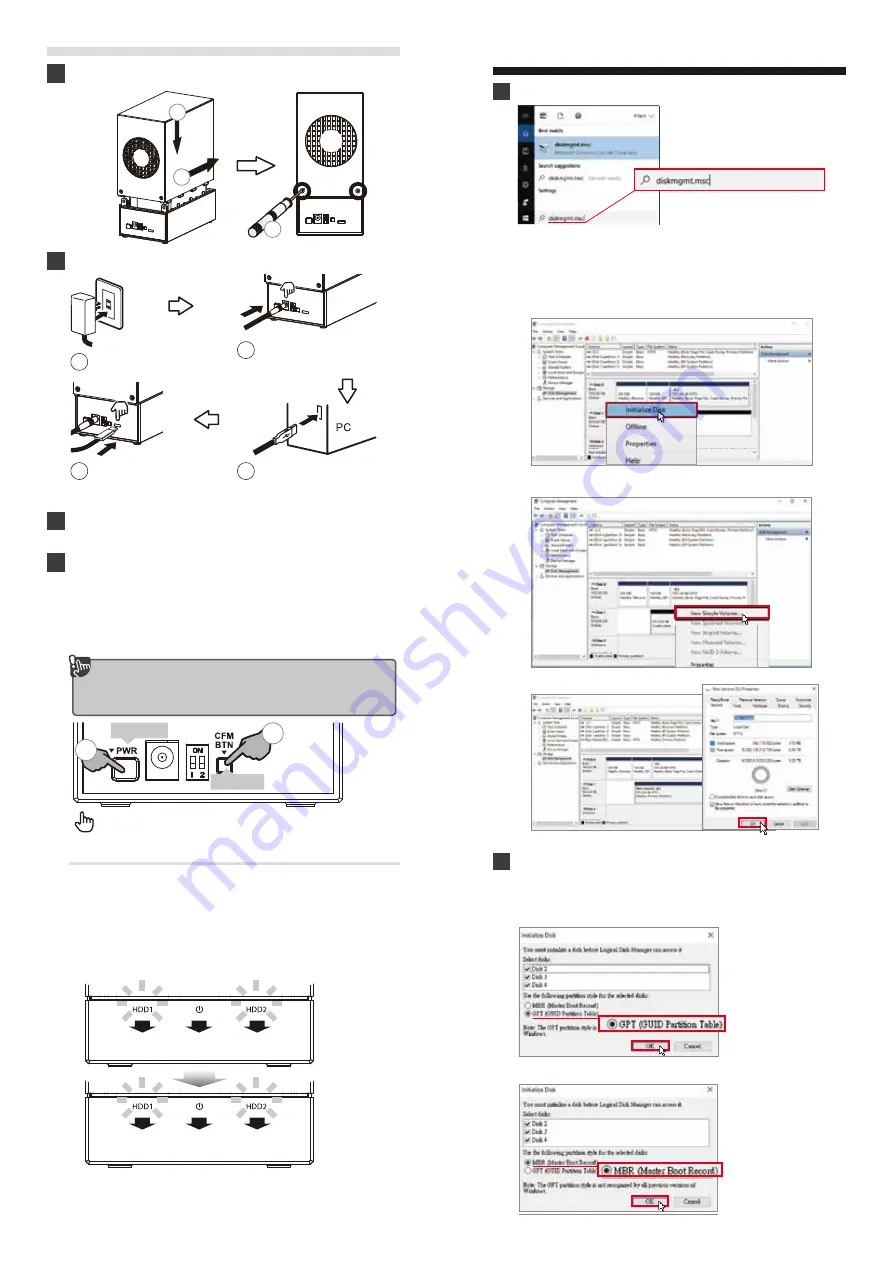
Initialization
1
Windows
If the HDD is uninitialized, you may have to initialize it
by doing steps as followed: At first click ''
Start
'',
''
Execute
'' on your PC and key in ''
diskmgmt.msc
''.
After that please press ''
RETURN
'' key.
1. Start disk initialization
2. Create new partition and format disk
3. HDD format completed
Please enable GPT if the total capacity is more than
2TB and enable MBR if the total capacity is less than 2TB.
Activate GPT if total volume is more than 2TB
Activate MBR if total volume is less than 2TB
2
Start disk initialization
C
. Keep holding on the Confirmation Button until
you see HDD purple indicator led flash.
Now you just need to partition and format the drives.
1
2
3
Close the cover and secure it with the screws removed
in step 1.
4
Make sure the PC is ON and ready to go,
then power on the device.
6
Plug in the adapter
1
Connect the USB cable
to the PC
3
Connect the DC power
cable to the device
2
Then, connect the other
side of the USB cable
to the device
4
Connect the cables in order.
5
A
. Make sure the enclosure is connected to a computer that is ON.
The setup procedures are as follows:
(HDD indicator : Blue)
(HDD indicator :
HDD purple indicator begins to flash)
B
. Set the dip switch at the back of the enclosure to the Mode/
RAID Mode you want to use. Press and hold the Confirmation
Button on the back panel, While holding the Confirmation
Button press the Power button. To set the mode you want to use.
There are 4 mode options for this device, Single,
JBOD(Spanning), RAID 0 and RAID 1.
The enclosure is not default to any of the above.
So If you just put hard drives in without setting a mode
to use, the enclosure will just turn off after
a few seconds of turning it ON.
7
The confirmation button is in the back,
so please find it first before you start.
CFM BTN: Confirmation Button
CFM BTN
PWR BTN
2
1
◎
Changing RAID mode may cause data lost,
backup your data before making changes.
◎
Default setting : Single


