background image

8

EN

Getting started

Readthissectiontolearnhowtostartusingthecam-

corder� This section covers basic functions such as

switchingon,insertingthebatteryandmemorycards,

and configuring preliminary settings� See later chap-

tersforadvancedfunctions�

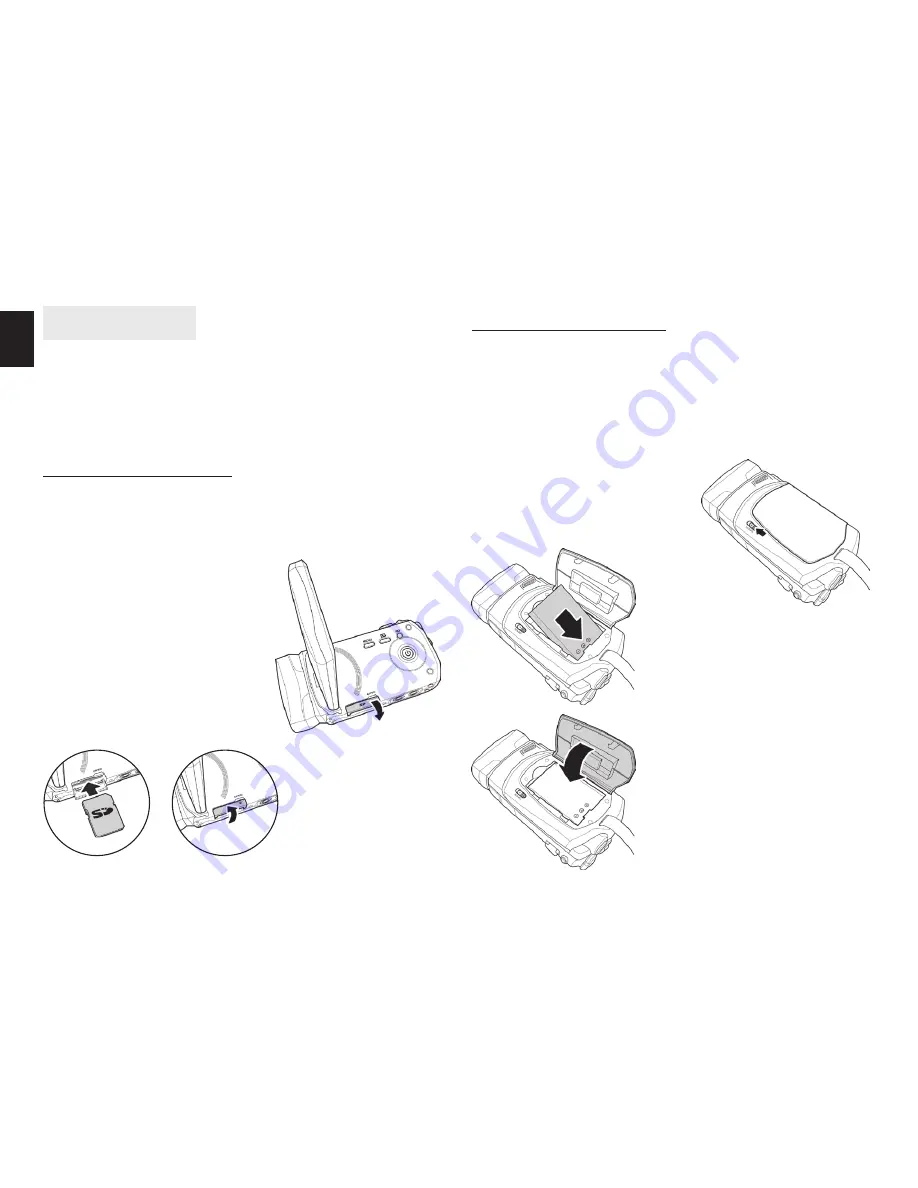
Inserting an SD card

AnSDcardcanbeinstalledinthecamcordertoprovide

additionalstoragespaceforstillimages,videoclips,or

otherfiles�

2� Insertthememorycard�We

recommend using a me-

mory card with a capacity

of1GBorhigher�

1� Open the SD card door as

shownintheillustration�

3� ClosetheSDcarddoor�

Inserting the battery

ThiscamcorderisdesignedtousearechargeableLi-ion

battery�Onlyusethebatteriessuppliedbythemanu-

factureroryourdealer�

Note: Install the battery exactly as described here. 

Installing the battery incorrectly could cause dam-

age to the camcorder.

2� Insert the battery� Make

sureand–sym-

bolsonthebatterylineup

with the + and – symbols

onyourcamcorder�

3� Closethebatterycover�

Note:  Make  sure  that  the 

battery cover is tightly clo-

sed to ensure proper opera-

tion.

1� Slidethebatterycover

 latchtoopenthebattery

 cover�

Содержание D-MENTION MT4038

Страница 1: ...User s Manual D MENTION COMPACT3DFULLHD1080pVIDEOCAMERA MT4038 ...

Страница 2: ...etup mode 10 Language 10 Date Time 11 Format 11 Default 11 Auto Power Off 11 Frequency 12 TV Standard 12 Beep 12 Using the Camcorder 12 Recording Videos 12 The Video Recording Screen 13 Video Mode Menu 14 White Balance 14 Resolution 14 Effect 15 Night Mode 15 Quality 15 Playback Videos 16 The Video Playback Screen 16 Deleting Videos 17 Protecting Videos 18 Autoplay Videos 18 Video Output 19 Shooti...

Страница 3: ...t least 2GB or greater available hard disk System requirements for 3D video playback Windows 7 Vista operating system Intel Core 2 Duo or AMD Athlon X2 CPU or higher NVIDIA GeForce 8 9 and 200 series 3D ready monitor 120Hz 3D vision kits Features The camcorder offers a variety of features and func tions including 3D and 2D video image shooting and playback 3 2 LCD 3D display Parallax barrier auto ...

Страница 4: ... Refer to the following illustrations to familiarize your self with the buttons and controls of this camcorder Front view Lens Lens Lens Head Led Light Speaker Zoom Button Tripod Mount Strap Shutter Button Top view Bottom view ...

Страница 5: ... Button Mode Dial Status Led Record Button USB AV Port Back view Right view Left view Battery Compartment Battery Cover Latch LCD Panel SD Card Compartment Microphone 3D Button Playback Button Menu Button Power Button ...

Страница 6: ...ding a video In Video Playback mode press to start and pause video playback Name Button Function Navigation Button In menu mode use the four way control to select items in the menu and press the middle but ton to confirm In Video or Camera mode Press the up down button to in crease decrease the EV settings Press the left button to quickly adjust White Balance Press the right button to turn the LED...

Страница 7: ... EN Operating the camcorder To turn on the power open the LCD panel or press the Power Button for one second Rotate the LCD panel so you can view pictures and movies Rotate the lens head to open the lens ...

Страница 8: ... a capacity of 1 GB or higher 1 Open the SD card door as shown in the illustration 3 Close the SD card door Inserting the battery This camcorder is designed to use a rechargeable Li ion battery Only use the batteries supplied by the manu facturer or your dealer Note Install the battery exactly as described here Installing the battery incorrectly could cause dam age to the camcorder 2 Insert the ba...

Страница 9: ...ight up for proper charging 3 After full charge the LED turns to green 4 Actual charging time depends on current battery ca pacity and charging conditions Turning on off the camcorder Press and hold the Power Button to turn the camcorder on off Note Closing and opening the LCD panel can power on off the camera Note For 3D video playback you need to use a 3D HDTV Connecting to TV AV Cable To view p...

Страница 10: ...t Before you start using the camcorder some basic set tings such as date and time language and beep func tion need to be configured Managing the Setup mode To select a menu in the Setup mode do the following 1 Adjust the Mode Dial to Setup mode to display the Setup mode screen 2 Use the Navigation Button to scroll through the op tions pages until the desired menu is highlighted Please see below fo...

Страница 11: ... automati cally sets to sleep mode to save power To adjust the Auto Power Off do the following 1 Use the left right Navigation Button to select X Disable the Auto Power Off function 1 min Auto Power Off after 1 minute 5 min Auto Power Off after 5 minutes 2 Press the middle Navigation Button to confirm Format The Format menu allows you to format your memory card or the internal memory when no memor...

Страница 12: ...allows you to turn the operation sound and button sound off or on Using the Camcorder Recording Videos To record a movie do the following 1 Rotate the lens head and flip open the LCD panel to turn on the camcorder 2 Adjust the Mode Dial to Video mode To adjust the video you may Press the 3D Button to switch to 3D or 2D mode 3D mode allows you to record videos with 3D effects 2D mode allows you to ...

Страница 13: ... size of each video recording is approximately 3 9GB The system will separate another file automatically and record the video until the memory is full The Video Recording Screen Icon Description 1 Indicates that the camcorder is in Video mode 2 Indicates the amount of zoom being used 3 Indicates the current White Balance mode 4 Indicates that night mode is enabled 5 Indicates the amount of battery...

Страница 14: ...ase do the following 1 Use the left right Navigation Button to select the de sired option Auto Select this option to let the camcorder set the white balance automatically Sunny Select this option for daylight filming Cloudy Select this option for filming in cloudy days Fluorescent Select this option for fluorescent light ing Tungsten Select this option for normal indoor light ing conditions 2 Pres...

Страница 15: ...Effect menu allows you to change the recording ef fect To set the Effect do the following 1 Use the left right Navigation Button to select the de sired option Natural Select it for color photography Sepia Select it for brown color effect Black and white Se lect it for black and white effect resolution the more memory space is required To select the resolution do the following 1 Use the left right ...

Страница 16: ... mode Adjust the Mode Dial to switch to Video mode if not 2 Press the Playback Button to open the Video play back screen 3 Press the left right Navigation Button to browse the recorded videos 4 Press the middle Navigation Button or Record But ton to playback the video To pause playback press the Record Button Press the middle Navigation Button to stop playback To adjust the volume press the Zoom B...

Страница 17: ...e the se lected video To delete all videos do the following 1 Press the Playback Button to enter Video Playback mode 2 Press the Menu Button to open the Video Playback menu screen 3 Use the left right Navigation Button to select then press the middle Navigation Button to confirm 4 Use the left right Navigation Button to select and then press the middle Navigation Button to delete all videos Note O...

Страница 18: ...ect unprotect more files use the left right Navigation Button to select other files then press the middle Navigation Button to protect unprotect the file Autoplay Videos The Autoplay function allows you to play each video clip in turn To start autoplay do the following 1 In Video mode press the Playback Button to enter the Video Playback mode 2 Press the Menu Button to open the Video Playback menu...

Страница 19: ...If you are viewing with a regular 2D TV the image will be displayed side by side Shooting Photos To shoot a photo do the following 1 Rotate the lens head and flip open the LCD panel to turn on the camcorder 2 Adjust the Mode Dial to switch to Camera mode 3 Press the Shutter Button to capture a photo To adjust the camera you may Press the 3D Button to switch to 3D or 2D mode 3D mode allows you to t...

Страница 20: ...being used 3 Indicates the total number of pictures 4 Indicates the current White Balance mode 5 Indicates that night mode is enabled The Camera Screen Camera Mode Menu To select a menu in the Camera mode do the following 1 Press the middle Navigation Button to open the Camera mode menu screen 2 Use the Navigation Button to scroll through the op tions until the desired menu is highlighted Please s...

Страница 21: ...his option for fluorescent lighting Tungsten Select this option for normal indoor light ing conditions 2 Press the middle Navi gation Button to con firm Resolution The Resolution menu allows you to set the resolution before you capture an image or a video The higher the resolution the more memory space is required To select the resolution do the following 1 Use the left right Navigation Button to ...

Страница 22: ... middle Navigation Button to confirm Quality The Quality menu allows you to set the image quality Higher quality images contain more details and there fore use more memory space To set the quality do the following 1 Use the left right Navigation Button to select Fine Select for higher image quality Normal Select for normal image quality 2 Press the middle Navi gation Button to con firm Playback Ph...

Страница 23: ...de press the Playback Button to enter the Photo Playback mode 2 Press the left right Navigation Button to select the photo you want to delete 3 Press the Menu Button to open the Photo Playback menu screen 4 Use the left right Navigation Button to select then press the middle Navigation Button to confirm 5 Press the middle Navigation Button to delete the se lected photo To delete all photos do the ...

Страница 24: ...utton to delete all photos Note Once deleted files cannot be recovered En sure the files are transferred to the computer or saved to another storage device Files that have been protected will not be deleted You have to unlock the files first before deleting them 2 Press the left right Navigation Button to select the photo you want to protect unprotect 3 Press the Menu Button to open the Photo Play...

Страница 25: ...enu screen 3 Use the left right Navigation Button to select then press the middle Navigation Button to confirm 4 Use the left right Navigation Button to select de sired option 2D You will see 2D photos on TV 3D You will see 3D photos on TV 5 Press the middle Navigation Button to confirm 1 In Camera mode press the Playback Button to enter the Camera Playback mode 2 Press the Menu Button to open the...

Страница 26: ...M Firmware Interpolation General Movie clips H 264 AVI 3D and 2D Movie WVGA 848x480 60fps 720p 30 60fps 1080p 30fps Zoom 3D 6 8X 2D 10X LCD monitor 3 2 color LCD monitor 320x480 pixels LED light Effective range 1M Mode On Off White balance Auto Sunny Cloudy Tungsten Fluorescent EV compensation 2 0 EV 2 0 EV Interface AV out NTSC PAL HDMI MSDC USB 2 0 high speed Shutter speed Video 1 15 1 2000 seco...

Страница 27: ...corder turns off while taking a picture The camera is running out of battery power Replace the battery The image is out of focus The subject is beyond focus range Please take a picture within the available focus range A black screen appears on the screen The EV setting may be set too high Adjust the EV setting on the camcorder Problem Possible Cause Solution Memory card cannot be used The memory c...

Отзывы: