background image

F6000

User Guide

I. Product Overview

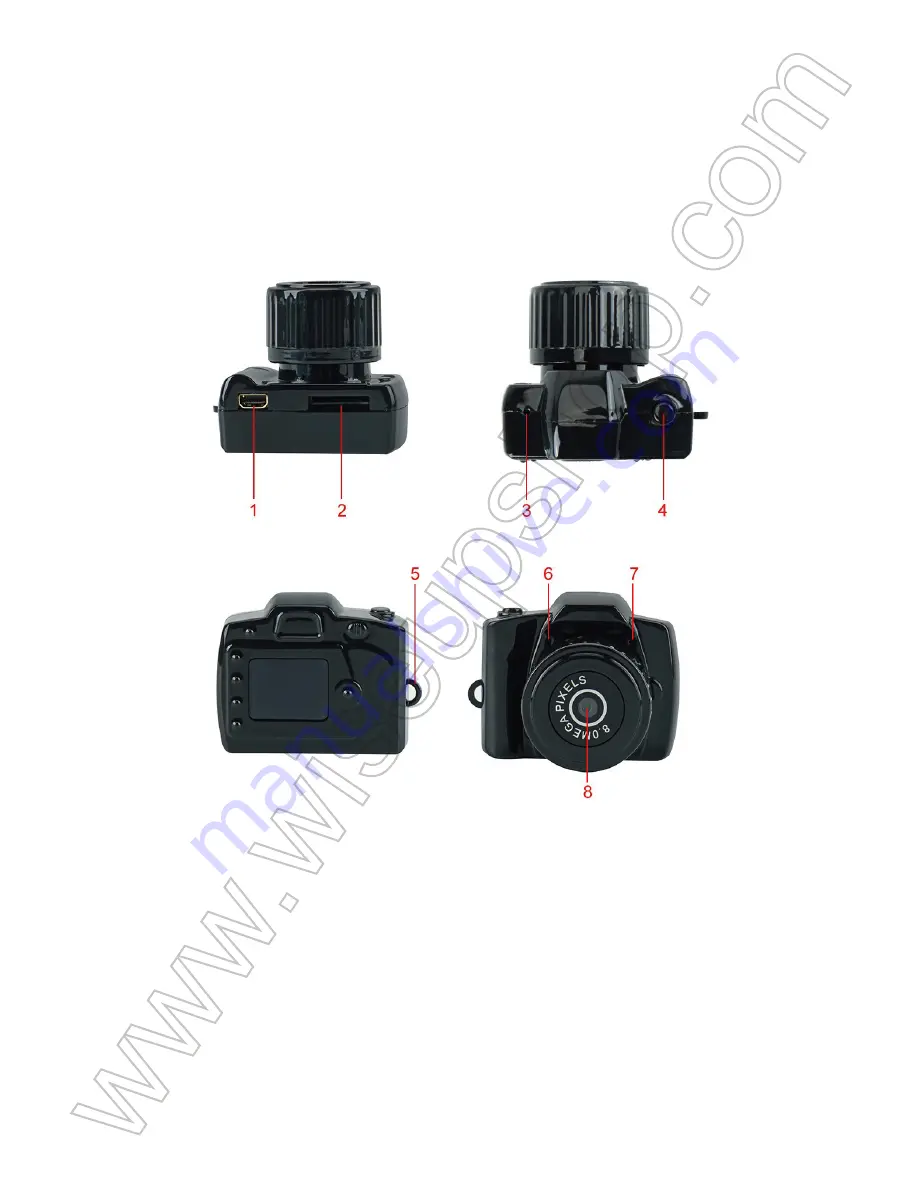
1. Mini USB Port
2. Micro SD Card Slot
3. Microphone
4. Power/Camera/Video Recording Button
5. Lanyard Hole
6. Reset Button
7. Blue Indicator Light
8. Camera Lens

II. What’s in the Box

-1× Mini Camcorder
-1× USB Cable
-1× AC110-240V to DC 5V Power Adapter
-1× 8GB Micro SD Card (fitted into the Micro SD card slot already)

III. Operation

>> Please make sure your mini camcorder is fully charged before using.
>> Please make sure the Micro SD card has been formatted already and is securely fitted 
into the camera’s SD card slot, or it will not work. We recommend you use a SDHC Class 
10 Micro SD card.

[Note]:

 If no Micro SD card is fitted into the camera, the camera will shut down automatically. 

The blue indicator light will be illuminated for 5 seconds then turn off.

3.1. POWER ON/OFF

3.1.1. Power on the camera by pressing the Power Button for 2 seconds. The blue 
indicator light will be illuminated, indicating the camera has entered into standby mode 
automatically.
3.1.2. Power off the camera by pressing the Power Button for 3 seconds. The blue 
indicator light will flash 3 times and then turn off.

[Note]:

 The camera will shut down automatically if it is in standby mode without any operation 

more than 1 minute.

3.2. VIDEO RECORDING

3.2.1. Power on the camera by pressing the Power Button for 2 seconds. The blue 
indicator light will be illuminated, indicating the camera has entered into standby mode 
automatically.
3.2.2. Press the Video Recording Button for 2 seconds to start video recording. The blue 
indicator light will flash 3 times quickly and keep flashing slowly.
3.2.3. Press the Video Recording Button once to stop video recording. The blue indicator 
light will flash twice quickly and then stay on, indicating the camera is back to standby 
mode.

[Note]:

1). A video clip will be generated and saved every 30 minutes automatically.

2). The mini camcorder can record video for 80 minutes continuously on a full charge.

3). Video Resolution: 1280x720P                                  Video Format: AVI

4). If the battery is low, the camera will save all video files then shut down automatically. The blue 

indicator will be illuminated for 3 seconds then flash twice and turn off.

5). If the memory is full during the video recording process, the camera will save all video files 

and then shut down automatically. The blue indicator light will flash 3 times and turn off, then it 

will be illuminated for 1 minute and turn off.

3.3. CAMERA/STILL PHOTOGRAPHY

3.3.1. Power on the camera by pressing the Power Button for 2 seconds. The blue 
indicator light will be illuminated, indicating the camera has entered into standby mode 
automatically.
3.3.2. Press the Camera Button once to take a photo. Every time you take a photo, the 
blue indicator light will flash once.

IV. Video/Image File Uploads

4.1. Using the USB Cable

4.1.1. Power off the camera, connect it to a proper PC computer USB port using the USB 
cable attached.
4.1.2. The camera will be recognized as a removable disk drive.
4.1.3. All the files can be accessed in the drive.

4.2. Using a Card Reader

4.2.1. Power off the camera, remove the Micro SD card and then insert it into a card reader.
4.2.2. Insert the card reader into a proper PC computer USB port.
4.2.3. The Micro SD card will be recognized as a removable disk drive.
4.2.4. All the files can be accessed in the drive.

V. Setting Time/Date Stamp

5.1. Power off the camera and connect it to your PC computer using the USB cable 

provided.
5.2. Removable disk drive folder appears.
5.3. Click on the drive in the root directory and inside root directory, create a txt file named 
“time.txt”.
5.4. Write the current date and time in the “time.txt” file with the correct format:
YYYY/MM/DD HH:MM:SS (For example: 2017/03/14 14:24:32). Save this file.
5.5. Restart the camera and the system will upgrade the program automatically.

VI. Charging

6.1. Power off the camera, connect it to an outlet AC power supply using the USB cable 
and power adapter provided.
6.2. The blue indicator light will keep flashing during the charging process.
6.3. It will take 80 minutes to obtain a full charge.
6.4. The blue indicator light will be illuminated when the camera is fully charged.

VII. Resetting

If for any reason, the camera stops responding or isn’t working properly, a quick reset will 
restore it back to normal operation.

Operation:

 When the camera is powered on, use a pin to press the Reset Button once; 

the camera will shut down automatically. Now you can restart the camera with the factory 
default settings.

Содержание F6000

Страница 1: ...F6000 User Guide I Product Overview 1 Mini USB Port 2 Micro SD Card Slot 3 Microphone 4 Power Camera Video Recording Button 5 Lanyard Hole 6 Reset Button 7 Blue Indicator Light 8 Camera Lens ...

Страница 2: ...ndicator light will be illuminated indicating the camera has entered into standby mode automatically 3 1 2 Power off the camera by pressing the Power Button for 3 seconds The blue indicator light will flash 3 times and then turn off Note The camera will shut down automatically if it is in standby mode without any operation more than 1 minute 3 2 VIDEO RECORDING 3 2 1 Power on the camera by pressin...

Страница 3: ...or 2 seconds The blue indicator light will be illuminated indicating the camera has entered into standby mode automatically 3 3 2 Press the Camera Button once to take a photo Every time you take a photo the blue indicator light will flash once IV Video Image File Uploads 4 1 Using the USB Cable 4 1 1 Power off the camera connect it to a proper PC computer USB port using the USB cable attached 4 1 ...

Страница 4: ...nect it to an outlet AC power supply using the USB cable and power adapter provided 6 2 The blue indicator light will keep flashing during the charging process 6 3 It will take 80 minutes to obtain a full charge 6 4 The blue indicator light will be illuminated when the camera is fully charged VII Resetting If for any reason the camera stops responding or isn t working properly a quick reset will r...

Страница 5: ...6000 Benutzerhandbuch I Produktübersicht 1 Mini USB Anschluss 2 Mikro Sd Einbauschlitz 3 Mikrofon 4 Power Kamera Videoaufnahme Taste 5 Lanyard Loch 6 Reset Taste 7 Blaues Indikatorlicht 8 Kameraobjektiv ...

Страница 6: ... Sekunden lang drücken Die blaue Kontrollleuchte leuchtet auf und zeigt an dass die Kamera automatisch in den Standby Modus geschaltet wurde 3 1 2 Schalten Sie die Kamera aus indem Sie den Netzschalter 3 Sekunden lang drücken Die blaue Kontrollleuchte blinkt 3 mal und schaltet sich dann aus Hinweis Die Kamera schaltet sich automatisch ab wenn sie sich im Standby Modus befindet ohne jegliche Operat...

Страница 7: ... die Kamera ein indem Sie den Netzschalter 2 Sekunden lang drücken Die blaue Kontrollleuchte leuchtet auf und zeigt an dass die Kamera automatisch in den Standby Modus geschaltet wurde 3 3 2 Drücken Sie einmal die Kamera Taste um ein Foto aufzunehmen Jedes Mal wenn Sie ein Foto machen blinkt die blaue Kontrollleuchte einmal IV Video Bilddatei Uploads 4 1 Verwenden des USB Kabels 4 1 1 Schalten Sie...

Страница 8: ...ktualisieren VI Aufladen 6 1 Schalten Sie die Kamera aus schließen Sie sie an eine Steckdose an Stromversorgung über das mitgelieferte USB Kabel und Netzteil 6 2 Die blaue Kontrollleuchte blinkt während des Ladevorgangs 6 3 Es dauert 80 Minuten um eine volle Ladung zu erhalten 6 4 Die blaue Kontrollleuchte leuchtet wenn die Kamera voll aufgeladen ist VII Zurücksetzen Wenn aus irgendeinem Grund die...

Страница 9: ... Aperçu du produit 1 Mini port USB 2 Emplacement pour Carte Micro SD 3 Microphone 4 Bouton d Alimentation Caméra Enregistrement Vidéo 5 Trou de Cordon 6 Bouton de Réinitialisation 7 Voyant lumineux bleu 8 Lentille de caméra ...

Страница 10: ...es Le voyant bleu s allume indiquant que La camréa est entré en mode veille automatiquement 3 1 2 Mettez l appareil hors tension en appuyant sur le Bouton d Alimentation pendant 3 secondes Le voyant bleu clignote 3 fois puis éteint Remarque La camréa s arrête automatiquement s il est en mode veille sans aucune opération supérieure à 1 minute 3 2 ENREGISTREMENT VIDEO 3 2 1 Allumez la caméra en appu...

Страница 11: ...nt 2 secondes Le voyant bleu s allume indiquant que La camréa est entré en mode veille automatiquement 3 3 2 Appuyez une fois sur le bouton de La camréa pour prendre une photo Chaque fois que vous prenez une photo le voyant bleu clignote une fois IV Téléchargement de fichiers vidéo image 4 1 Utilisation du câble USB 4 1 1 Mettez la caméra hors tension connectez la à un port USB d ordinateur PC app...

Страница 12: ...areil hors tension connectez le à une alimentation secteur à l aide du câble USB et de l adaptateur fourni 6 2 Le voyant bleu continuera à clignoter pendant le processus de charge 6 3 Il faudra 80 minutes pour obtenir une charge complète 6 4 Le voyant bleu s allume lorsque La camréa est complètement chargé VII Réinitialisation Si pour quelque raison que ce soit l appareil cesse de répondre ou ne f...

Страница 13: ...Panoramica del prodotto 1 porta mini USB 2 Micro SD Card Slot 3 Microfono 4 Alimentazione pulsante della fotocamera video registrazione 5 foro della cordicella 6 Pulsante di ripristino 7 Indicatore Light Blue 8 Camera Lens ...

Страница 14: ...per 2 secondi La spia blu si accende indicante che è entrato automaticamente in modalità standby 3 1 2 Spegnere la fotocamera premendo il tasto Power per 3 secondi L indicatore luminoso blu lampeggia 3 volte e poi si spegne Nota La fotocamera si spegne automaticamente se è in modalità standby senza alcuna operazione più di 1 minuto 3 2 REGISTRAZIONE VIDEO 3 2 1 Accendere la fotocamera premendo il ...

Страница 15: ...La spia blu si accende indicante che è entrato automaticamente in modalità standby 3 3 2 Premere il pulsante della fotocamera una volta per scattare una foto Ogni volta che si scatta una foto l indicatore luminoso blu lampeggia una volta IV Upload video file di immagine 4 1 Uso del cavo USB 4 1 1 Spegnere la fotocamera collegarla ad una vera e propria porta USB del computer PC utilizzando il cavo ...

Страница 16: ... CA con il cavo USB e l adattatore di alimentazione fornito 6 2 L indicatore luminoso blu continuerà a lampeggiare durante la carica 6 3 Ci vorranno 80 minuti per ottenere una carica completa 6 4 La spia blu si illumina quando la telecamera è completamente carica VII Ripristino Se per qualsiasi motivo la fotocamera smette di rispondere o non funziona correttamente eseguire un ripristino rapido rip...

Страница 17: ...io I Descripción del Producto 1 Mini Puerto USB 2 Ranura Para Tarjetas MICRO SD 3 Micrófono 4 Botón de Encendido Cámara Grabación de Vídeo 5 Agujero del Cordón 6 Botón de Reseteo 7 Luz Indicadora Azul 8 Lente de la Cámara ...

Страница 18: ...nando el botón de encendido durante 2 segundos El indicador luminoso azul se ilumina indicando que la cámara ha entrado en el modo de espera automáticamente 3 1 2 Apague la cámara presionando el botón de encendido durante 3 segundos El indicador luminoso azul parpadeará 3 veces y luego se apagará Nota La cámara se apagará automáticamente si está en modo de espera sin ninguna operación durante más ...

Страница 19: ...nará durante 1 minuto y se apagará 3 3 FOTOGRAFÍA DE CÁMARA STILL 3 3 1 Encienda la cámara presionando el botón de encendido durante 2 segundos El indicador luminoso azul se ilumina indicando que la cámara ha entrado en el modo de espera automáticamente 3 3 2 Presione el botón de cámara una vez para tomar una foto Cada vez que tome una foto el indicador luminoso azul parpadeará una vez IV Subida d...

Страница 20: ... el programa automáticamente VI Cargando 6 1 Apague la cámara conéctela a una toma de corriente de CA con el cable USB y el adaptador de corriente suministrados 6 2 La luz indicadora azul continuará parpadeando durante el proceso de carga 6 3 Tardará 80 minutos en obtener una carga completa 6 4 El indicador luminoso azul se iluminará cuando la cámara esté completamente cargada VII Restablecimiento...

Страница 21: ...F6000 ユーザーガイド I 製品の概要 1 ミニUSBポート 2 マイクロSDカードスロッ ト 3 マイク 4 電源 カメラ ビデオ録画ボタン 5 レニアードホール 6 リセッ トボタン 7 ブルーインジケータライト 8 カメラレンズ ...

Страница 22: ...ON OFF 3 1 1 電源ボタンを2秒間押してカメラの電源を入れます 青色のインジケータランプが点灯 し カメラが自動的にスタンバイモードに入ったことを示します 3 1 2 電源ボタンを3秒間押してカメラの電源を切ってください 青のインジケータランプが 3回点滅してから消灯します 注意 1分以上待ってからスタンバイ状態になると自動的にシャッ トダウンします 3 2 ビデオ録画 3 2 1 電源ボタンを2秒間押してカメラの電源を入れます 青色のインジケータランプが点灯 し カメラが自動的にスタンバイモードに入ったことを示します 3 2 2 ビデオ録画ボタンを2秒間押してビデオ録画を開始します 青のインジケータランプが 3回速く点滅し ゆっく りと点滅し続けます 3 2 3 ビデオ録画ボタンを1回押してビデオ録画を停止します 青いインジケータランプが2 回すばやく点滅してから点灯し カメラ...

Страница 23: ...ケーブルの使用 4 1 1 カメラの電源を切って 付属のUSBケーブルを使って適切なPCのコンピュータのUSB ポートに接続します 4 1 2 カメラはリムーバブルディスクドライブとして認識されます 4 1 3 ドライブ内のすべてのファイルにアクセスできます 4 2 カードリーダーの使用 4 2 1 カメラの電源を切り Micro SDカードを取り出してカードリーダーに挿入します 4 2 2 カードリーダーを適切なPCコンピュータのUSBポートに挿入します 4 2 3 Micro SDカードはリムーバブルディスク ドライブとして認識されます 4 2 4 ドライブ内のすべてのファイルにアクセスできます V 設定時間 日付スタンプ 5 1 カメラの電源を切り 付属のUSBケーブルを使用してPCのコンピュータに接続します 5 2 リムーバブルディスク ドライブフォルダが表示されます 5 3 ルー...

Страница 24: ...源アダプタを使用してコンセントのAC電 源に接続します 6 2 充電中に青いインジケータランプが点滅し続けます 6 3 完全な充電を得るには80分かかります 6 4 カメラが完全に充電されると 青色のインジケータランプが点灯します VII リセッ ト 何らかの理由でカメラが応答しなくなった場合 または正常に動作していない場合 クイッ クリセッ トを行うと元の状態に戻ります 操作 カメラの電源が入ったら ピンを使用してリセッ トボタンを1回押します カメラは自動 的にシャッ トダウンします これで 出荷時のデフォルト設定でカメラを再起動できます ...

Отзывы: