background image

User guide P9-0152-B

 29 of 60

Version 3.0.0/2013

Medema Production A/S

Batteries

The Mini Crosser uses sealed, maintenance-free GEL batteries 
(Exide 12 V/56 Ah or AGM 12 V/71 Ah). 

They do not generate gas and do not have to be topped up with 
 water. 

Charging

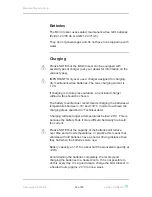
Please NOTE that the Mini Crosser can be equipped with 
several types of charger (ask your dealer for information on the 
various types).

IMPORTANT! Only ever use a charger designed for charging 
dry maintenance-free batteries. The max. charging current is 
 12 A. 

If charging is to take place outdoors, an enclosed charger 
without a fan should be chosen. 

The battery manufacturer recommends charging the batteries at 
temperatures b10° and +30°C in order to achieve the 
charging times specifi ed in “Technical data”. 

Charging will take longer at temperatures below +20°C. This is 
because the battery fi nds it more diffi cult chemically to absorb 
the current. 

Please NOTE that the capacity of the batteries will reduce 
over time and at low temperatures. In practice this means that 
vehicles with old batteries have a shorter driving distance than 
they had when the batteries were new.

Battery capacity at -10°C is about half the equivalent capacity at 
+20°C.

Avoid draining the batteries completely. We recommend 
charging the batteries in a heated room. If it is not possible to 
do this every day, it is a good idea to charge the Mini Crosser in 
a heated room (approx. 20°C) once a week.

Содержание Mini Crosses M2 4W Cabin

Страница 1: ...User Manual Mini Crosser M 2 4W Cabin P9 0152 B ver 3 0 0 September 2013 GB medemagroup User Manual Mini Crosser M 2 4W Cabin medemagroup...

Страница 2: ...User guide P9 0152 B 2 of 60 Version 3 0 0 2013 Medema Production A S Serial number ___ ______________ ______ _______ Delivery date ________________ Year 20______ This vehicle was supplied by Date...

Страница 3: ...25 Anti tilt wheels stabilisers 26 General care and maintenance 27 Insurance 28 Batteries 29 Charging 29 Battery disposal 31 Storage 31 Cleaning 31 Fuel for heater 32 Heater 32 Windscreen wiper washe...

Страница 4: ...abin has been designed for users weighing max 175 kg The vehicle can be specially adapted at the factory for users weighing up to 200 kg Alarm Temperature sensor alarm system and tilt alarm are built...

Страница 5: ...s of operation The service must be carried out by an authorised workshop IMPORTANT For safety reasons it is of the utmost importance that service and safety check intervals are complied with as this m...

Страница 6: ...d EN 12184 Electrically powered wheelchairs scooters and their chargers The product is risk analysed in accordance with the harmonized standard DS EN ISO 14971 2007 04 10 2 edition Medical devices App...

Страница 7: ...ing adjustment or modification of the control panel Lever for adjusting the angle of the handlebars Charging socket Key switch Accelerator four finger control Indicator lights R L Horn Indicator light...

Страница 8: ...before the key again has been turned at 0 and back to 1 again Speed selector The turtle indicates lowest speed range 0 6 km h The hare indicates the highest speed range Up to 15 km h Increase decreas...

Страница 9: ...speed can also be regulated downhill The engine will then act as a brake Light switch Turns on the front and rear lights The key switch must however be turned to position 1 drive Hazard warning lights...

Страница 10: ...stop after approx 20 seconds Shake the scooter again the alarm will be activated again Tilt Tilt symbols Tilt Alarm sideways By exceeding the preset value the symbol flashes and the horn hoots if the...

Страница 11: ...function you will be asked for a 4 digit code From the factory this code is set to be 1234 but it can be altered by a service technician Use the button to set value that you want the scooteres max sp...

Страница 12: ...he scooter again the alarm will be activated again Tilt Present On Off Extra With this parameter set to On will turn the tilt icons to red and blinking and there will be a whining tone if enabled if y...

Страница 13: ...e on the next page Check that the seat height is correct and press the release button in again Move the seat tube up down until the release clicks into a hole Make sure you keep your back straight whe...

Страница 14: ...P9 0152 B 14 of 60 Version 3 0 0 2013 Medema Production A S Seat tube in top position There are five holes for adjusting the seat tube The release must be in a hole for the seat to be stable Seat tub...

Страница 15: ...mounted on the right but can be put on the left if so wished IMPORTANT The Mini Crosser is most stable when the seat is in its lowest position Always drive carefully when the seat is raised Never use...

Страница 16: ...tion Use the lever again and push the steering column forward to make it easier to get out The height of the steering column can be adjusted approx 11 cm up down First remove the rubber plug covering...

Страница 17: ...uction and serial number The same serial number can also be found on the front of the User Manual Please quote this number when making inquiries about servicing spare parts etc Maximum user weight Veh...

Страница 18: ...upport when entering or getting out of the vehicle For some users the assistance of an attendant can be recommended The attendant should Take care not to injure him herself when lifting lowering suppo...

Страница 19: ...atically when it reaches a certain speed There is an electric safety feature in the control system which works even if the battery is disconnected This is also the reason why the Mini Crosser cannot b...

Страница 20: ...ot lower the handlebars so far that the accelerator can hit you on the leg when you turn the vehicle and so be operated in advertently If the handlebars need to be very low a twist grip accelerator is...

Страница 21: ...strations on the following pages Try braking at different speeds and notice the stopping distances If possible try driving on different surfaces road grass and gravel Practise assessing how far you ca...

Страница 22: ...switched off Mobile phones should not be used while driving When driving in traffic Be particularly aware of the following when driving in traffic The Mini Crosser is a low vehicle and not always easy...

Страница 23: ...s Accelerate moderately so that your vehicle can overcome the obstacle Do not stop halfway but reduce speed once the vehicle is up If the kerb is too high do not try again but find an alternative rout...

Страница 24: ...table Lean forwards Accelerate moderately so that your vehicle can overcome the obstacle Do not stop halfway Reduce speed once the vehicle is up If you need to start on a hill accelerate slowly so as...

Страница 25: ...is a built in thermoswitch which initially sets the Mini Crosser to half speed However if you carry on moving over difficult ground the Mini Crosser will at some stage stop completely and the battery...

Страница 26: ...The Mini Crosser is a very stable vehicle HOWEVER in the case of incorrect weight distribution or careless driving there is a risk of tipping over We therefore recommend fitting anti tilt wheels in su...

Страница 27: ...safety wise we recommend the following regular checks Daily Test the indicators and driving lights before using the Mini Crosser in the dark or poor visibility Every three months Test the brakes and...

Страница 28: ...ntervals are complied with as this minimises the risk of brake failure and short circuits in the wiring which could generate heat and cause a fire For further information see the Service Manual Insura...

Страница 29: ...y manufacturer recommends charging the batteries at temperatures between 10 and 30 C in order to achieve the charging times specified in Technical data Charging will take longer at temperatures below...

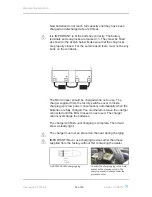
Страница 30: ...charger supplied from the factory switches over to trickle charging very low power consumption automatically when the batteries are fully charged You can therefore leave the charger connected until t...

Страница 31: ...scooter should be stored and charged under cover preferably at temperatures above 0 C Note The charger must be kept dry but should not be covered when in use In the case of long term storage we recomm...

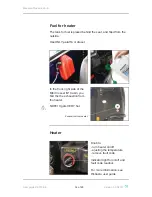
Страница 32: ...outside Use ONLY paraffin or diesel In the front right side of the Mini Crosser M2 Cabin you find the the exhaustion from the heater NOTE It gets VERY hot Exhaustion from heater Heater Knob to turn h...

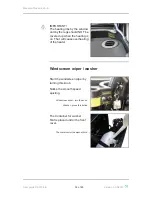
Страница 33: ...be covered up when the heating is on That will cause overheating of the heater Windscreen wiper washer Start the windscreen wiper by turning this knob Notice the smooth speed ajusting Windscreen wipe...

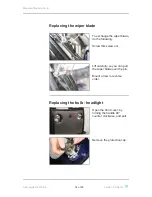
Страница 34: ...blade To exchange the wiper blade do the following Screw this screw out Lift carefully so you can pull the wiper blade over the pin Mount a new in reverse order Replacing the bulb headlight Open the...

Страница 35: ...uction A S Press down and turn counter clockwise and lift out Now you have access to the bulb take the bulb out Mount a new in reverse order NOTE Be aware that drain list are not trapped when the fron...

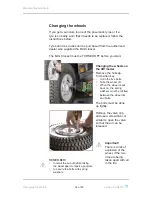
Страница 36: ...t Changing the wheels on the 4W model Remove the hubcap 5 mm Allen key Undo the five bolts Take the wheel off When the wheel is put back on the spring washers must be refitted between the wheel rim an...

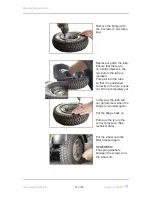
Страница 37: ...before the tube is replaced Pump air into the tube so that it is positioned correctly in the tyre but do not fill it up completely yet In this way the tube will not get jammed when the flange is moun...

Страница 38: ...able to reach full speed and traction The control fuse protects against mains faults It is located under the rear cover The main fuse protects against short circuits in the main current circuit The fu...

Страница 39: ...y turning the handle 90 counter clockwise and pull Under the front cover you will find the fuse for the heater and windscreem wiper Fuse for windscreen wiper Fuse for heater NOTE Be aware that drain l...

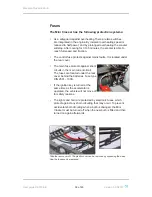
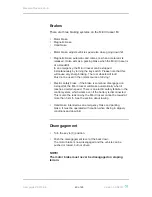
Страница 40: ...al course of driving Electric safety brake if the brake is somehow disengaged on a slope hill the Mini Crosser will brake automatically when it reaches a certain speed There is an electric safety feat...

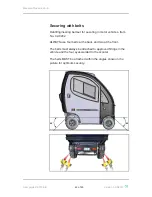
Страница 41: ...yes at the front and two at the back All the eyes are marked in yellow See the section entitled Securing with belts Push the disengagement lever down to disengage only handbrake works and push up to r...

Страница 42: ...ng belt set for securing in motor vehicles Item No C2 0242 ALWAYS use four belts at the back and two at the front The belts must always be attached to approved fittings in the vehicle and the four eye...

Страница 43: ...ide P9 0152 B 43 of 60 Version 3 0 0 2013 Medema Production A S Greater than the anchorage points on the scooter Attachment point Attachment point Greater than the anchorage points on the scooter Cent...

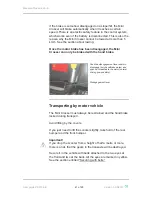
Страница 44: ...Crosser must always be turned off and the motor brake disengaged during towing See the section on Brakes If the Mini Crosser is to be towed secure a rope to the tow fitting on the front marked with a...

Страница 45: ...1030 mm 1610 mm 1600 mm 175 mm 730 mm 1050 mm User guide P9 0152 B 45 of 60 Version 3 0 0 2013 Medema Production A S Dimensioned drawing Mini Crosser M2 4W...

Страница 46: ...standard but can also be put on the left Lever for seat forward back Pull the lever out up to release the seat on the slide rail The seat can then be moved forward or back as required When the lever i...

Страница 47: ...the backrest Armrest forward back The armrest can be moved forward back on the C rail This can be done by undoing the screws indicated Do the screws up again after making the adjustment Backrest forw...

Страница 48: ...ocking at each 45 The lever is spring loaded and the seat is locked automatically when the lever is released Lever for fore aft adjustment of the seat Pull the lever up to release the seat on the slid...

Страница 49: ...ing the angle of the backrest The angle of the backrest can be adjusted approximately 140 This is done by lifting this lever Adjusting the lumbar support The lumbar support can be adjusted by turning...

Страница 50: ...enly choppy while driving Can be caused by poor connection of electricity Turn off the scooter immediately and seek out an authorised workshop If you continue driving heat can be generated in the poor...

Страница 51: ...supplier Thermometer symbol is half red and flashes The scooter is running at half speed The motor is overheating and has reached the limit of when the first safety switch responds Immediately pull o...

Страница 52: ...itch or the scooter is overheating The Mini Crosser will turn itself off automatically after it has been stationary for 10 minutes The battery indicator flashes with 6 lamps at a rate of about 3 secon...

Страница 53: ...l weight incl batteries and Ergo Std seat 243 kg Weight without seat Ergo Standard 45 cm 222 kg Dynamic stability in all directions 10 17 Kerb climbing 11 cm Max speed 15 km h Braking distance 10 km h...

Страница 54: ...ide rail Mando seat with slide rail Mando seat without slide rail 64 74 cm 61 71 cm 64 74 cm 61 61 cm Height footplate to front edge of seat Ergo Standard with slide rail Ergo Standard without slide r...

Страница 55: ...x 22 28 4 x 26 7 x 23 Battery weight 2 batteries 56 Ah 75 80 Ah 110 115 Ah 43 kg 50 kg 80 kg Energy consumption in kWh when charging from empty 56 Ah 75 80 Ah 110 115 Ah Approx 1 5 Approx 1 5 Approx...

Страница 56: ...88 Email info draisin com Internet www draisin com Germany Beromobil GmbH Elektromobile Treppenlifte Tel 49 06123 60 57 22 Fax 49 06123 60 57 23 Email info beromobil de Internet www beromobil de Germa...

Страница 57: ...om Sweden Minicrosser AB Tel 46 303 245 200 Fax 46 303 245 228 Email info minicrosser se Internet www minicrosser se Switzerland Degonda Rehab SA Tel 41 033 345 83 00 Fax 41 033 345 83 01 Email info t...

Страница 58: ...User guide P9 0152 B 58 of 60 Version 3 0 0 2013 Medema Production A S Own notes...

Страница 59: ...User guide P9 0152 B 59 of 60 Version 3 0 0 2013 Medema Production A S...

Страница 60: ...medemagroup...

Отзывы: