background image

5


Product Overview 


Function button 

Power button 

Wi-Fi LED 

Function LED 

Power LED 

Micro SD card slot 

Micro USB port 

HDMI port 

Microphone 

Содержание DM07

Страница 1: ...1 ...

Страница 2: ...nergy and if not installed and used in accordance with the instructions may cause harmful interference to radio communications However there is no guarantee that interference will not occur in a particular installation If this equipment does cause interference to radio or television equipment reception which can be determined by turning the equipment off and on the user is encouraged to try to cor...

Страница 3: ...hard on the device body For your own safety avoid using the device when there is a storm or lightning Use only the accessories supplied by the manufacturer Keep the device out of the reach of infants Do not leave the device on the dashboard where it is subject to direct sunlight The battery is integrated with the device Do not dissemble and modify The battery should be replaced by an authorized se...

Страница 4: ...clip it to your shirt wear it as a necklace or mount it to the car windshield to record high quality videos and pictures Package Content The following items come with your package Camera USB Cable Car Adapter Optional Strap Clip Pin Clip Stand Suction Cup Bracket Optional ...

Страница 5: ...5 Product Overview Function button Power button Wi Fi LED Function LED Power LED Micro SD card slot Micro USB port HDMI port Microphone ...

Страница 6: ...hile recording press and hold the Function button for 3 seconds Take photo Press the Function button Reset to default Press and hold the Function button for 10 seconds Reboot Press and hold the Power button for 10 seconds LED Indicators Status Power LED Wi Fi LED Function LED Power on Light Green Light Green Off Start recording Light Green Light Green Blink Green Wi Fi off Light Green Off Off Powe...

Страница 7: ...t SD Card Please use SD card with the size memory at least 8GB Class 10 up to 64GB Be sure to format SD card using the device before the initial usage Do not remove the memory card while recording This may damage the memory card Charging the Battery 1 Connect one end of the USB cable to the micro USB port of the device 2 Connect the other end of the USB cable to the computer ...

Страница 8: ...native you can also charge the device using an AC adapter Powering the Device On Off To turn on the power press and hold the Power button for 2 seconds To turn off the power press and hold the Power button for 3 seconds ...

Страница 9: ...ay Store Android application 3 On the search bar enter the keyword MeCamHD to search for APP 4 Download and install MeCam HD After the installation is complete the MeCam icon is displayed on the application screen Note When you use a code reader application to scan the respective QR code below your smartphone will show a direct link to download MeCam HD iOS Android The application UI varies depend...

Страница 10: ... 2 In WIRELESS NETWORKS tap Wi Fi and set it to ON The available networks are listed 3 Tap MeCamHD to connect to the camera 4 Enter the password and tap Join iOS or Connect Android Note The default password is Enjoylife You can change the SSID and password in Setup mode ...

Страница 11: ...review tab to switch to Preview Record mode 2 Tap to view the live view on your smartphone Record Mode Capture Photos Select ONE SHOT to switch to Photo mode Tap to capture a photo Note You can also press the Function button on the camera to capture a photo ...

Страница 12: ...ch to Continuous Shot mode Tap and hold to continuously capture photos Release to stop shooting Capture Photos By Time Lapse Select TIME LAPSE to switch to Time Lapse mode Tap to continuously capture photos at the preset interval time Tap to stop shooting ...

Страница 13: ...ote You can also press the Function button on the camera to start stop recording video Snap Movie Select SNAP MOVIE to switch to Snap Movie mode Tap to start recording a 15 second video clip Tap and hold to continuously record the video Release it to pause the recording To manually stop recording tap Finish ...

Страница 14: ...the desired video to play the video 2 Tap the screen to pause the playback Tap the screen again to resume the video playback View Photo On Photo list tap the desired photo that you want to view Delete Files On the playback screen tap to delete the current file A confirmation message appears on the screen then tap Delete to confirm file deletion ...

Страница 15: ...back screen tap and then select the video resolution to save the selected video into your smartphone The downloaded files are listed in the Mobile list for video only Note You do not need to specify the photo size before saving it into the smartphone ...

Страница 16: ... connect your smartphone to the Internet either by mobile data connection or Wi Fi 2 Launch MeCam HD application 3 Tap Sign in Facebook or YouTube Follow the on screen instructions to login to your social network account Tap Finish when the settings are complete 4 Tap Playback tab and select file that you want to share from the Mobile list 5 Tap and select Facebook or YouTube to share the file ...

Страница 17: ...nu Option Description Video Resolution Set the video resolution Available options 1920x1080 30f 1280x720 60f 432x240 120f Photo Burst Frequency Specify the number of continuous shots per second Available options 5p1s 10p1s 30p1s Time Lapse Frequency Select the interval options when capturing photos using Lapse mode Available options 1p2s 1p30s 1pm Stabilization Select ON to enable the stabilizer f...

Страница 18: ... settings Date Time Stamp Overlay Select ON to include a date and time on a video stream Available options ON OFF Format SD card Select OK to format the memory card installed on the device CAUTION Formatting is typically irreversible so be sure to transfer the recorded files to your PC first before formatting the SD card Version Information View the model name and firmware version Factory Default ...

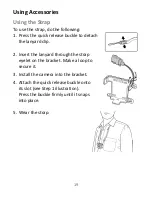
Страница 19: ... buckle to detach the lanyard clip 2 Insert the lanyard through the strap eyelet on the bracket Make a loop to secure it 3 Install the camera into the bracket 4 Attach the quick release buckle onto its slot see Step 1 illustration Press the buckle firmly until it snaps into place 5 Wear the strap ...

Страница 20: ...g the clip do the following 1 Install the camera into the bracket 2 Pinch the prongs to open the clipper and wear it on your cloth Using the Pin Clip To wear the device on your cloth using the pin clip do the following 1 Install the camera into the bracket ...

Страница 21: ...n squeeze the pin and slide the bar back into position Using the Stand The device can also be used as a surveillance camera to monitor your home or office To attach the stand do the following 1 Install the camera into the bracket Then install the stand to the slot on the bracket 2 Place the stand on a stable surface ...

Страница 22: ...t 2 With the suction cup laying flat position the suction cup on the windshield 3 Hold the base firmly on the windshield and press down the clamp to mount the suction cup bracket to the windshield 4 Adjust the device position Loose the knob to swivel the device vertically or horizontally up to 360 Then tighten the knob to make sure the device is securely locked in place ...

Страница 23: ...4 External Memory Micro SD card SDXC Min 8GB class 10 Interface Micro USB 2 0 Micro HDMI TV Output Wireless Connectivity 802 11 b g n WiFi App Control Android IOS App for streaming video and control device G Sensor 3 Axis 0 4G Battery Build in 720mAh Li Polymer battery Operating Temperature 0 C 60 C Do NOT expose under sun more than 1 hour Storage Temperature 20 C 60 C Dimensions 50 x 47 x 27mm We...

Страница 24: ...24 ...

Отзывы: