background image


Chapter 3 

Functional Details 

External components 

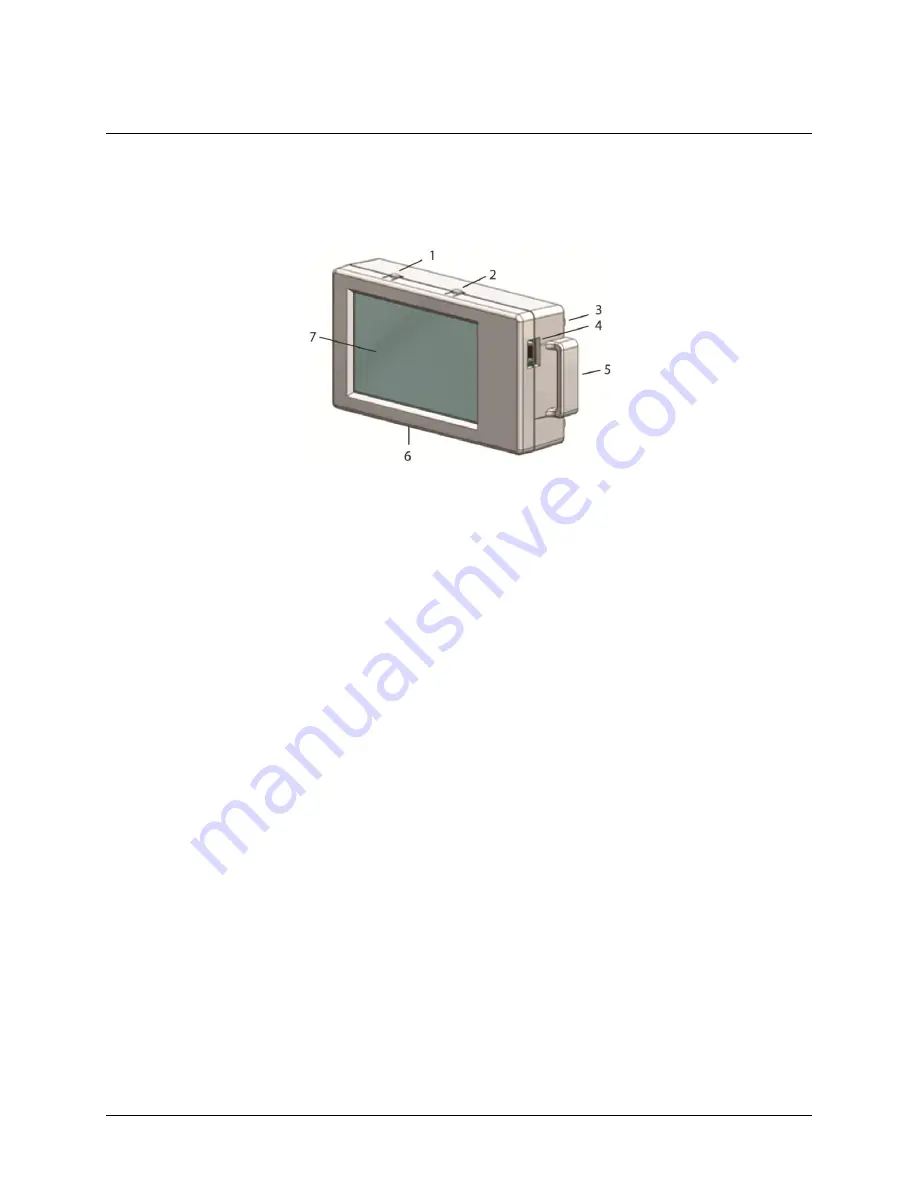
The external components on the USB-5106 are shown in Figure 1. 


Start/Stop button 

Mounting loops (one on each side) 

Alarm/Stats button 

Logger bottom (not shown): External inputs 

Logger rear (not shown): Mounting 
magnets (×4) and battery compartment 

LCD screen 

USB port 


Figure 1. USB-5106 components 

Start/Stop button 

Press this button for 3 seconds to start or stop logging data, or to resume logging. This requires configuring the 
logger with a push button start or stop, and with "Resume logging on next button push" selected; see 

Setting up 

the USB-5106

 on page 9 for more information.  

You can also press this button for 1 second to record an internal event (see 

Recording internal logger events

 on 

page 13), or to turn on the LCD screen on if it is configured to be off. 

Alarm/Stats button 

Use this button to clear a tripped alarm (see 

Alarm

 on page 10) or to cycle between statistics, alarm readings, 

and the current sensor reading. 

Mounting magnets 

Four built-in mounting magnets on the rear of the device are used to mount the logger to a magnetic surface. 

Battery compartment 

The battery compartment houses the two AAA 1.5 volt alkaline batteries. Refer to 

Battery information

 on page 

14 for information about the logger batteries. 

USB port 

Use this port to connect the logger to the computer with the mini-USB cable; see 

Setting up the USB-5106

 on 

page 9, and 

Reading out the logger

 on page 13 for more information. 

Mounting loops 

Use the two mounting loops (only one is visible in the diagram) to mount the logger with the hook-and-loop 
strap; see 

Mounting the logger

 on page 14 for more information about using the mounting loops. 

Содержание USB-5106

Страница 1: ...USB 5106 4 channel analog logger User s Guide Document Revision 2A February 2015 Copyright 2015 ...

Страница 2: ...in any form by any means electronic mechanical by photocopying recording or otherwise without the prior written permission of Measurement Computing Corporation Notice Measurement Computing Corporation does not authorize any Measurement Computing Corporation product for use in life support systems and or devices without prior written consent from Measurement Computing Corporation Life support devic...

Страница 3: ...nctional Details 7 External components 7 Start Stop button 7 Alarm Stats button 7 Mounting magnets 7 Battery compartment 7 USB port 7 Mounting loops 7 External sensor inputs 8 LCD Screen 8 Setting up the USB 5106 9 Data logging options 9 Logging modes 9 Alarm modes 10 Connecting external sensors 11 Compatible sensors 11 Reading out the logger 13 Recording internal logger events 13 Mounting the log...

Страница 4: ...of objects on a screen such as buttons text boxes and check boxes italic text Italic text is used for the names of manuals and help topic titles and to emphasize a word or phrase Where to find more information Additional information about USB 5106 hardware is available on our website at www mccdaq com You can also contact Measurement Computing Corporation with specific questions Knowledgebase kb m...

Страница 5: ...ip when the sensor reading rises above or falls below a specified measurement Set up burst logging in which the logger records data at a different interval during certain conditions Calculate minimum maximum average and standard deviation statistics Use the built in LCD screen to check current readings and to monitor logging status battery use and memory consumption between readouts TheUSB 5106 da...

Страница 6: ...device is installed when you install the software Therefore you need to install the USB 5100 Series Data Logger Software before you install the hardware For operation on a Windows operating system we recommend that you run Windows Update to update your operating system with the latest USB drivers Perform the following steps to connect a USB 5100 Series data logger 1 Install the two AAA batteries S...

Страница 7: ...er events on page 13 or to turn on the LCD screen on if it is configured to be off Alarm Stats button Use this button to clear a tripped alarm see Alarm on page 10 or to cycle between statistics alarm readings and the current sensor reading Mounting magnets Four built in mounting magnets on the rear of the device are used to mount the logger to a magnetic surface Battery compartment The battery co...

Страница 8: ...below The alarm symbol clears depending on how alarms are configured If the alarm is configured to clear when the logger is relaunched this symbol remains on the LCD Otherwise it clears when the sensor reading is back within the alarm limits or you press the Alarm Stats button for 3 seconds The channel number associated with the sensor reading Up to four channels are visible at one time The sensor...

Страница 9: ...elected in the software If you choose a logging interval less than 15 seconds the data will be recorded at the faster interval but the temperature readings will only be updated on the screen every 15 seconds When the logger has stopped logging the LCD screen remains on until the logger is offloaded to a computer unless launched with the Turn LCD off option Once the logger is offloaded and disconne...

Страница 10: ...nsor channels The alarm symbol displays on the LCD screen when an alarm is tripped Alarm limits are checked when the LCD screen refreshes every 15 seconds You can set the alarm mode to Cumulative or Consecutive Cumulative raises an alarm when the sensor is out of range for a specified number of samples The high or low samples don t need to be consecutive Consecutive raises an alarm when the sensor...

Страница 11: ...rnal input jacks but others require additional cables as described in the following sections If you disconnect a sensor or if it is not fully inserted into the jack while the logger is logging an erroneous sensor reading can appear on the LCD for that channel In addition erroneous readings will be logged and saved in the data file depending on the logging interval for example if a sensor is discon...

Страница 12: ...ut off the end of the gray cable where it connects to the blue and yellow wires as it contains the precision resistor required for current measurement The 4 20 mA input cable is for use in indoor and outdoor environments Figure 5 shows a schematic of the 4 20 mA input cable Figure 5 4 20 mA input cable diagram Figure 6 shows a wiring diagram of the 4 20 mA input cable Figure 6 4 20 mA input cable ...

Страница 13: ...how to read out logged data Recording internal logger events The logger records the following internal events to track logger operation and status You can plot these events after reading out the logger and opening the data file Internal Event Name Definition Host Connected The logger is connected to the computer Started The Start Stop button was pressed to begin logging Stopped The logger received...

Страница 14: ...kV Avoid electrostatic discharge by grounding yourself using a wrist strap or touch the computer chassis or other grounded object to eliminate any stored static charge Battery information The logger requires two user replaceable AAA 1 5 volt alkaline batteries Non rechargeable lithium batteries can be used for operation at the extreme ends of the logger operating range Expected battery life varies...

Страница 15: ...s in fire Do not expose the contents of the batteries to water Dispose of the batteries according to local regulations The USB 5100 Series Data Logger Software lets you record the current battery voltage at each logging interval this option is disabled by default Recording battery life at each logging interval takes up memory and therefore reduces logging duration It is recommended you only record...

Страница 16: ...hen memory full push button or date time Restart mode Push button Time accuracy 1 minute per month at 25 C 77 F refer to the Time Accuracy plot below Resolution 16 bit Battery life 1 year typical with logging rate of 1 minute and a sampling interval of 15 seconds or greater Battery type Two AAA 1 5 V alkaline batteries user replaceable Memory 4 MB 1 9 million measurements maximum Download type USB...

Страница 17: ...le specifications Parameter CABLE 4 20mA CABLE ADAP5 CABLE ADAP10 CABLE ADAP24 Measurement Range 0 mA to 20 1 mA 0 V to 5 0 V 0 V to 10 V 0 V to 24 V Accuracy 0 001 mA 0 2 of reading 0 2 mV 0 3 of reading 0 4 mV 0 3 of reading 1 0 mV 0 3 of reading Resolution 0 3 µA 80 µV 160 µV 384 µV ...

Страница 18: ...Measurement Computing Corporation 10 Commerce Way Suite 1008 Norton Massachusetts 02766 508 946 5100 Fax 508 946 9500 E mail info mccdaq com www mccdaq com ...

Отзывы: