background image


18 

 
MAINTENANCE & ADJUSTMENTS 

Safe Servicing Practices 

This product is capable of amputating hands and feet and 
throwing objects. Always follow all safety instructions to avoid 
serious injury or death. 
 

NOTE:

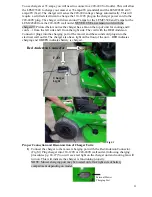
 Always remove key and disconnect battery cables  

by pulling rearward on 

LARGE RED

 battery quick disconnect  

in battery box compartment when any maintenance  
or repairs are performed on mower unit! 


Service 

Park the mower on level ground. Make sure that steering control levers 
are in the neutral  position, deck blade switch in OFF position, raise deck, rotate 
key to OFF position, remove key from switch and disconnect battery cables by pulling 
rearward on 

LARGE RED

 battery quick disconnect in battery box 

compartment.  
IMPORTANT!.Wait for all movement to stop before adjusting, cleaning or repairing.  
Repairs or maintenance requiring power should be performed by trained maintenance 
personnel only. Read and observe safety warnings in front of manual. 

• Any maintenance operation that requires 
the removal of safety covers must be performed


by a trained service technician. 

Before working on or under the deck, make certain master power ignition 
switch is OFF and key is removed and deck blade switch cannot be accidentally 
started and disconnect battery cables by pulling rearward on 

LARGE RED

 battery  

quick disconnect in battery box compartment.  
IMPORTANT! Repairs or maintenance requiring power should be performed  
by trained maintenance personnel only. 
Use a stick or similar instrument to clean under the 
mower making sure that no part of the body, especially 
arms and hands are under mower. 
Keep your machine clean and remove any deposits of 
trash and clippings, which can cause fires and overheating. 
Allow machine to cool before storing. 

Clean flammable material from machine. Prevent 
fires by keeping battery compartment, deck and operator’s 
station clean of accumulated trash, grass clippings, 
and other debris. 

Clean battery compartment, drive motor compartment, 
mower deck, seat etc. of all dirt and debris. DO NOT spray 
unit with water. Do not use, solvents, hard cleaners or 
abrasives. Use only compressed air. 
Always wear adequate eye protection when servicing the 
batteries, or when grinding mower blades and removing 
accumulated debris. Never attempt to make any adjustments or repairs to the 
mower’s drive system, mower deck or any attachment 
while the traction drive system is running. Repairs or maintenance 
 requiring power should be performed by trained maintenance personnel only. 
Never work under the machine or attachment unless it is 
safely supported with jack stands. Make certain machine 
is secure when it is raised and placed on the jack stands. 
The jack stands should not allow the machine to move 
when the traction drive system is running and the drive 
wheels are rotating. 

Use only certified jack stands. 

Use 

only appropriate jack stands, with a minimum weight rating 
of 2000 pounds (907.2 kg) to block the unit up. Use in pairs only. Follow  
the instructions supplied with the vehicle stands. 
Do not touch hot parts of machine. 
 

Содержание Nemesis NXR

Страница 1: ...se stated Photographs and illustrations used were current at the time of printing but subsequent production changes may cause your machine to vary slightly in detail Mean Green Products reserves the r...

Страница 2: ...tain that the operators and mechanics read and understand this manual and all decals before operating this machine It is also the owner s responsibility to make certain that the operators and mechanic...

Страница 3: ...in operation Keep hands feet and clothing away from rotating blades 1A Warning Do Not Step fig 1B Fall Hazard Keep Hands Feet Away When Mower Is In Operation 1B Important Deck Height Indicator fig 1D...

Страница 4: ...ONLY 6 Keep Safe Distance From Drop Offs and Ditches 7 Do NOT Carry Passengers 8 Ejection Warning Move Slowly On Slopes 9 Be Aware When Backing Up 10 Keep Flames Away From Charging Batteries 11 See Ow...

Страница 5: ...deck for mowing number level of 1 to 5 increments Left Side Mower Control Panel With Operator Seated Important Control Buttons Left Side Control Panel With Operator Seated Fig 4A Battery Capacity Indi...

Страница 6: ...or new user to the equipment Get comfortable with mower before increasing knob into HIGH speed Fig 4E Optional USB Port for convenient use of electronics IMPORTANT Blade Warning Light System located...

Страница 7: ...Blades Off and then On to reset the PTO TO AVOID THE BLADES SHUTTING OFF SLOW DOWN AND RAISE DECK SLIGHTLY This means the grass is too tall thick or wet and may need recut in this area for optimal per...

Страница 8: ...achine for damage after striking a foreign object If damage is found repair machine immediately Be sure to stop on level ground disengage deck blade switch place drive control bars in neutral position...

Страница 9: ...It also reduces the risk of a wheel going off and the machine tipping over Do not exceed a 15 degree angle between the ramp and the ground or between the ramp and the trailer or truck When on a ramp a...

Страница 10: ...of the machine An operator should not operate on a slope until he is thoroughly familiar with the equipment Do not operate on slopes greater than 15 degrees Refer to Slope Guide page 9A when determini...

Страница 11: ...and deck blade switch Check mower safety start interlock system daily prior to operation This system is an important mower safety feature It should be repaired immediately if it malfunctions Call Mean...

Страница 12: ...ve wheels to counter rotate To stop or decrease speed To stop move both Drive Control Bars to neutral middle position and push levers OUTWARD into the neutral slots When going forward and want to decr...

Страница 13: ...To prevent pivoting directly on the tire neutral and one handle bar back from tread it is best to keep both wheels going at least neutral simultaneously Repeat several slightly forward times NOTE Chan...

Страница 14: ...o execute a left end of row zero turn 1 Slow down at the end of the row 2 Move the RIGHT handle bar lever forward slightly while moving the LEFT handle bar lever back to center and then slightly back...

Страница 15: ...them as the operator could be thrown from the equipment Approach at a slow speed and angle one drive wheel at the obstruction Continue at an angle until the wheel clears and then pivot the opposite wh...

Страница 16: ...ider than the previous mower This ensures that uneven turf is not cut too short Raise the cutting height of the mower if the grass if slightly taller than normal or if it contains a high degree of moi...

Страница 17: ...into locking notch Fig 6B PUSH 2 each levers UP and INWARD to re engage drive levers Fig 6A NOTE Never drive mower with levers released Always push levers back to the engaged position before driving F...

Страница 18: ...trained maintenance personnel only Use a stick or similar instrument to clean under the mower making sure that no part of the body especially arms and hands are under mower Keep your machine clean an...

Страница 19: ...ar near batteries Use insulated tools Regular Maintenance Regular maintenance is the best prevention for costly downtime or expensive premature repair The following pages contain suggested maintenance...

Страница 20: ...se for front wheel bearings IMPORTANT Recommended maintenance at the beginning of each mowing season AND every 50 hours of operation Electrical system This mower operates on a 48 volt electrical syste...

Страница 21: ...Panel Fig 20A Rear mower behind seat Rotate 4 Quick Turn Tabs turn counterclockwise NOTE Move seat forward completely and then remove exterior battery panel on rear of mower by lifting toward seat an...

Страница 22: ...ll come off when the blade cap screw is removed Touch up sharpening can be done with a file Check the blades for balance following grinding A commercial balancing tool is available through most hardwa...

Страница 23: ...ear batteries Keep batteries out of reach of children Always keep protective shields covers and guards in place and securely fastened If they become damaged repair or replace immediately Never modify...

Страница 24: ...equipment damage fire serious injury or death 1 Always charge batteries after each use regardless of how little used Once charging is complete charger can be disconnected Charger will not turn back on...

Страница 25: ...side and 1 from the right side The cord with the RED Anderson Connector plugs into the charging port of the mower and the second cord plugs into the electrical wall outlet The charger also has a ligh...

Страница 26: ...s WARNING Do not smoke while servicing the batteries WARNING Always wear safety glasses and protective clothing near battery Use insulated tools 1 Lithium Modules do not develop a memory and need not...

Страница 27: ...ldable ROPS or a retractable ROPS is down or there is no ROPS Adjust the seat belt for proper fit and connect the buckle This seat belt is auto locking retractable type WARNING ROPS Roll Over Protecti...

Страница 28: ...eck that key is in the ON position Check all battery connections in back battery compartment Make sure batteries are charged Check to see that ALL circuit breakers are not tripped Mower blades stop du...

Страница 29: ...es fully charged Especially important to prevent battery damage when the temperature is below 32 F 0 C New season preparation Before starting the mower following post season storage the following serv...

Страница 30: ...ate of charge or voltage Different SOC means different voltage and may charge discharge to each other rapidly which is not ideal for the modules 5 If the battery module will not be used for a long tim...

Отзывы: