background image

28

CARING FOR YOUR TELESCOPE

Your DS-114AT telescope is a precision optical instrument designed to yield a lifetime of
rewarding observations. Given the care and respect due any precision instrument, your tele-
scope will rarely, if ever, require factory servicing. Maintenance guidelines include:

a.  Avoid cleaning the telescope’s optics: a little dust on the front surface of the telescope’s

correcting lens causes virtually no degradation of image quality and should not be consid-
ered reason to clean the lens. 

b.  When absolutely necessary, dust on the front lens should be removed with gentle strokes

of a camel hair brush or blown off with an ear syringe (available at any pharmacy). DO
NOT use a commercial photographic lens cleaner. 

c.  Organic materials (e.g., fingerprints) on the front lens may be removed with a solution of

3 parts distilled water to 1 part isopropyl alcohol. You may also add 1 drop of biodegrad-
able dishwashing soap per pint of solution. Use soft, white facial tissues and make short,
gentle strokes. Change tissues often.

CAUTION: Do not use scented or lotioned tissues or damage could result to the
optics.

d.  If used outdoors on a humid night, water condensation on the telescope surfaces will prob-

ably result. While such condensation does not normally cause any damage to the tele-
scope, it is recommended that the entire telescope be wiped down with a dry cloth before
the telescope is packed away. Do not, however, wipe any of the optical surfaces. Rather,
simply allow the telescope to sit for some time in the warm indoor air, so that the wet opti-
cal surfaces can dry unattended. 

e.  If your telescope is not to be used for an extended period, perhaps for one month or more,

it is advisable to remove the batteries from the battery pack. Batteries left in the battery
pack for prolonged periods may leak, causing damage.

f. 

Do not leave the telescope inside a sealed car on a warm summer day; excessive ambi-
ent temperatures can damage the telescope’s internal lubrication and electronic circuitry.

Collimation

Your DS-114AT may occasionally require re-alignment, particularly if the telescope has
received rough handling in shipment. Good optical alignment is essential for telescope per-
formance, and in any case the alignment procedure is not difficult to follow. 

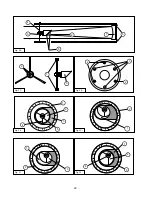
The optical systems of the DS-114AT reflecting telescopes includes the following parts: primary
mirror (1, Fig. 26); secondary mirror (2, Fig. 26); secondary mirror-holder (3, Fig. 26); secondary
mirror-vanes (4, Fig. 26) and (1, Fig. 27); primary mirror-tilt screws (5, Fig. 26). The telescope’s
image is brought to a focus at (6, Fig. 26).

1.  Confirm alignment - To confirm optical alignment look down the focuser drawtube  (1,

Fig. 29) with the eyepiece removed. The edge of the focuser drawtube frames reflections
of the primary mirror (2, Fig. 29), the secondary mirror (3, Fig. 29), the three (“spider”)
vanes (4, Fig. 29) holding the secondary mirror, and the observer’s eye (5, Fig. 29). With
the optics properly aligned, all of these reflections appear concentric (centered), as shown
in Fig. 29. Any deviation from concentricity of any of these telescope parts with the eye
requires adjustments to the secondary mirror-holder (Fig. 27) and/or the primary mirror cell
(Fig. 28), as described below.

2. Secondary mirror-vane adjustments: If the secondary mirror (1, Fig. 30) is left or right of cen-
ter within the drawtube (2, Fig. 30), slightly loosen the 3-vane adjustment/lock knobs (1, Fig. 27)
located on the outside surface of the main tube and slide the entire secondary mirror-holder sys-
tem up or down in the slotted holes of the main tube until the secondary mirror is centered in the
drawtube. If the secondary mirror (1, Fig. 30) is above- or below-center within the drawtube,
thread inward one of the adjustment/lock knobs (1, Fig. 27) while unthreading another of these
knobs. Only make adjustments to two knobs at a time until the secondary mirror appears as in
Fig. 31

Содержание DS-114AT

Страница 1: ...Instruction Manual DS 114AT Reflecting Telescope Meade Instruments Corporation...

Страница 2: ...mage In the Newtonian type of reflector light is reflect ed by a small flat secondary mirror to the side of the main tube for observation of the image Light is collected by a concave mirror and brough...

Страница 3: ...onal Accessories 31 Meade Customer Service 31 Appendix A Locating the Celestial Pole 32 Appendix B To Find Objects Not in the Database 33 Appendix C Observing Satellites 34 Basic Astronomy 35 CONTENTS...

Страница 4: ...around 180 Loosen the cradle ring lock knobs and move the knobs out of the way so that you can open the cradle rings Once the rings are open remove the optical tube from the cradle rings 3 Stand the...

Страница 5: ...the tube remains horizontal i e without tipping up or down Then tighten the cradle rings lock knobs to a firm feel 7 Sight along the tube Sight along the side of the telescope s main tube to locate a...

Страница 6: ...5 7 3 23 Fig 1 DS 114AT Series Telescope Fig 1b Inset Computer Control Panel A LED B 12V Port C Handbox Port D AZ Port E ALT Port F AUX Port 12 14 19 18 21 4 Fig 1c Cradle Rings Lock Knobs on opposite...

Страница 7: ...leg to the desired length Then press the clip back against the leg to lock in place Accessory Tray Conveniently holds extra eyepieces Autostar and other accessories Az Horizontal Gear and Motor Moves...

Страница 8: ...urn to the previous menu or data level in the Autostar database MODE is similar to the ESCAPE key on a computer NOTE Pressing MODE while in the Select Item level moves Autostar to the top most screen...

Страница 9: ...he slew speed Holding down the Speed key longer one to two seconds accesses the Help function If you have a question about an Autostar operation e g INITIALIZA TION ALIGNMENT etc hold down the Speed k...

Страница 10: ...cal tube around 180 and replace it into the cradle rings Fasten the cradle rings lock knobs 10 Fig 1 so that they only hold the optical tube loosely do not tighten the lock knobs yet Slide the tube ba...

Страница 11: ...the telescope always plug in the battery pack to the control panel last after plugging in the two motors and Autostar Connecting the battery pack to the control panel before the motors and Autostar ar...

Страница 12: ...Your telescope comes supplied with a low powered 25mm eyepiece which gives a wide com fortable field of view with high image resolution Low power eyepieces offer a wide field of view bright high contr...

Страница 13: ...have such an effect on image quality Observing in early morning hours before the ground has built up internal heat pro duces better viewing conditions than during late afternoon hours Observing Using...

Страница 14: ...at the Moon note that the Moon is not visible every night and practice using the Arrow keys and the slew speeds to view different features The Moon contains many interesting features including craters...

Страница 15: ...o look at the Sun At the end of this message press the key prompted by Autostar to signify that the message has been read and understood 5 Getting Started The Getting Started menu displays a scrolling...

Страница 16: ...scopes moves left Press until it is centered displays Bring the reference object back to the center of the eyepiece using ONLY the Right Arrow key When the reference object is centered press ENTER Imp...

Страница 17: ...sen in the center of the eyepiece If you wish to track another star use the Arrow keys to slew the telescope to the star Center the star The tracking motors will then keep that star in the center of t...

Страница 18: ...piral search is useful when the telescope slews to an object but that object is not visible in the eyepiece after the telescope finishes its search This sometimes occurs during an alignment procedure...

Страница 19: ...ided Tour This example demonstrates using Tonight s Best Guided Tour 1 After observing Saturn press MODE twice so that Select Item Object displays again 2 Press the Scroll Down key twice Select Item G...

Страница 20: ...tion Exercise To demonstrate how the Autostar menu structure works the following exercise calculates Sunset time so an evening observing session can be planned NOTE To perform an accurate calculation...

Страница 21: ...h numbers 0 9 and the alphabet The Down Arrow key begins with the letter A the Up Arrow key begins with digit 9 To move the cursor across the display Use the Right or Left Arrow key 5 Fig 2 to move th...

Страница 22: ...e Station the Hubble Space Telescope Global Positioning System GPS satellites and geosynchronous orbit satellites User Objects allows the user to define and store in memory deep sky objects of specifi...

Страница 23: ...Date menu See DATE page 25 Moon Phases displays the date and time of the next Full New 1st Quarter and 3rd Quarter Moon Meteor Showers provides information on upcoming meteor showers such as the Pers...

Страница 24: ...screen and Autostar goes to the glossary entry for that word To access directly from the Glossary menu use the Scroll keys to scroll through the alphabet Press ENTER on the desired letter Scroll to th...

Страница 25: ...ALIGN page 17 However there are numerous other features available within the Setup menu including Date changes the date used by Autostar This function is useful to check events in the past or future...

Страница 26: ...he Moon over long observing sessions c Custom Allows entry of user defined tracking rates Reverse L R Reverses the functions of the Left and Right Arrow keys i e the Right key moves the telescope to t...

Страница 27: ...en the entry is complete Download transfers information from a personal computer or another Autostar During the operation the warning Downloading Do Not Turn Off appears NOTE The Download function req...

Страница 28: ...o not leave the telescope inside a sealed car on a warm summer day excessive ambi ent temperatures can damage the telescope s internal lubrication and electronic circuitry Collimation Your DS 114AT ma...

Страница 29: ...29 2 1 3 3 2 1 2 3 4 5 1 2 1 2 3 2 1 2 3 4 3 6 2 5 1 4 Fig 26 Fig 27 Fig 28 Fig 29 Fig 30 Fig 31 Fig 32...

Страница 30: ...ed behind the primary mirror at the lower end of the main tube See Fig 28 Before adjusting the primary mirror tilt screws first unscrew by several turns use either a hex wrench or pliers the three hex...

Страница 31: ...ope or to print out star charts for use in observing sessions Operates with any Windows based personal computer The Cable Connector Kit permits connection of the DS 114AT telescope model Autostar and...

Страница 32: ...the Sun set To precisely point at the pole find the North Star Polaris by using the Big Dipper as a guide Fig 33 IMPORTANT NOTE For almost all astronomical observing requirements approximate settings...

Страница 33: ...hen you are finished press ENTER 7 Declination 00 00 displays Use the Up and Down Arrow keys to enter the digits for the Declination coordinate of your object If necessary use the Scroll Keys to chang...

Страница 34: ...ted satellite track When the track clears the obstruction press ENTER again to pause the telescope then continue with this procedure 9 With about 20 seconds left on the countdown timer start watching...

Страница 35: ...uni verse might be observed Autostar Glossary Be sure to make use of Autostar s Glossary feature The Glossary menu provides an alphabetical list ing of definitions and descriptions of common astronomi...

Страница 36: ...half and full much like those of the Moon The disk of Venus appears white as Sunlight is reflected off the thick cloud cover that completely obscures any surface detail Mars is about half the diameter...

Страница 37: ...37...

Страница 38: ...d by Meade international distributors RGA Number Required Prior to the return of any product or part a Return Goods Authorization RGA number must be obtained from Meade by writing or calling 949 451 1...

Отзывы: