© MDM INCORPORATED
WWW.MDMINC.COM
Reliable. Efficient.
PROUDLY MADE
IN THE USA
®
ALPHA PRIMER
P.3
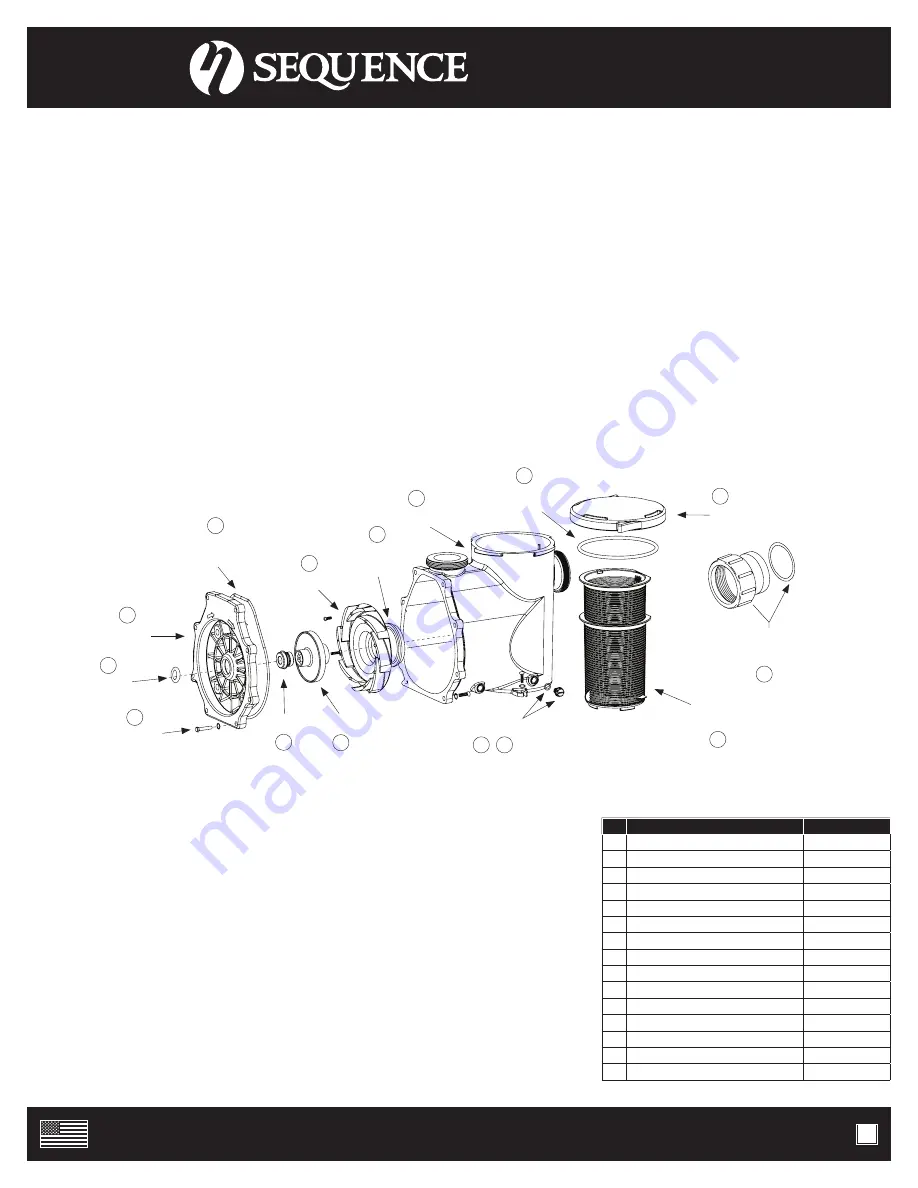
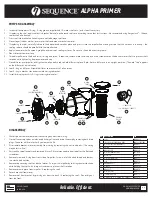
PUMP END ASSEMBLY
1. Inspect all pump parts (O-ring, O-ring groove, impeller hub ID, motor shaft, etc.) and clean if necessary.
2. If replacing the seal, apply sealant in bracket bore hole and around seal case according to sealant instructions. We recommend using Gasgacinch
®
. Silicone
sealant can also be used.
3. Press seal into bracket while taking care not to damage seal face.
4. Place slinger (rubber washer) over motor shaft and mount bracket to motor.
5. If replacing the seal, carefully lubricate the boot around ceramic piece and press it into the impeller hub making certain that the ceramic is in evenly - the
sealing surface should be parallel with the impeller hub.
6. Apply clean water to the carbon-graphite and seal seat sealing surfaces. Do not use silicon lubricants or grease.
7. Mount bracket to motor face.
8. Thread impeller onto shaft and install o-ring and screw. If required, remove motor end-cap and use a screwdriver on the back of motor shaft to prevent shaft
rotation while tightening. Replace motor end cap.
9. Place diffuser over impeller and tighten the allen bolts used to hold diffuser in place. Note: Be sure diffuser is in an upright position. (The word “top” appears
on the diffuser as an indicator).
10. Seat O-ring on diffuser. Assemble diffuser to bracket with 2 allen screws.
11. Seat O-ring in bracket slot and assemble casing to bracket.
12. Install drain plugs with its O-rings in casing drain holes.
DISASSEMBLY
1. Shut off power to motor before disconnecting any electrical wiring.
2. Close all necessary valves on inlet and discharge lines and drain the pump by removing both drain
plugs. The water will drain faster if you loosen the lid.
3. Disassemble bracket-motor assembly from casing by removing the nuts and bolts. (The casing
may be left in-line).
4. Unscrew the two allen bolts and remove diffuser. Diffuser may need to be pried off with a flathead
screwdriver.
5. Remove screw and O-ring from front side of impeller. Screw is a left-handed thread and loosens
in a clockwise direction.
6. Remove cap covering shaft at back of motor. Unscrew the impeller by twisting counterclockwise
while holding the shaft with a large screwdriver to prevent shaft rotation.
7. Remove ceramic piece from impeller (if replacing the seal).
8. Detach bracket from motor.
9. Remove seal from bracket by pressing out from the back (if replacing the seal). Do not dig out
from the front.
NO. DESCRIPTION
P/N
1
SEAL
1000.0414
2
IMPELLER
*DEPENDS ON MODEL
CONSULT FACTORY
3
O-RING (CASING TO BRACKET)
9000.061
4
CASING
9000.070
5
DRAIN PLUG
1000.110
6
O-RING (DRAIN PLUG)
805-0112
7
DIFFUSER
9000.120
8
O-RING (DIFFUSER)
9000.121
9
LID
9000.779
10
HARDWARE KIT
9000.502
11
SLINGER
1000.010V
12
BRACKET
9000.030
13
O-RING (LID)
9000.777
14
STRAINER BASKET
9000.778
15
2” ADAPTER (2 ½” UNION X 2” SOCKET)
9000.070-2
IMPELLER*
SEAL
DRAIN PLUG
& O-RING
STRAINER
BASKET
HARDWARE
BRACKET
O-RING,
(CASING TO BRACKET)
O-RING
(DIFFUSER)
DIFFUSER
LID
O-RING
(LID)
CASING
SLINGER
2” ADAPTER
( 2 ½” UNION X 2” SOCKET)
10
11
12
3
7
8
4
13
9
15
14
5
6
2
1


