


Page 8 of 20 / OM 897
The default program parameters conform to Energy Star
guidelines and are a good point from which to start. Default
settings are:
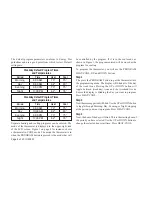
Weekday Default Program Times
and Temperatures
Period
Time
Heat
Cool
Morning
6:00 AM
70°
75°
Day
8:00 AM
62°
8°
Evening
6:00 PM
70°
75°
Night
11:00 PM
62°
78°
Weekday Default Program Times
and Temperatures
Period
Time
Heat
Cool
Morning
8:00 AM
70°
75°
Day
10:00 AM
62°
8°
Evening
6:00 PM
70°
75°
Night
11:00 PM
62°
78°
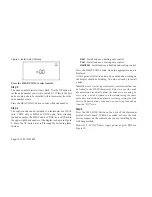
Separate heating and cooling programs can be entered. The
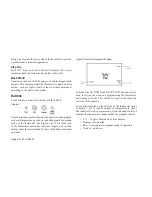
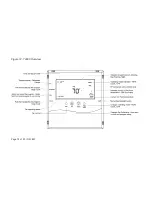
mode of the thermostat is displayed in the upper right side
of the LCD screen. Figure 1 on page 4 for instance, shows
a thermostat in COOL mode. The mode the thermostat is in
when the PROGRAM button is pressed is the mode that will
be controlled by the program. If it is in the cool mode, as
shown in Figure 1, the program entered will be stored as the
program for cooling.
To program the thermostat, you will use the PROGRAM,
HEAT/COOL, UP, and DOWN buttons.
Step 1
The press the PROGRAM button to put the thermostat into
the programming mode. The display will blink all of the day
of the week icons. Pressing the UP or DOWN button will
toggle between (weekday) icons and the (weekend) icons.
Ensure the display is blinking the day you want to program.
Press HEAT/COOL.
Step 2
Next the morning period will blink. Use the UP or DOWN button
to toggle through Morning, Day, Evening, or Night, stopping
at the period you want to program. Press HEAT/COOL.
Step 3
Next, the hour of the day will blink. This is the starting hour of
the period you have selected. Use the UP or DOWN button to
change the selected hour start time. Press HEAT/COOL.
Содержание OM 897-1
Страница 18: ...Page 18 of 20 OM 897 Figure 12 T9000 Overview...
Страница 19: ...OM 897 Page 19 of 20...


