McQuay OM 897-1 Скачать руководство пользователя страница 4

Page 4 of 20 / OM 897

AA  size,  1.5-volt  alkaline  batteries.  If  the  batteries  become 
completely  depleted,  the  heating/cooling  system  will  go  to 
the “Off” state.

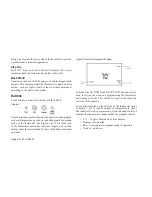
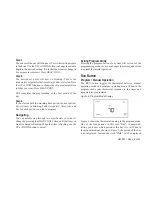
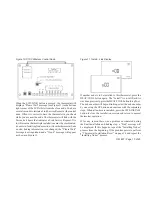
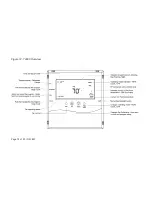
Figure 1. T9000 Front View
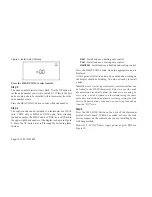
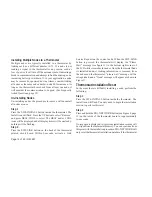
Replacing Batteries

To  open  the  thermostat,  use  both  hands  and  press  the  two 
push-tabs on the bottom of the thermostat housing with your 
thumbs while pulling the front of the thermostat away from 
the base (Figure 2)

Introduction

The  T9000  Wireless  Temperature  Control  is  a  two-part 
wireless  thermostat  system  designed  to  provide  precision 
temperature control without the installation labor and expense 
of wiring. Powered by AA batteries, the thermostat can operate 
continuously for approximately 18 months, and can be mounted 
in  any  suitable  location  that  will  provide  good  temperature 
control.  A  large  LCD  display  (Figure  1)  provides  the  user 
with current room temperature, set point temperature, time, 
program interval, and other system status information. In hotel 
applications, programming, clock set up buttons and associated 
display information are typically not displayed. The second part 
of the T9000 system is called a Remote Control Node or “RCN”. 

An RCN interfaces with specific desired HVAC equipment, 

and communicates with its thermostat using unlicensed 900 

MHz, radio frequency energy. At the time of installation, the 

T9000 thermostat is linked to one or more RCN controls. The 
thermostat and RCN that have been linked will not interfere 
with, or be affected by, any other thermostat or RCN in adjacent 
rooms, apartments, or neighboring homes.
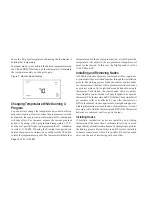
Batteries

Installing/Changing

A  low  battery  icon 

will  light  on  the  thermostat 

display when the batteries are within approximately one week 
of  being  exhausted. The T9000  is  designed  to  use  standard 

Содержание OM 897-1

Страница 1: ...ol For McQuay Applied Packaged Terminal Air Conditioners and Heat Pumps and Console Water Source Heat Pumps Operation Maintenance Manual OM 897 1 Group PDAC PDHP Part Number 668111002 Date August 2009...

Страница 2: ...RULES OPERATION IS SUBJECT TO THE FOLLOWING TWO CONDITIONS 1 THIS DEVICE MAY NOT CAUSE HARMFUL INTERFERENCE AND 2 THIS DEVICE MUST ACCEPT ANY INTERFERENCE RECEIVED INCLUDING INTERFERENCE THAT MAY CAU...

Страница 3: ...ng the Clock 7 Thermostat Programming 7 9 Navigating 9 Exiting the Program Mode 9 Run Button 9 Program Manual Operation 9 10 Changing Temperature 10 While Running a Program 10 Installing and Removing...

Страница 4: ...ood temperature control A large LCD display Figure 1 provides the user with current room temperature set point temperature time program interval and other system status information In hotel applicatio...

Страница 5: ...ithin the conditioned space at about 5 feet above the floor Try not to locate the thermostat in a place where it could be exposed to heat such as a warm air vent or where it could be exposed to direct...

Страница 6: ...evel across the top or side of the base plate to provide a professionally installed appearance Step Two Drill 3 8 holes and insert drywall fasteners 6 screws recommended and fasten the back plate to t...

Страница 7: ...ress the UP or DOWN button to change the hour Note that AM PM will change as you roll the hour past twelve Be sure to set the hour properly for AM or PM Press the HEAT COOL button to keep the hour you...

Страница 8: ...n is pressed is the mode that will be controlled by the program If it is in the cool mode as shown in Figure 1 the program entered will be stored as the program for cooling To program the thermostat y...

Страница 9: ...y step through to a specific item you want to change by pressing the HEAT COOLbutton until the item you want to change is flashing When that item is flashing use the UP or DOWN button to adjust Exitin...

Страница 10: ...d In this case the Night period is set for 11 00 PM and 65 Installing and Removing Nodes AT9000thermostatandremotecontrolnodewillnotoperateas a system until they are linked together through the instal...

Страница 11: ...tons Step 2 The UP button on the front of the thermostat is used to toggle between the following two choices Install Install a Node Remove Uninstall ALL Nodes The Remove option will be discussed later...

Страница 12: ...node as a cooling only control Heat Cool Install node as a heating and cooling control Press the HEAT COOL button when the appropriate icon is displayed At this point all selections have been made an...

Страница 13: ...message will appear as shown in Figure 11 Figure 11 Install Link Display If another node is to be installed to this thermostat press the HEAT COOL button again The Install icon will flash As wasdonepr...

Страница 14: ...ll be on steady nothing will be flashing Step 2 Press the SW9 LINK button on the back of the thermostat printed circuit board Within 5 seconds activate a Link Service Request on the control node When...

Страница 15: ...urn back on Coincidental RF interference could cause a temporary loss of communication In virtually all such cases the interference is temporary CanIrunmultipleheatingorcoolingloadssuchaselectric base...

Страница 16: ...a HVAC contractorand ortheoriginalequipmentmanufacturerbefore making changes The display on my thermostat is blank What happened Ablankdisplayindicatesyourbatteriesaredepleted Whenthe low battery icon...

Страница 17: ...swell as room temperature When your air conditioner runs it not onlycoolstheair italsoremovesmoisture loweringhumidity High humidity can encourage mold growth Can I use another T9000 thermostat withou...

Страница 18: ...Page 18 of 20 OM 897 Figure 12 T9000 Overview...

Страница 19: ...OM 897 Page 19 of 20...

Страница 20: ...arranty All McQuay equipment is sold pursuant to its standard terms and conditions of sale including Limited Product Warranty Consult your local McQuay Representative for warranty details Refer to For...

Отзывы: