


06-10-2020 14
:
09
Pagina 1 van 5
http://manuals-backend.z-wave.info/make.php?lang=en&sku=MCOETPS412&cert=&type=mini
MCO Home
MCO Home Glass Touch Switch
GEN5 (2 Buttons)
SKU: MCOETPS412
Quickstart
This is a
Binary Power Switch
for
XXXQFrequencyName
. To run this device please connect it to your mains power supply.
A
This device is a Z-Wave
Actuator. To include or exclude the device you only need to press and hold any key for 8 seconds.
Important safety information
Please read this manual carefully. Failure to follow the recommendations in this manual may be dangerous or may violate the law. The manufacturer, importer,
distributor and seller shall not be liable for any loss or damage resulting from failure to comply with the instructions in this manual or any other material. Use this
equipment only for its intended purpose. Follow the disposal instructions. Do not dispose of electronic equipment or batteries in a fire or near open heat
sources.
Product Description
The TPS412 by MCO Home is a wall switch with 2 integrated switch relays. The relays can be controlled both with the touch switches, which are integrated into
the glass surface, and via Z-Wave commands. The relays can switch two loads with up to 1,100 watts each. Beside local switching the device can be used to
control two groups of directly associated devices. A blue LED on every button indicates the switching status.
The wall switch can be easily connected to an electrical load without installing a flush mounted module separately. The relays are located inside a module
which is directly connected to the glass touch button. With that MCO Home wall switch you can replace any switch insert or toggle switch. The wall switch can
be mounted on any flush box.
With the stylish glass wall switches by MCO Home you can easily integrate your already installed lights into your home automation network. Without installing
any news cable, you can switch your lighting as usual via wall switch – but thanks to Z-Wave technology also via remote control, smartphone or sensor-
controlled automation.
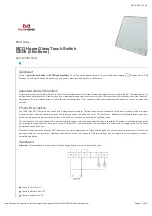
Installation
Important
: Please make sure you have cut off power supply before you start to install the device.
Connect Hot Line to "L"
Connect Neutral Line to "N"
Connect Load wire to "L1"