


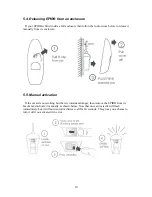


3.3. Manual EPIRB in enclosure
Customers who need to mount their EPIRB in an exposed position can select the protective
enclosure without a HRU fitted (´c´ suffix). This means that the EPIRB will
not
float free if
your vessel sinks. This is known as a category 2 EPIRB. You can tell which enclosure you
have by reading the category from the front of the enclosure:
E3a/Rescue 406a
Category 1
HRU fitted
Automatic float-free
E3c/Rescue 406c
Category 2
No HRU fitted
Will not float free
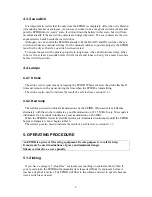
4. Controls
4.1. ON button
This is hidden behind a sliding door, which protects it from accidental
activation. The sliding door has a tamper seal to show if the EPIRB has been
activated.
The EPIRB can be activated manually by sliding the door to the left (breaking the seal) and
then momentarily pressing the ON button.
When activated the EPIRB will start to flash immediately. It will not make any distress
transmissions for 50 seconds. This gives you a chance to turn it off if you activated it
accidentaily. When the lamp starts to flash, the 50 seconds delay has passed and distress
transmissions have started.
4.2. READY button
This button de-activates the EPIRB and also tests the EPIRB.
Ready
Pressing and releasing this button quickly will de-activate the E
PIRB
and return it to its „ready“ state. When the button is released the
elf-test
strobe and the red lamp will stop flashing.
S
Pressing and holding the ready button (for about 10 seconds) will allow the
e
the
built-in self-test to run. When the button is held down the red lamp will com
on for 4 seconds, then go off. During this time both the 121.5 MHz homer
and the 406 MHz satellite transmitter make „safe“ transmissions. If both
of these test transmissions arrive at the antenna with sufficient power then
strobe light will falsh 3 times to tell you that all is well. If the red lamp does
not come on, or the strobe light does not flash within 10 seconds, then there
is a fault; the EPIRB should be taken to a service agent.
7


