background image

14. MCT Input: 

Used to transfer signals from 

McIntosh products with an MCT connector. Required 

for SACD audio.

15. HDMI (ARC) Input: 

Connect an HDMI cord 

here to share control and connectivity with a compat-

ible ARC TV. 

Note: The HDMI ARC functionality of the MA9500 

is only compatiable with ARC TVs. Other 

devices will not work.

16. USB Audio Input: 

A USB Type-B connector will 

go here to receive a digital signal from a computer.

17. Balanced Inputs: 

Plug in an XLR connector cable 

(see next page) to these ports for balanced signals.

18. Service Port: 

This USB Type-B port will be used 

for service purposes only.

19. Data Ports (1-4): 

Using 3.5mm data cables (see 

next section), you can plug other McIntosh devices 

into these ports and control them with your McIntosh 

Remote Control.

20. RS232 Port: 

Using a 3.5mm-to-DB9 cable 

(see next section), you can connect the device to a 

computer or another controller device through here.

21. IR In Port: 

Connect an external IR sensor here 

with a 3.5mm connector (see next section).

22. Trigger Ports (1 and 2): 

Connecting external 

components to these ports via a 3.5mm connection 

(see next section) will allow you to send a signal to 

turn those devices On or Off from a signal sent by the 

MA9500.

23. Main Output Control Port: 

McIntosh devices 

can turn each other On and Off when connected via a 

3.5mm connector (see next section) to these ports.

24. Passthru Input: 

Connecting other devices with 

a 3.5mm connector (see next section), in addition to 

their main connection, will enable Passthru Mode 

when enabled in the Setup Menu (see Page 13), 

producing unaltered audio.

Connector and Cable Information

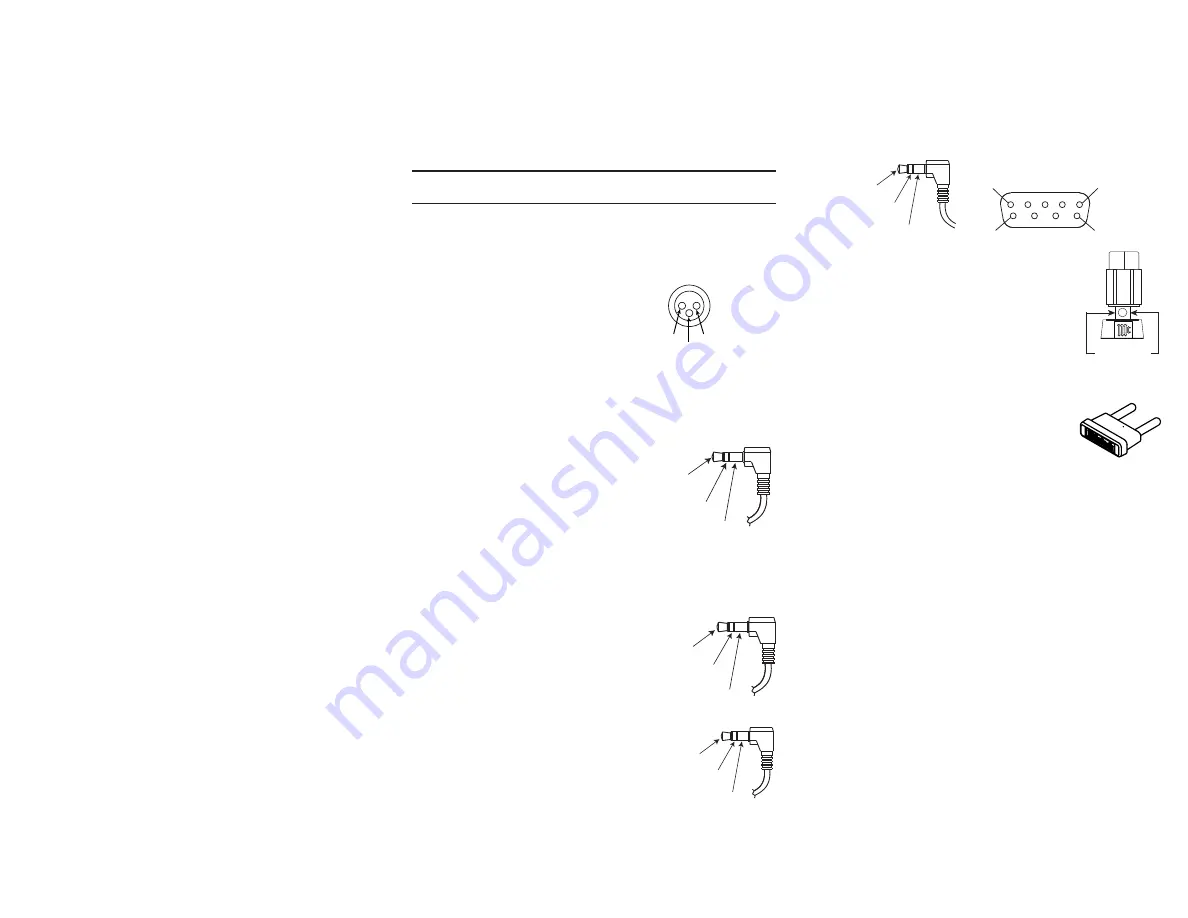
XLR Connectors

Below is the Pin configuration for the XLR Balanced 

Input Connectors on the MA9500. Refer to the dia-

gram for connection:


PIN 1: Shield/Ground


PIN 2: + Output


PIN 3: - Output

Power Control and Trigger Connectors

The Power Control Trigger Output Jacks send and 

Passthru Input Jack receives Power 

On/Off Signals (+12 volt/0 volt) 

when connected to other McIntosh 

Components. An additional con-

nection is for controlling the illumi-

nation of the Power Output Meters 

on McIntosh Power Amplifiers. A 

3.5mm stereo mini phone plug is used for connection 

to the Power Control, Trigger and Passthru Outputs.

Data Port Connectors

The Data Out Ports send Remote 

Control Signals to Source Compo-

nents. A 3.5mm stereo mini phone 

plug is used for connection.

IR IN Port Connectors

The IR IN Port also uses a 3.5mm 

stereo mini phone plug and allows 

the connection of other brand IR 

Receivers to the MA9500.

RS232-C Data Port Cable

The RS232 Data Cable is a 3.5mm stereo mini phone 

plug to a sub miniature DB 9 connector:

Output Terminal Connector

When cables with spade lugs are used 

for Loudspeaker Connection, the spade 

lugs need an opening of at least 3/10 inch 

(7.6mm) 

McIntosh Plug-In Jumper Connector 

(x2 Included)

The MA9500 utilizes two phono style 

Plug-In Jumpers to connect the Preampli-

fier Output to the Power Amplifier Input.

Note: Additional or replacement Jumper Connectors can 

be obtained from the McInotsh Parts Department 

under Part No. 117781.

PIN 1

PIN 6

PIN 5

PIN 9

Data In

(DB9-pin2)

Ground

(DB9-pin5)


Data Out

(DB9-pin3)

DB9

(male connector)

 3/10 of an inch

(7.6millimeters)

PIN 1

PIN 2

PIN 3 

Power

Control

Meter

Illumination

Control Ground

Main, Trig 1&2

and Pass-Thru

Data

Signal

N/C

Data

Ground

IR Data

Control

Ground

N/C

Содержание MA9500

Страница 1: ...MA9500 Integrated Amplifier Owner s Manual...

Страница 2: ...tion exposure limits set forth for an uncontrolled environment and meets the FCC radio frequency RF Exposure Guidelines in Supplement C to OET65 and RSS 102 of the IC radio frequency RF Exposure rules...

Страница 3: ...ing the Front Panel 11 Navigating the Remote Control 12 Setting Up Your MA9500 13 Using Knobs for Menu Navigation 13 Entering Setup Menu 13 Entering Trim Functions Menu 13 Selecting Adjusting Menu Set...

Страница 4: ...E 1 2 OUTPUTS EQUALIZER MUTE STANDBY ON RESET PUSH TRIM HOLD SETUP TRIM SETUP ADJUST 25 VOLUME INPUT 50 100 200 400 1k 2 5k 10k P O W E R O U T P U T 50 30 DECIBELS WATTS 40 20 10 0 3 0m 30m 600 30 3...

Страница 5: ...Amplifier so that airflow is not obstructed Allow 20 inches 50 8cm depth behind the front panel Allow 1 7 6 inch 3 66cm in front of the mounting panel for knob clearance Be sure to cut out a ventilat...

Страница 6: ...Computer Connection Legend Data Cable Digital Signal Cable Sensor Keypad Cable Ground Wire Power Control Cable Audio Signal Cable Loudspeaker Cable 2 conductor shielded with 1 8 inch stereo mini phon...

Страница 7: ...GND CAUTION RISK OF ELECTRIC SHOCK DO NOT OPEN SERIAL NUMBER L R GND ATTENTION RISQUE DE CHOC ELECTRIQUE NE PAS OUVRIR MC MM PHONO DA2 DIGITAL AUDIO MODULE HDMI ARC MCT OPTICAL 1 DIGITAL AUDIO INPUTS...

Страница 8: ...the signal to a subwoofer or power amplifier Connect included Jumper Plugs see next page to this port and PWR AMP to use onboard amp see Page 16 5 PWR AMP Input 5 PWR AMP Input The included Jumper Plu...

Страница 9: ...audio Connector and Cable Information XLR Connectors Below is the Pin configuration for the XLR Balanced Input Connectors on the MA9500 Refer to the dia gram for connection PIN 1 Shield Ground PIN 2...

Страница 10: ...top making sure not to overtighten Finally to secure the wires in place use the included McIntosh Wrench and turn the posts one quarter turn 90 clockwise WARNING Overtightening can cause damage Openin...

Страница 11: ...on based on your current selection Shows inputs and Menu options for navigation 5 Equalizer Toggle Button Toggle the Equalizer see Page 16 On or Off for the currently selected Input with this button 6...

Страница 12: ...everse Seek Down Navigate backwards through the current active media using this button This is also used to adjust the tuner downwards 22 23 24 14 Fast Forward Seek Up Navigate forward through the cur...

Страница 13: ...switched The front panel Remote Control Output buttons will be deactivated and the outputs will be always On SETUP HEADPHONES Mute All Outputs Mute No Outputs Mute All Outputs When headphones are plug...

Страница 14: ...r TRIG 1 or TRIG 2 when Output 2 is activated either via the front panel buttons or the Remote Control SETUP TRIGGER 1 TRIGGER 2 Main Output 1 Output 2 Input Hold Input SETUP TRIGGER 1 2 input name ON...

Страница 15: ...ng and adjusting Settings in the Trim Function Menu The Remote Control will also adjust these Settings Note The Balance Input Trim and Equalizer Settings in this Menu will only be adjusted and affect...

Страница 16: ...s The Power Guard LED lights on the front panel will be lit when it automatically activates The MA9500 also includes an internal Sentry Monitor which guages the amount of incoming electricity and will...

Страница 17: ...difference between Fixed Output and a regular Output A A regular Output is designed to be used for listening Sound from regular Outputs will behave as anticipated adjusting the Equalizer or Volume fo...

Страница 18: ...ed 16V balanced Phono MM 80mV Phono MC 8mV Headphone Impedance 100 to 600 ohms Equalizer Controls 25Hz 50Hz 100Hz 200Hz 400Hz 1 000Hz 2 500Hz and 10 000Hz Power Amplifier Specifications Power Output M...

Страница 19: ...re attached to the bottom of the equipment Two 1 4 20 x 2 1 4 inch screws and washers must be used to fasten the unit securely to the bottom pad and wood skid This will ensure the proper equipment loc...

Страница 20: ......

Отзывы: