background image


Copyright 2004 M-B Companies, Inc. 
All Rights Reserved


11 

Maintenance 

FILLER REPLACEMENT 


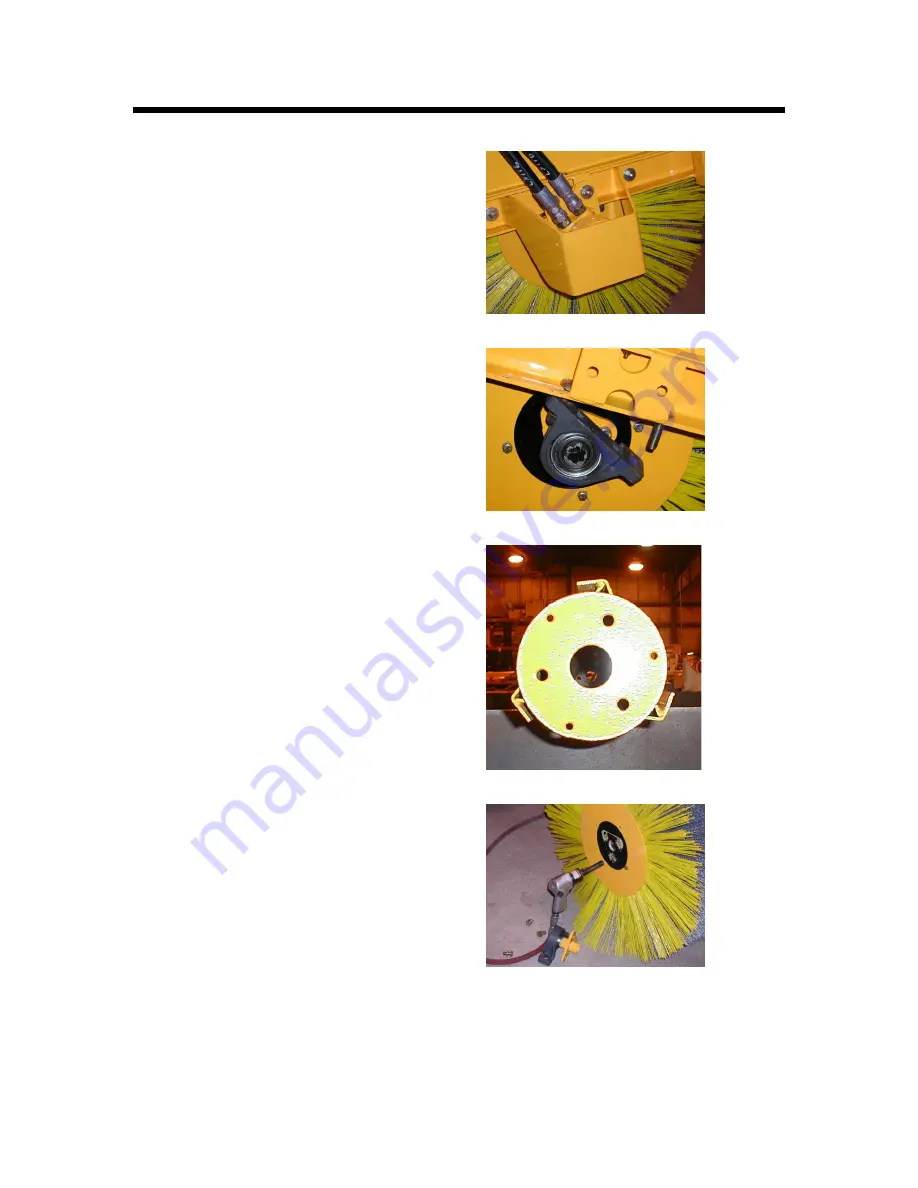
CORE REMOVAL 

  Lower broom until brush contacts the ground via 

hydraulic lift cylinder or mechanical head anchor.  

  Remove bolts attaching motor guard to the brush 

frame.  Remove guard and set aside.  

  Remove (2) ½” bolts attaching motor mount plate to 

the brush frame.  Slide motor out of mating splined 
hub.  Let motor hang on hoses. 

  Remove hardware holding pillow block bearing to 

bottom of brush frame. Complete steps 2 thru 4 on 
both ends of core. 

  Slide core out the front of broom. 


BRUSH REMOVAL 

  Remove (3) ½” bolts attaching splined hub to end of 

core.  Remove hub and set aside. 

  Remove (3) or (4) bolts attaching wafer retainer plate 

(end disc) to end of core.  Set retainer and hardware 
aside. 

  Slide spent filler and spacers off core and discard. 


BRUSH INSTALLATION 

  Stand core in upright position and begin filling the 

core by sliding an individual segment and spacer 
down the full length of the core starting with a poly 
segment.  Note the location of the drive pin on the 
inside ring of each segment.  Be sure to rotate each 
segment so the position of the pin is on a different 
side of the core with each segment being installed.  
This will help to insure proper balance on the core. 

  Continue stacking the core in a segment-spacer, 

segment-spacer configuration until it is full ending 
with a segment.  Always start and finish with a poly 
segment. 

  The last segment should actually extend beyond the 

end of the core (Minimum ½”) so when the end disc is 
installed it compresses the filler onto the core when 
the bolts are tightened. 

  Install end disc to the end of the core and secure with 

original bolts. 

  Reinstall splined hub and bearing. 


CORE INSTALLATION 

  Position refilled core in front of the broom head.  Lift 

the broom head high enough to place the filled core 
back into its original position.  Once in place, lower 
broom head down onto the pillow block bearing at 
each end of the core. 

  Reverse steps 2 – 4 from core removal section to 

complete reinstallation.  Note: Apply grease or anti-
seize to splines before installing hydraulic motors. 

  Before placing machine back into service, adjust and 

test for proper amount of brush pattern.  Excessive


pattern can cause brush failure or premature wear. 


Содержание HLP

Страница 1: ...m MB Companies Inc Attachment Sales 1615 Wisconsin Avenue P O Box 200 New Holstein WI 53061 Telephone 800 558 5800 FAX 920 898 4588 Please have your SERIAL NUMBER ready when contacting your authorized...

Страница 2: ...Copyright 2004 M B Companies Inc All Rights Reserved 2 SERIAL NUMBER...

Страница 3: ...Copyright 2004 M B Companies Inc All Rights Reserved 3...

Страница 4: ...le 9 Lubrication 9 Filler Replacement 10 Troubleshooting 11 Parts List 11 WARNING You must read understand and comply with all the safety and operating instructions in this manual before attempting to...

Страница 5: ...Always wear substantial footwear and appropriate clothing Wear footwear that improves traction on slippery slopes DO NOT wear long scarves or loose clothing that could become entangled in moving part...

Страница 6: ...the unit to remind you of this important information while you are operating your unit All WARNING CAUTION and instructional messages on your unit should be carefully read and obeyed Personal bodily...

Страница 7: ...your authorized dealer for replacement parts service or information you MUST have these numbers Record your model name number manufacturer s identification numbers in the space provided for easy acce...

Страница 8: ...se to 18 as it can be Because of the constrained spaces on some mowers it maybe necessary that the shaft is higher or lower Note occasionally the horizontal mounting shaft is replaced by pins or bolts...

Страница 9: ...dried on or difficult to remove such as mud or ice it may be necessary to drive extremely slow to allow the broom to scrub the surface STORAGE Always store the broom in a supported position with the...

Страница 10: ...draulic systems provided by M B LUBRICATION Grease bearings and pivot points per the maintenance schedule using Chevron Ultra Duty II Grade 2 or equivalent high temp grease There are minimum of 8 grea...

Страница 11: ...rive pin on the inside ring of each segment Be sure to rotate each segment so the position of the pin is on a different side of the core with each segment being installed This will help to insure prop...

Страница 12: ...ear b Adjust using leveling bolt c Adjust on head anchor Broom sweeping poorly a Material is caked on or frozen b Uneven sweeping surface c Material is too heavy d Broom rotating too slowly e Tractor...

Страница 13: ...Copyright 2004 M B Companies Inc All Rights Reserved 13 Parts List...

Страница 14: ...10 Endcover Seal 1 11 Seal Carrier 1 12 Thrust Washer 1 13 Rear Thrust Bearing 201 92027 1 14 Front Housing Bearing 201 92129 1 15 Housing Includes 14 16 201 92022 1 16 Rear Housing Bearing 201 92130...

Отзывы: