Mazda 0000-8F-P07 Скачать руководство пользователя страница 13

13

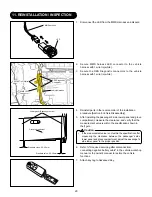
5.  Carefully and slowly peel off the top protective layer, 

leaving only the GPS Film Antenna on the Windshield.

• 

Do not touch the GPS Film Antenna Terminal.

Caution

After installing the GPS Film Antenna, proceed to the 

next step to install the TEL Film Antenna.

Caution

• 

Use glass cleaner to clean the inside windshield attachment 

surface indicated by the template before attaching the GPS/

TEL Film Antennas.

Green Tab

GPS Film Antenna

Headliner

GPS Film 

Antenna

Blue Tab

Green Tab

Headliner

GPS Film Antenna

Green Tab

GPS Film Antenna

GPS Film Antenna Backing

Green Tab

GPS Film Antenna Backing

GPS Film Antenna

Green Tab

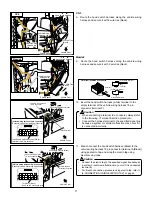
2.  Use the Blue tab to remove the partial protective backing 

from the GPS Film Antenna.

3.  From inside the vehicle, align to the edge of the headliner 

and within the specified template location, attach the 

partially exposed adhesive side of the GPS Film Antenna 

on the Windshield.

4.  Use the Green tab to slowly peel off the remaining 

protective backing while using a squeegee to attach the 

GPS Film Antenna on the Windshield.

• 

Make sure to use a squeegee when attaching the GPS Film 

Antenna on the windshield to eliminate any air bubbles.

Caution

Vehicle front

TEL Film Antenna

2

Headliner

1

2

TEL Film Antenna

6.  Use no. 1 tab to peel off the partial protective backing of 

the TEL Film Antenna.

7.  From inside the vehicle, align to the edge of the headliner 

and within the specified template location, attach the 

partially exposed adhesive side of the TEL Film Antenna 

on the Windshield.

Green Tab

GPS Film Antenna

Vehicle front

GPS Film Antenna

Top Protective Sticker

Green Tab

GPS Film Antenna

Vehicle front

GPS Film Antenna

Top Protective Sticker

GPS Film Antenna

Top Protective Sticker

Top Protective Sticker

GPS Film Antenna

Содержание 0000-8F-P07

Страница 1: ...ning using a torque wrench is not necessary Do not modify the Mazda Mobile Start Do not install the Mazda Mobile Start in any way other than described in the following instructions If in any doubt ple...

Страница 2: ...ntenna Harness GND RES Diagnostic Connectors MMS Harness MMS ECU GPS TEL Antenna Cables TEL Antenna MMS 2P Connector LED Connector Sold separately Hood switch Only for vehicles without theft deterrent...

Страница 3: ...mplate 1 Electro tap 1 Wire Tie White 200mm 15 Urethane Foam tape 35 x 115mm 4 Installation Instructions ENG SPA FRE 3 A Pillar Clip D09W 68162 1 Wire Tie Black 200mm 10 Sold separately The following...

Страница 4: ...related accident as well as an electrical short or fire Park the vehicle on a level ground Set the vehicle on park P and apply the parking brake Be sure to turn the ignition switch off otherwise the...

Страница 5: ...A TEL TEL ANTENNA GPS TEL Connector to Connector MMS Wire Vehicle Wire Scotch lock connection MMS or Vehicle Terminal Insert VEHICLE CONNECTOR SSU Start Stop control Unit FEMALE PIN FEMALE PIN MALE PI...

Страница 6: ...Plate to detach Tab A and Clip A 2 Use shaded area to pull 3 and lift 4 Passenger side Front Scuff Plate to detach Tab B and Clip B Bolt tightening torque 4 0 6 0 N m 2 9 4 4 ft lbf Warning Front Scu...

Страница 7: ...anel If decoration panel is pulled out on one side you will damage it make sure to pull the whole panel straight out Decoration panel Caution Vehicle front Removal tool Clip A Decoration panel Hook A...

Страница 8: ...ides Screws Screw Clips Clips Bolt Clip B Clip B Seaming Welt 1 Clip A Clip B Clip B Clip A Passenger Side A Pillar Seaming Welt A Pillar trim removal 1 Partially peel back the seaming welt 2 Dislodge...

Страница 9: ...rapped flathead screwdriver Tape wrapped flathead screwdriver 1 2 3 Grommet Tape wrapped flathead screwdriver Grommet Hook Grommet Hook 1 2 3 Front pillar inner panel A pillar inner panel Tape wrapped...

Страница 10: ...ations Hood Latch Screw Wire Tie Black Hood Switch Relay and fuse block cover Tab Harness Clamp Hood switch harness 8 Lift the fresh air duct to route the hood switch harness between fresh air duct an...

Страница 11: ...connected incorrectly Caution Vehicle front Hood switch harness Black Electro tap and electrical vinyl tape Vehicle wiring harness 18 pin connector Terminal A Black Hood switch harness Black Vehicle...

Страница 12: ...e to the vehicle harness using 1 wire tie black between the vehicle harness clip and vehicle harness branch Mazda2 12 Secure hood switch harness to vehicle harness with 1 wire tie black 13 Bundle up e...

Страница 13: ...e edge of the headliner and within the specified template location attach the partially exposed adhesive side of the GPS Film Antenna on the Windshield 4 Use the Green tab to slowly peel off the remai...

Страница 14: ...tab to slowly peel off the remaining protective backing while using a squeegee to attach the TEL Film Antenna on the windshield 9 Carefully and slowly peel off the Top Protective Sticker leaving only...

Страница 15: ...50mm away from the TEL Connector 16 Peel the protective backing off the TEL Connector 17 Attach the TEL Connector making sure to align to the TEL Film Antenna line guide Press the TEL Connector firml...

Страница 16: ...f 1 2 FH Protection sheet 22 Secure the FH Protection sheet using electrical tape 23 Secure the GPS TEL Antenna Cables to the vehicle harness using 2 wire ties white 24 Route both GPS TEL Antenna Cabl...

Страница 17: ...re the Antenna Cables and MMS Harness together with the Vehicle Harness using 1 wire tie white 29 Plug in MMS harness 2P connector to Vehicle Harness 2P Pre connector The 2P Pre connector is located e...

Страница 18: ...3 x Double sided adhesive tapes 25 x 25 mm 38 Apply 3 Double sided adhesive tapes 25 x 25 mm to the Glove Box under cover on 3 locations 39 Degrease the bottom of the MMS ECU using primer GPS 1P Conn...

Страница 19: ...45 Degrease the bottom side of the MMS ECU using primer 46 Place the MMS ECU on Glove Box undercover as shown and ensure Double sided adhesive tape secures MMS ECU to the Glove Box undercover 47 Appl...

Страница 20: ...vehicle harness using 2 wire ties white 2 x Wire Ties White Electrical tape GPS TEL Antenna Cables MMS Harness LED 53 Connect the LED to the MMS Harness 2P White connector Complete Section 9 MMS Regi...

Страница 21: ...rity indicator does not flash this procedure has failed Disconnect the battery and start over from step 1 Security Indicator Flashing OFF 5 Repeat steps 3 and 4 for the 2nd Advanced Key 6 Connect for...

Страница 22: ...OFF B Exit the vehicle with the Advanced key and place it at least 5 feet away from the vehicle C Enter the vehicle and close the door Horn will sound 2 times Horn will sound 2 times again before the...

Страница 23: ...sconnection connecting negative battery cable in the vehicle workshop manual or the owner s manual to restore the vehicle functions MMS LED Connector Vehicle Harness 2 x Wire Ties White If the measure...

Страница 24: ...items after installation Verify the fitting between the vehicle part and the installed part and inspect for damage or dirt Check 2 Vehicle parts reinstallation Inspection Parts Inspection Items Inspe...

Отзывы: