background image

26

Cycle Signal 

The End of Cycle Signal produces an audible sound when the drying cycle is finished. 
Promptly removing clothes at the end of the cycle reduces wrinkling.

Press SIGNAL ON/OFF. The light on the control will glow yellow when the Cycle Signal is on.  

NOTE:

 When the WRINKLE PREVENT feature is selected and the End of Cycle Signal is on, an 

audible sound will be emitted every 5 minutes until the clothes are removed, or the WRINKLE 
PREVENT feature is finished.

Changing Cycles, Options and Modifiers

You can change Sensor Cycles, Timed Cycles, Modifiers and Options anytime before pressing 
Start. 

NOTE:

 Three short tones sound if an unavailable combination is selected. The last selection 

will not be accepted.

Changing Cycles after pressing Start

1.

Press START/PAUSE once. This pauses the current cycle.

2.

Select the desired cycle and options.

3.

Press and hold START/PAUSE. The dryer starts at the beginning of the new cycle.

NOTE:

 If you do not press START/PAUSE within 5 minutes of selecting the cycle, the dryer 

automatically shuts off.

Changing Modifiers and Options after pressing Start

You can change a Modifier or Option anytime before the selected Modifier or Option begins.

1.

Press START/PAUSE once.

2.

Select the new Modifier and/or Option.

3.

Press and hold START/PAUSE to continue the cycle.

Changing the Preset Sensor Cycles Dryness Settings

If all your loads on all Sensor cycles are consistently not as dry as you would like, you may 
change the preset Sensor Cycles Dryness settings to increase the dryness. This change will 
affect all of your Sensor cycles.
Your Sensor Cycles Dryness settings can be adjusted to adapt to different installations, 
environmental conditions or personal preference. There are 3 drying settings: 1 (factory preset 
dryness level), 2 (slightly dryer clothes, approximately 15% more drying time) and 3 (much 
dryer clothes, approximately 30% more drying time). 

1.

The Sensor Cycles Dryness settings cannot be changed while the dryer is running.

2.

Press and hold the Sensor Cycles Dryness button for 5 seconds. The dryer will beep, and 
“CF” will be displayed on the Estimated Time Remaining screen for 1 second followed by 
the current drying setting.

3.

To select a new drying setting, press the Sensor Cycles Dryness button again until the 
desired drying setting is shown. 

NOTE: 

While cycling through the settings, the current setting will not flash, but the other 

settings will flash.

4.

Press START/PAUSE to save the drying setting.

5.

The drying setting you selected will become your new preset drying setting for all Sensor cycles.

Drying Rack Option 

The drying rack is useful for drying items you would not necessarily want to tumble dry or that 
you would normally line dry (for example, sweaters).
If your model does not have a drying rack, you may be able to purchase one for your model. 
To find out whether your model allows drying rack usage and for information on ordering, 
please refer to the front page of the manual or contact the dealer from whom you purchased 
your dryer. 

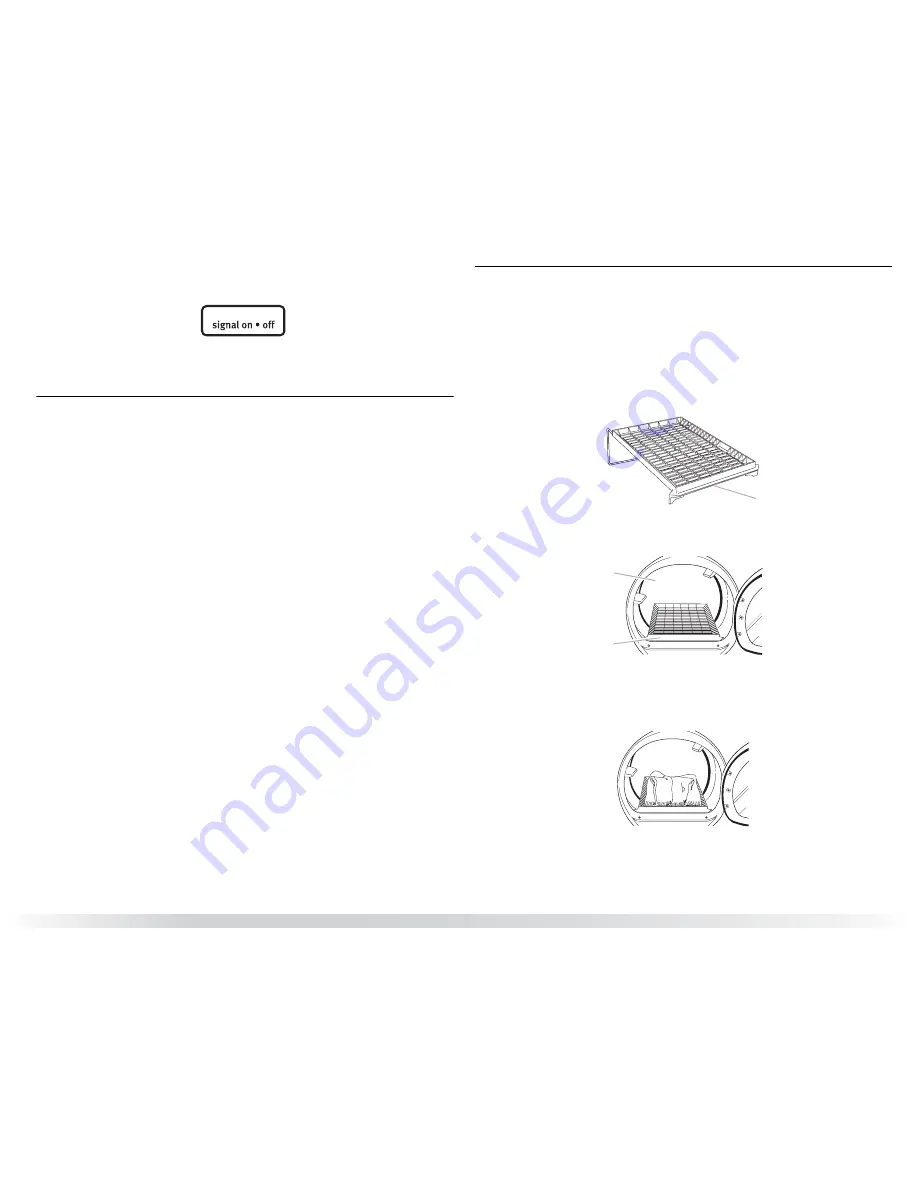
To use the drying rack

Do not remove the lint screen.

1.

Open dryer door.

2.

Place drying rack inside dryer drum, positioning the back wire on the ledge of the inner 
dryer back panel. Push down on front edge of drying rack to secure over the lint screen.

3.

Put the wet items on top of the drying rack. Leave space between the items so air can 
reach all the surfaces.

NOTE: 

Do not allow items to hang over the edge of the drying rack. 

4.

Close the door.

5.

Select a timed drying cycle and temperature (see following chart). Items containing foam, 
rubber, or plastic must be dried on a clothesline or by using the Air Dry temperature 
setting.

6.

You must select a time by pressing the TIME ADJUST up or down buttons. Reset time as 
needed to complete drying. Refer to the following table.

A. Front edge

A. Dryer rack front edge

B. Dryer back panel

A

A

B

Содержание Performance MEDE300

Страница 1: ...PREGUNTAS RESPECTO A LAS CARACTER STICAS FUNCIONAMIENTO RENDIMIENTO PARTES ACCESORIOS O SERVICIO T CNICO LLAME AL 1 800 688 9900 EN CANAD LLAME AL 1 800 807 6777 AU CANADA POUR ASSISTANCE INSTALLATIO...

Страница 2: ...HEUSE 33 INSTRUCTIONS D INSTALLATION 34 Outillage et pi ces 34 Pi destal facultatif 35 Exigences d emplacement 35 Sp cifications lectriques 37 Exigences concernant l vacuation 38 Planification du syst...

Страница 3: ...have been previously cleaned in washed in soaked in or spotted with gasoline dry cleaning solvents or other flammable or explosive substances as they give off vapors that could ignite or explode Do no...

Страница 4: ...dryer or refer to the Assistance or Service section Stack Kit Are you planning to stack your washer and dryer To do so you will need to purchase a Stack Kit To order call the dealer from whom you pur...

Страница 5: ...permit installation of the dryer in garages closets mobile homes or sleeping quarters Contact your local building inspector Installation clearances The location must be large enough to allow the drye...

Страница 6: ...ventilation openings in the top of the cabinet are required Required spacing For side or bottom venting 0 0 cm spacing is allowed A Side view closet or confined area B Closet door with vents 0 0 cm 1...

Страница 7: ...rating plate on a separate 30 amp circuit fused on both sides of the line A time delay fuse or circuit breaker is recommended Connect to an individual branch circuit Do not have a fuse in the neutral...

Страница 8: ...or 3 wire and be Flexible armored cable or nonmetallic sheathed copper cable with ground wire protected with flexible metallic conduit All current carrying wires must be insulated 10 gauge solid coppe...

Страница 9: ...ded that you use Power Supply Cord Replacement Part Number 9831317 For further information please reference the service numbers located in the Assistance or Service section WARNING Electrical Shock Ha...

Страница 10: ...re green or bare wire must be connected to green ground connector Connect remaining 2 supply wires to remaining 2 terminals gold Securely tighten all electrical connections Failure to do so can result...

Страница 11: ...position Tighten strain relief screw against the direct wire cable 4 Now complete installation following instructions for your type of electrical connection 4 wire recommended 3 wire if 4 wire is not...

Страница 12: ...tion Now go to Venting Requirements 4 wire connection Direct wire IMPORTANT A 4 wire connection is required for mobile homes and where local codes do not permit the use of 3 wire connections Direct wi...

Страница 13: ...cable to external ground conductor screw Tighten screw 4 Place the hooked ends of the other direct wire cable wires under the outer terminal block screws hooks facing right Squeeze hooked ends togethe...

Страница 14: ...t wire cable must have 5 ft 1 52 m of extra length so dryer can be moved if needed Strip 31 2 8 9 cm of outer covering from end of cable Strip insulation back 1 2 5 cm If using 3 wire cable with groun...

Страница 15: ...k screw 2 Remove neutral ground wire from external ground conductor screw Connect neutral ground wire and the neutral wire white or center wire of power supply cord cable under center silver colored t...

Страница 16: ...nformation see the Assistance or Service section Rigid metal vent For best drying performance rigid metal vents are recommended Rigid metal vent is recommended to avoid crushing and kinking Flexible m...

Страница 17: ...t the dryer from the rear of the dryer Other installations are possible Optional exhaust installations This dryer can be converted to exhaust out the right side left side or through the bottom If you...

Страница 18: ...t vent outside Determine vent path Select the route that will provide the straightest and most direct path outdoors Plan the installation to use the fewest number of elbows and turns When using elbows...

Страница 19: ...nel Gently lay the dryer on the cardboard See illustration 3 Examine the leveling legs Find the diamond marking 4 Screw the legs into the leg holes by hand Use a wrench to finish turning the legs unti...

Страница 20: ...inked 5 Check that the dryer is level See Level Dryer 6 In the U S A For power supply cord installation plug into a grounded outlet For direct wire installation turn on power In Canada Plug into a gro...

Страница 21: ...matically vary from the default time based on the size and fabric type of the load Toward the end of the drying process the estimated time display will adjust again showing the final drying time To us...

Страница 22: ...ted time display will adjust based on the approximate load size cycle dryness level selected and amount of moisture left in the clothes When the clothes have reached approximately 80 of the dryness le...

Страница 23: ...Tips Select the correct cycle and dryness level or temperature for your load If a Sensor Cycle is running the display shows the estimated cycle time when your dryer is automatically sensing the drynes...

Страница 24: ...us light glows the load is about 80 dry NOTE The Damp indicator does not glow during timed cycles Cool Down The Cool Down light glows during the cool down part of the cycle Laundry is cooling down for...

Страница 25: ...LE PREVENT Feature When you are unable to remove a load of clothes from the dryer as soon as it stops wrinkles can form The WRINKLE PREVENT feature periodically tumbles rearranges and fluffs the load...

Страница 26: ...drying time and 3 much dryer clothes approximately 30 more drying time 1 The Sensor Cycles Dryness settings cannot be changed while the dryer is running 2 Press and hold the Sensor Cycles Dryness but...

Страница 27: ...dryer during removal check the exhaust hood and remove the lint See Venting Requirements As needed cleaning Laundry detergent and fabric softener residue can build up on the lint screen This buildup c...

Страница 28: ...r only when you are at home If you will be on vacation or not using your dryer for an extended period of time you should 1 Unplug dryer or disconnect power 2 Clean lint screen See Cleaning the Lint Sc...

Страница 29: ...p When balled up the load will bounce causing the dryer to vibrate Separate the load items and restart the dryer Dryer displaying code message PF power failure check the following Was the drying cycle...

Страница 30: ...nings at the top and bottom of the door The front of the dryer requires a minimum of 1 2 5 cm of airspace and for most installations the rear of the dryer requires 5 12 7 cm See the Installation Instr...

Страница 31: ...U S A Call Maytag Services LLC Customer Assistance toll free 1 800 688 9900 or vist our website at www maytag com Our consultants provide assistance with Features and specifications on our full line o...

Страница 32: ...llation of your major appliance if it is installed in an inaccessible location or is not installed in accordance with published installation instructions 11 Major appliances with original model serial...

Страница 33: ...de non respect des instructions Votre s curit et celle des autres est tr s importante Nous donnons de nombreux messages de s curit importants dans ce manuel et sur votre appareil m nager Assurez vous...

Страница 34: ...troite est n cessaire lorsque la s cheuse est utilis e pr s d eux Avant d enlever la s cheuse du service ou la jeter enlever la porte du compartiment de s chage Ne pas mettre la main dans la s cheuse...

Страница 35: ...installe la laveuse et la s cheuse PERFORMANCE SERIES et que l on souhaite viter de voir des objets tomber derri re les machines il est possible d acheter une paire de dosserets pour laveuse s cheuse...

Страница 36: ...sur les c t s et l arri re L espacement recommand doit tre consid r pour les raisons suivantes On pr voira un peu plus d espace pour faciliter l installation et l entretien Un espace suppl mentaire pe...

Страница 37: ...Il faut prendre des dispositions sp ciales pour l apport d air de l ext rieur dans la s cheuse L ouverture telle qu une fen tre proximit devrait tre au moins deux fois plus grande que l ouverture de d...

Страница 38: ...iner le tableau du conduit d vacuation Apporter les modifications n cessaires au syst me d vacuation pour atteindre le meilleur rendement de s chage En cas de nouveau syst me d vacuation Mat riel pour...

Страница 39: ...air que les coudes 90 Brides de serrage Utiliser des brides pour sceller tous les joints Le conduit d vacuation ne doit pas tre connect ou fix avec des vis ou avec tout autre dispositif de serrage qui...

Страница 40: ...installations o le d gagement est r duit Veuillez consulter la section Assistance ou service pour passer une commande Installation au dessus de la s cheuse Pi ce num ro 4396028 Installation de p risc...

Страница 41: ...tteindre la meilleure performance de s chage Tableau des syst mes d vacuation REMARQUE Les installations d vacuation du conduit par le c t ou par le bas comportent un changement de direction 90 l int...

Страница 42: ...vers le bas et v rifier nouveau si elle est de niveau Achever l installation 1 V rifier que toutes les pi ces sont install es S il reste une pi ce passer en revue les diff rentes tapes pour d couvrir...

Страница 43: ...t affich e lorsqu un programme de d tection est s lectionn Au cours des premi res minutes du processus de s chage la dur e du programme peut varier automatiquement par rapport la dur e par d faut en f...

Страница 44: ...de d tection Cette caract ristique am liore le rendement de s chage avec la fonction de d tection automatique de l humidit plus qui fait avancer le programme au fur et mesure que l humidit est extrait...

Страница 45: ...de la s cheuse Pour activer la caract ristique Verrouillage des commandes lorsque la s cheuse est en marche Appuyer sur le bouton CYCLE END SIGNAL pendant trois secondes La commande est verrouill e lo...

Страница 46: ...rmittence pendant 120 minutes Si la caract ristique WRINKLE PREVENT est s lectionn e les v tements cessent de culbuter et la partie Dry sec du t moin s illumine Wet mouill Le t moin lumineux de statut...

Страница 47: ...UM LIGHT qu on ouvre ou ferme la porte ou qu on laisse la porte ouverte pendant 20 minutes Lorsque la s cheuse ne fonctionne pas la lampe du tambour s allume lorsqu on appuie sur la touche DRUM LIGHT...

Страница 48: ...e pause 2 Choisir le nouveau modificateur et ou la nouvelle option 3 Appuyer sans rel cher sur START PAUSE pour poursuivre le programme Modifier les pr r glages de degr de s chage des programmes de d...

Страница 49: ...nt 7 Appuyer environ 1 seconde sur le bouton HOLD TO START appuyer sans rel cher pour mettre en marche REMARQUE Vous devez enlever la grille de s chage pour le culbutage normal Ne pas utiliser les pro...

Страница 50: ...bstru par suite d une accumulation de r sidus Lavage 1 Enlever la charpie du filtre en la roulant avec les doigts 2 Mouiller les deux c t s du filtre charpie avec de l eau chaude 3 Mouiller une brosse...

Страница 51: ...ie Voir Nettoyage du filtre charpie Pr cautions prendre avant un d m nagement 1 D brancher le cordon d alimentation lectrique 2 Veiller ce que les pieds de nivellement soient fix s solidement la base...

Страница 52: ...ndit ce qui fait vibrer la s cheuse S parer les articles de la charge et remettre la s cheuse en marche La s cheuse affiche un message cod PF panne de courant v rifier ce qui suit Le programme de s ch...

Страница 53: ...oivent comporter des ouvertures d a ration au sommet et en bas de la porte Un espace minimum de 1 2 5 cm est n cessaire l avant de la s cheuse et pour la plupart des installations un espace de 5 12 7...

Страница 54: ...client le de Maytag Services LLC ou appeler le centre de service d sign par Maytag le plus proche Aux tats Unis T l phoner sans frais au Centre d assistance la client le de Maytage Services LLC au 1...

Страница 55: ...ppareil si celui ci est install dans un endroit inaccessible ou n est pas install conform ment aux instructions d installation fournies 11 Les gros appareils m nagers dont les num ros de s rie et de m...

Страница 56: ...k Trademark of Maytag Corporation or its related companies Used under license by Maytag Limited in Canada Marque d pos e Marque de commerce of Maytag Corporation ou de ses compagnies affili es Emploi...

Отзывы: