background image

SYSTEM OPERATION

16

VENT-DRAIN

Figure 8

NOTE: 

For 

non-direct vent 

installations, a minimum of one 

90° elbow should be installed on the combustion air intake 

coupling to guard against inadvertent blockage.

COMBUSTION AIR PIPE

Direct Vent Installations

E

DGES


OF


SHEET


METAL


HOLES


MAY


BE


SHARP

. U

SE


GLOVES


AS


A


PRECAUTION


WHEN


REMOVING


HOLE


PLUGS

.

WARNING

On 

upflow 

units secure the combustion air intake pipe  to 

the air intake coupling by using a take apart rubber coupling 

supplied with the furnace or a plastic coupling.  Also, the in

-

take coupling may be inverted to allow the intake pipe to be 

glued directly to it. After inverting the coupling, secure it to 

the furnace top with screws. On 

counterflow

 units secure the 

combustion air intake pipe to the air intake coupling using the 

rubber coupling and worm gear hose clamps provided with the 

unit. The counterflow rubber coupling allows service removal 

of air intake piping internal to the furnace blower compartment.   

The combustion air intake pipe can also be secured directly 

to the counterflow unit air intake pipe coupling.

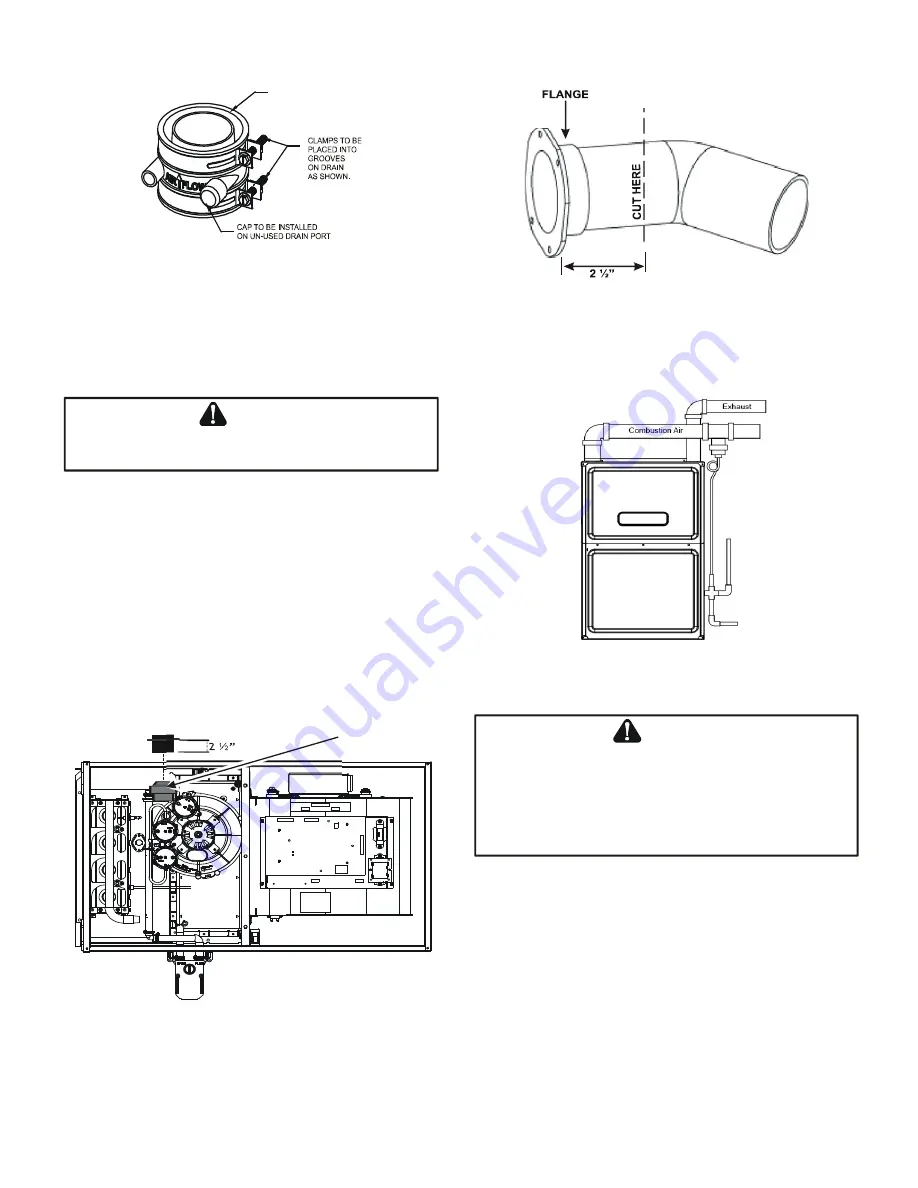
Insert flange. Cut 2 ½” long. 

Figure 9

RF000142

Figure 10


Figure 9B

T

HE


RUBBER


ELBOW


IS


NOT


DESIGNED


TO


SUPPORT


A


LOAD

. W

HEN


THE


RUBBER


ELBOW


IS


MOUNTED


EXTERNALLY


TO


THE


FURNACE


CABINET

EXTREME


CARE


MUST


BE


TAKEN


TO


ADEQUATELY


SUPPORT


FIELD

-

SUPPLIED


VENT

/

FLUE


PIPING

AS


DAMAGE


CAN


RESULT


IN


LEAKS


CAUSING


BODILY


INJURY


OR


DEATH


DUE


TO


EXPOSURE


TO


FLUE


GASES

INCLUDING


CARBON


MONOXIDE

WARNING

COMBUSTION AIR INTAKE OPTIONS:

 The RF000142 cou

-

pling can be secured directly to the furnace intake coupling 

if condensation is a concern. If the RF000142 is used on the 

combustion air inlet, it must be installed with the arrow point

-

ing up. It should be noted, the combustion air will actually be 

moving in a direction opposite of the arrow on the RF000142 

coupling. It must have a field supplied, trapped drain tube 

free-draining to proper condensate disposal location. A loop 

in the drain tube can serve as a trap. The unused RF000142 

drain fitting should be capped. A tee installed in the intake 

pipe is also an acceptable method of catching condensation. 

It  must  have  a  field  supplied,  trapped  drain  tube  or  pipe, 

free-draining to proper condensate disposal location. A loop 

in the drain tube can serve as a trap. (See Figure 9B) 

Содержание Amana ACVM97 Series

Страница 1: ...PECIFIED IN THIS MANUAL WITHOUT PROPER TRAINING MAY RESULT IN PRODUCT DAMAGE PROPERTY DAMAGE PERSONAL INJURY OR DEATH Cancer and Reproductive Harm www P65Warnings ca gov PROP 65 WARNING FOR CALIFORNIA CONSUMERS 0140M00517 A Pride and workmanship go into every product to provide our customers with quality products It is possible however that during its lifetime a product may require service Product...

Страница 2: ...PLIANCE WARNING HIGH VOLTAGE DISCONNECT ALL POWER BEFORE SERVICING OR INSTALLING THIS UNIT MULTIPLE POWER SOURCES MAY BE PRESENT FAILURE TO DO SO MAY CAUSE PROPERTY DAMAGE PERSONAL INJURY OR DEATH RECOGNIZE SAFETY SYMBOLS WORDS AND LABELS IMPORTANT INFORMATION OUTSIDE THE U S call 1 713 861 2500 Not a technical assistance line for dealers Your telephone company will bill you for the call ...

Страница 3: ...actly which has been under water C Use only your hand to move the gas control switch or knob Never use tools If the gas control switch or knob D Do not use this appliance if any part has been under water Immediately call a qualified service technician to inspect the appliance and to replace any part of the control system and any gas control 7 Wait five 5 minutes to clear out any will not operate d...

Страница 4: ...it demandez immediatement a un reparateur qualifie d inspecter l appareil et de remplacer toute piece du systeme de controle et toute commande de gaz ayant ete dans l eau 0140F00002P INSTRUCTIONS DE SERVICE 1 UN INSTANT Lisez d abord les consignes 2 Reglez le thermostat a son point le plus bas 3 Coupez l alimentation electrique de l appareil 4 Cet appareil est muni d un mecanisme qui allume automa...

Страница 5: ...13 861 2500 Not a technical assistance line for dealers Your telephone company will bill you for the call B10259 216 CO can cause serious illness including permanent brain damage or death Advertencia especial para la instalación de calentadores ó manejadoras de aire en áreas cerradas como estacionamientos ó cuartos de servicio B10259 216 El monóxido de carbono puede causar enfermedades severas com...

Страница 6: ...ns Not used for inventory control Configura on NOx M N Low NOx C Cabinet Width Motor B 17 C 21 V Variable Speed ECM ComfortBridge D 24 E ECM S Single Speed Maximum CFM 2 800 CFM 4 1600 CFM Gas Valve 3 1200 CFM 5 2000 CFM M C Two Stage MBTU h S Single Stage 040 40 000 BTU h 060 60 000 BTU h AFUE 120 120 000 BTU h 97 97 AFUE 96 96 AFUE 92 92 AFUE ...

Страница 7: ...eps 1 through 3 if installing the control on a furnace Return any old or new controls to their containers before touching any ungrounded object TO PREVENT PROPERTY DAMAGE PERSONAL INJURY OR DEATH DUE TO FIRE DO NOT INSTALL THIS FURNACE IN A MOBILE HOME TRAILER OR RECREATIONAL VEHICLE WARNING Product Application Furnace Alone Furnace 1 Stage Non Communicating A C Furnace 1 Stage Non Communicating A...

Страница 8: ...ollow the latest edition of the National Fuel Gas Code NFPA 54 ANSI Z223 1 and or CAN CSA B149 1 15 Installation Codes local plumbing or waste water codes and other applicable codes A copy of the National Fuel Gas Code NFPA 54 ANSI Z223 1 can be obtained from any of the following American National Standards Institute 25 West 43rd Street 4th Floor New York NY 10036 National Fire Protection Associat...

Страница 9: ...ustion and Ventilation Air Requirements for details If the furnace is used in connection with a cooling coil unit install the furnace upstream or in parallel with the cooling coil unit Premature heat exchanger failure will result if the cooling unit is placed ahead of the furnace For vertical upflow or downflow applications the min imum cooling coil width shall not be less than furnace width minus...

Страница 10: ...ng system serving other appliances the venting system may be too large to properly vent the remaining attached appliances The following vent testing procedure is repro duced from the American National Standard National Standard of Canada for Gas Fired Central Furnaces ANSI Z21 47 CSA 2 3 latest edition Section 1 23 1 The following steps shall be followed with each appliance connected to the ventin...

Страница 11: ...r requirements for the appliances Most homes will require outside air be supplied to the furnace area by means of ventilation grilles or ducts connecting di rectly to the outdoors or spaces open to the outdoors such as attics or crawl spaces INSTALLATION POSITIONS This furnace may be installed in an upright position or hori zontal on either the left or right side panel Do not install this furnace ...

Страница 12: ...ing connections may also be used in these positions Refer to Vent Flue Pipe and Combustion Air Pipe for details concerning the conversion to the alternate vent flue and combustion air connections When using the horizontal alternate vent configuration you must use the RF000142 vent drain kit See following illustration Alternate Vent Flue Location Figure 3A Figure 3B Figure 3C Recommended Installati...

Страница 13: ...this product It is the responsibility of the installer to follow the manufac turers recommendations and to verify that all vent flue piping and connectors are compatible with furnace flue products Additionally it is the responsibility of the installer to ensure that all piping and connections possess adequate structural integrity and support to prevent flue pipe separation shifting or sagging duri...

Страница 14: ...ate a water trap Piping must be adequately secured and supported to prohibit sagging joint separation and or detachment from the fur nace Horizontal runs of vent flue piping must be supported every three to five feet and must maintain a 1 4 inch per foot downward slope back towards the furnace to properly return condensate to the furnace s drain system Allowances should be made for minor expansion...

Страница 15: ...VC Primer Purple or clear Use PVC Solvent Cement Gray For Canadian installations ABS may be used as a combus tion air pipe only ABS is not an approved vent material in Canada If ABS is used as a combustion air pipe it must be CSA certified Always follow the manufacturer s instructions in the use of primer and cement Do not use primer and ce ment around potential sources of ignition Do not use prim...

Страница 16: ...w unit air intake pipe coupling Insert flange Cut 2 long Figure 9 RF000142 Figure 10 Figure 9B THE RUBBER ELBOW IS NOT DESIGNED TO SUPPORT A LOAD WHEN THE RUBBER ELBOW IS MOUNTED EXTERNALLY TO THE FURNACE CABINET EXTREME CARE MUST BE TAKEN TO ADEQUATELY SUPPORT FIELD SUPPLIED VENT FLUE PIPING AS DAMAGE CAN RESULT IN LEAKS CAUSING BODILY INJURY OR DEATH DUE TO EXPOSURE TO FLUE GASES INCLUDING CARBO...

Страница 17: ...feet in length and one elbow tee 3 Tee used in the vent flue termination must be included when determining the number of elbows in the piping system 4 2 or 3 diameter pipe can be used in place of 2 diam eter pipe 5 Increased Clearance Configurations using 2 45 deg Long Sweep elbows should be considered equivalent to one 90 degree elbow NON DIRECT VENT INSTALLATIONS A minimum of one 90 elbow should...

Страница 18: ...ength of pipe should be the wall thickness plus the depth of the socket fittings to be installed on the inside and outside of the wall The wall penetration should be sealed with silicone caulking material NOTE Terminate both pipes in the same pressure zone same side of roof no major obstacles between pipes etc 90º OR 45 ELBOW 12 MIN TO GRADE OR HIGHEST ANTICIPATED SNOW LEVEL 6 MAX 4 MIN Standard H...

Страница 19: ... to furnace 6 Max Floor Basement Crawlspace DOWN VENTING UPFLOW MODEL FURNACES ONLY All piping and fittings must be joined per material manufacturers specifications to prevent separation and flue gas leaks Figure 12 STRAIGHT ELBOWS Figure 14 COMBUSTION AIR INTAKE OPTIONAL Not required for single pipe installation TEE OPTIONAL 96 MAX 3 MIN ROOF LINE 12 MIN HEIGHT DIFFERENCE BETWEEN INTAKE AND VENT ...

Страница 20: ...ingle unit If more than one direct vent furnace is to be installed horizon tally through a common side wall maintain the clearances as in the following figure Always terminate all exhaust vent outlets at the same elevation and always terminate all air intakes at the same elevation CONCENTRIC VENT TERMINATION Refer to the directions provided with the Concentric Vent Kit DCVK for installation specif...

Страница 21: ...e a cabinet seal when installed See instructions below for your model and installation position NOTE Both sides of the drain trap must be primed prior to initial furnace start up FIELD SUPPLIED DRAIN Drain the furnace and air conditioning coil if applicable in compliance with code requirements In horizontal or coun terflow installations a field installed rubber coupling will allow the drain trap t...

Страница 22: ...nd install them in the blower deck 5 Draining the Vent Elbow Locate hose 2 factory installed and cut 1 away from the 45 degree bend discard the 45 degree section Insert hose 2 from out side the cabinet through the cabinet drain hole nearest the top Secure it to the barbed fitting in the elbow with a red clamp 6 Draining the Collector Box Install the non grommet end of hose 11 from outside the cabi...

Страница 23: ...e top mounting tabs of the trap into the two predrilled holes in the side of the cabinet 14 Refer to Field Supplied Drain section for instructions on field supplied installed drain on outlet of furnace trap UPFLOW MODEL INSTALLED HORIZONTALLY WITH LEFT SIDE DOWN ALTERNATE Also see Front Cover Pressure Switch Tube Location on page 9 Insert flange Cut 2 long R 000142 F Figure 25 1 Draining the RF000...

Страница 24: ...r to Field Supplied Drain section for instructions on field supplied installed drain on outlet of furnace trap COUNTERFLOW MODEL INSTALLED HORIZONTALLY WITH RIGHT SIDE DOWN Minimum 5 clearance is required for the drain trap beneath the furnace NOTE For horizontal installations some of the required hoses are found in the factory installed hose assemblies Remove the hose clamps to obtain the respect...

Страница 25: ...et must point to the original bottom of the furnace 16 Using the two sheet metal screws provided in the cab inet secure the trap to the furnace 17 Refer to Field Supplied Drain section for instructions on field supplied installed drain on outlet of furnace trap ELECTRICAL CONNECTIONS HIGH VOLTAGE TO AVOID THE RISK OF ELECTRICAL SHOCK WIRING TO THE UNIT MUST BE POLARIZED AND GROUNDED WARNING HIGH V...

Страница 26: ...r door interlock switch which interrupts unit voltage when the blower door is opened for servicing Do not defeat this switch EXTREMELY IMPORTANT This system does not contain an O wire input reversing valve signal If a heat pump is installed the thermostat should be setup for single stage heat single stage cool installs W Heat Call and Y Cool Call Setting thermostat for heat pump control will resul...

Страница 27: ...e each of these items have defaulted values for Comfort Settings 1 5 Only when Comfort Setting 6 is selected will each item be available for full adjustment 1 Stage Up Percent 7 segment menu SUP This is a value that determines how far past the target runtime the system should continue running the heat pump before transitioning to the furnace For example assume this menu was set to 20 with a target...

Страница 28: ...nditioner Heat Pump Airflow etc are based off of multipliers which are percentages of this maximum CFM Max CFM is as follows 3 Ton Models 1400 CFM 4 Ton Models 1760 CFM 5 Ton Models 2200 CFM Setup Furnace Airflow Adjust the Gas Heating Airflow menu gAF setting to the desired percentage of maximum airflow In most cases the default gas heat airflow will provide a temperature rise near the middle of ...

Страница 29: ...cooling calls and 24VAC on W for Heating calls Based on these simple inputs internal algorithms will decide how to control two stages of furnace heat in addition to any single or multi stage outdoor heating cooling operation the algorithms will handle dual fuel multi stage systems as well The thermostat must be setup to provide only a Y call when cooling is required and only a W call when heating ...

Страница 30: ...pment 2 stage AC HP units and Inverter AC HP units The thermostat is only required to provide a single stage heat cool call and fan or dehumidification call during operation Two wires are required between the indoor unit and outdoor unit on the 1 and 2 terminals It is recommended to install a separate transformer with all 2 stage outdoor units to reduce the power draw on the indoor transformer 4 w...

Страница 31: ...NS R C G Y 24 VAC Thermostat 1 2 C Heat Pump Optional R C Y This is the only case where setting the thermostat to heat pump mode is acceptable NON COMMUNICATING SINGLE STAGE HEAT PUMP R C G Y Optional Optional Optional if feature supported by thermostat INDOOR BOARD TERMINAL CONNECTIONS 1 2 C R C G Y C Y Remote Condensing Unit Single Stage Cooling 24 VAC Thermostat Non Communicating Single Stage A...

Страница 32: ...rket Use Y W G signals Thermostat has a Dehum or Configurable terminal with Dehum option Yes No Does your thermostat have a whole house Dehumidifier setting Install Dehumidistat in living space or return duct If the Dehumidistat opens on a rise on humidity then you will set Dehum logic to Low via Coolcloud app or push buttons If the Dehumidistat closes on a rise in humidity then you will set Dehum...

Страница 33: ... ELECTRICAL SHOCK DISCONNECT ELECTRICAL POWER BEFORE SERVICING OR CHANGING ANY ELECTRICAL WIRING WARNING The accessory load specifications are as follows EAC 1 0 Amp maximum at 120 VAC The furnace integrated control module is equipped with a line voltage accessory terminal for controlling power to an optional field supplied electronic air cleaner or any device required to operate in parallel with ...

Страница 34: ...e required for account setup Connecting Phone Application to Furnace When in close proximity to the furnace the phone application will detect the Bluetooth Network being broadcasted by the system Once the Bluetooth network is selected by the user due to security reasons the user will be prompted for a 3 digit access code before system information can be displayed The 3 digit code will be displayed...

Страница 35: ...ns The three switches are labeled Left Center and Right The center switch is used to enter into the option menu and make the selection the left and right switches are used to browse the main menu and option menus When the center switch is pressed in the main menu the furnace control will go to the option menu and display the default or previously selected option Pressing the left or right button w...

Страница 36: ...g displayed will stop flashing To then complete the selection process and make 45 the official fan only setting Press and Release the Center Button for the last time This final step will jump the user back to the main menu list and FSd will be displayed again 2 The constant fan multiplier has now been changed from 25 to 45 Airflow Display When the blower is running the CFM will be displayed in Sta...

Страница 37: ...ypes The furnace must be equipped to operate on the type of gas applied This includes any conversion kits required for alternate fuels and or high altitude Inlet gas supply pressures must be maintained within the ranges specified in the following table The supply pressure must be constant and available with all other household gas fired appliances operating The minimum gas supply pres sure must be...

Страница 38: ...THE FURNACE WARNING Gas Piping Connections 1 1 1 10 132 278 520 1050 1600 20 92 190 350 730 1100 30 73 152 285 590 980 40 63 130 245 500 760 50 56 115 215 440 670 60 50 105 195 400 610 70 46 96 180 370 560 80 43 90 170 350 530 90 40 84 160 320 490 100 38 79 150 305 460 CFH BTUH Furnace Input _______________ _________ Heating Value of Gas BTU Cubic Foot Natural Gas Capacity of Pipe In Cubic Feet of...

Страница 39: ...ere Use listed gas appliance connectors in accordance with their instructions Connectors must be fully in the same room as the furnace Protect connectors and semirigid tubing against physical and thermal damage when installed Ensure aluminum al loy tubing and connectors are coated to protect against external corrosion when in contact with masonry plaster or insulation or subjected to repeated wett...

Страница 40: ...A PROPANE SUPPLIER TO INSTALL A GAS DETECTING WARNING DEVICE IN CASE OF A GAS LEAK SINCE PROPANE GAS IS HEAVIER THAN AIR ANY LEAKING GAS CAN SETTLE IN ANY LOW AREAS OR CONFINED SPACES PROPANE GAS ODORANT MAY FADE MAKING THE GAS UNDETECTABLE EXCEPT WITH A WARNING DEVICE WARNING 200 PSIG Maximum 5 to 15 PSIG 20 PSIG Max Continuous 11 W C Second Stage Regulator First Stage Regulator Propane Gas insta...

Страница 41: ...e coil drilling a test hole in it and reinstalling the block off plate Take a duct static reading at the test hole Tape up the test hole after your test is complete The negative pressure must be read between the filter and the furnace blower Too much external static pressure will result in insufficient air that can cause excessive temperature rise This can cause limit switch tripping and heat exch...

Страница 42: ...p with this furnace but must be provided sized and installed externally by the installer Filters must comply with UL900 or CAN ULCS111 standards Damage or repairs due to the installation of the furnace without filters is not covered under the warranty On upflow units guide dimples locate the side return cutout locations Use a straight edge to scribe lines connecting the dimples Cut out the opening...

Страница 43: ...lue gases escaping through the drain system FURNACE OPERATION Purge gas lines of air prior to startup Be sure not purge lines into an enclosed burner compartment Follow NFPA 54 Na tional Fuel Gas Code for proper purging methods In Canada follow approved purging methods in CAN CSA B149 1 15 Check for leaks using an approved chloride free soap and water solution an electronic combustible gas detecto...

Страница 44: ...r gas piping size etc and or consult with local gas utility 5 Turn OFF gas to furnace at the manual shutoff valve and disconnect manometer Reinstall plug before turning on gas to furnace 6 Turn OFF any unnecessary gas appliances stated in step 3 GAS MANIFOLD PRESSURE MEASUREMENT AND ADJUSTMENT TO PREVENT UNRELIABLE OPERATION OR EQUIPMENT DAMAGE THE GAS MANIFOLD PRESSURE MUST BE AS SPECIFIED ON THE...

Страница 45: ...ment display IdL 6 Provide the thermostat W call again The furnace will now operate in low stage for greater than 5 minutes assuming the target runtime has been set to something greater than 10 minutes 7 When test is complete remove the W heat call to the furnace The system will shut down NOTE When converting from natural gas to L P consult your distributor for proper conversion kit Gas Type Gas I...

Страница 46: ...stage operation Circulator blower is energized on heat speed following the selected blower on delay and will begin to ramp up Electronic air cleaner terminal is energized with circulator blower Furnace is now operating on the specified stage deter mined by the internal control algorithm Furnace runs integrated control module monitors safety circuits continuously The W terminal thermostat contacts ...

Страница 47: ...e control Any tools held in a person s hand during grounding will be discharged 3 Service integrated control module or connecting wiring following the discharge process in step 2 Use caution not to recharge your body with static electricity i e do not move or shuffle your feet do not touch ungrounded objects etc If you come in contact with an ungrounded object repeat step 2 before touching control...

Страница 48: ... or electronic air cleaner can be used as an alternate filter Follow the filter sizes given in the Recommended Minimum Filter size table to ensure proper unit performance To remove filters from an external filter rack in an upright upflow installation follow the directions provided with external filter rack kit Horizontal Unit Filter Removal Filters in horizontal installations are located in the c...

Страница 49: ...tor Rollout Limit Switch Heat Exchanger with Primary Limit Switch Recuperator Coil Auxiliary Limit Switch Coil Front Cover Pressure Switch Integrated Control Module Induced Draft Blower Transformer Door Switch Bluetooth Module WARNING HIGH VOLTAGE DISCONNECT ALL POWER BEFORE SERVICING OR INSTALLING THIS UNIT MULTIPLE POWER SOURCES MAY BE PRESENT FAILURE TO DO SO MAY CAUSE PROPERTY DAMAGE PERSONAL ...

Страница 50: ...wing information for removal and installation of filters FILTER REMOVAL PROCEDURE MEDIA AIR FILTER OR ELECTRONIC AIR CLEANER REMOVAL Follow the manufacturer s directions for service UPRIGHT COUNTERFLOW FILTER REMOVAL To remove filters from the ductwork above an upright coun terflow installation 1 Turn off electrical power to furnace 2 Remove access door in ductwork above furnace 3 Remove filters 4...

Страница 51: ... for the hand on the cubic foot dial to make one complete revolution with all appliances off except the furnace Take this information and locate it on the gas rate chart Observe the forty 40 seconds locate and read across to the one 1 cubic foot dial column There we find the num ber 90 which shows that ninety 90 cubic feet of gas will be consumed in one 1 hour Let s assume the local gas utility ha...

Страница 52: ...2 164 327 655 1636 37 97 195 486 12 75 150 300 600 1500 38 23 47 95 189 474 13 69 138 277 555 1385 39 92 185 462 14 64 129 257 514 1286 40 22 45 90 180 450 15 60 120 240 480 1200 41 176 439 16 56 113 225 450 1125 42 21 43 86 172 429 17 53 106 212 424 1059 43 167 419 18 50 100 200 400 1000 44 41 82 164 409 19 47 95 189 379 947 45 20 40 80 160 400 20 45 90 180 360 900 46 78 157 391 21 43 86 171 343 ...

Страница 53: ...era ture rise limitation BTU HR Calculation Example The unit being tested takes 40 seconds for the 1 cubic foot dial to make one complete revolution Using the chart this translates to 90 cubic feet per hour Based upon the assumption that one cubic foot of natural gas has 1 025 BTU s Check with your local utility for actual BTU content the calculated input is 92 250 BTU s per hour Furnace Nameplate...

Страница 54: ...TRANSFORMERS TRANSFORMER SECONDARY PRIMARY GND C R LINE VOLTAGE L1 HOT LINE VOLTAGE NEUTRAL METER READS 24 VOLTS METER READS 120 VOLTS GND C R N L1 GND C R N L1 READS 96 VOLTS IN PHASE READS 144 VOLTS OUT OF PHASE If meter reads approximately 96 volts the primary to secondary are in phase if reads approximately 144 volts out of phase reverse low voltage wires C R G N D NEUTRAL L1 PHASING SYMBOL 24...

Страница 55: ...G 1 Check wiring visually for signs of overheating damaged insulation and loose connections 2 Use an ohmmeter to check continuity of any suspected open wires 3 If any wires must be replaced replace with AWM 105 C 2 64 thick insulation of the same gauge or its equivalent CHECKING THERMOSTAT WIRING THERMOSTAT AND WIRING DISCONNECT ALL POWER BEFORE SERVICING WARNING 1 Remove the blower compartment do...

Страница 56: ...hoke Correction is required when powering the 3 4 and 1 horsepower motors with 115 volts inductor pictured below The operation of this inductor is to reduce the line current by storing the electrical energy in a magnetic field such that the voltageAC waveform leads the current AC waveform In other words the inductor reduces line current which extends the life of the 3 4 and 1 horsepower motors IMP...

Страница 57: ...e motor Allow up to 5 seconds for the motor to start NOTE If the orange power button does not illuminate when depressed the tool either has an open fuse or is not properly connected to a 24VAC source 8 The green LED on the diagnostic tool will blink indicating communications between the tool and motor See table below for indications of tool indicators and motor actions Replace or repair as needed ...

Страница 58: ...ontrol harness between the motor and control board Voltage should be between 3 and 15 VDC 3 If no voltage is present check control board See section S 313 MOTOR CONTROL END BELL CHECKS HIGH VOLTAGE Disconnect ALL power before servicing or installing Multiple power sources may be present Failure to do so may cause property damage personal injury or death 1 Disconnect power to the furnace NOTE Motor...

Страница 59: ... by a given motor speed or pulley adjustment The furnace motor cannot deliver proper air quantities CFM against statics other than those listed Too great of an external static pressure will result in insuffi cient air that can cause excessive temperature rise resulting in limit tripping etc Whereas not enough static may result in motor overloading To determine proper air movement proceed as follow...

Страница 60: ...he BTUH output of the furnace and the amount of air CFM circulated over the heat exchanger Measure motor current draw to determine that the motor is not overloaded during adjustments CHECKING PRIMARY LIMIT CONTROL Primary limit controls are nonadjustable automatic reset bi metal type limit control Refer to the following drawing for the location of the primary limit 2 PRIMARY LIMIT CONTROL Primary ...

Страница 61: ...blower housing one on each side as shown in the following illustration LIMIT AUXILIARY LIMIT CONTROL AUXILIARY LIMIT CONTROL BLOWER HOUSING Auxiliary Limit Control Location Select 90 95 Furnaces MANUAL OR AUTOMATIC RESET AUXILIARY LIMITS LOCATED IN BLOWER SIDE WARNING HIGH VOLTAGE DISCONNECT ALL POWER BEFORE SERVICING OR INSTALLING THIS UNIT MULTIPLE POWER SOURCES MAY BE PRESENT FAILURE TO DO SO M...

Страница 62: ... motor leads 4 Touch one probe of the ohmmeter to the motor frame ground and the other probe in turn to each lead If the windings do not test continuous or a reading is obtained to ground replace the motor 5 If the windings have a continuity reading reconnect wires Turn power on to the furnace and turn the thermostat on in the heating mode Check voltage for 115V at the induced draft motor terminal...

Страница 63: ...nt dam age They should be removed and installed with a box end wrench in order to prevent distortion In no instance should an orifice be peened over and re drilled This will change the angle or deflection of the vacuum effect or entraining of primary air which will make it difficult to adjust the flame properly This same problem can occur if an orifice spud of a different length is substituted WAR...

Страница 64: ...nstall plug before turning on gas to fur nace 6 Turn OFF any unnecessary gas appliances started in step 3 7 Turn on gas to furnace and check for leaks If leaks are found repair and then reinstall burner compartment door 8 Turn on electrical power and verify proper unit operation WARNING HIGH VOLTAGE DISCONNECT ALL ELECTRICAL POWER AND SHUT OFF GAS SUPPLY BEFORE SERVICING OR INSTALLING THIS UNIT MU...

Страница 65: ...oor and verify proper unit operation d Turn on power and close thermostat R and W1 contacts to provide a call for low stage heat e Measure the gas manifold pressure with burners firing Adjust manifold pressure f Use the modulation adjustment screw on the gas valve and turn clockwise one click using a pocket screwdriver to increase gas flow Allow the gas flow to adjust ap proximately 15 seconds bef...

Страница 66: ...show a complete circuit across the pressure switch If the switch is not closed compare the negative pressure to the closing point speci fied for the particular switch Either the switch is defective or the inducer venting system is inadequate OPEN TO ATMOSPHERE INCLINED MANOMETER HOSE TO INDUCED DRAFT BLOWER TAP 1 4 TEE INDUCED DRAFT BLOWER PRESSURE SWITCH PRESSURE SWITCH HOSE INDUCED DRAFT BLOWER ...

Страница 67: ... wiring If this step is successful give the control a call for heat and wait five 5 seconds or until the furnace goes into lockout If the control detects a failure it will now be shown on the diag nostic indicator light display Refer to the Abnormal Operation section in the Sequence of Operation section of this manual for more detail on failure codes 1 Check for 120 volts from Line 1 Hot to Line 2...

Страница 68: ...d the sensor terminal 3 Be sure the positive side of the meter is to the flame sen sor wire and the negative side of the meter is to sensor terminal LINE VOLTAGE NOW PRESENT WARNING 4 Place the unit into a heating cycle 5 As soon as flame is established a micro amp reading should be evident once proof of flame micro amp reading is established the hot surface igniter will be de energized 6 The Inte...

Страница 69: ...heat d Segment 1 Segment 2 Segment 3 Idle I d L Constant Fan Compressor Cooling Low Stage I Compressor Cooling High Stage Compressor Cooling Single Stage Compressor Heat Low Stage I Compressor Heat High Stage Compressor Heat Single Stage Gas Heat Low Stage Gas Heat High Stage Defrost Low Stage Gas Heat d Defrost High Stage Gas Heat d Segment 1 Segment 2 Segment 3 Humidifier d De Humidifier d Venti...

Страница 70: ...t Switch Open d Condensate Switch Open Grounding Fault Rollout Switch Open Redundant Relay Open Redundant Relay Stuck Closed Status Data Not Yet on Network Invalid Data on Network Invalid External Shared Data Invalid Downloaded Firmware Un Recognized Data ID Blower Motor Not Running Blower Communication Alarm Blower Motor HP ID Mismatch Blower Motor Operating in Power Temperature or Speed Limit Bl...

Страница 71: ...as Heat d Defrost Low Stage Gas Heat Defrost High Stage Gas Heat d Defrost High Stage Gas Heat Name 7 Segment Display Cloud Phone App Idle IdL Idle Constant Fan Constant Fan Compressor Cooling Low Stage Compressor Cooling Low Stage Compressor Cooling High Stage Compressor Cooling High Stage Compressor Cooling Single Stage Compressor Cooling Single Stage Compressor Heat Low Stage Compressor Heat Lo...

Страница 72: ...ons for the furnace staging algorithm opera on only shows up when ClimateTalk T Stat is not connected Hum On Enable 1 16 op ons and the default op on is 15 Provides the 16 humidifier enabling op ons in different opera on modes Ven la on On Time Adjustable between 0 60 minutes The default is 0 minute Off Adjusts the ven la on on me and turn it on off DeHum Logic Hi and Lo The default is Lo Provides the...

Страница 73: ...termediate I 15 12 9 6 3 0 3 6 9 12 15 Trims the cooling airflow by the selected amount Cool Trim Factor Low L 15 12 9 6 3 0 3 6 9 12 15 Trims the cooling airflow by the selected amount Cool Airflow Profile A B C D Select cooling airflow profiles Cool On Delay d 5 10 20 30 Selects the cooling on delay Cool Off Delay d 30 60 90 120 Selects the cooling off delay Dehum Enable d On or Off Enables the ...

Страница 74: ...lower performance Turn power OFF prior to repair Igniter is fragile handle with care Clean fame sensor with steel wool See Vent Flue Pipe section for piping details Furnace fails to operate Integrated control module LED display provides error code Low stage pressure switch circuit is closed at start of heating cycle Low stage pressure switch contacts sticking Shorts in pressure switch circuit wiri...

Страница 75: ... on low stage Integrated control module LED display provides error code High stage pressure switch circuit is closed at start of hea ng cycle Induced dra blower is opera ng Furnace is opera ng on low stage only High stage pressure switch contacts s cking Shorts in pressure switch circuit wiring Replace high stage pressure switch Repair short in wiring Turn power OFF prior to repair Replace pressur...

Страница 76: ...round source Turn power OFF prior to service Furnace fails to operate Integrated control module LED display provides error code Open rollout switch Gas pressure too high Burners mis aligned Restricted heat exchanger or venting Check correct gas pressure Check correct burner alignment Check correct restriction Turn power OFF prior to service Furnace fails to operate Integrated control module LED di...

Страница 77: ...irculator blower if motor horsepower is the same specified for the specific furnace model Replace if necessary Verify shared data set is correct for the specific model Re populate data using the CoolCloudHVAC App if required Turn Power OFF prior to repair Replace motor with correct replacement part Error code will be cleared once shared data and motor horsepower match Furnace operates at reduced p...

Страница 78: ...ed Integrated control module LED display provides error code Airflow is low er than demanded Blocked filters Restrictive ductw ork Undersized ductw ork Check integrated control module Verify control is populated w ith correct shared data set See data errors above for details Check for locked rotor condition see error code above for details Turn pow er off prior to repair Check filters for blockage...

Страница 79: ...d draining Venting The venting system should be planned and installed with the following in mind Should not be longer than necessary Use 45 elbows rather than 90 elbows when possible Must not sag or otherwise trap condensate Use longest radius fittings possible If using 3 venting make the transition from 2 to 3 as close as practically possible Make sure there is no flue gas recirculation into the ...

Страница 80: ...ESET PRIMARY WH 1 RD RED GY GRAY 40 kBTU CONTROLS SINGLE CONTROL ON MANUAL RESET ROLLOUT LIMIT WH L NOTES GY PK BK 5 SWITCH ASSEMBLY ID BLOWER TWO STAGE PRESSURE OR SERVICING WIRING EQUIPMENT GND ON SOME MODELS INTERNAL TO PRESSURE SWITCH HIGH FIRE PROT DEVICE INTEGRATED CONTROL PK C USE COPPER CONDUCTORS ONLY AT LEAST 105 IT MUST BE REPLACED WITH WIRING MATERIAL HAVING A TEMPERATURE RATING OF 3 I...

Страница 81: ...with select Goodman and Amana Brand 34 5 furnace models ACVC9 and GCVC9 These kits are available for the following furnace widths 17 5 wide CFSB17 21 wide CFSB21 and 24 wide CFSB24 The kits must be used to prevent excessive temperature from reaching combustible materials if the furnace is installed on a combustible floor This subbase effectively separated the furnace base and plenum from combustib...

Страница 82: ... gas furnace products installed on LP gas listed in this manual This kit includes harness adaptors to work with White Rodgers single two stage gas valves Honeywell single and two stage gas valves as well as modulating gas valves LPM 10 N A LP Conversion Kit For use with the ComfortBridge Brand Modulating Furnace using the White Rodgers 36J27 Kit includes 1 25 mm orifices a jumper clip instructions...

Страница 83: ...05CNB X X MVM971205DNB X X CVM970603BNB X X X X CVM970803BNB X X X X CVM970804CNB X X X X CVM971005CNB X X Model Number AM11 AE14 CFSB17 CFSB21 CFSB24 RF000142 Description Media Air Cleaners Electronic Air Cleaner Downflow Subbase 17 5 Downflow Subbase 21 Downflow Subbase 24 5 Drain Coupling Kit MVM970603BNB X X X MVM970803BNB X X X MVM970804CNB X X X MVM971005CNB X X X MVM971205DNB X X X CVM97060...

Страница 84: ...on L P Kit Low LP Tank Protection High Altitude Natural Gas Kit MVM970603BNB X X X MVM970803BNB X X X MVM970804CNB X X X MVM971005CNB X X X MVM971205DNB X X X CVM970603BNB X X X CVM970803BNB X X X CVM970804CNB X X X CVM971005CNB X X X 97 Com Furnace Accessories ...

Страница 85: ...rm on one of the following links Goodman Brand Products http www goodmanmfg com about contact us Amana Brand Products http www amana hac com about us contact us You can also scan the QR code on the right for the product brand you purchased to be directed to the feedback page GOODMAN BRAND AMANA BRAND ...

Отзывы: