

page 2
Note:
If your
LED Outdoor Wall Sconce
does not turn on after
battery installation:
•
Make sure the batteries have been inserted matching the
c / - polarity orientation and are making secure
contact with the terminals.
•
Make sure you are testing the
LED Outdoor Wall Sconce
in
a dark area since the light will only turn on at night.
Note:
Dispose of old batteries properly, following your local and
state regulations. Do not dispose of batteries in regular
household refuse or into a fire.
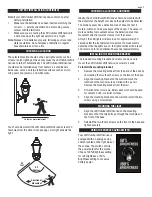
The selected location should not be near light sources such as
street or porch lighting as these may cause the
LED Outdoor Wall
Sconce
to turn off automatically. The
LED Outdoor Wall Sconce
should also be installed away from heaters, air conditioners,
barbecues, vents, and large reflective surfaces such as swim-
ming pools and jacuzzis, and white walls.
You should also install the
LED Outdoor Wall Sconce
at least 30
feet away from the street since passing cars might activate the
light.
Ideally, the
LED Outdoor Wall Sconce
should be mounted with
the detector at the height of or above the objects to be detected.
The motion sensor has a detection area of about 22 feet (7
meters) within a 100 degree angle of the sensor. The sensor is
more sensitive to movement across the detection area than
movement directly towards or away from the sensor.
At night, the LED lights will remain on for approximately 30
seconds after the last detected movement. If a movement is
detected while the lights are on, the light duration will be reset
and remain on for an additional 30 seconds (approximately).
The included mounting bracket and screws can be used to
mount the
LED Outdoor Wall Sconce
securely to a wall.
To install the mounting bracket:
1. Remove the mounting bracket from the back of the base by
unscrewing the two thumb screws on the front of the base.
2. Align the mounting bracket on the wall and mark the
locations of the two holes to be drilled with a pencil.
Remove the mounting bracket from the wall.
3. Drill pilot holes for screws. Screw anchors should be used
for cement, brick, or similar surfaces.
4. Align the mounting bracket on the wall and install the two
screws using a screwdriver.
1. Align the
LED Outdoor Wall Sconce
on the mounting
bracket so that the two bolts go through the two holes on
the front of the base.
2. Reinstall the two thumb screws on the front of the base and
tighten securely.
Your
LED Outdoor Wall Sconce
is
equipped with an energy-saving
switch, located on the right side of
the sconce. The switch controls
the power output for the sconce.
Choose 100% Brightness setting
for full brightness, or 50%
Brightness setting to conserve
battery power.
BATTERY INSTALLATION (CONTINUED)
CHOOSING A LOCATION
INSTALLING THE MOUNTING BRACKET
MOUNTING THE LIGHT
USING THE ENERGY SAVING SWITCH
30 feet or more from street
90
Degrees
22
feet
Direction of
Movement
CHOOSING A LOCATION, CONTINUED