background image

10

Chapter 3 Quick Installation Instructions

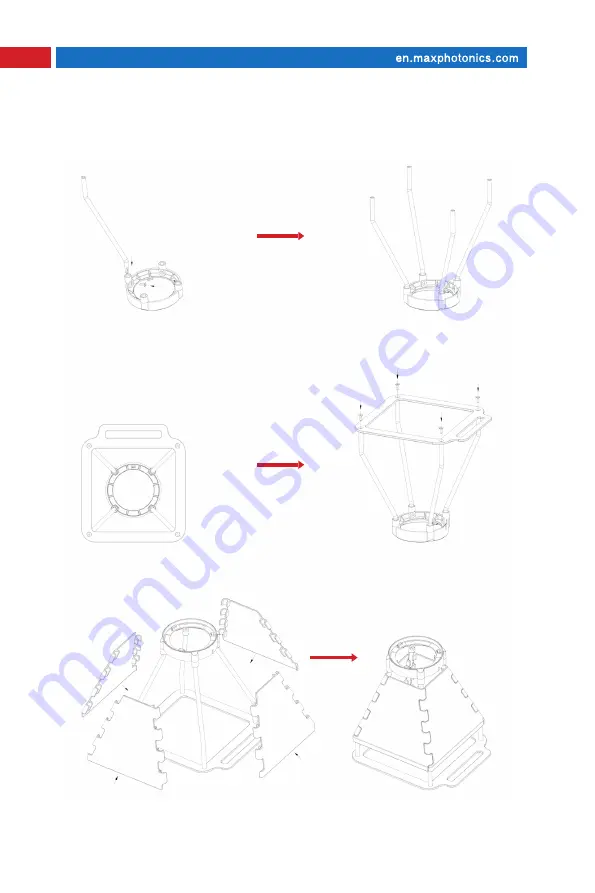
1. Insert the 4 support rods into the connector, then lock the screws.

2. Align the bottom plate with the support rod, the connector "BACK" is in the 

same direction as the groove on the bottom plate, and then lock the screws.

3. Buckle the bottom 4 protective sheets into the support rod.

2-Fixed Focus Bracket Installation Instructions

Содержание E1-10W

Страница 1: ...Maxphotonics Co Ltd E1 10W All in one Engraving Machine Fiber Laser ...

Страница 2: ...rthermore Maxphotonics does not assume responsibility for any infringement of patents or other rights of third parties due to use of the information contained in this document Maxphotonics shall not be liable for errors contained in this document or for direct or indirect damages of relevant equipment Maxphotonics and the Maxphotonics Logo are registered trademarks of Maxphotonics Co Ltd and the L...

Страница 3: ...ng Maxphotonics products Please take time to read and understand this User s Guide and familiarize yourself with the operating and maintenance instructions before you use the product We strongly recommend that the operator read the Section 2 titled Safety Information prior to operating the product This User s Guide should stay with the product to provide you and all future users and owners of the ...

Страница 4: ... is the second largest domestic fiber laser manufacturer in the domestic market Maxphotonics specializes in the research development production and sales of fiber lasers including pulsed fiber lasers continuous fiber lasers and direct diode lasers It also implements pump sources combiners fiber gratings isolators laser output heads and stripping Optical devices such as molds acousto optic modulato...

Страница 5: ...icator Description 8 1 Host Indicator 8 2 Power Interface 8 Chapter 3 Quick Installation Instructions 9 1 Handheld Engraving 9 2 Fixed Focus Bracket Installation Instructions 10 Chapter 4 Download And Operation 11 1 Download And Install 11 2 Access The Host 11 3 Connect To WIFI 12 4 APP Device Connection 12 Chapter 5 Product Specifications 14 ...

Страница 6: ...Contents 4 Chapter 6 Use Safety Guidelines 15 Chapter 7 Precautions 17 Chapter 8 Disclaimer 18 Chapter 9 Warn 19 Chapter 10 Copyright Statement 21 Chapter 11 Appendix 22 ...

Страница 7: ...5 Chapter 1 Product Accessories List 1 Host 2 Power Adapter 3 Fixed focus bracket 4 Wireless network card 5 Goggles 6 Wooden ruler 1 Standard products Included In This Set ...

Страница 8: ...6 Chapter 1 Product Accessories List Manual lift table host 2 Professional Edition ...

Страница 9: ...7 Chapter 1 Product Accessories List 3 Deluxe Edition Electric lift table host mobile portable power supply material package DECLARE For details of packaging please refer to the purchased version ...

Страница 10: ...ption 1 Host Indicator 2 Power Interface 1 Preview button 2 Host indicator 3 Short press to stop long press to start engraving button 1 Electric stand power interface 2 Exhaust fan reserved power interface 3 Host DC power interface round ...

Страница 11: ...gn the surface of the object to be engraved 2 Access the host DC power supply 3 The installation is complete Complete the engraving according to the APP guidelines 1 Install the fixed focus bracket on the bottom of the main unit 1 Handheld Engraving Carved Object Surface ...

Страница 12: ...nnector then lock the screws 2 Align the bottom plate with the support rod the connector BACK is in the same direction as the groove on the bottom plate and then lock the screws 3 Buckle the bottom 4 protective sheets into the support rod 2 Fixed Focus Bracket Installation Instructions ...

Страница 13: ... click the software installation package select the installation path check agree to install install complete the installation 2 Access The Host Insert the wireless network card into the computer search for the WiFi hotspot of the engraving machine and connect it The initial password of the WiFi hotspot is 123456789 Host DC power interface Owl PC Client Owl Android Client ...

Страница 14: ...en two color light which means the WiFi system is stable 1 If Wi Fi is not turned on turn on Wi Fi first 2 Click Device not connected on the main interface again confirm that the device is powered on and find the corresponding address of the handheld marking machine 3 When you need to disconnect click Device is connected enter the next interface and click the connection device address page and a p...

Страница 15: ...firm whether the power of the device is turned on and whether the battery is charged After confirming power off and restart and follow the steps to connect again 2 Connection failure Please confirm whether the device has been connected to other mobile terminals or computers If there is a connection you need to disconnect other connections first and then follow the steps to connect again ...

Страница 16: ...ngth 1064nm Laser output power 10W Exterior Aluminum alloy anodizing document transfer WiFi Supported document formats jpg png bmp dxf dwg APP connection method WiFi connection APP operating system Support Android 6 0 Windows 10 power input DC 24V 7 5A range of working temperature 0 C 40 C Operating humidity range 5 80 non zero frosting ...

Страница 17: ... install a fixed focus bracket or a laser protective cover wear goggles to prevent the laser from accidentally hurting your eyes or skin and remove irrelevant items to prevent laser exposure And cause unnecessary damage especially to remove flammable and explosive materials to prevent fire 5 When starting the engraving after the laser is started do not move the device so as not to cause the device...

Страница 18: ...lectric fan to blow it away in time or place it in a spacious and ventilated place to operate 10 Before using this product to engrave objects check whether the engraved objects have total reflection or diffuse reflection characteristics and special attention should be paid to safety protection for such objects it is recommended to use a whiteboard pen to blacken the engraved area before engraving ...

Страница 19: ...xtremely important to the safe operation of this product Regarding the operation and maintenance specifications of this product please strictly follow the instructions in this manual When operating this product be sure to wear goggles throughout When the engraving machine processes high reflection materials if the processing graphics are in the center of the marking area there will be a phenomenon...

Страница 20: ...e injury to you and the surrounding people or damage the host or other surrounding items Once you use this product it is deemed that you have carefully read the disclaimer and warning information and understand recognize and accept all terms and contents of this statement You promise to use this product only for normal purposes and agree that Owl Laser will not be responsible for any damage injury...

Страница 21: ... such as goggles protective covers protective clothing or fire fighting equipment etc and it is strictly forbidden to stack flammable and explosive materials around the workbench and equipment and the working environment must be preserved good ventilate There may be risks in the process of laser work Users should carefully consider whether the material of the object to be engraved is suitable for ...

Страница 22: ...d on the laser will be emitted at the speed of light and the user must avoid direct exposure to the laser beam It is strictly forbidden to place any irrelevant total reflection or diffuse reflection objects in the equipment so as to prevent the laser light from being reflected on the human body or flammable objects Before using this product to engrave objects please ensure that the emissions gener...

Страница 23: ...red trademark of maxphotonics 2 The information in this manual is subject to change without notice and the information in this manual does not constitute a commitment of the company Please refer to our web page www maxphotonics com for the latest updates 3 The contents of this manual shall not be rewritten and forwarded in any form or for any purpose without the written permission of the company e...

Страница 24: ...ay cause harmful interference to radio communications Operation of this equipment in a residential area is likely to cause harmful interference in which case the user will be required to correct the interference at his own expense This device complies with Part 15 of the FCC rules Operation is subject to the following two conditions 1 this device may not cause harmful interference and 2 this devic...

Отзывы: