background image

7

TM

7

 )

6

Loosen


the


locking


knobs

  (

step


Pull


the


table


extensions


out


to


the


desired


length 

(

step

    ) 

and secure 


the


table


extensions


by tightening 


the


locking


knobs.


Insert


the


workpiece


supports 

(

F

into


the


table


extensions

 (

step

    )

.


Adjust


the


height


of


the


workpiece


supports 

(

F

)

.


Tighten


the


locking


knobs 

(

G

with 

spring 

(

I

)

 and blocker 

(

H

)

 to lock 


1


2

3

4

Extending the Saw Stand

(

see Figs. 6

and

7

)

2

2

1

3

4

the


workpiece


support 

(

F

) (

step

    )

.

WARNING

Ensure


that


the


saw


stand


is


stable


and


that


all


locking


pins


have


been


engaged

.

A

S

SEMBL

Y

Содержание 057-2330-8

Страница 1: ......

Страница 2: ......

Страница 3: ...all our toll free helpline at 1 888 670 6682 Parts list Assembly 5 Specifications Safety guidelines 10 Operation Warranty 3 SAVE THESE INSTRUCTIONS This manual contains important safety and operating instructions Read all instructions and follow them with use of this product TM CONSERVEZ CES INSTRUCTIONS 11 15 4 9 ...

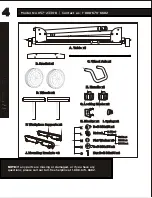
Страница 4: ...ave any questions please call our toll free helpline at 1 888 670 6682 G Locking Knobs x2 Model No 057 2330 8 Contact us 1 888 670 6682 B Bracket x1 J Mounting Brackets 2 H Blocker x2 I Spring x2 Hex Bolt M6x35 x4 K Flat Washer x8 Nut x8 M1 M6 x4 M2 M8 x2 M3 M12 x2 M O Bolt M6x15 x4 L L1 M6 x6 L2 M8 x2 N Bolt M6x35 x2 A Table x1 ...

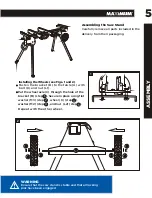
Страница 5: ... the delivery from their packaging ASSEMBLY 5 TM Put the wheel axle C through the hole of the 4 3 5 2 2 4 5 3 bracket B step Secure in place using flat washer M3 step wheel D step 1 2 3 1 Installing the Wheels see Figs 1 and 2 Fasten the bracket B to the table A with bolt K and nut L1 2 washer M2 step and nut L2 step 4 5 Repeat with the other wheel 1 ...

Страница 6: ... three legs Flip the saw stand back to the working position firmly against the floor step Tighten the lock nut again step The saw stand is easily levelled with its height adjustable legs Loosen lock nut step the leg in or out until the saw stand is aligned level and all four legs are and screw 1 2 3 3 Installing the Handle see Fig 3 Insert the handle E onto the two tubular brackets on the end of t...

Страница 7: ...s Insert the workpiece supports F into the table extensions step Adjust the height of the workpiece supports F Tighten the locking knobs G with spring I and blocker H to lock 1 2 3 4 Extending the Saw Stand see Figs 6 and 7 2 2 1 3 4 the workpiece support F step WARNING Ensure that the saw stand is stable and that all locking pins have been engaged ASSEMBLY ...

Страница 8: ... to each other Position the mounting brackets J on the saw stand and push the locking handle down until the locking pin can be heard to engage Adjusting the Mounting Brackets see Fig 8 After intensive use of the saw stand the mounting brackets may require readjustment Turn the mounting brackets J upside down and screw the adjustment screw in clockwise counter clockwise direction according to your ...

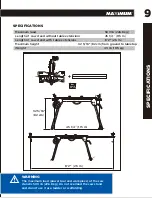
Страница 9: ...aximum height 32 5 16 82 cm from ground to tabletop Max 500 lb The maximum load power tool and workpiece of the saw stand is 500 lb 226 8 kg Do not overload the saw stand and do not use it as a ladder or scaffolding 226 8 kg Weight 43 lb 19 5 kg SPECIFICATIONS SPECIFICATIONS Maximum load WARNING 45 1 4 1 15 m 32 5 16 82 cm 8 2 2 5 m ...

Страница 10: ...power tool or the workpiece cannot be uniformly and securely guided Do not overload the saw stand and do not use it as a ladder or scaffolding Overloading or standing on the saw stand can lead to the upward shifting of the centre of gravity of the stand and its tipping over When working or transporting take care that all bolts and connecting elements are firmly tightened The mounting brackets sets...

Страница 11: ...aw and lock the saw arm in the down position Lower the saw down onto the brackets J feeding the hex bolts O through the sliding plate Secure in place using a flat washer M1 Repeat steps to install second bracket J to the other side of the saw After making sure both brackets J are parallel to each other finger tighten all four hex bolts O to hold in position Attaching the Mounting Brackets see Fig ...

Страница 12: ...rmly especially the longer and heavier section Sawing Workpieces of the Same Length The material stop can be used for easily sawing workpieces to the same length Tilt the material stop upward Position the workpiece support F at the desired clearance to the saw table of the power tool see Figs 11 and 12 ...

Страница 13: ...and move the power tool to the wheel side of the saw stand Firmly tighten both locking handles of the mounting brackets J First hold the miter saw stand on the wheel side fold the legs into the table step then fold the other two legs Then you can easily move the power tool together with the saw stand 1 2 3 4 5 6 in the down position and then tighten the locking knobs G to lock the workpiece suppor...

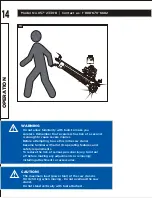
Страница 14: ...re attempting to use this mitre saw stand become familiar with all of its operating features and safety requirements To reduce the risk of serious personal injury turn tool off before making any adjustments or removing installing attachments or accessories The maximum load power tool of the saw stand is 110 lb 50 kg when moving Do not overload the saw stand Max 1 l 10 b 50 kg Do not stand vertical...

Страница 15: ...kmanship and material to be assessed and determined by the Service Provider b this warranty will not apply to any product or part thereof which is worn or broken or which has become inoperative due to abuse misuse accidental damage neglect or lack of proper installation operation or maintenance as outlined in the applicable owner s manual or operating instructions c this warranty does not apply to...

Страница 16: ...he original product warranty conditions and related time period as initiated by the original date of purchase if product is purchased in Quebec the warranty term will be extended for a period equal to the time during which the Quebec retailer possesses the product in attempt to fulfill warranty obligations replaced product will not default to new product warranty conditions and m The retailer and ...

Страница 17: ...ent of the purchaser at law in equity or otherwise in no event shall the liability of the retailer or manufacturer under this warranty whether in contract tort product liability or otherwise exceed in the aggregate the amount paid by the purchaser to the retailer for the product to which this warranty applies Notice to Consumer This warranty gives you specific legal rights and you may have other r...

Страница 18: ...Made in China Imported by MAXIMUM Canada Toronto Canada M4S 2B8 Model No 057 2330 8 Contact us 1 888 670 6682 18 WARRANTY ...

Отзывы: