background image


Spangenberg International B.V. 

– Nijverheidsweg 19F – 3641 RP Mijdrecht – Holland – T. +31 (0) 297 253 969 – F. +31 (0) 297 256 445 

[email protected]

 - 

www.maximaholland.com


Read this instruction manual completely before attempting to install and operate this product. All 
installations and set ups must be done by authorized service agents, your dealer, or Maxima 
representatives. 


If your machine is supplied with a factory fitted molded plug then you may plug the unit into a standard 
electrical outlet. Make sure that the voltage of the machine and the wall outlet are compatible. If your 
machine is not supplied with a factory fitted molded plug then a qualified electrical technician must be 
contracted to wire the unit to the power supply. 


Before using your appliance for the first time it is recommended to clean the appliance according to 
instructions mentioned in 

chapter “

Cleaning and Maintenance

.  


Installation  
 
1.


The machine must be positioned on a flat and stable surface.  

 
2.


Choose a surface where the machine is not exposed to direct sunlight, or close to a direct source of heat 
such as a cooker, oven or radiator. 

 
3.


When positioning the appliance, maintain a distance of 10cm (4 inches) between the appliance and walls or 
other objects for ventilation and ease of use. 

4.


Level and position the machine in such a way that the plug is accessible at all times. 

 
5.


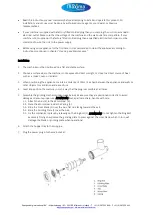
Assemble the grinding mechanics (see image below). Make sure they are positioned correctly to avoid 
damage and ensure proper use. ATTENTION! Some parts are sharp, handle with care. 
5.1.


Attach the Axis (4) to the Worm Gear (5). 

5.2.


Place the Worm Gear inside the Casing (6). 

5.3.


Slide the Cross Blade (3) over the Axis, flat side facing towards the exit. 

5.4.


Slide the Grinding Plate (2) over the Axis. 

5.5.


Fix the mechanics in place by screwing on the Ring Bolt (1). ATTENTION! Do not tighten the Ring Bolt 
excessivly. Doing so will cause the grinding plate to press against the cross blade, which in turn will 
damage the blade or grinding plate when operational. 

 
6.


Attach the hopper tray to the top pipe. 
 

7.


Plug the power plug into the main socket. 


Содержание 09300445

Страница 1: ...69 F 31 0 297 256 445 info spangenberg nl www maximaholland com MAXIMA MEAT MINCERS USER MANUAL GEBRUIKSHANDLEIDING BEFORE USING THIS PRODUCT YOU SHOULD READ THIS USER MANUAL PROPERLY ALVORENS U DIT PRODUCT IN GEBRUIK GAAT NEMEN DIENT U EERST AANDACHTIG DEZE GEBRUIKSHANDLEIDING DOOR TE LEZEN ...

Страница 2: ...We know you will enjoy using this product and Thank You for choosing our product We hope you consider Maxima for your future equipment purchases NEDERLANDS Introductie Bedankt voor het aanschaffen van dit Maxima product Deze instructies dienen volledig gelezen te worden voordat u dit product gaat installeren of gebruiken Op deze manier kunt u optimaal en veilig van dit product gebruik maken Uw nie...

Страница 3: ... Hardened Steel Plates Hardened Steel Casing Stainless Steel Tray Stainless Steel Worm Gear Stainless Steel Ring Bolt Stainless Steel Knives Hardened Steel Plates Hardened Steel Accessories 1 Pusher 1 Sausage Filler Ø20 mm 2 Cross Knives Grinding Plate 6 mm Grinding Plate 8 mm 1 Pusher 1 Sausage Filler Ø20 mm 2 Cross Knives Grinding Plate 6 mm Grinding Plate 8 mm 1 Pusher 1 Sausage Filler Ø20 mm 2...

Страница 4: ...s near the moving parts of the machine Never let children use professional machines without supervision Always pull the power plug out of the socket when the machine is not being used ATTENTION As long as the power plug is in the socket the machine is connected to the power source Keep all packaging away from children Dispose of packaging in accordance to the regulations of local authorities Turn ...

Страница 5: ...n a flat and stable surface 2 Choose a surface where the machine is not exposed to direct sunlight or close to a direct source of heat such as a cooker oven or radiator 3 When positioning the appliance maintain a distance of 10cm 4 inches between the appliance and walls or other objects for ventilation and ease of use 4 Level and position the machine in such a way that the plug is accessible at al...

Страница 6: ...g from the main socket Clean the appliance according to instructions see chapter Cleaning and Maintenance Cleaning and Maintenance Maintenance and repairs should only be done by certified engineers Regularly check and clean the appliance its parts and accessories if aplicable Regularly check the power plug and power cable for damage If either is damaged do not use the appliance Instead have it rep...

Страница 7: ... there is a device fault or quality problem of spare parts under correct operation The following is not included in the free service 1 Damages result from transportation installation improper connections 2 Component damages caused by failing to provide power and voltage as required in technical data 3 Damages caused by disassembling products adjust or change the mechanical and electrical structure...

Страница 8: ... H460 x B240 x D440 mm H610 x B390 x D740 mm Afmetingen Schaal H45 x B85 x D370 mm H40 x B270 x D400 mm H45 x B85 x D370 mm Gewicht 26 Kg 32 Kg 55 Kg Materiaal Behuizing RVS Schaal RVS Wormwiel RVS Dopmoer RVS Messen Gehard Staal Gatenschijven Gehard Staal Behuizing RVS Schaal RVS Wormwiel RVS Dopmoer RVS Messen Gehard Staal Gatenschijven Gehard Staal Behuizing RVS Schaal RVS Wormwiel RVS Dopmoer ...

Страница 9: ...adiging Indien de stekker of snoer beschadigd is laat de reparatie bij een erkend bedrijf uitvoeren Gebruik het apparaat niet nadat het is gevallen of op andere wijze beschadigd is Laat het bij een erkend reparatiebedrijf controleren en zo nodig repareren WAARSCHUWING Probeer het apparaat niet zelf te repareren Dit kan levensgevaar opleveren Zorg dat het snoer niet met scherpe of hete voorwerpen i...

Страница 10: ...en zonder stekker geleverd wordt dient u dit door een gediplomeerd vakman te laten monteren Alvorens ingebruikname wordt geadviseerd het apparaat te reinigen volgens de instructies genoemd in het hoofdstuk Reiniging Onderhoud Installatie 1 Plaats het apparaat op een vlakke en stabiele ondergrond 2 Kies een plek uit die niet in direct zonlicht staat of dichtbij een warmtebron zoals bijvoorbeeld een...

Страница 11: ...een producten door de buis als de machine niet aan staat LET OP Gebruik alleen de meegeleverde stopper om producten door de buis te duwen Andere voorwerpen kunnen de machine beschadigen WAARSCHUWING Gebruik nooit uw handen om producten in de buis te duwen Dit kan ernstig letsel veroorzaken Duw voorzichtig en geleidelijk het product in de buis Duw niet te hard dit kan de machine beschadigen Vang he...

Страница 12: ... geen oplosmiddel of benzine houdende middelen Deze reinigingsmiddelen kunnen het apparaat beschadigen of schadelijke residu s achterlaten Reinig de onderdelen en accessoires met warm water en een mild reinigingsmiddel dat geschikt is voor gebruik in de voedselindustrie Gebruik een vochtige doek om de buitenkant van de machine te reinigen Droog het apparaat altijd na het reinigen gebruik hiervoor ...

Страница 13: ...zaken vallen niet onder de garantie 1 Schade als gevolg van transport installatie of verkeerde aansluitingen 2 Component schade veroorzaakt door verkeerde elektrische of water aansluiting 3 Schade als gevolg van demontage of aanpassingen aan de orginele machine zonder toestemming 4 Schade als gevolg van verkeerd gebruik slechte reiniging of ondeskundig onderhoud 5 Schade als gevolg van brand insto...

Отзывы: