background image

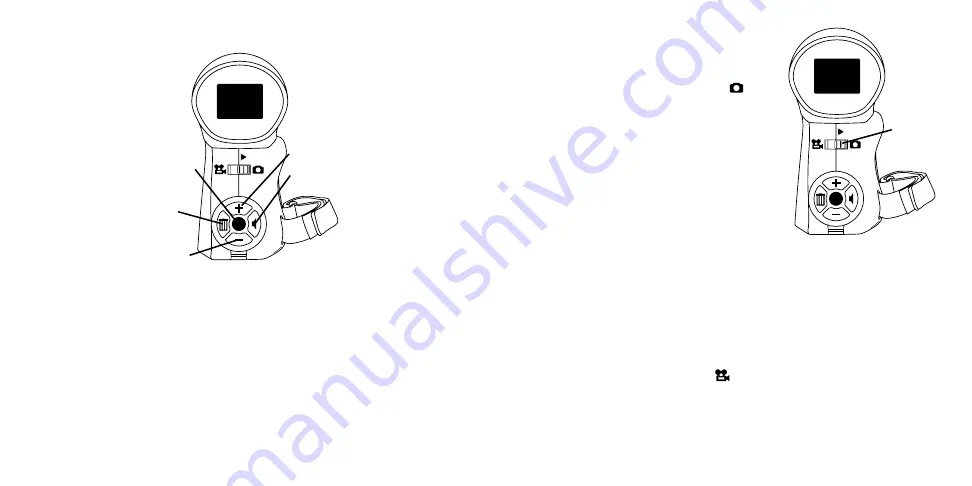
Here’s a list of what the buttons on the Control Pad do:

Direction Pad (D-Pad) 

Function

Up 


Zoom In; Scroll Up, Volume Up

Down   


Zoom Out; Scroll Down, Volume Down

Left 


Delete (playback only)

Right 


Volume Control (playback only)

Center   


Start / Stop Recording; Select Option

Taking a Picture

To take a picture using the Vidster™:

1. Switch the camera ON.

2. Set the Mode switch to PICTURE.  

    A camera icon will appear on the screen.

3. Set the Zoom (see Zoom In / Zoom Out  

    section for details).

4. Press the Center button to take the picture

Your picture is then displayed for you to  

review. If you want to delete the current  

picture, press the Delete (left) button on the  

D-Pad. This brings up the Delete menu. Select YES or NO and press the 

Center button to confirm your choice. Otherwise, in just a few seconds, 

the photo will be saved to the archive.

Video Recording

To record a video using the Vidster™:

1. Switch the camera ON.

2. Set the Mode switch to VIDEO.         A video camera icon will  

    appear on the screen.

3. If the memory is full you will get an on-screen message saying  

    “Memory Full,” you need to delete video or add an empty SD Card.

4. Set the Zoom (see Zoom In / Zoom Out section for details).

8

9

Right

Up

Down

Center

Left

Mode

switch

Содержание Vidster

Страница 1: ...er there is no guarantee that interference will not occur in a particular installation If this equip ment does cause harmful interference to radio or television reception which can be determined by tu...

Страница 2: ...Playback Mode Connecting to your TV Downloading From Your Vidster Features Speci cations 14 Tips Troubleshooting 15 PACKAGE CONTENTS The following is included with every Mattel Vidster 1 Handheld Vid...

Страница 3: ...line batteries Battery Safety Information In exceptional circumstances batteries may leak uids that can cause a chemical burn injury or ruin your product To avoid battery leakage Do not recharge non r...

Страница 4: ...r longer shoots or self portraits To install your Grip or Tripod 1 Locate the threaded insert on the bottom of the Vidster 2 Align and insert the threads on the grip included or a Tri pod optional wit...

Страница 5: ...idster will automatically recognize when the SD Memory Card has been properly installed Note You should never remove the Memory Card while the camera is in operation Installing Microphone Optional The...

Страница 6: ...ke the picture Your picture is then displayed for you to review If you want to delete the current picture press the Delete left button on the D Pad This brings up the Delete menu Select YES or NO and...

Страница 7: ...otal Camera Playback Switch the Mode button to playback It will default to the last mode video if you just shot a video photo if you just shot a photo and press the Down button if you want to view a P...

Страница 8: ...eo archives Note If there are no pictures or scenes in the archive use the up button to return to the main menu Connecting to your TV Whether playing a scene back from the archive or showing your frie...

Страница 9: ...deo RAM or more Microsoft DirectX 9 0 installed 7200 RPM or faster hard disk Operating System Windows ME Windows 2000 Windows XP VIDSTER FEATURES SPECIFICATIONS Features 2x Digital Zoom Vidster 32MB M...

Страница 10: ...2 minutes of no operation It maybe restarted by pressing the Center button TROUBLESHOOTING Problem Resolution Batteries Low Batteries low If you see this it will soon be Appears on screen time to repl...

Страница 11: ...excluded from coverage under this warranty Mattel s liability for defects in material and workmanship under this warranty shall be limited to repair or replacement at our sole option and in no event...

Страница 12: ...trade dress are owned by Mattel Inc Retain this address for future reference Mattel U K Ltd Vanwall Business Park Maidenhead SL6 4UB www service mattel com uk Mattel Australia Pty Ltd Richmond Victori...

Страница 13: ......

Отзывы: