background image

8

Introduction &

Contents

Installing your

VCR

Setting up your

VCR

Playing a 

Video T

ape

Recording

Programmes

Advanced

Features

Help and

Specification

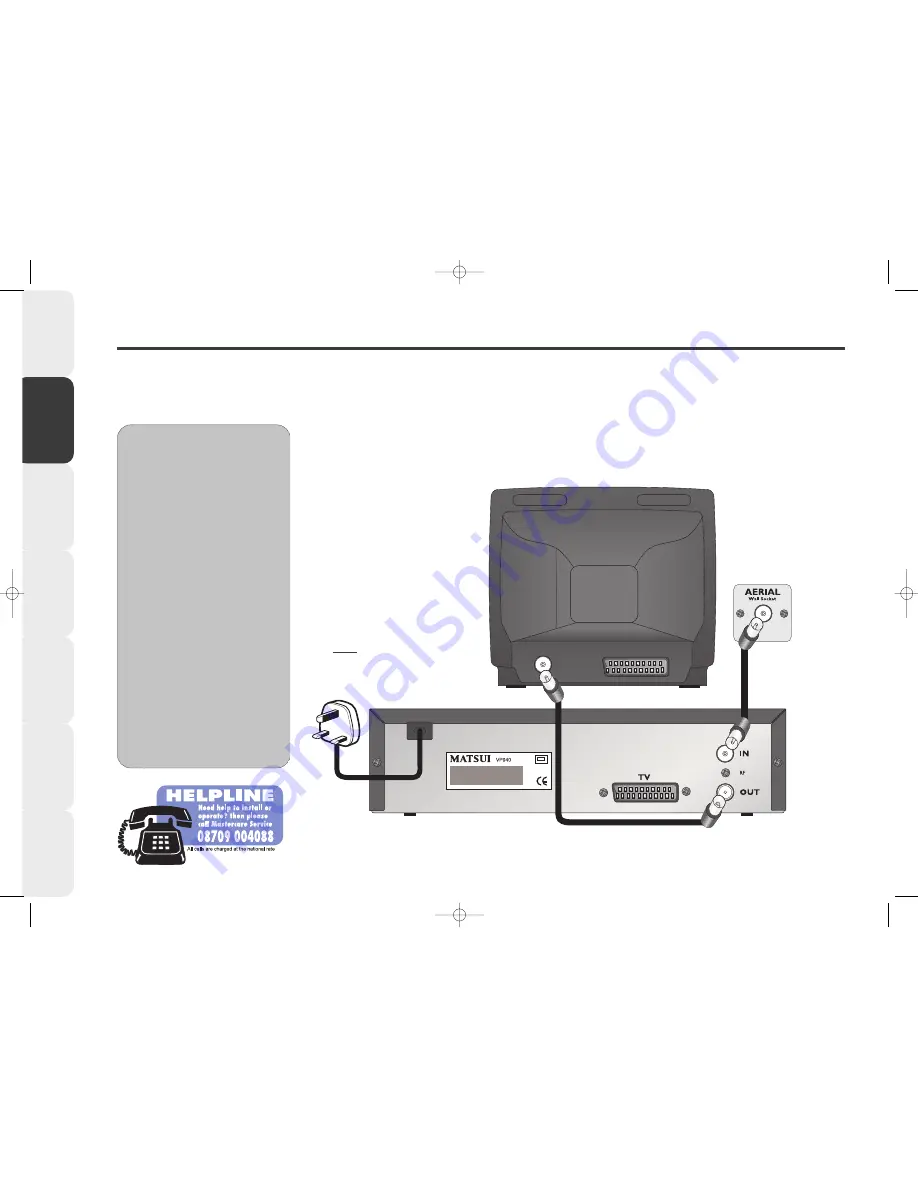
Basic VCR Installation

This page shows the most basic way to connect your VCR to your TV if you do not have a SCART lead or SCART socket on your TV. 
We recommend you connect your VCR to your TV using a SCART lead (see the previous page).
We recommend all connections must be made with both your VCR and TV unplugged from the mains supply. 

E

E

E

E

x

x

x

x

tt

tt

rr

rr

a

a

a

a


A

A

A

A

d

d

d

d

v

v

v

v

ii

ii

cc

cc

e

e

e

e

Before you can use your VCR, it

must be connected to your TV
using an aerial lead. You must also
connect your VCR to your
household aerial.

The type of household aerial

required depends on the position
of your home, it’s distance from the
transmitter and local interference. If
you do not have a household
aerial and you are uncertain of
what to buy, you should seek the
advice of a local aerial contractor.

If you use a cable service then

connect the aerial lead to your
cable decoder box instead of your
main aerial wall socket. 

(Consult your cable decoder box
instructions for more details)

8

Back view of TV

(not supplied)

.

Back view of VCR.

Aerial lead 

(not supplied).

Aerial lead 

(supplied).

DO NOT PLUG

YOUR VCR INTO

THE MAINS

SUPPLY YET.

VP9408.qxd  14/04/00  14:56  Page 8

Содержание VP9408

Страница 1: ...VP9408 qxd 14 04 00 14 56 Page 1 ...

Страница 2: ... Moisture Do not allow your VCR to be exposed to rain moisture dust If any liquid is spilt into your television it can cause serious damage If you spill any liquid into your VCR switch it off at the mains immediately Contact your store immediately Your VCR is supplied with an approved 13AMP fused mains plug When replacing the fuse always use a 3AMP BS 1362 approved type To obtain a replacement fus...

Страница 3: ...REW and Fast Forward F FWD 18 Video Index Search System 19 Clock Counter Display and Zero Return 20 Recording Programmes What are VIDEO Plus and PDC 21 One Touch Recording OTR 22 23 Recording using VIDEO Plus 24 25 Timer Recordings 26 27 Checking VIDEO Plus or Timer Recordings 28 Cancelling VIDEO Plus or Timer Recordings 29 Advanced Features Using the Playback Sharpness feature 30 Auto Repeat Play...

Страница 4: ...r r r rd d d di i i in n n ng g g gs s s s The built in timer allows automatic unattended recording of up to 8 programmes within a 1 month period S S S St t t ta a a an n n nd d d da a a ar r r rd d d d S S S SP P P P a a a an n n nd d d d L L L Lo o o on n n ng g g g P P P Pl l l la a a ay y y y L L L LP P P P Your VCR is pre set to standard play but you may extend the recording time of your vide...

Страница 5: ...harged at the national rate Introduction Contents Installing your VCR Setting up your VCR Playing a Video Tape Recording Programmes Advanced Features Help and Specification How to use this Instruction Book 5 STEP NUMBER Each page is broken down into simple steps WHAT YOU SEE A picture of your TV screen or on screen display WHAT TO PRESS A picture of the remote control or the front of your VCR show...

Страница 6: ...r any other strong light source shines on the remote sensor on your VCR Make sure there are no obstacles between your VCR and the remote control Do not operate your VCR from a distance greater than 5 meters Do not operate your VCR away from the normal viewing angle over 30o either side of the remote sensor on your VCR Use two AAA R03 UM 4 size batteries for the remote control The batteries may las...

Страница 7: ...cable service then connect the aerial lead to your cable decoder box instead of your main aerial wall socket Consult your cable decoder box instructions for more details The type of household aerial required depends on the position of your home it s distance from the transmitter and local interference If you do not have a household aerial and you are uncertain of what to buy you should seek the ad...

Страница 8: ...e Before you can use your VCR it must be connected to your TV using an aerial lead You must also connect your VCR to your household aerial The type of household aerial required depends on the position of your home it s distance from the transmitter and local interference If you do not have a household aerial and you are uncertain of what to buy you should seek the advice of a local aerial contract...

Страница 9: ...CR it must be connected to your TV using an aerial lead You must also connect your VCR to your household aerial You can connect your VCR to a TV and a Satellite decoder using a 2 way SCART lead Call Partmaster Direct on 0870 9090444 and ask for part number SAT2 If you use a cable service then connect the aerial lead to your cable decoder box instead of your main aerial wall socket Consult your cab...

Страница 10: ...s and hold the ON button until OUT 36 appears If the time still shows in the display then press and hold the ON button until OUT 36 appears Press and HOLD the ON button W W W Wh h h ha a a at t t t i i i is s s s A A A Au u u ut t t to o o o S S S SE E E ET T T T U U U UP P P P The AUTO SET UP feature makes installing your VCR easy It automatically searches and tunes all available TV Stations and ...

Страница 11: ...channel you have selected on your TV until the test pattern shown here appears clearly on your TV screen Consult your TV s Instruction Book for details about tuning your TV When you have tuned in your TV press the ON button on the front of your VCR The current time will appear again in the VCR display Your VCR is now fully installed and ready for use If you connected your VCR to your TV using just...

Страница 12: ...P or DOWN buttons on the front of your VCR to change the number try changing it to 37 Now tune your VCR channel on your TV again until the black and white test pattern appears Try changing the output number 3 3 3 3 ON AUTO TUNE STOP EJECT PLAY CHANNEL REW F FWD REC OTR If the pattern is now clear press the ON button to remove the black and white test pattern If the pattern is still not clear try c...

Страница 13: ...te control The MAIN menu appears Press the PLAY or STOP buttons to highlight SYSTEM SETUP then press ENTER Select the SYSTEM SETUP menu SELECT LANGUAGE SPRACHE LANGUE ENTER EXIT ENTER MENU CLOCK SET SYSTEM SETUP Press the PLAY or STOP buttons to highlight LANGUAGE Press the ENTER button on the remote control Select a Language LANGUAGE SPRACHE LANGUE ENGLISH FRANCAIS SELECT OK ENTER DEUTSCH Press t...

Страница 14: ...hat the buttons on the front of your VCR do ON SCREEN PROGRAMMING AUTO TUNE SORT SYSTEM NTSC PLAYBACK ON AUTO TUNE STOP EJECT PLAY CHANNEL REW F FWD REC OTR Cassette tape door VCR display window Record One Touch Record OTR button Rewind button Play button Fast Forward button VCR ON Standby button Stop Eject button Channel UP and DOWN AUTO SET UP buttons Remote control sensor VP9408 qxd 14 04 00 14...

Страница 15: ...hen a channel is skipped you will not be able to select it with the CHANNEL UP or DOWN buttons To unskip a channel select it with the NUMBERED buttons then press CANCEL again You will now be able to select the channel with the CHANNEL UP or DOWN buttons Skipping unwanted channels on your VCR PDC CH 5 PDC CH 4 If your VCR is in standby press the VCR ON button on your remote control to switch it on ...

Страница 16: ...record protection tab removed for example a rented or bought film your VCR will start to play automatically Automatic play from pre recorded tapes If playback does not start automatically press the PLAY button The word PLAY will appear in the VCR s display followed by the VCR counter Start playing a tape Press STOP to stop playing a video tape STOP will appear in the VCR display and the TV Station...

Страница 17: ...urrently selected on your VCR will be displayed on your TV Ejecting the tape P P P Pl l l la a a ay y y yi i i in n n ng g g g N N N NT T T TS S S SC C C C t t t ta a a ap p p pe e e es s s s o o o on n n n y y y yo o o ou u u ur r r r V V V VC C C CR R R R Your VCR can playback video tapes recorded using the NTSC colour system TV system usually used in USA and JAPAN on a PAL I TV TV system used i...

Страница 18: ...will appear in the display Rewind REW and Fast Forward F FWD The speed of the search time depends on the speed used during recording either standard play SP or long play LP Standard Play SP 1st press 5 times normal speed 2nd press 7 times normal speed NTSC times are slower Long Play LP 1st press 7 times normal speed 2nd press 13 times normal speed Press PLAY to return to normal playback 1 1 1 1 Yo...

Страница 19: ... search the selected number of index positions forward through the tape or REW to search backwards Playback will start automatically when the index position is found Search for the Index position V V V Vi i i id d d de e e eo o o o I I I In n n nd d d de e e ex x x xi i i in n n ng g g g The Video Index search system will only work once several recordings have been made on a VCR tape Occasionally ...

Страница 20: ...o 0 00 00 When you load a tape the counter will reset If you rewind a tape from 0 00 00 a minus sign will appear in front of the counter Reset the counter When the VCR is not playing press the ZERO RETURN button the tape will rewind or fast forward until the counter reaches 0 00 00 automatically This feature is useful for returning to a point in a tape you wish to view again Zero return When you r...

Страница 21: ... the channel you wish to record from then PDC will automatically be set to ON when you go into the recording menus If your VCR has automatically set PDC to OFF this will be because there is currently no PDC signal being transmitted and we recommend you leave PDC OFF For more information on making a PDC recording please turn to pages 24 27 When programming a Timer Recording you must set the start a...

Страница 22: ...tape 3 3 3 3 Press the NUMBERED buttons or the CHANNEL UP or DOWN buttons on the remote control to select the TV Station you wish to record Select a Station to record from O O O OT T T TR R R R i i i in n n nf f f fo o o or r r rm m m ma a a at t t ti i i io o o on n n n Your VCR can record in Standard play SP or Long play LP When you record in SP a 3 hour tape will be able to record 3 hours of pr...

Страница 23: ... you can set an OTR recording to stop after a set length of time Each time you press the REC OTR button the record time is increased by 30 minutes or 1 hour after 5 presses e g 1st press continuous recording 2nd press 30 minutes 3rd press 1 hour 4th press 1 hour 30 minutes 5th press 2 hours 6th press 3 hours 7th press 4 hours 8th press 5 hours e g four presses will start recording immediately but ...

Страница 24: ... the programme you wish to record using the NUMBERED buttons on the remote control If an incorrect PlusCode is entered the word ERROR will be displayed and you will have to re enter the correct number Enter a VIDEO Plus PlusCode 3 3 3 3 SELECT PLUSCODE NO DAILY ONCE OK EXIT WEEKLY 3 4 6 8 4 2 7 PLUSCODE NO CLEAR 0 9 CANCEL ENTER VIDEO PLUS Repeatedly press PLAY or STOP on the video remote control ...

Страница 25: ...elect PDC on or off PDC will automatically be set to ON if PDC is being broadcast on the channel you have selected see page 21 for more details Press ENTER to confirm your recording The timer recording screen will show the details of all the recordings you have programmed To edit a recording press PLAY or STOP to highlight the recording and then press ENTER Do NOT change any time or date settings ...

Страница 26: ... timer record screen will appear Press the REW or F FWD buttons to set the date of the programme you wish to record Press STOP to confirm the date Your timer allows up to 8 recordings to be set within 1 month of the current date Press REW or F FWD to set the hour the programme starts Press STOP to confirm the hour Press REW or F FWD to set the minute the programme starts Press STOP to confirm the ...

Страница 27: ...ess the TIMER SET button to set your timer recording Your VCR will go into timer record mode this looks like standby but the timer set symbol will appear in the VCR display If you do not put your VCR into timer record mode your recording will not take place Your TIMER RECORDING is now set At the set time your VCR will switch on and record your programme then go back into timer record mode When you...

Страница 28: ...utton The timer event menu will appear If you wish to amend a timer recording press PLAY or STOP to highlight the recording then press the ENTER button Select a recording SELECT TIMER REC SET START SET EXIT END MENU DATE CH SPEED PDC 8 MON 11 46 11 58 3 SP OFF OK ENTER See page 26 for details on setting the timer recording After checking the details repeatedly press the MENU button to clear the sc...

Страница 29: ... button The timer event menu will appear If you wish to cancel a timer recording press PLAY or STOP to highlight the recording Select a recording to cancel Press CANCEL the timer recording details will be deleted After checking the details repeatedly press the MENU button to clear the screen Delete the recording Press TIMER SET to put your VCR back into timer record mode if there are any more reco...

Страница 30: ...aying The playback sharpness screen will appear PLAYBACK SHARPNESS Press REW or F FWD to adjust the playback sharpness to the level you require Moving the bar to the left makes the picture appear softer Moving the bar to the right increases the definition on the picture Adjust the playback sharpness Press the MENU button repeatedly to remove the playback sharpness screen The playback sharpness scr...

Страница 31: ...ess PLAY or STOP to highlight AUTO REPEAT Select Auto Repeat SELECT TIMER REC SET CHANNEL SETUP AUTO REPEAT SYSTEM SETUP ENTER EXIT ENTER MENU ON PIN CODE REGISTRATION PLAYBACK SHARPNESS Press REW to select ON or OFF Press MENU to clear the screen Select on or off Press PLAY to start playing your tape When the end of the tape is reached it will rewind to the beginning and start to play again Start...

Страница 32: ...ET Press ENTER the CLOCK SET screen will appear SELECT CLOCK SET 3 3 3 3 SELECT CLOCK SET MONTH DAY TIME SET OK ENTER EXIT MENU YEAR 1 2000 0 00 8 SAT AUTO TIME ON The DATE digit will be flashing Press REW or F FWD to set the correct date The three letters after the date show the DAY of the week MON Monday The DAY will NOT be correct until the month and year have been set Press STOP to store the d...

Страница 33: ...ear the top of the screen should be correct Press STOP to store the year Set the YEAR 6 6 6 6 SELECT CLOCK SET MONTH DAY TIME SET OK ENTER EXIT MENU YEAR 10 2000 23 MON 11 00 AUTO TIME ON The HOUR digit will be flashing Press REW or F FWD to select the correct hour Please note that your VCR clock uses the 24 hour format Press STOP to store the hour Set the HOUR 7 7 7 7 SELECT CLOCK SET MONTH DAY T...

Страница 34: ... will appear Press PLAY or STOP to highlight CHANNEL SETUP Select the main MENU 3 3 3 3 SELECT GUIDE CH SET ENTER EXIT ENTER MENU CH TUNNING CHANNEL SETUP Press ENTER Press PLAY or STOP to highlight CH TUNING Press ENTER Select CH TUNING Your VCR is fitted with a tuner that can store up to 80 different stations if available Before you can view a channel on your VCR or make a recording you must tun...

Страница 35: ...el on your VCR Press PLAY or STOP to select the correct channel number The table on page 36 shows the correct channel numbers for stations to be stored in Store in the correct channel number 7 7 7 7 Press ENTER to store the station Repeat stages 4 7 if you wish to tune in further channels When you have finished press the MENU button 3 times to clear the screen Remove the menus 4 4 4 4 CH 1 MENU SE...

Страница 36: ...tellite channel has been incorrectly stored in channel 8 in your VCR Press MENU the main menu will appear Select the MAIN menu 2 2 2 2 SELECT TIMER REC SET CHANNEL SETUP AUTO REPEAT SYSTEM SETUP ENTER EXIT ENTER MENU OFF PIN CODE REGISTRATION PLAYBACK SHARPNESS Press PLAY or STOP to select CHANNEL SETUP Press ENTER Select CHANNEL SETUP 3 3 3 3 SELECT GUIDE CH SET ENTER EXIT ENTER MENU CH TUNNING C...

Страница 37: ...lect the VCR CH 6 6 6 6 SET 0 9 CH OK EXIT ENTER MENU GUIDE GUIDE CH SET VCR SAT CH 8 _ Press ENTER to store the new setting If you have connected your satellite using the SCART socket you must select AV underneath VCR CH Store your settings 7 7 7 7 Repeat stages 4 6 to adjust any other channels Press MENU three times to remove the menu Remove the menus 4 4 4 4 SET 0 9 CH OK EXIT ENTER MENU GUIDE ...

Страница 38: ... will appear Select PIN CODE REGISTRATION 2 2 2 2 Press ENTER to set the owners name Press PLAY or STOP until the desired letter is displayed Store the letter by pressing F FWD You can enter up to 20 letters Each press of PLAY or STOP changes the letter as follows Press ENTER to store your OWNER S NAME Enter owners name I I I IM M M MP P P PO O O OR R R RT T T TA A A AN N N NT T T T The PIN code p...

Страница 39: ... using the NUMBERED BUTTONS on the remote control then press ENTER If you enter the correct PIN code PIN CODE OK will appear and you can now use your VCR as normal If you entered an incorrect PIN code PIN CODE ERROR will appear and you can try to enter the correct code again If you entered an incorrect PIN code more than 3 times your VCR will lock itself and you will not be able to use it To unloc...

Страница 40: ...C CH 4 00 00 25 LP When you press the CALL button the current time channel and any other relevant information e g tape counter record sign will appear on the screen Press CALL again to remove the information Call Feature When a VCR tape is played the digital auto tracking system automatically adjusts the tracking of the VCR to obtain the best picture from the VCR tape The Auto Tracking Indicator A...

Страница 41: ...tting up your VCR Playing a Video Tape Recording Programmes Advanced Features Help and Specification 41 Help and Troubleshooting Please check the following points before contacting the Mastercare Service Helpline VP9408 qxd 14 04 00 15 02 Page 41 ...

Страница 42: ...dvanced Features Help and Specification If the problem still exists after checking the above points please call the Mastercare Service Helpline on 08709 004088 Please note If you call a Mastercare engineer out to your home and the product is found not to be faulty or the instruction book has not been followed our product guarantee is not applicable and a call out fee will be charged VP9408 qxd 14 ...

Страница 43: ...ly recorded tape 2 2 2 2 Make sure all connections are made before turning the power on Insert the tape you wish to record ON into your VCR 3 3 3 3 Press the AV button to select the AV channel 4 4 4 4 Insert the tape you wish to record FROM into the video camera 5 5 5 5 Press the REC OTR button on your VCR 6 6 6 6 Press the play button on the video camera playback and recording will start Connecti...

Страница 44: ... record them in any form without permission of the Copyright owners 21 Pin SCART socket 8 How to connect your VCR to a Hi Fi You can connect your VCR directly to your Hi Fi with an audio phono lead 1 1 1 1 All connections must be made with both your VCR and Hi Fi unplugged from the mains supply 2 2 2 2 Connect one end to the SCART socket on the back of your VCR 3 3 3 3 Connect the other end to the...

Страница 45: ...can be abrasive to your video heads To help prevent video head clogging use only good quality VHS tapes Discard worn out tapes Warning If the mains plug is cut from the mains lead of this appliance the plug must be destroyed A mains plug with bared wires is hazardous if engaged in a mains output socket The wires in your VCR mains lead are coloured in accordance with the following The wire which is...

Страница 46: ...y Response 50Hz 7 5kHz Specification Tape format 12 65mm high density tape Tape speed PAL SP 23 39 mm s LP 11 69mm s NTSC SP 33 35 mm s Rewind Fast Forward time F FWD 1 48 with E 180 cassette REW 1 48 with E 180 cassette Input level Video 1 0Vp p 75 ohm unbalanced Audio 500mV 50k ohm unbalanced Output level Video 1 0Vp p 75 ohm unbalanced Audio 500mV 1k ohm unbalanced RF output channel Channel 36 ...

Отзывы: