background image

12

BEFORE YOU BEGIN

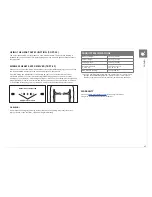
TREADMILL LOCATION

Place the treadmill on a level and stable surface away from direct sunlight. The intense UV light can cause discoloration on the 

plastics. Locate your treadmill in an area with cool temperatures and low humidity. Please leave a clear zone behind the treadmill 

that is at least the width of the treadmill and at least 79” (2000 mm) long. This zone must be clear of any obstruction and provide 

the user a clear exit path from the machine. For ease of access, there should be an accessible space on both sides of the treadmill 

of at least 24” (600 mm) to allow a user access to the treadmill from either side. Do not place the treadmill in any area that will 

block any vent or air openings. The treadmill should not be located in a garage, covered patio, near water or outdoors.

WARNING!

Our treadmills are heavy. To avoid injury and damage, use care and additional help if necessary when moving.

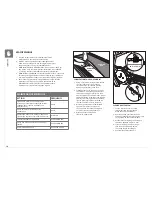
TENSIONING AND CENTERING THE RUNNING BELT

After placing the treadmill in the position it will be used, the belt must be checked for 

proper tension and centering. The belt might need to be adjusted after the first two 

hours of use. Temperature, humidity, and use cause the belt to stretch at different rates. 

If the belt starts to slip when a user is on it, be sure to follow the directions below.

1.  Locate the two hex head bolts on the rear of the treadmill. The bolts are located at each 

end of the frame at the back of the treadmill. These bolts adjust the rear belt roller. 

Do not adjust until the treadmill is on. This will prevent over tightening of one side.

2.  The belt should have equal distance on either side between the frame. If the belt 

is touching one side, do not start the treadmill. Turn the bolts counter clockwise 

approximately one full turn on each side. Manually center the belt by pushing the belt 

from side to side until it is parallel with the side rails. Tighten the bolts the same amount as 

when the user loosened them, approximately one full turn. Inspect the belt for damage.

3.  While walking on the treadmill at 3 mph (~4.8 kph), observe the belt position. If it is moving 

to the right, tighten the right bolt by turning it clockwise ¼ turn, and loosen the left bolt 

¼ turn. If it is moving to the left, tighten the left bolt by turning it clockwise ¼ turn and 

loosen the right ¼ turn. Repeat Step 3 until the belt remains centered for several minutes.

4.  Check the tension of the belt. The belt should be very snug. When a person 

walks or runs on the belt, it should not hesitate or slip. If this occurs, tighten 

the belt by turning both bolts clockwise ¼ turn. Repeat if necessary.

NOTE: Use the front cover to confirm the belt is properly centered as shown. It is 

necessary to adjust the belt until the edge of the belt is parallel to the cover.

CAUTION! 

Do not run faster than 3 mph (~4.8 kph) while centering. Keep 

fingers, hair and clothing away from belt at all times.

BELT IS TOO FAR TO THE RIGHT SIDE

BELT IS TOO FAR TO THE LEFT SIDE

TIGHTENS RIGHT SIDE OF ROLLER

TIGHTENS LEFT SIDE OF ROLLER

0.6 

m

(2 

ft

)

0.6 

m

(2 

ft

)

0.6 

m

(2 

ft

)

m

 (79”)

0.3 

m

 (1 

ft

)

ENGLISH

Содержание T-DPT

Страница 1: ...T DPT T DPT 02...

Страница 2: ...2 3 ENGLISH 12 DEUTSCH 21 NEDERALANDS 30 DANSK 39 FRAN AIS 48 ESPA OL 57 ITALIANO 66 75 POLSKI 84 PORTUGU S...

Страница 3: ...taal van uw keuze Voor extra hulp vindt u de Matrix contactgegevens op de volgende pagina DAN Du kan downloade den seneste brugsvejledning p dit foretrukne sprog fra webstedet ovenfor Hvis du har brug...

Страница 4: ...atrixfitness com MALAYSIA Johnson Fitness Malaysia Sdn Bhd Lot 557D Jalan Subang 3 Subang Jaya Industrial Estate 47610 Subang Jaya Selangor MALAYSIA Tel 60 603 5632 8273 my matrixfitness com NETHERLAN...

Страница 5: ...er the age of 14 be closer to the treadmill than 10 feet At NO time should children under the age of 14 use the treadmill Keep children under the age of 14 away from this equipment Teenagers must be s...

Страница 6: ...x2 F F 10mm Wrench x2 F F Phillips Screwdriver PARTS INCLUDED F F 1 Base Frame F F 2 Front Handlebar Supports F F 2 Rear Handlebar Supports F F 1 Sled Bar F F 1 Handlebar Set F F 1 Harness F F 1 Hardw...

Страница 7: ...t Flat Washer 4 4 Note Do not fully tighten hardware until the end of step 5 Step 2 Torque Value 78 4 Nm 57 8 ft lb 2 Note There are no screws holding on the motor cover ENGLISH T DPT 02 Remove batter...

Страница 8: ...not fully tighten hardware until the end of step 5 Step 3 Torque Value 78 4 Nm 57 8 ft lb White Hardware Bag Description Qty D Bolt 4 Note Do not fully tighten hardware until the end of step 5 Step 4...

Страница 9: ...HANDLEBAR SUPPORT using the twist tie located inside the RIGHT HANDLEBAR SUPPORT and attach to the CONNECTOR CABLE 2 on the MAIN FRAME B Repeat on other side C Completely tighten hardware from steps...

Страница 10: ...10 7 ENGLISH 8 H Yellow Hardware Bag Description Qty H I Screw Bolt T DPT 02 only 2 2 H I Connect cables T DPT 02 T DPT T DPT 02 T DPT...

Страница 11: ...11 9 ASSEMBLY COMPLETE Note Check that all harness connections are secure before use ENGLISH...

Страница 12: ...of the treadmill These bolts adjust the rear belt roller Do not adjust until the treadmill is on This will prevent over tightening of one side 2 The belt should have equal distance on either side bet...

Страница 13: ...rachute brake The left hand side lever controls the sled brake and the right hand lever controls the parachute brake The sled brake has 8 resistance settings and the parachute brake has 11 The brakes...

Страница 14: ...e strap hook ADJUSTING S DRIVE USER SUPPORT HARNESS 4 Pull lever to release the locking pin on the adjustable harness lock assembly by pulling lever forward towards the user 5 Slide the adjustable har...

Страница 15: ...BACKLIT LCD Displays Speed Time Distance Calories Heart Rate Pace Speed Speed Graph Calories and heart rate will display with use of non coded heart rate strap only DISTANCE QUICK KEY TIME QUICK KEY M...

Страница 16: ...workout 5 SPRINT 8 Press menu button arrow down to Sprint 8 and press enter Begin your Sprint 8 workout 6 CHALLENGE Allows user to set a distance within a time goal Press menu button arrow down to Ch...

Страница 17: ...roperly placed to receive an accurate and consistent readout If the chest strap is too loose or positioned improperly you may receive an erratic or inconsistent heart rate readout WARNING Heart rate m...

Страница 18: ...rforming maintenance or repair of any kind is qualified to do so MATRIX dealers will provide service and maintenance training at our corporate facility upon request LUBRICATING THE RUNNING BELT 1 Usin...

Страница 19: ......

Страница 20: ...T DPT T DPT 02 2017 Johnson Health Tech Part 1000384836 Rev 1 3 A...

Отзывы: