


en
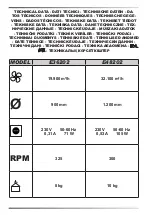
►►1. DESCRIPTION
(Fig. 1)
These air destratifier-ventilators are designed
to improve comfort in the room where it is
used, both in summer and winter. In summer,
they generate cool air flow downwards in or-
der to circulate the air and for cooling evapo-
ration. In winter, they minimise stratification
temperature, thus reducing heating costs in
offices with high ceilings.
Innovative design and construction, it is a low-
consumption, silent and high efficiency prod-
uct.
►►2. INFORMATION ON
SAFETY
IMPORTANT: READ AND UNDERSTAND
THIS OPERATING MANUAL BEFORE AS-
SEMBLING, COMMISSIONING OR PER-
FORMING MAINTENANCE ON THIS AP-
PLIANCE. INCORRECT INSTALLATION OR
USE OF THE APPLIANCE CAN CAUSE SE-
RIOUS INJURY. KEEP THIS MANUAL FOR
FURTHER REFERENCE.
IMPORTANT: THIS APPLIANCE IS NOT
SUITABLE FOR USE BY PERSONS (IN-
CLUDING CHILDREN) WITH REDUCED
PHYSICAL, SENSORY AND MENTAL CA-
PACITIES OR WITH LACK OF EXPERI-
ENCE OR KNOWLEDGE, UNLESS SUPER-
VISED BY A PERSON RESPONSIBLE FOR
THEIR SAFETY. CHILDREN MUST BE SU-
PERVISED TO MAKE SURE THEY DO NOT
PLAY WITH THE APPLIANCE.
IMPORTANT: ASSEMBLING, INSTALLING
AND CONNECTING THE APPLIANCE TO
THE MAINS POWER SUPPLY MUST BE
CARRIED OUT BY QUALIFIED PERSON-
NEL. WHEN INSTALLING THE APPLIANCE,
THE QUALIFIED OPERATOR MUST COM-
PLY WITH ALL LOCAL LEGISLATIONS AND
CURRENT REGULATIONS.
►2.1. Do not install the appliance in an ex
-
plosive environment.
►2.2. Disconnect the appliance from the
mains power supply before carrying out
any installation operations.
►2.3. No parts of the appliance must come
into contact with any foreign bodies or
parts when installation is completed (if
the blades must be cleaned, make sure
the fan is completely disconnected from
the mains power supply).
►2.4.
I
nstall the appliance at least three
metres high.
►2.5. Install the appliance on a sturdy and
safe structure, using suitable supports.
►2.6. Install the appliance in dry places,
avoiding humidity and contact with wa
-
ter.
►2.7. Connect the earthing cable correct
-
ly.
►2.8. Do not bend the blades during instal
-
lation, when carrying out maintenance
or when cleaning the appliance.
►►3. UNPACKING
►3.1. Remove all packaging materials used
to wrap and deliver the appliance and dis-
pose of them in compliance with the Stan-
dards in force.
►3.2. Extract all articles from the packaging.
►3.3. Check for any damage undergone dur-
ing transport. Immediately inform the dealer
where the appliance was purchased if this
appears damaged.
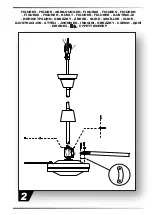
►►4. ASSEMBLY
(Fig. 2)
►4.1. Remove the cotter pin, nut, washer and
screw from the motor’s bracket.
►4.2. Move the upper and lower cover.
►4.3. Pass all cables through the central
holes and motor’s rod until they come out
from the upper end.
►4.4. Insert the rod into the motor’s bracket
(being very careful not to damage the ca-
bles). Reassemble the screw, washer, nut
and cotter pin to secure the rod.
►4.5. Fasten the safety cable to the motor’s
bracket (being very careful to prevent the
safety cable from coming into contact with
the motor).
►4.6. Using the supplied washers and
screws, install the blades onto the mo-
tor. The blades must be installed with the
curved side facing the motor, inserting the
insulation block between the blade and the
motor. When fastening the screws, make
sure that the blade support is perfectly par-
allel with the motor (the blades must all be
installed in the same direction).